Service Graph - Simplified onboarding
The onboarding process of service graph is simplified and you can onboard service graph by:
Automatically deploying an agent as a Kubernetes job
You can automate the onboarding process of service graph and this process automatically:
-
Downloads the YAML required for the agent.
-
Configures the agent.
-
Registers the Kubernetes cluster in NetScaler Console.
-
Performs the required settings to populate service graph in NetScaler Console.
Prerequisites
Ensure that you have:
-
Installed Kubernetes version 1.19 or later.
-
Installed HELM version 3.x.
-
Opened the required ports.
-
Established the connectivity by configuring the static routes. For registering NetScaler MPX or VPX in NetScaler Console using the agent, you must ensure to establish the connection between the cluster nodes and NetScaler MPX or VPX.
Note:
In case you do not want to configure the static routes, you can configure the node controller. For more information, see
https://github.com/citrix/citrix-k8s-node-controllerandhttps://github.com/citrix/citrix-helm-charts/tree/master/citrix-node-controller.
Get the client and secret CSV file from Citrix Cloud
After you configure the agent, get the client and secret CSV file from the Citrix Cloud page:
-
Log on to citrix.cloud.com
-
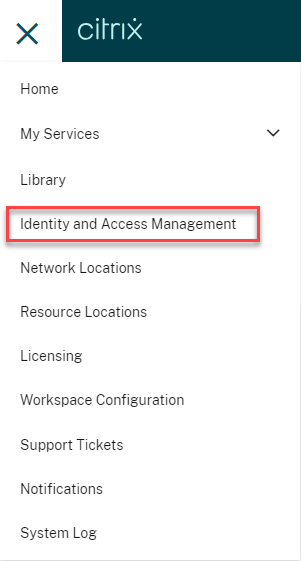
Click the Home icon and select Identity and Access Management
-
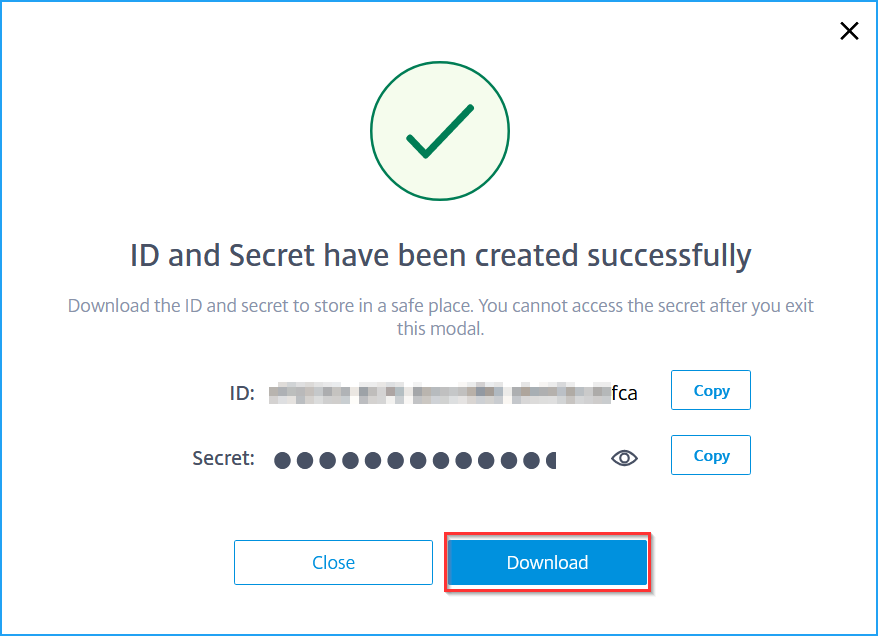
From the API Access tab, enter a secure client name and click Create Client.

-
ID and Secret is generated. Click Download and save the CSV file.
-
On the Kubernetes main node, run the following command to create an authorization token using the ID and secret:
wget https://raw.githubusercontent.com/citrix/citrix-helm-charts/master/generate_token.pypython3 generate_token.py --accessID=<accessID> --accessSecret=<accessSecret>Note
The authorization token is valid only for 1-hour.
You can configure:
- NetScaler agent by creating an automatic secret
Or
- NetScaler agent by creating a manual secret
Configure the NetScaler Console by creating an automatic secret
Deploy an agent using the helm chart
Run the following commands in the Kubernetes main node to deploy the agent:
helm repo add citrix https://citrix.github.io/citrix-helm-charts
helm install citrix-adm citrix/adm-agent-onboarding --namespace <namespace> --set token=<Token>
The agent is deployed, and the cluster is registered to the NetScaler Console. When you create the agent using the automatic secret, it also enables you to deploy the adm-agent-helper, along with the agent that can create the Kubernetes Secret containing the agent credentials.
This process happens automatically when the namespace is labeled as citrix-cpx=enabled. Run the following command on the Kubernetes main node:
kubectl label namespace <namespace> citrix-cpx=enabled
Note
If you want not to deploy
adm-agent-helper, you can create the login secret manually for the agent.
Register NetScaler VPX/MPX with NetScaler Console
Note
You can register the NetScaler VPX/MPX in NetScaler Console only for additional benefit.
To register the NetScaler VPX/MPX with NetScaler Console, you must establish the connectivity between NetScaler VPX or MPX and cluster nodes, by configuring the static routes. You can ignore this process if you have configured Citrix-node-controller.
You must create a Kubernetes secret containing the NetScaler VPX/MPX login credentials in the namespace. After this process, the agent onboarding is started.
kubectl create secret generic nslogin --from-literal=username=<username> --from-literal=password=<adc-password> -n <namespace>
You must set the management IP address of NetScaler VPX/MPX as an environment variable: adc.IP.
helm repo add citrix https://citrix.github.io/citrix-helm-charts
helm install citrix-adm citrix/adm-agent-onboarding --namespace <namespace> --set adc.IP=<ADC ManagementIP>,adc.loginSecret=nslogin --set token=<Token>
Note
Ensure that the management HTTP port adc.mgmtHTTPPort and HTTPS port adc.mgmtHTTPSPort as 80 and 443 are open.
Configure the agent by creating a manual secret
NetScaler CPX requires the agent login credentials for registering itself to NetScaler Console. You can manually set the namespace to deploy the NetScaler CPX.
kubectl create secret generic admlogin --from-literal=username=nsroot --from-literal=password=<adm-agent-password> -n <namespace>
After you create the secret, you can use the following command to configure the agent.
helm install citrix-adm citrix/adm-agent-onboarding --namespace <namespace> --set admAgent.loginSecret=admlogin --set token=<Token>
Register NetScaler VPX/MPX with NetScaler Console
To register the NetScaler VPX/MPX with NetScaler Console, you must establish the connectivity between NetScaler VPX or MPX and cluster nodes, by configuring the static routes. You can ignore this process if you have configured Citrix-node-controller.
After configuring the static routes, you must create a Kubernetes secret containing the NetScaler VPX/MPX login credentials in the namespace. After this process, the agent onboarding is started.
kubectl create secret generic nslogin --from-literal=username=<username> --from-literal=password=<adc-password> -n <namespace>
You must set the management IP address of NetScaler VPX/MPX as an environment variable: adc.IP.
helm repo add citrix https://citrix.github.io/citrix-helm-charts
helm install citrix-adm citrix/adm-agent-onboarding --namespace <namespace> --set adc.IP=<ADC ManagementIP>,adc.loginSecret=nslogin --set token=<Token>
Note
Ensure that the management HTTP port adc.mgmtHTTPPort and HTTPS port adc.mgmtHTTPSPort as 80 and 443 are open.
After you configure the mentioned steps, service graph starts to populate within 15 minutes duration. In NetScaler Console, navigate to Applications > Service Graph and then click Microservices to view service graph.
Examples:
-
To generate service graph with Service Mesh Lite, see Service graph example.
-
To generate service graph of Citrix integration with Istio Service Mesh, see Service graph with NetScaler Observability and NetScaler Console.
Manually configuring service graph
You can populate service graph manually by:
-
Configuring the agent as a microservice in the Kubernetes cluster.
-
Completing the other workflows such as registering cluster, adding instances, and enabling licensing and detailed TCP and Web transactions.
Note
If you want to use an existing agent or configure an on-premises NetScaler agent using a hypervisor, follow the procedures at Setting up service graph to populate the service graph.
-
Navigate to Applications > Service Graph and select the Microservices tab.
You can view the microservices cluster is not configured. Click the option to configure.

-
Select Custom Deployment.
-
Select the deployment type.
-
Select Microservices as the application type.
-
Click Next to set up the agent.
-
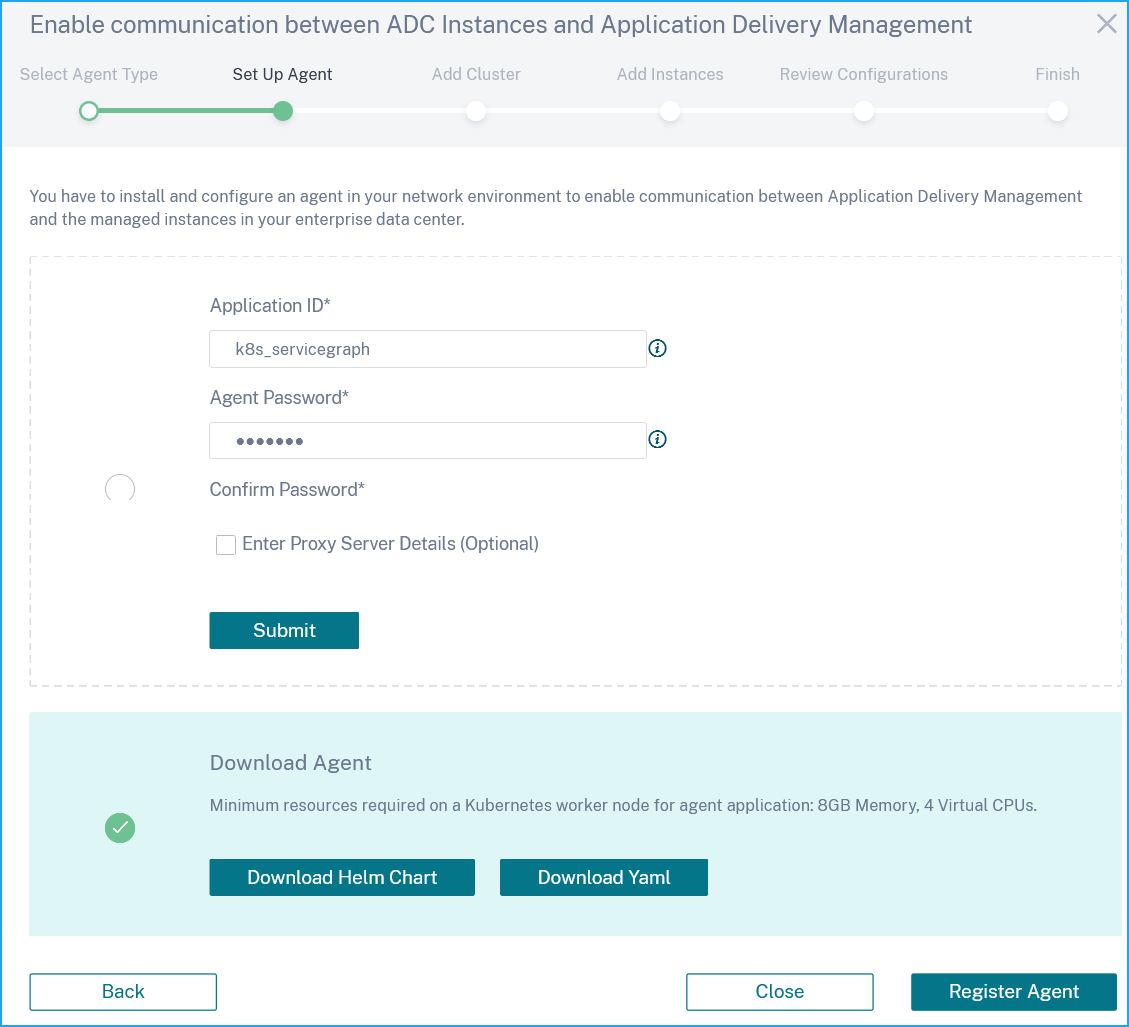
In the Download Agent Microservice page, specify the following parameters:
-
Application ID – A string id to define the service for the agent in the Kubernetes cluster and distinguish this agent from other agents in the same cluster.
-
Password – Specify a password for CPX to use this password to onboard CPX to NetScaler Console through the agent.
-
Confirm Password – Specify the same password for confirmation.
Note
You must not use the default password (
nsroot). -
Click Submit.
-
-
Click Download YAML File or Download Helm Chart.
-
In the Kubernetes main mode, save the downloaded YAML file and run the following command to register the agent:
kubectl create -f <yaml file>For example,
kubectl create -f testing.yamlThe agent is successfully created.
-
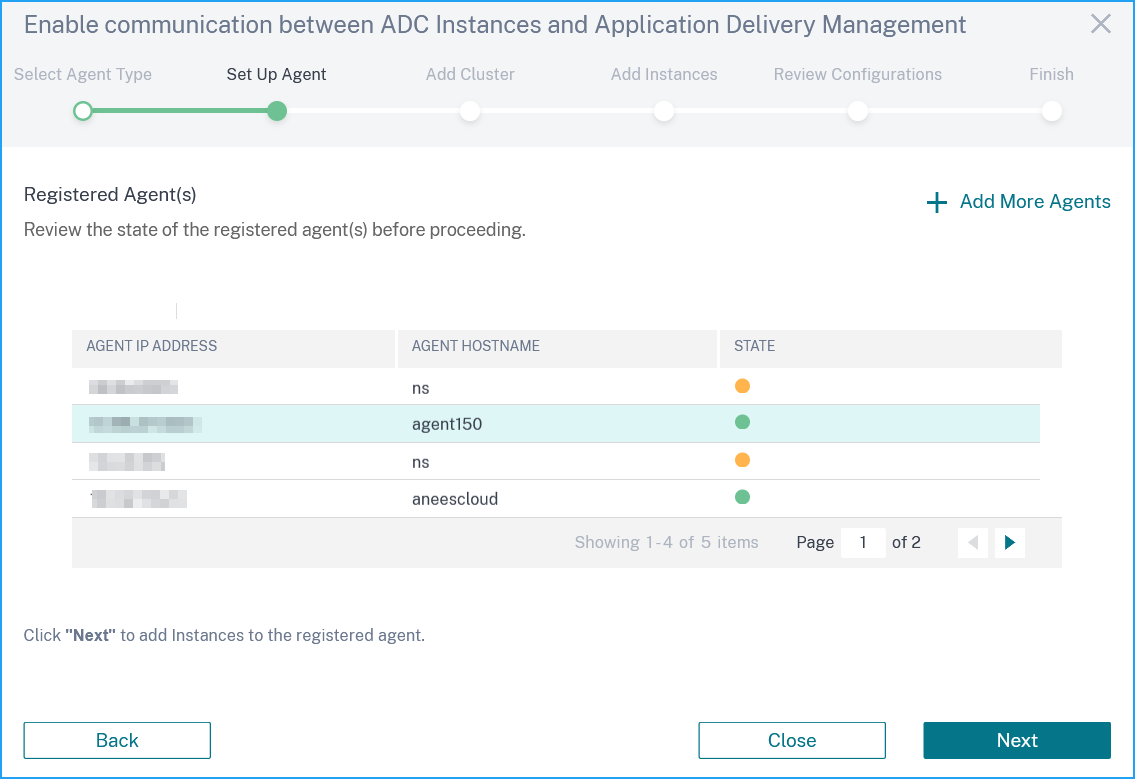
Click Register Agent.
The page loads for a few seconds and displays the registered agent.
-
Ensure if the agent is present in the list and click Next.
-
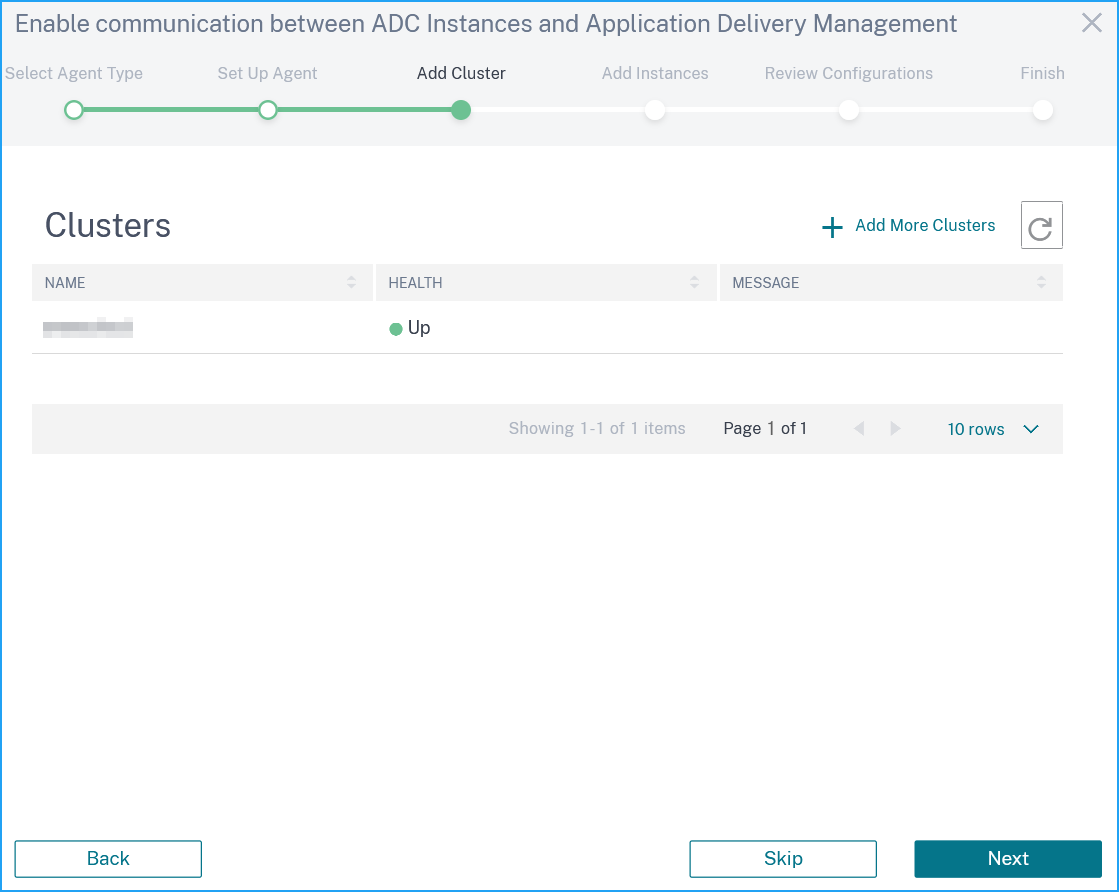
You must register the cluster. Click Add More Clusters and specify the following parameters:
-
Name - Specify a name of your choice.
-
API Server URL - You can get the API Server URL details from the Kubernetes main node.
-
On the Kubernetes main node, run the command
kubectl cluster-info.
-
Enter the URL that displays for “Kubernetes main is running at.”
-
-
Authentication Token - Specify the authentication token. The authentication token is required to validate access for communication between Kubernetes cluster and NetScaler Console. To generate an authentication token:
On the Kubernetes main node:
-
Use the following YAML to create a service account:
apiVersion: v1 kind: ServiceAccount metadata: name: <name> namespace: <namespace> -
Run
kubectl create -f <yaml file>.The service account is created.
-
Run
kubectl create clusterrolebinding <name> --clusterrole=cluster-admin --serviceaccount=<namespace>:<name>to bind the cluster role to service account.The service account now has the cluster-wide access.
A token is automatically generated while creating the service account.
-
Run
kubectl describe sa <name>to view the token. -
To get the secret string, run
kubectl describe secret <token-name>.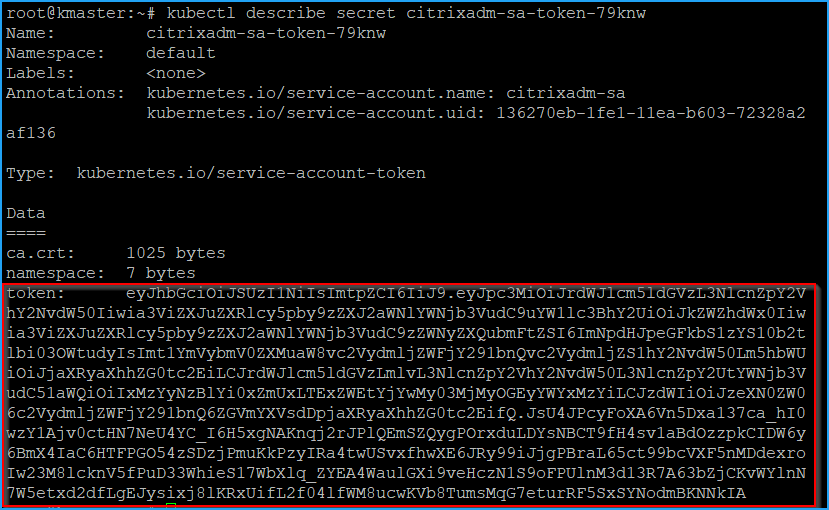
-
-
-
Select the agent from the list.
-
Click Create.
-
In the Clusters page, the cluster information is displayed. Click Next.
-
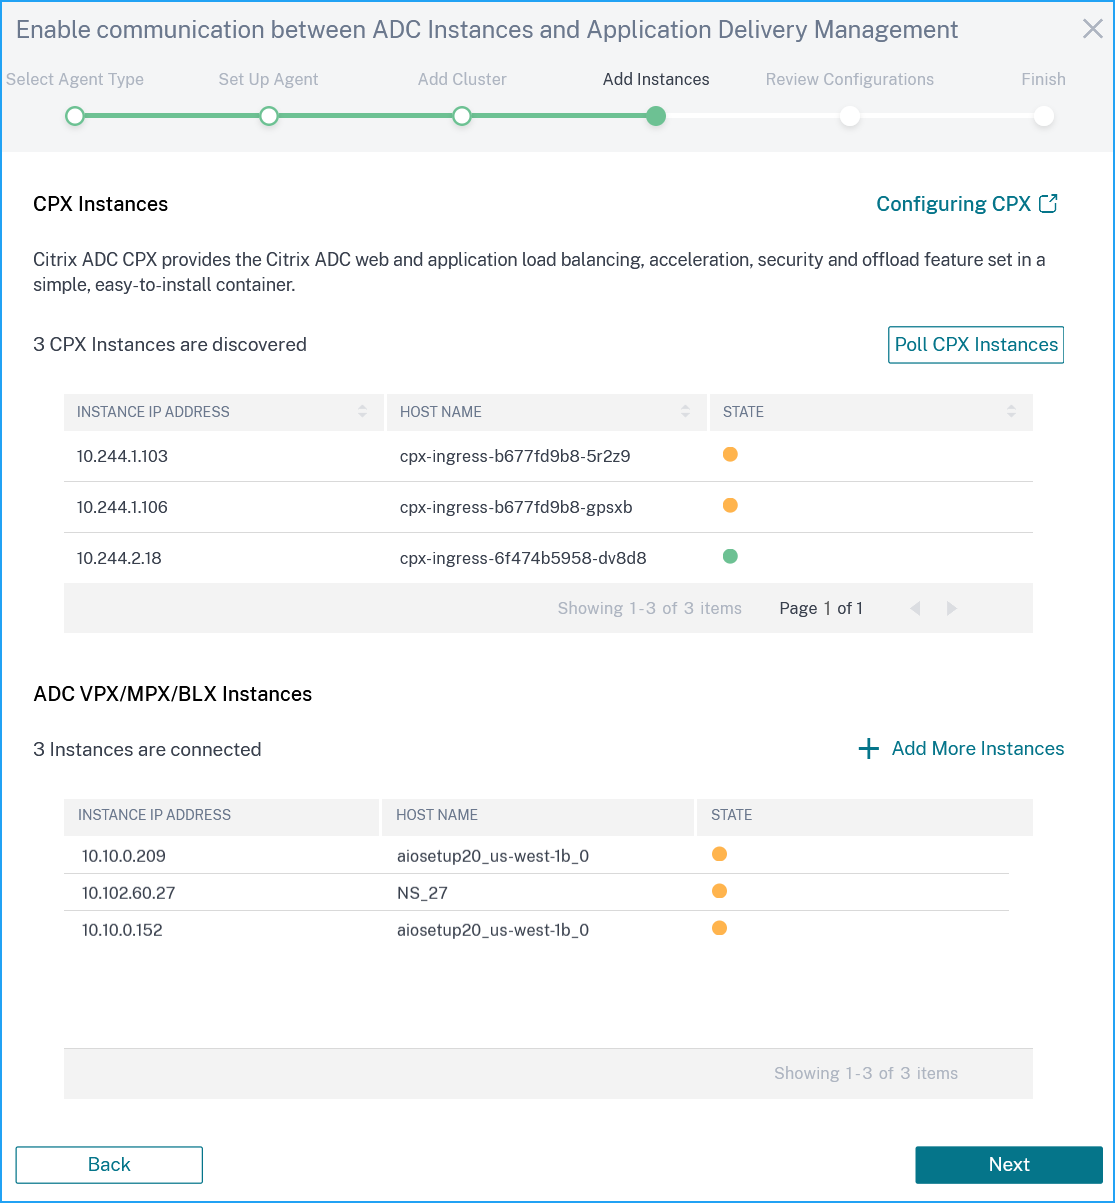
Configure the CPX and VPX instances, and click Next.
-
Click Next to enable detailed web and TCP transactions.

-
The configurations are complete. Select Service Graph and click Done.
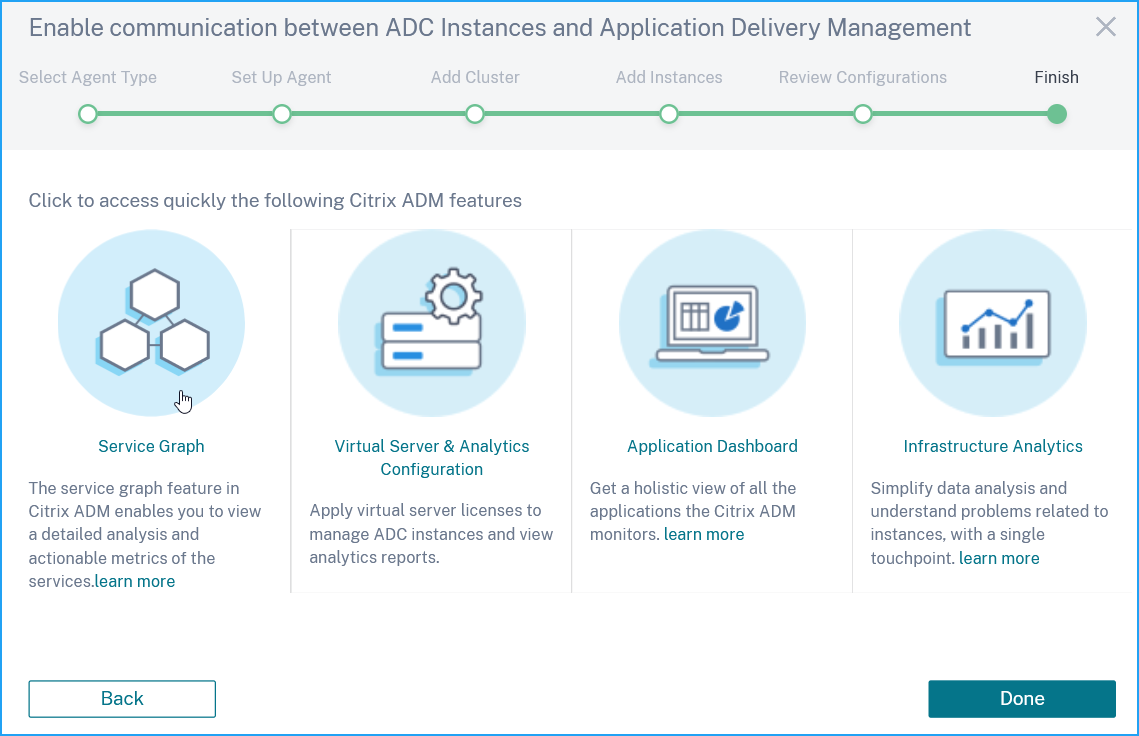
The Service Graph gets populated in approximately 15 minutes. Navigate to Applications > Service Graph and select the Microservices tab to view service graph.