-
-
Citrix ADC automation using Citrix ADM in Cisco ACI hybrid mode
-
Citrix ADC device package in Cisco ACI's cloud orchestrator mode
-
This content has been machine translated dynamically.
Dieser Inhalt ist eine maschinelle Übersetzung, die dynamisch erstellt wurde. (Haftungsausschluss)
Cet article a été traduit automatiquement de manière dynamique. (Clause de non responsabilité)
Este artículo lo ha traducido una máquina de forma dinámica. (Aviso legal)
此内容已经过机器动态翻译。 放弃
このコンテンツは動的に機械翻訳されています。免責事項
이 콘텐츠는 동적으로 기계 번역되었습니다. 책임 부인
Este texto foi traduzido automaticamente. (Aviso legal)
Questo contenuto è stato tradotto dinamicamente con traduzione automatica.(Esclusione di responsabilità))
This article has been machine translated.
Dieser Artikel wurde maschinell übersetzt. (Haftungsausschluss)
Ce article a été traduit automatiquement. (Clause de non responsabilité)
Este artículo ha sido traducido automáticamente. (Aviso legal)
この記事は機械翻訳されています.免責事項
이 기사는 기계 번역되었습니다.책임 부인
Este artigo foi traduzido automaticamente.(Aviso legal)
这篇文章已经过机器翻译.放弃
Questo articolo è stato tradotto automaticamente.(Esclusione di responsabilità))
Translation failed!
Use SCP (put) command in configuration jobs
You can use the Configuration Jobs feature of Citrix ADM to create configuration jobs, send email notifications, and check execution logs of the jobs created. A job is a set of configuration commands that you can create and run on a single managed instance or on multiple managed instances. For example, you can use configuration jobs for device upgrades.
Configuration jobs in Citrix ADM use Secure Shell (SSH) commands to configure instances, and you can configure a configuration job to use secure copy (SCP) to securely transfer files. SCP is based on the SSH protocol. One of the SCP commands that you can include in a configuration job is the “put” command. You can use the “put” command in configuration jobs to upload or transfer one or more files stored in a local directory on your system to Citrix ADM and then to a directory on the NetScaler instance or instances.
Note The file is uploaded to Citrix ADM and it is later copied (put) to the selected NetScaler instances. The uploaded file is stored in Citrix ADM and is deleted only when the job is deleted. This is necessary for jobs scheduled to execute at a later time.
The command has the following syntax:
put <local_filename> <remote_path/remote_filename>
where,
<local_filename> is the name of the local file to be uploaded.
<remote_path / remote_filename> is the path to a remote directory, and the name to assign to the file when it is copied to that directory.
While creating the configuration job, you can convert the local and remote file name parameters into variables. This lets you assign different files to these parameters for the same set of NetScaler instances every time you execute the job. Also, when you use a file at multiple places in a job and if you want to rename the file, you can redefine the variable instead of changing the file name at all places.
To use the put command to upload files in a configuration job:
-
Navigate to Networks > Configuration Jobs.
-
On the Jobs page, click Create Job.
-
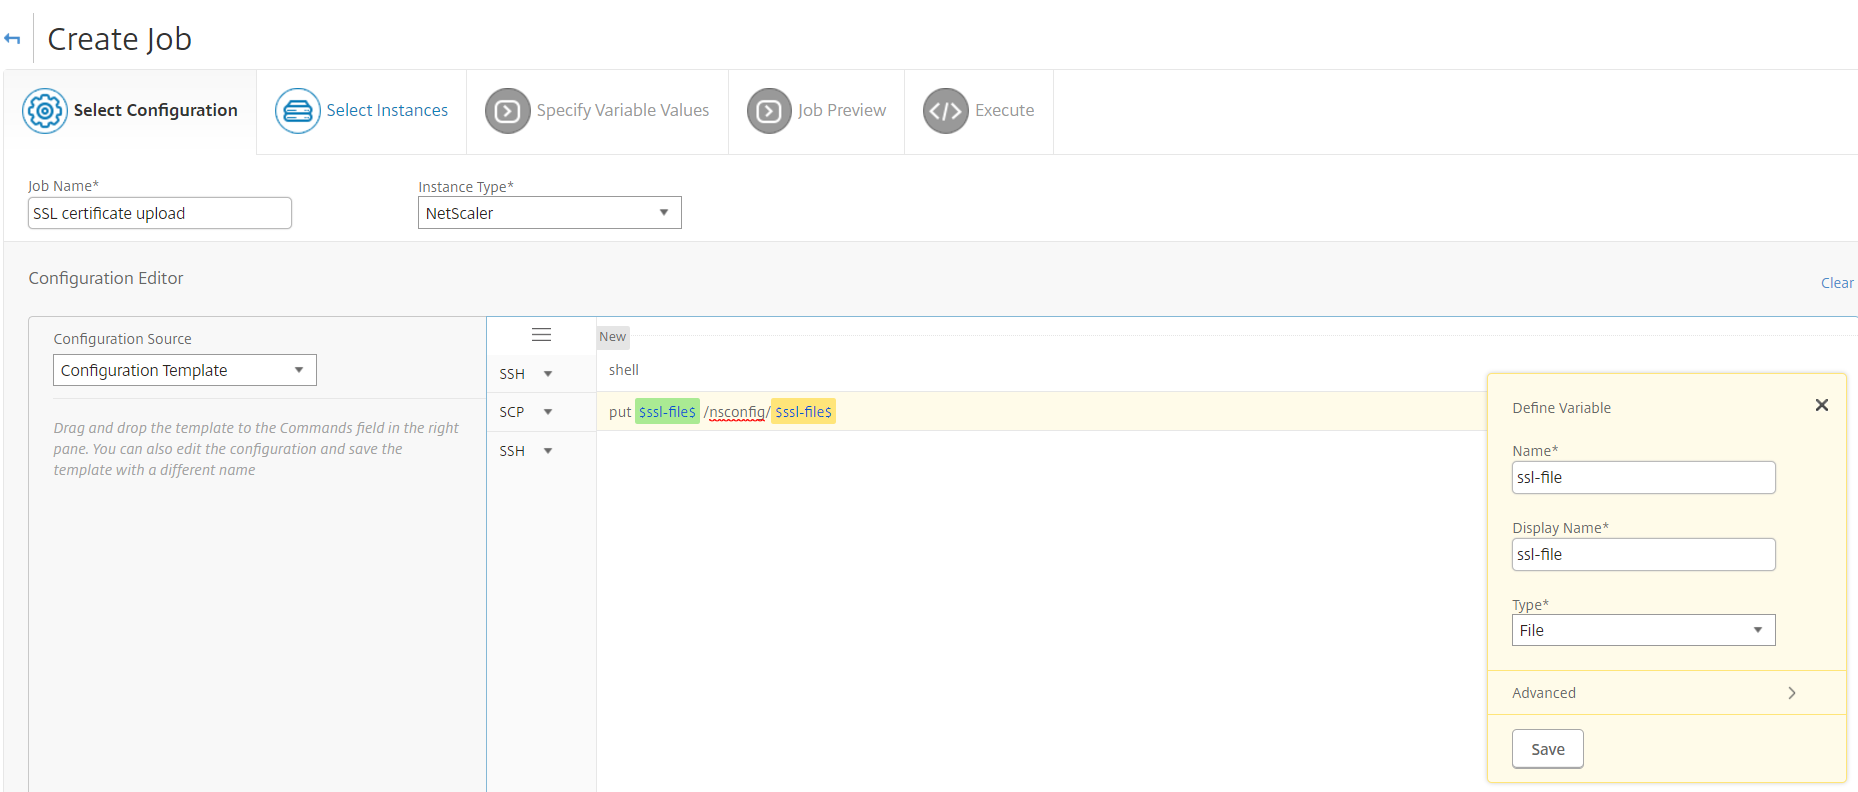
On the Create Job page, enter the name of the job in the Job name field, and in the Configuration Editor pane, enter the “put” command.
For example, if you want to create a configuration job that copies a SSL certificate file saved on your local system to multiple NetScaler instances, you can add a “put” command that uses a variable instead of the name of a particular file, and define the variable type as “file”.
put ssl-file /nsconfig/ssl-file
<!--NeedCopy-->
In this example,
-
ssl-file - This is the name of the file that needs to be uploaded in the NetScaler instance.
-
/nsconfig/ssl-file - This is the destination folder on the instance where the ssl-file will be put after the execution of the task.
-
-
In the command that you just entered, select the file name that you want to convert to a variable, and then click Convert to Variable, as shown in the following figure.

-
Verify that the file name has been enclosed by dollar signs (indicating that it is now a variable), and then click the variable.
-
Specify the details of the variable, such as name, display name, and type.
-
From the Type drop-down list, select File. Click Save. Declaring the variable as a “File” type allows you to upload files to Citrix ADM.
-
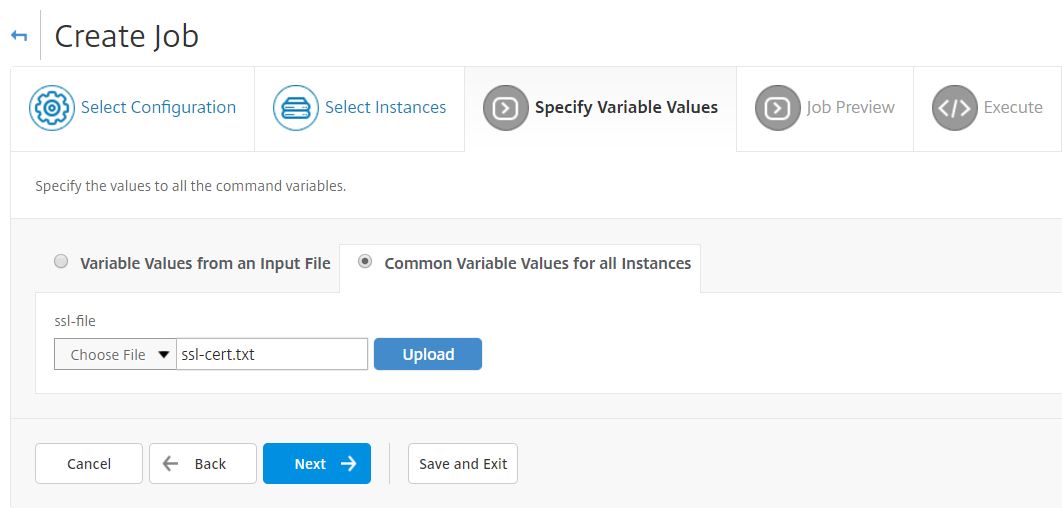
Click Next and select the NetScaler instances to which to copy the files.
-
On the Specify Variable Values tab, select Common Variables Values for all Instances section, select the file from the local storage on your system, click Upload to upload the file to Citrix ADM, and click Next.
-
On the Job Preview tab, you can evaluate and verify the commands to be run on each instance or instance group.
-
On the Execute tab, you can execute the job now or schedule it to be executed at a later time. You can also choose what action Citrix ADM should take if the command fails. You can also create an Email notification to receive notification about the success or failure of the job, and other details. Click Finish.
-
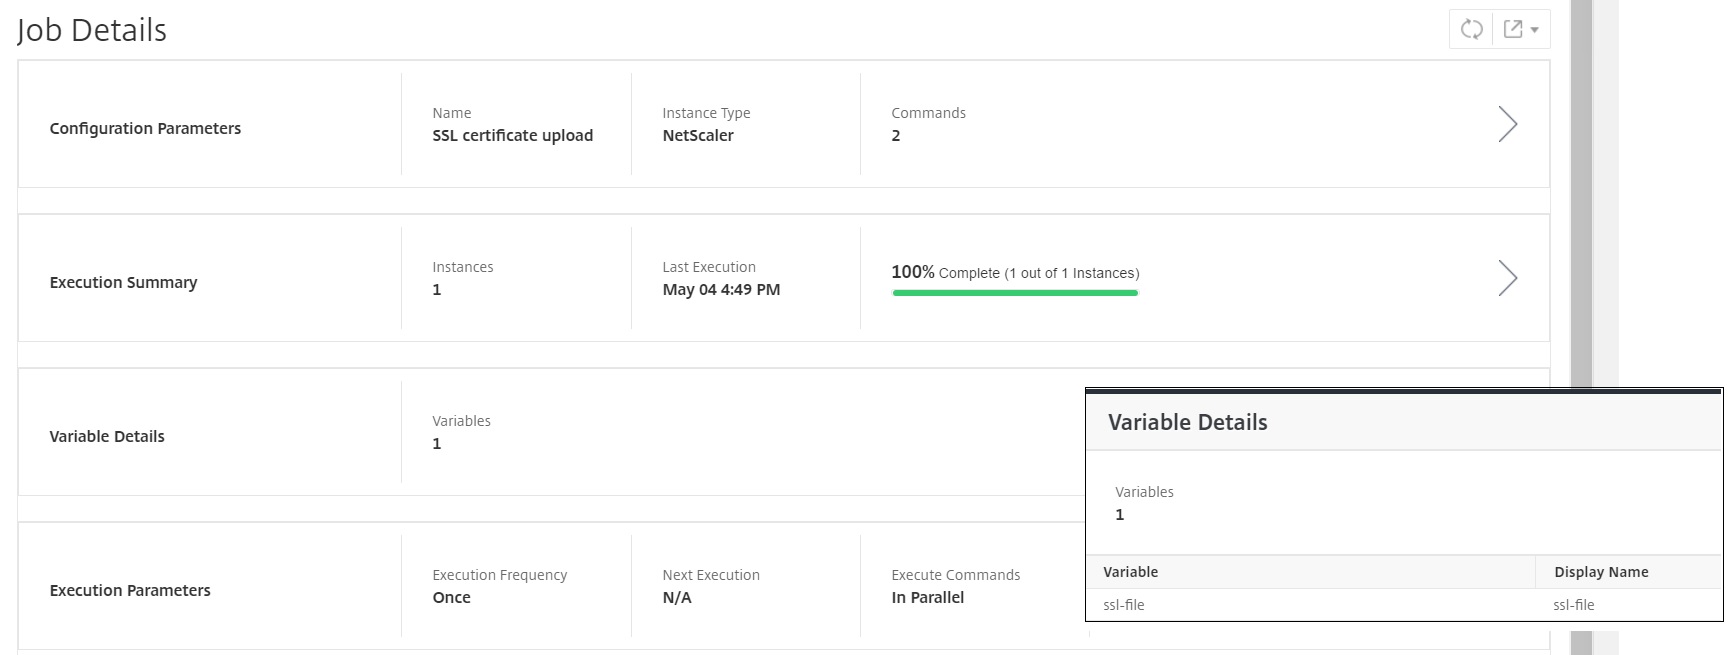
You can see the job details by navigating to Networks > Configuration Jobs, and selecting the job that you just configured. Click Details, and then click Variable Details to list the variables added to your job.
Share
Share
In this article
This Preview product documentation is Cloud Software Group Confidential.
You agree to hold this documentation confidential pursuant to the terms of your Cloud Software Group Beta/Tech Preview Agreement.
The development, release and timing of any features or functionality described in the Preview documentation remains at our sole discretion and are subject to change without notice or consultation.
The documentation is for informational purposes only and is not a commitment, promise or legal obligation to deliver any material, code or functionality and should not be relied upon in making Cloud Software Group product purchase decisions.
If you do not agree, select I DO NOT AGREE to exit.