-
-
Citrix ADC automation using Citrix ADM in Cisco ACI hybrid mode
-
Citrix ADC device package in Cisco ACI's cloud orchestrator mode
-
This content has been machine translated dynamically.
Dieser Inhalt ist eine maschinelle Übersetzung, die dynamisch erstellt wurde. (Haftungsausschluss)
Cet article a été traduit automatiquement de manière dynamique. (Clause de non responsabilité)
Este artículo lo ha traducido una máquina de forma dinámica. (Aviso legal)
此内容已经过机器动态翻译。 放弃
このコンテンツは動的に機械翻訳されています。免責事項
이 콘텐츠는 동적으로 기계 번역되었습니다. 책임 부인
Este texto foi traduzido automaticamente. (Aviso legal)
Questo contenuto è stato tradotto dinamicamente con traduzione automatica.(Esclusione di responsabilità))
This article has been machine translated.
Dieser Artikel wurde maschinell übersetzt. (Haftungsausschluss)
Ce article a été traduit automatiquement. (Clause de non responsabilité)
Este artículo ha sido traducido automáticamente. (Aviso legal)
この記事は機械翻訳されています.免責事項
이 기사는 기계 번역되었습니다.책임 부인
Este artigo foi traduzido automaticamente.(Aviso legal)
这篇文章已经过机器翻译.放弃
Questo articolo è stato tradotto automaticamente.(Esclusione di responsabilità))
Translation failed!
Create event rules
May 24, 2018
You can configure rules to monitor specific events. Rules make it easier to monitor a large number of events generated across your Citrix Application Delivery Controller (ADC) infrastructure.
You can filter a set of events by configuring rules with specific conditions and assigning actions to the rules. When the events generated meet the filter criteria in the rule, the action associated with the rule is executed. The conditions for which you can create filters are: severity, Citrix ADC instances, category, failure objects, configuration commands, and messages.
You can assign the following actions to the events:
-
Send e-mail Action: Send an email for the events that match the filter criteria.
-
Send Trap Action: Send or forward SNMP traps to an external trap destination
-
Send SMS Action: Send a Short Message Service (SMS) message for each event that matches the filter criteria.
-
Run Command Action: Run a command when an incoming event meets the configured rule.
-
Execute Job Action: Execute a job is for events that match the filter criteria that you’ve specified.
-
Suppress Action: Suppresses drop an event for a specific time period.
You can also have notifications resent at a specified interval until an event is cleared. And you can customize the email with a specific subject line, user message, and/or attachment.
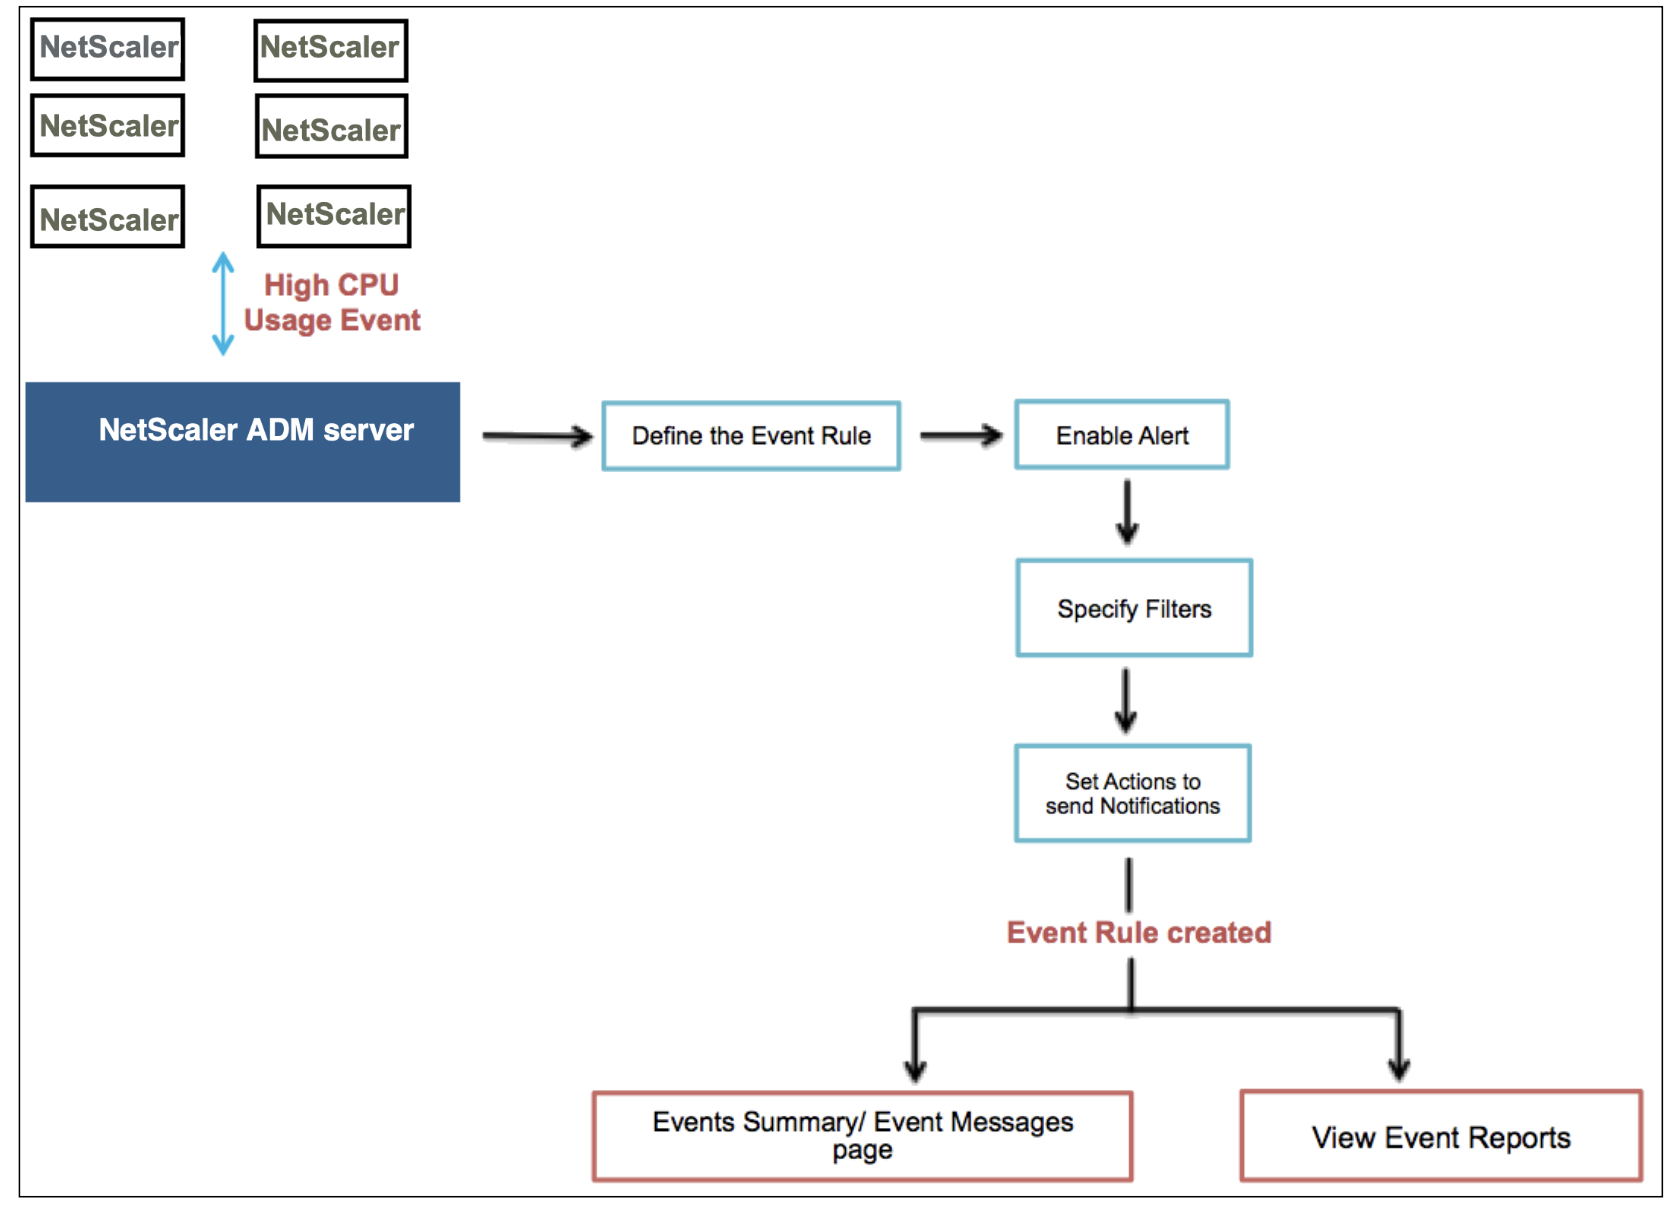
For example, as an administrator you might want to monitor “high CPU usage” events for specific Citrix ADC instances if those events could lead to an outage of your Citrix ADC instances. You could create a rule to monitor the instances, and specify an action that sends you an email notification when an event in the “high CPU usage” category occurs. You could schedule the rule to run at a specific time, such as between 11 AM to 11 PM, so that you are not notified every time there is an event generated.
Configuring an event rule involves the following tasks:
Step 1 - Define an event rule
Navigate to Networks > Events > Rules, and click Add. If you want enable your rule, select the Enable Rule checkbox.
You can set the Event Age option to specify the time interval (in seconds) after which Citrix Application Delivery Management (ADM) refreshes an event rule.
Note:
The minimum value for the event age is 60 seconds. If you keep the Event Age field blank, the event rule is applied immediately after the event is occurred.
Based on the example above, you may want to be notified by email every time your Citrix ADC instance has a “high CPU usage” event for a period of 60 seconds or longer. You can set the event age as 60 seconds, so that every time your Citrix ADC instance has a “high CPU usage” event for 60 seconds or more, you will receive an email notification with details of the event.
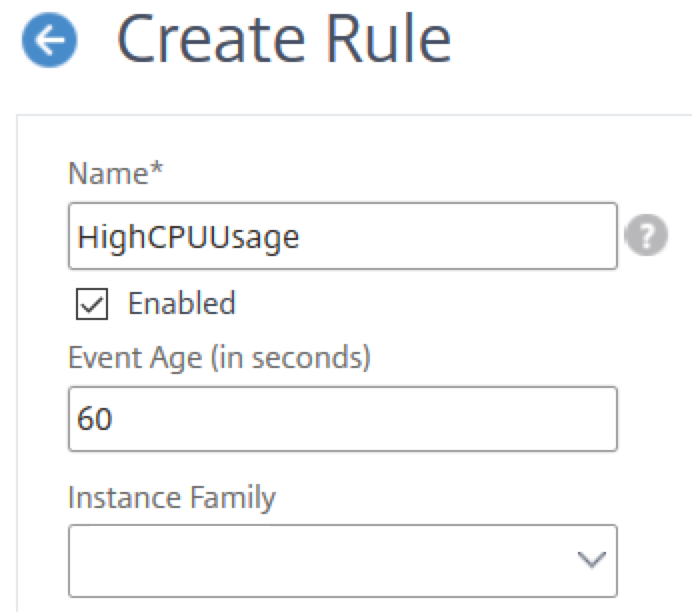
You can also filter event rules by Device Family to track the Citrix ADC instance from which Citrix ADM receives an event.
Step 2 - Choose the severity of the event
You can create event rules that use the default severity settings. Severity specifies the current severity of the events you which you want to add the event rule.
You can define the following levels of severity: Critical, Major, Minor, Warning, Clear, and Information.
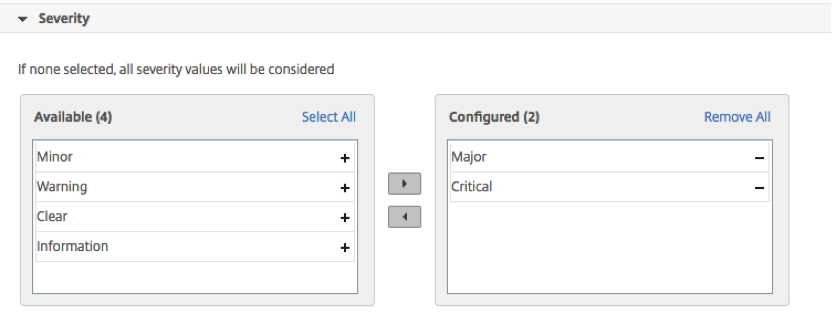
Note
You can configure severity for both generic and enterprise-specific events. To modify event severity for Citrix ADC instances managed on Citrix ADM, navigate to Networks > Events > Event Settings. Choose the Category for which you want to configure event severity and click Configure Severity. Assign a new severity level and click OK.
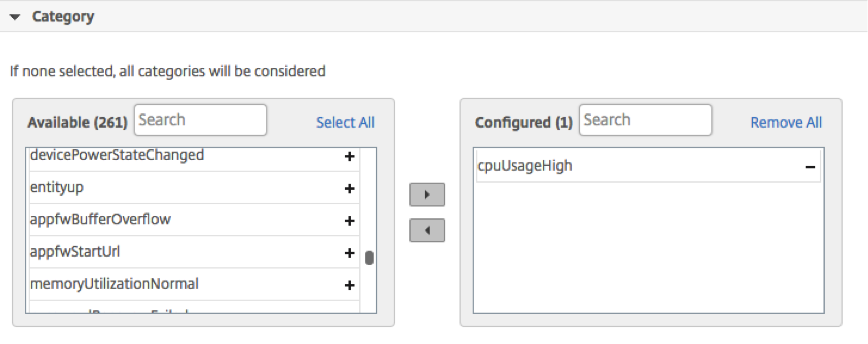
Step 3 - Specifying the event category
You can specify the category or categories of the events generated by your Citrix ADC instances. All categories are created on Citrix ADC instances. These categories are then mapped with Citrix ADM that can be used to define event rules. Select the category you want to consider and move it from the Available table to the Configured table.
In the example above, you will need to choose “cpuUsageHigh” as the event category from the table displayed.
Step 4 - Specify Citrix ADC instances
Select the IP addresses of the Citrix ADC instances for which you want to define the event rule. In the Instances section, click Select Instances. In the Select Instances page, choose your instances, and click Select.

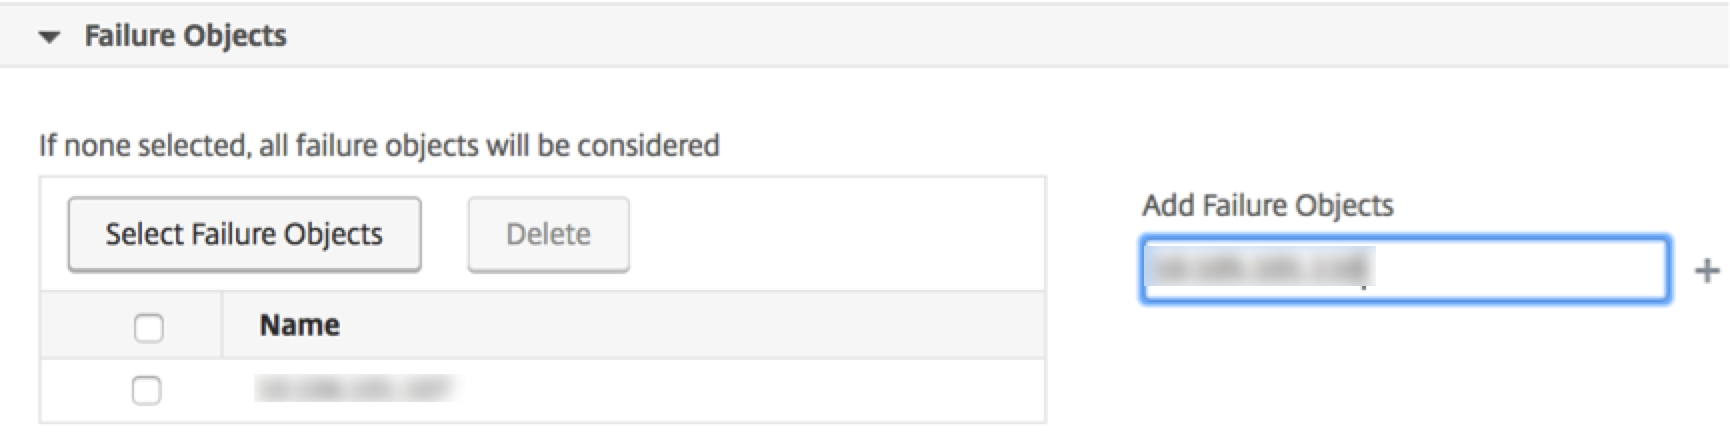
Step 5 - Select failure objects
You can either select a failure object from the drop-down list provided or add a failure object for which an event has been generated. Failure objects are entity instances or counters for which an event has been generated.
The failure object affects the way an event is processed and ensures that the failure object reflects the exact problem as notified. This can be used to track down problems quickly and to identify the reason for failure, instead of simply reporting raw events. For example, if a user has login issues, then the failure object here is the username or password, such as “nsroot”.
This list can contain counter names for all threshold‐related events, entity names for all entity‐related events, certificate names for certificate‐related events, and so on.
Step 6 - Specify additional filters
You can further filter an event rule by:
-
Configuration Commands - You can specify the complete configuration command, or specify the description pattern within asterisk (*) to filter the events. In addition to the command, you can choose to further filter the event rule by the command’s authentication status and/ or its execution status. For example, for a NetscalerConfigChange event, type *bind system global policy_name*.

-
Messages - You can specify the complete message description, or specify the description pattern within asterisk (*) to filter the events.
For example, for a NetscalerConfigChange event, type *ns_client_ipaddress :10.102.126.250*.
Step 7 - Add event rule actions
You can add event rule actions to assign notification actions for an event. These notifications are sent or performed when an event meets the defined filter criteria that you’ve set above. You can add the following event actions:
-
Send e-mail Action
-
Send Trap Action
-
Send SMS Action
-
Run Command Action
-
Execute Job Action
-
Suppress Action
To set e-mail Event Rule Action:
When you choose the Send e-mail Action event action type, an email is triggered when the events meet the defined filter criteria. You will need to either create an email distribution list by providing mail server or mail profile details or you can select an email distribution list that you’ve previously created.
You can also add a customized subject line and user message, and upload an attachment to your email when an incoming event matches the configured rule.
Using this option, you can also ensure that all critical events are addressed and no important email notifications are missed, by selecting the Repeat Email Notification until the event is cleared checkbox to send repeated email notifications for event rules that meet the criteria you’ve selected. For example, if you’ve created an event rule for instances that involve disk failures, and you want to be notified until the issue is resolved, you can opt to receive repeated email notifications about those events.

To set Trap Event Rule Action:
When you choose the Send Trap Action event action type, SNMP traps are sent or forwarded to an external trap destination. By defining a trap distribution list (or a trap destination and trap profile details), trap messages are send to a specific trap listeners when events meet the defined filter criteria.
To set SMS Event Rule Action:
When you choose the Send SMS Action event action type, a Short Message Service (SMS) message for each event that matches the filter criteria. You will need to either create an SMS distribution list by providing the SMS server or SMS profile details or you can select an SMS distribution list that you’ve previously created.
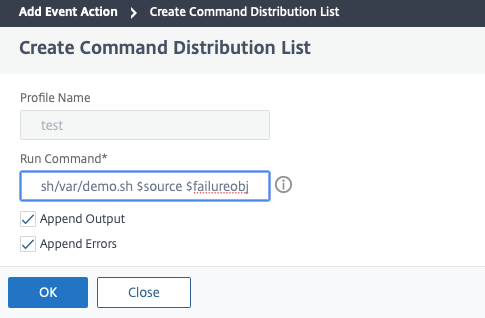
To set the Run Command Action:
When you choose the Run Command Action event action, you can create a command or a script that can be executed on Citrix ADM for events matching a particular filter criterion. For example, if an event of “Critical” severity is raised when there is a configuration change on a managed instance, you can run a command script.
You can also, set the following parameters for the Run Command Action script:
| Parameter | Description |
| $source | This parameter corresponds to the source IP address of the received event. |
| $category | This parameter corresponds to the type of traps defined under category of the filter |
| $entity | This parameter corresponds to the entity instances or counters for which an event has been generated. It can include the counter names for all threshold-related events, entity names for all entity-related events, and certificate names for all certificate-related events. |
| $severity | This parameter corresponds to the severity of the event. |
| $failureobj | The failure object affects the way an event is processed and ensures that the failure object reflects the exact problem as notified. This can be used to track down problems quickly and to identify the reason for failure, instead of simply reporting raw events. |
Note
During command execution, these parameters will be replaced with actual values.
To configure the “Run Command Action” event action on Citrix ADM:
-
Under Event Rule Actions, click Add Action and select Run Command Action from the Action Type drop-down.
-
On the Create Command Distribution List page, specify a profile name and the command to be run. This command will be executed when the events meet the defined filter criteria.
Note
You can enable the Append Output and Append Errors options if you want to store the output and errors generated (if any) when you run a command script in the Citrix ADM server log files. If you do not enable these options, Citrix ADM will discard all outputs and errors generated while running the command script.
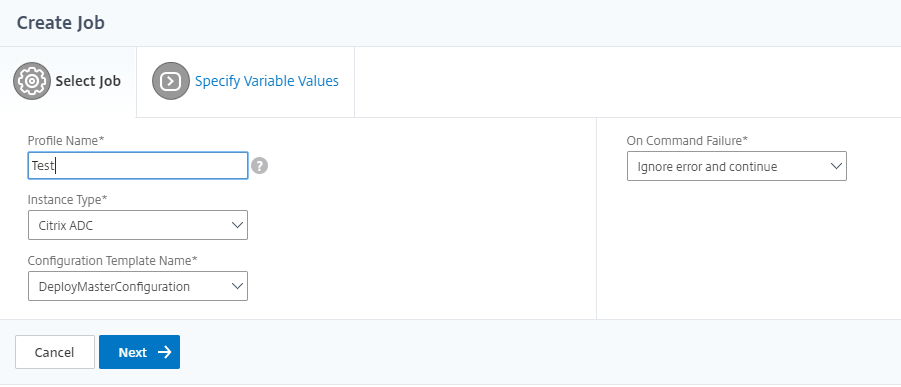
To set the Execute Job Action:
By creating a profile with configuration jobs, a job is executed as a built-in job or a custom job for Citrix ADC, Citrix SDX, and Citrix SD-WAN WO instances, for events and alarms that match the filter criteria you’ve specified.
-
Under Event Rule Actions, click Add Action and select Execute Job Action from the Action Type menu.
-
Create a profile with a job you want run when the events meet the defined filter criteria.
-
While creating a job, specify a profile name, the instance type, the configuration template, and what action you’d like to perform if the commands on the job fail.
-
Based on the instance type selected and the configuration template chosen, specify your variables values and click Finish to create the job.
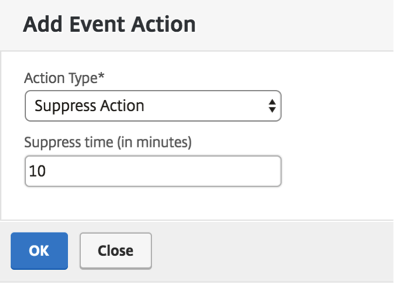
To set the Suppress Action:
When you choose the Suppress Action event action, you can configure a time period, in minutes, for which an event is suppressed or dropped. You can suppress the event for a minimum of 1 minute.
Your event rule is now created with appropriate filters and well defined event rule actions.
Share
Share
This Preview product documentation is Cloud Software Group Confidential.
You agree to hold this documentation confidential pursuant to the terms of your Cloud Software Group Beta/Tech Preview Agreement.
The development, release and timing of any features or functionality described in the Preview documentation remains at our sole discretion and are subject to change without notice or consultation.
The documentation is for informational purposes only and is not a commitment, promise or legal obligation to deliver any material, code or functionality and should not be relied upon in making Cloud Software Group product purchase decisions.
If you do not agree, select I DO NOT AGREE to exit.