-
-
NetScaler MPX 8005, MPX 8015, MPX 8200, MPX 8400, MPX 8600, and MPX 8800
-
NetScaler MPX 11500, MPX 13500, MPX 14500, MPX 16500, MPX 18500, and MPX 20500
-
NetScaler MPX 11515, MPX 11520, MPX 11530, MPX 11540, and MPX 11542
-
NetScaler MPX 14020, MPX 14030, MPX 14040, MPX 14060, MPX 14080, and MPX 14100
-
NetScaler MPX 14020 40C, MPX 14040 40C, MPX 14060 40C, MPX 14080 40C, MPX 14100 40C
-
NetScaler MPX 14020 40G, MPX 14040 40G, MPX 14060 40G, MPX 14080 40G, MPX 14100 40G
-
NetScaler MPX 14040 40S, MPX 14060 40S, MPX 14080 40S, MPX14100 40S
-
NetScaler MPX 17500, MPX 19500, and MPX 21500
-
NetScaler MPX 22040, MPX 22060, MPX 22080, MPX 22100, and MPX 22120
-
How to verify the file system integrity of your NetScaler appliance
-
Migrate the configuration of an existing NetScaler appliance to another NetScaler appliance
This content has been machine translated dynamically.
Dieser Inhalt ist eine maschinelle Übersetzung, die dynamisch erstellt wurde. (Haftungsausschluss)
Cet article a été traduit automatiquement de manière dynamique. (Clause de non responsabilité)
Este artículo lo ha traducido una máquina de forma dinámica. (Aviso legal)
此内容已经过机器动态翻译。 放弃
このコンテンツは動的に機械翻訳されています。免責事項
이 콘텐츠는 동적으로 기계 번역되었습니다. 책임 부인
Este texto foi traduzido automaticamente. (Aviso legal)
Questo contenuto è stato tradotto dinamicamente con traduzione automatica.(Esclusione di responsabilità))
This article has been machine translated.
Dieser Artikel wurde maschinell übersetzt. (Haftungsausschluss)
Ce article a été traduit automatiquement. (Clause de non responsabilité)
Este artículo ha sido traducido automáticamente. (Aviso legal)
この記事は機械翻訳されています.免責事項
이 기사는 기계 번역되었습니다.책임 부인
Este artigo foi traduzido automaticamente.(Aviso legal)
这篇文章已经过机器翻译.放弃
Questo articolo è stato tradotto automaticamente.(Esclusione di responsabilità))
Translation failed!
NetScaler MPX 17500, MPX 19500, and MPX 21500
Note: This platform has reached its end of life.
The NetScaler models MPX 17500/19500/21500 are 2U appliances. Each model has two 6-core processors and 48 GB of memory.
The following figure shows the front panel of the MPX 17500/19500/21500 appliance.
Figure 1. NetScaler MPX 17500/19500/21500 appliance, front panel
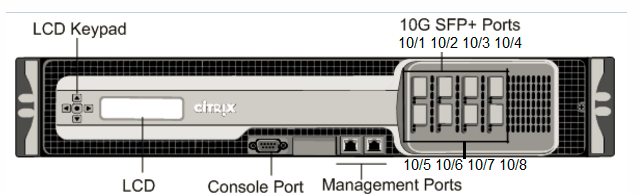
The MPX 17500/19500/21500 appliances have the following ports:
- RS232 serial console port.
- Two 10/100/1000Base-T copper Ethernet management ports (RJ45), numbered 0/1 and 0/2 from left to right. These ports are used to connect directly to the appliance for system administration functions.
- Eight 10G SFP+ ports numbered 10/1, 10/2, 10/3, and 10/4 on the top row from left to right. Ports are numbered 10/5, 10/6, 10/7, and 10/8 on the bottom row from left to right.
The following figure shows the back panel of the MPX 17500/19500/21500 appliance.
Figure 2. NetScaler MPX 17500/19500/21500 appliance, back panel
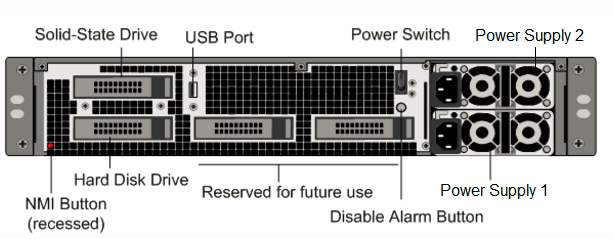
The following components are visible on the back panel of the MPX 17500/19500/21500 appliance:
-
160 GB or larger removable solid-state drive.
Note: Drive densities might increase as components become EOL but its size is never smaller than the original.
-
USB port (reserved for a future release).
-
Power switch, which turns off power to the appliance, as if you were to unplug the power supply. Press the switch for five seconds to shut off the power.
-
Non-maskable interrupt (NMI) button that is used at the request of Technical Support and produces a core dump on the appliance. Use a pen, pencil, or other pointed object to press this red button, which is recessed to prevent unintentional activation.
-
Removable hard-disk drive that stores user data.
-
Disable alarm button. This button is functional only when the appliance has two power supplies.
Press this button to stop the power alarm from sounding when either of the following conditions is true:
- You have plugged the appliance into only one power outlet.
- One power supply is malfunctioning, and you want to continue operating the appliance until it is repaired.
-
Two power supplies, each rated at 1000 watts, 110–220 volts. Maximum power consumption is 500 watts.
For information about installing the rails, rack mounting the hardware, and connecting the cables, see Installing the Hardware.
For information about performing the initial configuration of your appliance, see Initial Configuration.
Share
Share
In this article
This Preview product documentation is Cloud Software Group Confidential.
You agree to hold this documentation confidential pursuant to the terms of your Cloud Software Group Beta/Tech Preview Agreement.
The development, release and timing of any features or functionality described in the Preview documentation remains at our sole discretion and are subject to change without notice or consultation.
The documentation is for informational purposes only and is not a commitment, promise or legal obligation to deliver any material, code or functionality and should not be relied upon in making Cloud Software Group product purchase decisions.
If you do not agree, select I DO NOT AGREE to exit.