Zero Touch Deployment
Note
The Zero Touch Deployment service is supported only on select Citrix SD-WAN™ appliances:
- SD-WAN 110 Standard Edition
- SD-WAN 210 Standard Edition
- SD-WAN 410 Standard Edition
- SD-WAN 2100 Standard Edition
- SD-WAN 1000 Standard Edition (reimage required)
- SD-WAN 1000 Enterprise Edition (Premium Edition) (reimage required)
- SD-WAN 1100 Standard Edition
- SD-WAN 1100 Premium (Enterprise) Edition
- SD-WAN 2000 Standard Edition (reimage required)
- SD-WAN 2000 Enterprise Edition (Premium Edition(reimage required)
- SD-WAN AWS VPX instance
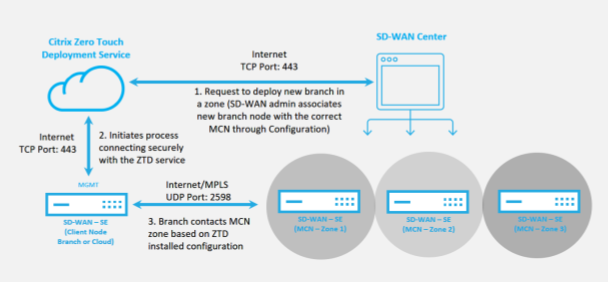
Zero Touch Deployment (ZTD) Service is a Citrix® operated and managed cloud service which allows discovery of new appliances in the Citrix SD-WAN network, and automates the deployment process for branch offices. The ZTD Cloud Service is accessible from any node in the network via Internet, and over Secure Socket Layer (SSL) protocol.
The ZTD Cloud Service securely communicates with backend Citrix Network services storing identification of customers who have purchased Zero Touch capable devices (e.g. SD-WAN 410-SE, 2100-SE). The backend services are in place to authenticate any Zero Touch Deployment request, properly validating association between the Customer Account and the Serial Numbers of Citrix SD-WAN appliances.
ZTD High-Level Architecture and Workflow
Data Center Site
Citrix SD-WAN Administrator – A user with Administration rights of the SD-WAN environment with the following primary responsibilities:
- Configuration creation using Citrix SD-WAN Center Network Configuration tool, or import of configuration from the Master Control Node (MCN) SD-WAN appliance
- Citrix Cloud™ Login to initiate the Zero Touch Deployment Service for new site node deployment.
Note
If your SD-WAN Center is connected to the internet through a proxy server, you have to configure the proxy server settings on the SD-WAN Center. For more information, see Proxy Server Settings for Zero Touch Deployment.
Network Administrator – A user responsible for Enterprise network management (DHCP, DNS, internet, firewall, etc.)
- If necessary, configure firewalls for outbound communication to FQDN sdwanzt.citrixnetworkapi.net from SD-WAN Center.
Remote Site
Onsite Installer – A local contact or hired installer for on-site activity with the following primary responsibilities:
- Physically unpack the Citrix SD-WAN appliance.
-
Reimage non-ZTD ready appliances.
- Required for: SD-WAN 1000-SE, 2000-SE, 1000-EE, 2000-EE
- Not required for: SD-WAN 410-SE, 2100-SE
- Power cable the appliance.
- Cable the appliance for internet connectivity on the Management interface (e.g. MGMT, or 0/1).
- Cable the appliance for WAN link connectivity on the Data interfaces (e.g. apA.WAN, apB.WAN, apC.WAN, 0/2, 0/3, 0/5, etc).
Note
The interface layout is different each model, so please reference the documentation for identification of data and management ports.
The following prerequisites are required before starting any Zero Touch Deployment service:
- Actively running SD-WAN promoted to Master Control Node (MCN).
- Actively running SD-WAN Center with connectivity to the MCN through Virtual Path.
- Citrix Cloud Login credentials created on https://onboarding.cloud.com (reference the instruction below on account creation).
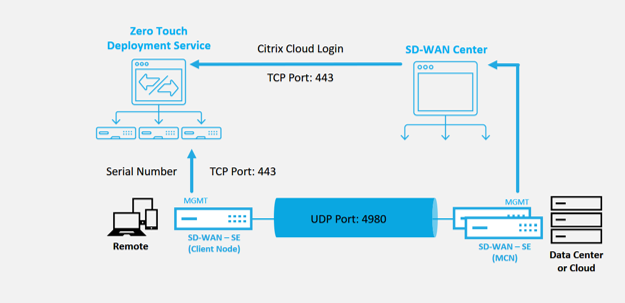
- Management network connectivity (SD-WAN Center and SD-WAN Appliance) to the Internet on port 443, either directly or through a proxy server.
- Internet connectivity on port 443 to access the SD-WAN Center web portal for the ZTD initial setup.
- (optional) At least one actively running SD-WAN appliance operating at a branch office in Client Mode with valid Virtual Path connectivity to MCN to help validate successful path establishment across the existing underlay network.
The last prerequisite is not a requirement, but allows the SD-WAN Administrator to validate that the underlay network allows Virtual Paths to be established when the Zero Touch Deployment is complete with any newly added site. Primarily, this validates that the appropriate Firewall and Route policies are in place to either NAT traffic accordingly or confirm ability for UDP port 4980 can successfully penetrate the network to reach the MCN.
Zero Touch Deployment Service Overview
The Zero Touch Deployment Service works in tandem with the SD-WAN Center to provide an easier deployment of branch office SD-WAN appliances. SD-WAN Center is configured and used as the central management tool for the SD-WAN Standard and Enterprise (Premium) Edition appliances. To utilize the Zero Touch Deployment Service (or ZTD Cloud Service), an Administrator must begin by deploying the first SD-WAN device in the environment, then configure and deploy the SD-WAN Center as the central point of management. When the SD-WAN Center, release 9.1 or later, is installed with connectivity to the public internet on port 443, SD-WAN Center automatically initiates the Cloud Service and install necessary components to unlock the Zero Touch Deployment features and to make the Zero Touch Deployment option available in the GUI of SD-WAN Center. Zero Touch Deployment is not available by default in the SD-WAN Center software. This is purposely designed to make sure the proper preliminary components on the underlay network are present before allowing an Administrator to initiate any on-site activity involving Zero Touch Deployment.
After a working SD-WAN environment is up and running registration into the Zero Touch Deployment Service is accomplished through creating a Citrix Cloud account login. With SD-WAN Center able to communicate with the ZTD service, the GUI exposes the Zero Touch Deployment options under the Configuration tab. Logging into the Zero Touch Service authenticates the Customer ID associated with the particular SD-WAN environment and registers the SD-WAN Center, in addition to unlocking the account for further authentication of ZTD appliance deployments.
Using the Network Configuration tool in SD-WAN Center, the SD-WAN Administrator will then need to utilize the templates or clone site capability to build out the SD-WAN Configuration to add new sites. The new configuration is used by the SD-WAN Center to initiate the deployment of ZTD for the newly added sites. When the SD-WAN Administrator initiates a site for deployment using the ZTD process, he or she has the option to pre-authenticate the appliance to be used for ZTD by pre-populating the serial number, and initiating email communication to on-site installer to begin on-site activity.
The Onsite Installer receives email communication that the site is ready for Zero Touch Deployment and can begin the installation procedure of powering on and cabling the appliance for DHCP IP address assignment and internet access on the MGMT port. Also, cabling in any LAN and WAN ports. Everything else is initiated by the ZTD Service and progress is monitored by the utilizing the activation URL. In the event the remote node to be installed is a cloud instance, opening up the activation URL begins the workflow to automatically install the instance in the designated cloud environment, no action is needed by a local installer.
The Zero Touch Deployment Cloud Service automates the following actions:
Download and Update the ZTD Agent if new features are available on the branch appliance.
- Authenticate the branch appliance by validating the serial number.
- Authenticate that the SD-WAN Administrator accepted the site for ZTD using the SD-WAN Center.
- Pull the configuration file specific for the targeted appliance from the SD-WAN Center.
- Push the configuration file specific for the targeted appliance to the branch appliance.
- Install the configuration file on the branch appliance.
- Push any missing SD-WAN software components or required updates to the branch appliance.
- Push a temporary 10 Mbps license file for confirmation of Virtual Path establishment to the branch appliance.
- Enable the SD-WAN Service on the branch appliance.
More steps are required of the SD-WAN Administrator to install a permanent license file on the appliance.
Zero Touch Deployment Service Procedure
The following procedure detail the steps required to deploy a new site using the Zero Touch Deployment Service. Have a running MCN and one client node already working with proper communication to SD-WAN Center, as well as established Virtual Paths confirming connectivity across the underlay network. The following steps are required of the SD-WAN Administrator to initiate the deployment of zero touch:
How to Configure Zero Touch Deployment Service
The SD-WAN Center has the functionality to accept requests from newly connected appliances to join the SD-WAN Enterprise network. The request is forwarded to the web interface through the zero touch deployment service. Once the appliance connects to the service, configuration and software upgrade packages are downloaded.
Configuration workflow:
- Access SD-WAN Center > Create New site configuration or Import existing configuration and save it.
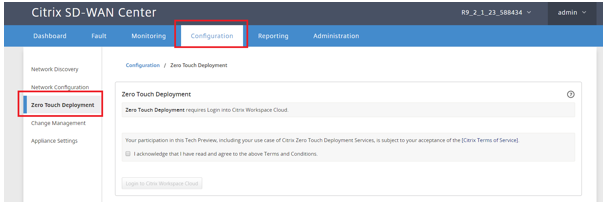
- Log in to Citrix Workspace™ Cloud to enable ZTD service. The Zero Touch Deployment menu option is now displayed in the SD-WAN center web management interface.
- In SD-WAN Center, navigate to Configuration > Zero Touch Deployment > Deploy New Site.
- Select an appliance, click Enable, and click Deploy.
- Installer receives activation email > Enter the serial number > Activate > Appliance is deployed successfully.
To configure Zero Touch Deployment service:
- Install SD-WAN Center with enabled Zero Touch Deployment capabilities.
- Install SD-WAN Center with DHCP assigned IP address.
- Verify that SD-WAN Center is assignment a proper management IP address and network DNS address with connectivity to the public internet across the management network.
-
Upgrade the SD-WAN Center to the latest SD-WAN software release version.
-
With proper internet connectivity, the SD-WAN Center initiates the Zero Touch Deployment (ZTD) Cloud Service and automatically download and install any firmware updates specific to ZTD, if this call home procedure fails the following Zero Touch Deployment option will not be available in the GUI.
-
Read the Terms and Conditions, and then select “I acknowledge that I have read and agree to the above Terms and Conditions.”
-
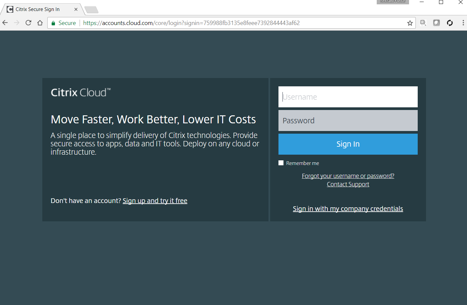
Click the “Login to Citrix Workspace Cloud” button if a Citrix Cloud account has already been created.
-
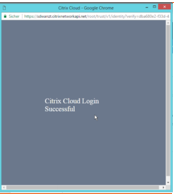
Login into the Citrix Cloud account, and upon receiving the following message of successful login, PLEASE DO NOT CLOSE THIS WINDOW UP, THE PROCESS REQUIRES ANOTHER ~20 SECONDS FOR THE SD-WAN CENTER GUI TO BE REFRESHED. The window should close on its own when it is complete.**
-
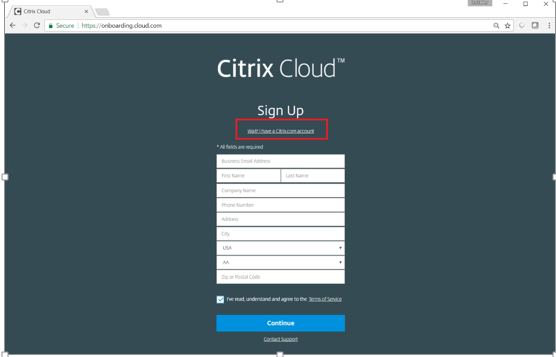
To create a Cloud Login account follow the below procedure:
-
Open a web browser to https://onboarding.cloud.com
-
Click on the link for “Wait, I have a Citrix.com account.”
-
-
Sign-in with an existing Citrix account.
-
Once logged into SD-WAN Center Zero Touch Deployment page, you may notice that no sites are available for ZTD deployment because of the following reasons:
- The active configuration has not been selected from the Configuration drop-down menu
- All the sites for the current active configuration have already been deployed
- The configuration was not built using the SD-WAN Center, but rather the Configuration Editor available on the MCN
- Sites were not built in the configuration referencing zero touch capable appliances (e.g. 410-SE, 2100-SE, Cloud VPX)
-
Update the configuration to add a new remote site with a ZTD capable SD-WAN appliance using SD-WAN Center Network Configuration.
If the SD-WAN configuration was not built using the SD-WAN Center Network Configuration, import the active configuration from the MCN and begin modifying the configuration using SD-WAN Center. For Zero Touch Deployment capability, the SD-WAN Administrator must build the configuration using SD-WAN Center. The following procedure should be used to add a new site targeted for zero touch deployment.
Design the new site for SD-WAN appliance deployment by first outlining the details of the new site (that is, Appliance Model, Interface Groups usage, Virtual IP Addresses, WAN Links with bandwidth and their respective Gateways).
Important
You may notice any site node that has VPX selected as the model is also listed, but currently ZTD support is only available for the AWS VPX instance. Note
- Make sure that you are using a support web browser for Citrix SD-WAN Center
- Make sure the web browser is not blocking any pop-up windows during the Citrix Workspace Login
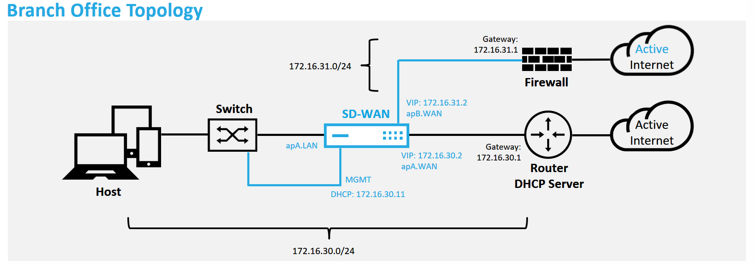
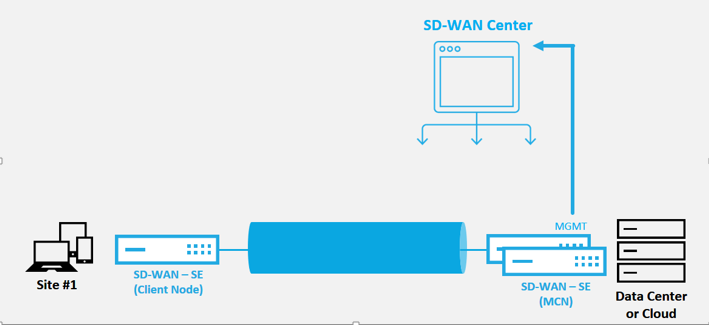
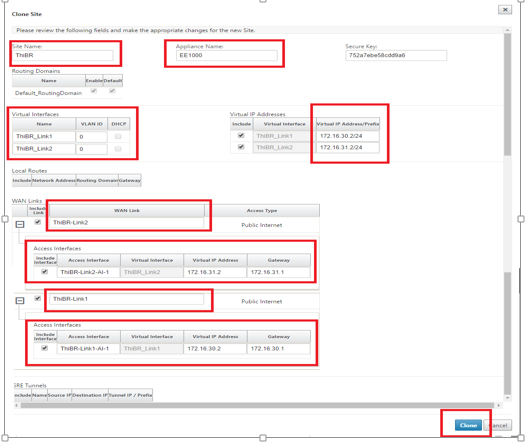
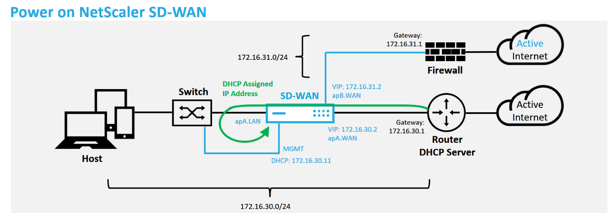
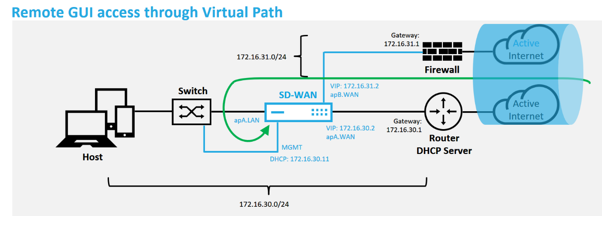
This is an example deployment of a branch office site, the SD-WAN appliance is deployed physically in path of the existing MPLS WAN link across a 172.16.30.0/24 network, and using an existing backup link by enabling it into an active state and terminating that second WAN link directly into the SD-WAN appliance on a different subnet 172.16.31.0/24.
Note
The SD-WAN appliances automatably assign a default IP address of 192.168.100.1/16. With DHCP enabled by default, the DHCP Server in the network may provide the appliance a second IP address in a subnet that overlaps the default. This can possibly result in a routing issue on the appliance where the appliance may fail to connect to the ZTD Cloud Service. Configure the DHCP server to assign IP addresses outside of the range of 192.168.0.0/16.
There are various different deployment modes available for SD-WAN product placement in a network. In the above example, SD-WAN is being deployed as an overlay on top of existing networking infrastructure. For new sites, SD-WAN Administrators may choose to deploy the SD-WAN in Edge or Gateway Mode deployment, eliminating the need for a WAN edge router and firewall, and consolidating the network needs of edge routing and firewall onto the SD-WAN solution.
-
Open the SD-WAN Center web management interface and navigate to the Configuration > Network Configuration page.
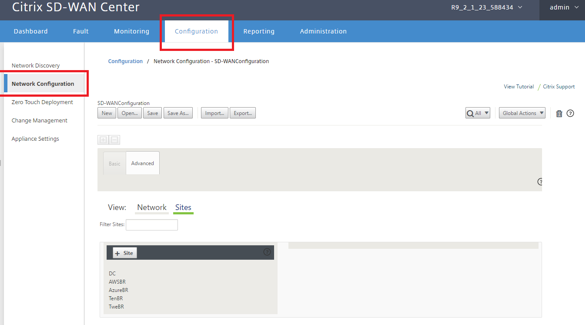
-
Make sure a working configuration is already in place, or import the configuration from the MCN.
-
Navigate to the Advanced tab to create a site.
-
Open the Sites tile to display the currently configurated sites.
-
Quickly built the configuration for the new site by utilizing the clone feature of any existing site.
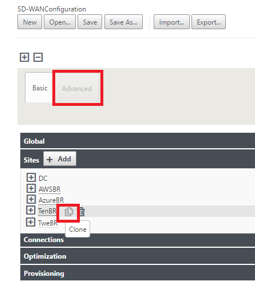
-
Populate all the required fields from the topology designed for this new branch site
-
After cloning a new site, navigate to the site’s Basic Settings, and verify that the Model of SD-WAN is correctly selected which would support the zero touch service.
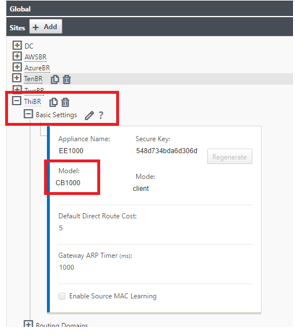
-
The SD-WAN model for the site can be updated, but do be aware that the Interface Groups may have to be redefined since the updated appliance may have a new interface layout then what was used to clone.
-
Save the new configuration on SD-WAN Center, and use the export to the “Change Management inbox” option to push the configuration using Change Management.
-
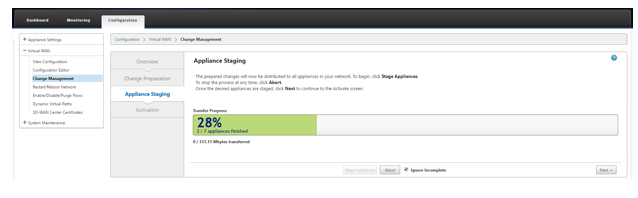
Follow the Change Management procedure to properly stage the new configuration, which makes the existing SD-WAN devices aware of the new site to be deployed via zero touch, you need to utilize the “Ignore Incomplete” option to skip attempting to push the configuration to the new site that still needs to go through the ZTD workflow.
-
Navigate back to the SD-WAN Center Zero Touch Deployment page, and with the new active configuration running, the new site is available for deployment.
-
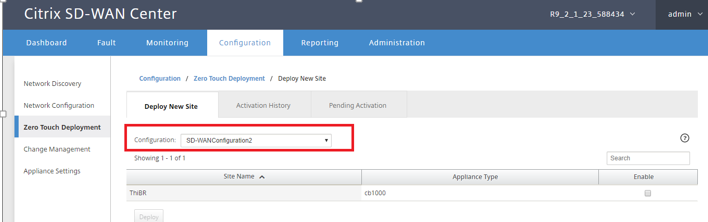
In the Zero Touch Deployment page, under the Deploy New Site tab, select the running network configuration file
-
After the running configuration file is selected, the list of all the branch sites with undeployed SD-WAN devices that are supported for zero touch will be displayed
-
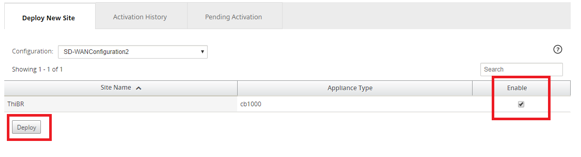
Select the branch sites you want to configure for Zero Touch service, click Enable, and then Deploy.
-
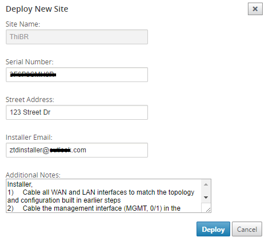
A Deploy New Site pop-up window appears, where the Admin can provide the Serial Number, branch site Street Address, Installer Email address, and more Notes, if necessary.
Note
The Serial Number entry field is optional and depending if it is populated or not, will result in a change in on-site activity the Installer is responsible for.
- If Serial Number field is populated – The installer in not required to enter serial number into the activation URL generated with the deploy site command
- If Serial Number field is left black – The installer will be responsible for entering in the correct serial number of the appliance into the activation URL generated with the deploy site command
-
After clicking the Deploy button, a message will appear indicating that “The Site configuration has been deployed.”
-
This action triggers the SD-WAN Center, which was previously registered with the ZTD Cloud Service, to share the configuration of this particular site to be temporality stored in the ZTD Cloud Service.
-
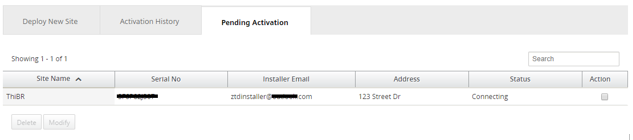
Navigate to the Pending Activation tab to confirm that the branch site information populated successfully and was put into a pending installer activity status.
Note
A zero touch deployment in the Pending Activation state can optionally be chosen to Delete or Modify, if information is incorrect. If a Site is deleted from the pending activation page, it becomes available to be deployed in the Deploy New Site tab page. Once you choose to delete the branch site from Pending activation, the activation link send to the installer becomes invalid.
If the Serial Number field was not populated by the SD-WAN Administrator, the Status Field indicates “Waiting for Installer” instead of “Connecting.”
-
-
The next series of activities is performed by the On-site Installer.
-
The Installer verifies the mailbox for the email address that the SD-WAN Administrator used when deploying the site.
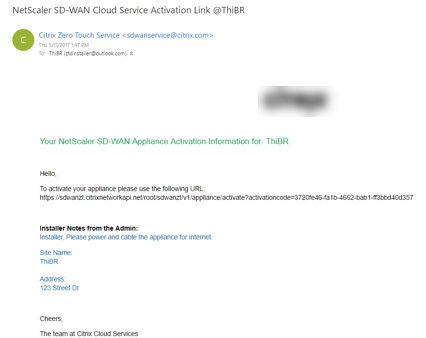
-
Open the zero touch deployment Activation URL in an internet browser window.
-
If the SD-WAN Administrator did not pre-populate the serial number in the deploy site step, then the Installer would be responsible for locating the serial number on the physical appliance and entering the serial number manually into the activation URL, then click the Activate button.

-
If the Admin pre-populating the Serial Number information, the Activation URL will have already progressed to the next step.
-
The installer must physically be on-site to perform the following actions:
- Cable all WAN and LAN interfaces to match the topology and configuration built in earlier steps.
- Cable the management interface (MGMT, 0/1) in the segment of the network that provides DHCP IP address and connectivity to the Internet with DNS and FQDN to IP address resolution.
- Power cable the SD-WAN appliance.
- Turn on the power switch of the appliance.
Note
Most appliances will automatically power on when the power cable is attached. Some appliance may have to be powered on using the power switch on the front of the appliance, others may have the power switch on the rear of the appliance. Some power switches require holding the power button until the unit powers up.
-
-
The next series of steps are automated with the help of the Zero Touch Deployment service, but requires that the following pre-requisites are available.
- The branch appliance should be powered up
- DHCP must be available in the existing network to assign management and DNS IP address
- Any DHCP assigned IP address requires connectivity to the internet with ability to resolve FQDNs
- IP assignment can be configured manually, as long as the other pre-requisites are meet
-
The appliance obtains an IP address from the networks DHCP Server, in this example topology this is achieved through the bypassed data interfaces of a factory default state appliance.
-
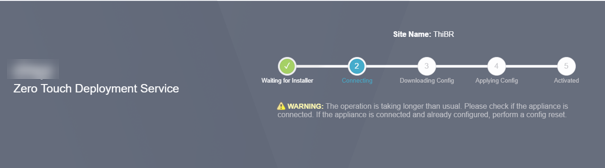
As the appliance obtains the web management and DNS IP addresses from the underlay network DHCP Server, the appliance initiates the Zero Touch Deployment Service and download any ZTD related software updates.
-
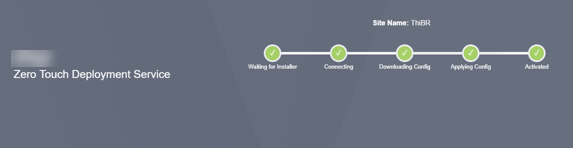
With successful connectivity to the ZTD Cloud Service, the deployment process automatically perform the following:
- Download the Configuration File that is stored earlier by the SD-WAN Center
- Applying the Configuration to the local appliance
- Download and Install a temporary 10 MB license file
- Download and Install any software updates if needed
- Activate the SD-WAN Service
-
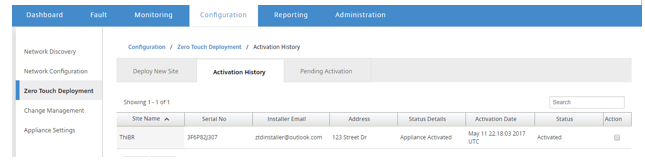
Further confirmation can be done in the SD-WAN Center web management interface, the Zero Touch Deployment menu displays successfully activated appliances in the Activation History tab.
-
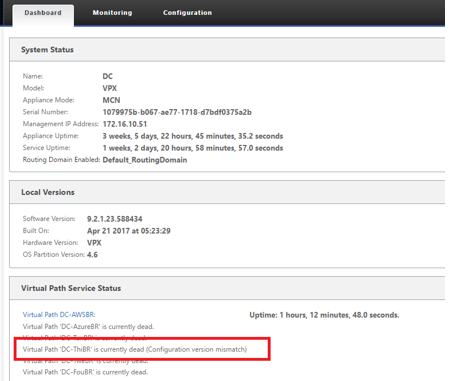
The Virtual Paths may not immediately show in a connected state because the MCN may not trust the configuration handed down from the ZTD Cloud Service, and reports “Configuration version mismatch” in the MCN Dashboard.
-
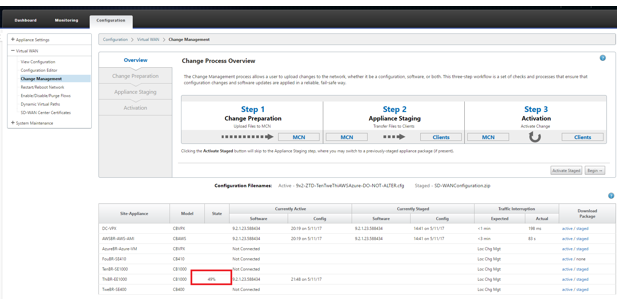
The configuration is redelivered to the newly installed branch office appliance and the status is monitored on the MCN > Configuration > Virtual WAN > Change Management page (this process can take several minutes to complete).
-
The SD-WAN Administrator can monitor the head-end MCN web management page for the established Virtual Paths of the remote site.
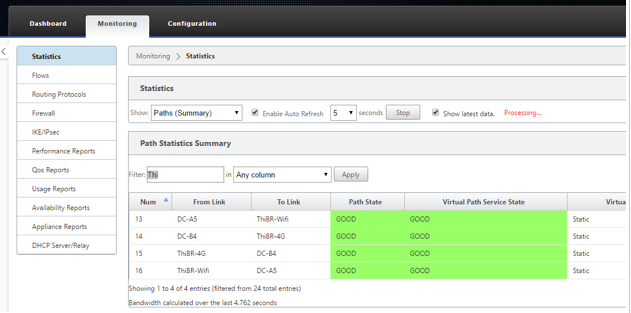
-
SD-WAN Center can also be utilized to identify the DHCP assigned IP address of the on-site appliance from the Configuration > Network Discovery > Inventory and Status page.
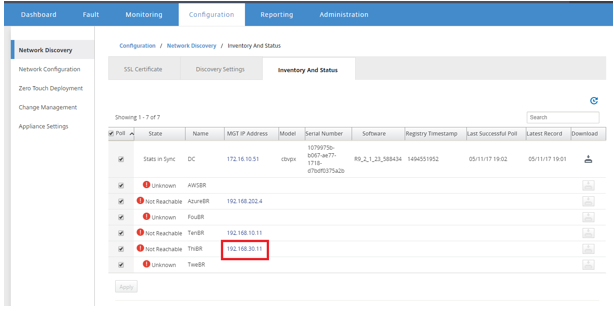
-
At this point the SD-WAN Network Administrator can gain web management access to on-site appliance utilizing the SD-WAN overlay network.
-
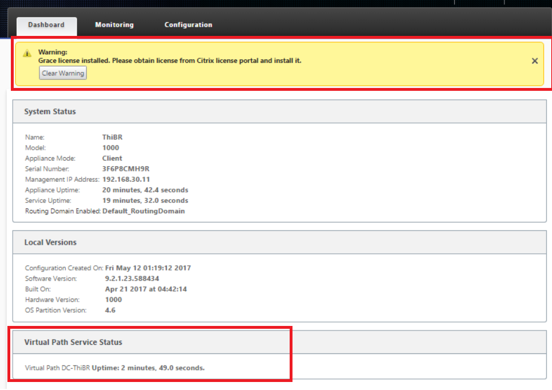
Web management access to the remote site appliance indicates that the appliance has been installed with a temporary Grace License at 10 Mbps, which enables the ability for the Virtual Path Service Status to report as active.
-
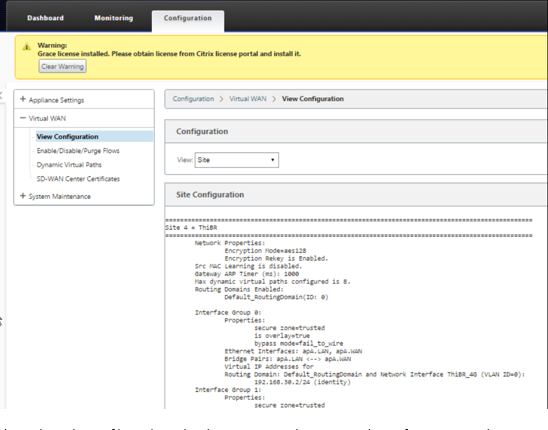
The appliance configuration can be validated using the Configuration > Virtual WAN > View Configuration page.
-
The appliance license file can be updated to a permanent license using the Configuration > Appliance Settings > Licensing page.
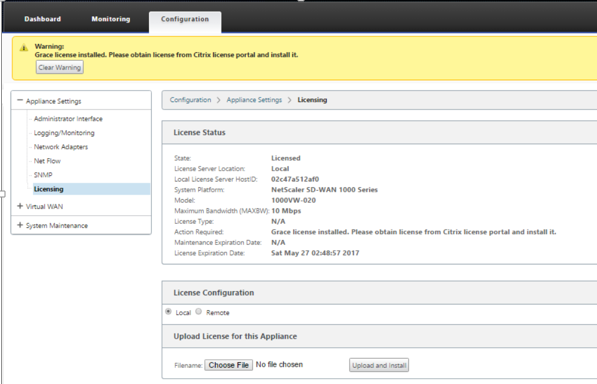
-
After uploading and installing the permanent license file, the Grace License warning banner disappears and during the license install process no loss in connectivity to the remote site will occur (zero pings are dropped).