Smart access using Adaptive Authentication
Citrix Cloud customers can provide smart access (Adaptive Access) to the Citrix DaaS resources (virtual apps and desktops) or the Secure Private Access service using Adaptive Authentication as an IdP to Citrix Workspace.
The Smart Access feature allows the Adaptive Authentication service to surface all the policy information about the user to Citrix Workspace or Citrix DaaS. The Adaptive Authentication service can provide device posture (EPA), network location (inside or outside the corporate network, geo-location), user attributes like user groups, time of day or a combination of these parameters as part of the policy information. The Citrix DaaS administrator can then use this policy information to configure contextual access to the virtual apps and desktops. The virtual apps and desktops can either be enumerated or not based on the earlier parameters (access policy). Some user actions such as clipboard access, printer redirection, client drive, or USB mapping can also be controlled.
Example use cases:
- The administrator can configure the group of apps to be displayed or accessed only from specific network locations like the corporate network.
- The administrator can configure the group of apps to be displayed or accessed only from corporate managed devices. For example, EPA scans can check whether the device is a corporate managed or BYOD. Based on the EPA scan result, the relevant apps can be enumerated for the user.
Pre-requisites
- Adaptive Authentication as an IdP must be configured for Citrix Workspace. For details, see Adaptive Authentication service.
- Adaptive Authentication service with Citrix DaaS is up and running.
- The Adaptive Access feature is enabled. For details, see Enable Adaptive Access.
Understanding the flow of events for smart access
- The user logs in to Citrix Workspace.
- The user gets redirected to the Adaptive Authentication service configured as an IdP.
- The user is prompted for pre-authentication (EPA) or authentication.
- The user is successfully authenticated.
- Smart access policies are evaluated according to the configuration and tags are associated with the user session.
- The Adaptive Authentication service pushes the tags to the Citrix Graph service. The user is redirected to the Citrix Workspace landing page.
- Citrix Workspace fetches the policy information for this user session, matches the filter, and evaluates the apps or desktops that must be enumerated.
- Admin configures the access policy on Citrix DaaS to restrict the ICA access for users.
Configuration of Smart access policies on Adaptive Authentication instances
Configuring smart access policies on an Adaptive Authentication instance is a two-step process:
- Define smart access policies with smart access tags on Adaptive Authentication instances. For example, see Step 1.
- Define the same tags on your DaaS/Secure Private Access for resource access. For example, see Step 2.
Use case 1: Configure a smart access policy to allow access to users logging in from the Chrome browser and block clipboard access for them
Step 1: Configure smart access policies with smart tags on Adaptive Authentication instance
- Log in to the Adaptive Authentication instance.
- Navigate to Adaptive Authentication virtual server (Security > AAA - Application Traffic > Virtual Servers).
- Select the authentication virtual server and then click Edit.
- Click Smart Access Policies.
- Define the expression of the policy according to your requirement.
- Click Add Binding.
- In Select Policy, click Add.
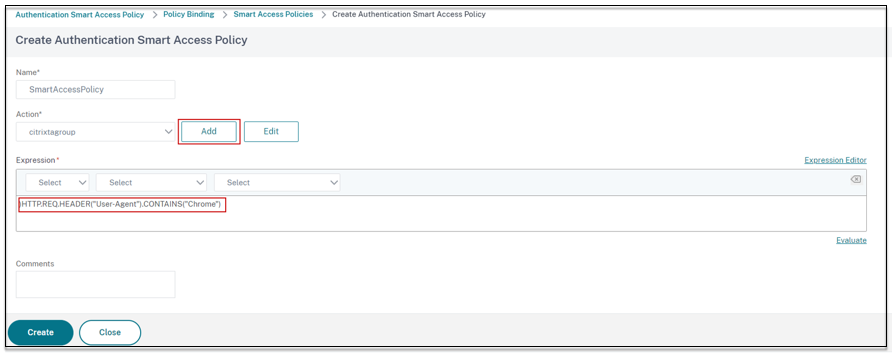
- Enter a name for the smart access policy.
- Define the expression.
For the example of allowing access for users logging in from a Chrome browser, enter the expression
HTTP.REQ.HEADER("User-Agent").CONTAINS("Chrome")Similarly, you can create expressions based on the time, user login, authentication and authorization group, and other options.
-
Now, create smart tags and bind these tags to the smart access policy.
- In Action, click Add.
- In Name, type a name for the smart access profile.
- In Tags, define the smart access tags. For example, TAG-CHROME.

- Click Create.
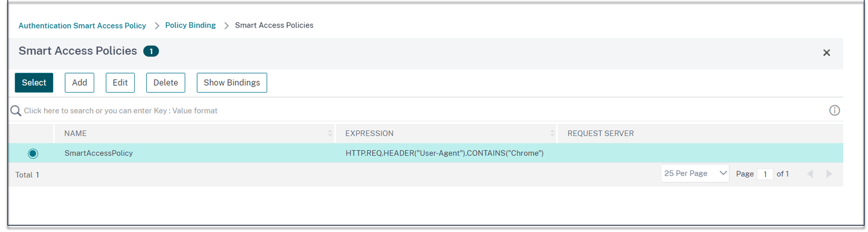
- Select the smart access policy and click Add Binding.
- Bind this smart access tag to the smart access policy created earlier.
Note:
You can also create a smart access policy from Security >AAA - Application Traffic > Policies > Authentication > Advanced Policies > Smart Access > Policies and then bind it to the authentication virtual server.
Step 2: Define smart access tags in DaaS Studio
- Add the policies with the smart tag “TAG-CHROME”. For details, see Define tags in Citrix Studio.
Use case 2: Configure smart access policies based on EPA results, for post authentication
Step 1: Configure smart access policies with smart tags on Adaptive Authentication instance
For smart access based on conditions like end point analysis, configure nFactor flow, define an EPA action, and then add the default group.
To configure EPA as a factor in nFactor flow, see Configure EPA as a factor.
Logical flow
- The user accesses the Workspace URL.
- The user is redirected to Adaptive Authentication for authentication/EPA.
- End point analysis is done on the end user and the results are stored by adding the user to the defined default group.
- The user is prompted for the next authentication flow.
- Smart access policies are evaluated and the user is assigned the smart access tags.
Configuration
Users accessing from a machine with antivirus installed must be marked as compliant and provided with full access. However, user machines without antivirus must be marked non-compliant and provided with limited access.
-
Create an nFactor policy for EPA. For details, see Configure EPA as a factor.
In the nFactor flow, ensure that the first is a user authentication factor.
- Select the EPA expression to check if the antivirus is present or not.
-
In the EPA action define the default group.
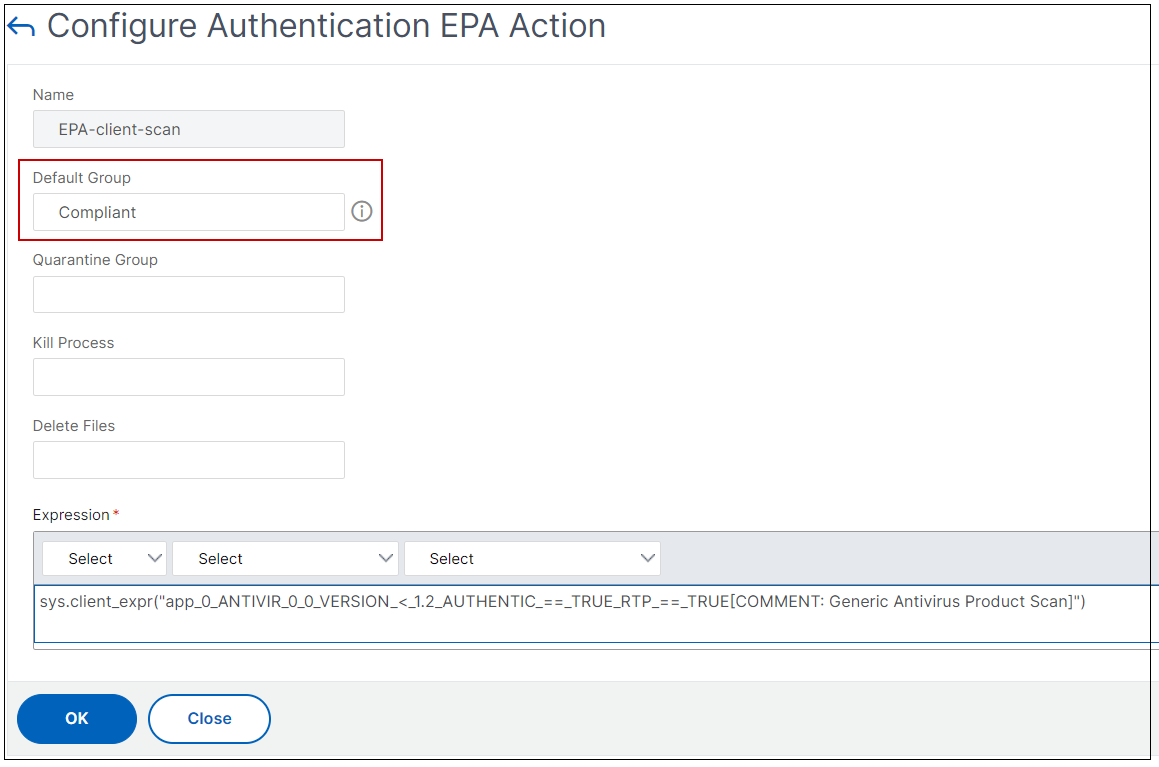
User is added to this default group if EPA runs as success.
-
Now, create smart access policies
- Log in to the Adaptive Authentication instance.
- Navigate to Adaptive Authentication virtual server (Security > AAA - Application Traffic > Virtual Servers).
- Select the Adaptive Authentication virtual server and click Edit.
- Click Smart Access Policies.
-
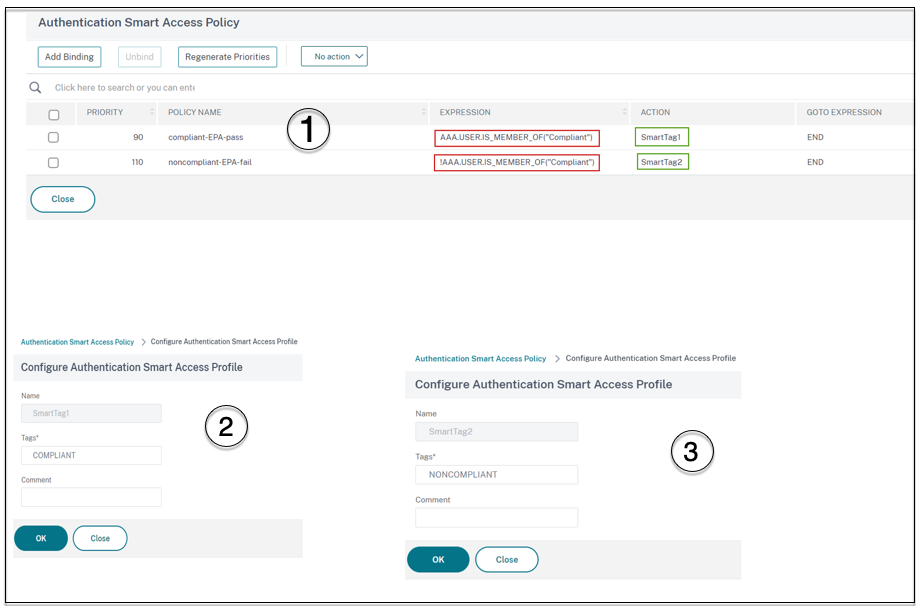
Create two smart access policies with the following expressions.
- AAA.USER.IS_MEMBER_OF (“Compliant”) - For the user EPA pass condition
- !AAA.USER.IS_MEMBER_OF (“Compliant”) – For the user EPA fail condition
-
Define smart access tags for both of these policies.
Example:
- Tag name
SmartTag1with the tag COMPLIANT forAAA.USER.IS_MEMBER_OF (“Compliant”) - Tag name
SmartTag2with the tag NONCOMPLIANT for!AAA.USER.IS_MEMBER_OF (“Compliant”)
- Tag name
Adaptive Authentication instance configuration with conditions as EPA for smart access is now complete.
You can configure the tags and expression according to your requirements.
Step 2: Configure smart access tags in DaaS Studio
Add the policies with smart tags “COMPLIANT” and “NONCOMPLIANT” in the respective delivery groups. For details, see Define tags in Citrix Studio.
Define tags in DaaS studio
Define tags in delivery groups to restrict the application enumeration for users.
Example: BranchOffice users must see applications from the Adaptive Access Delivery group which has all the applications. Whereas, WorkfromHome users must see applications from WFH Delivery Group.
- Sign into Citrix Cloud.
- Select My Services > DaaS.
- Click Manage.
- Create delivery groups as per your requirement. For details, see Create delivery groups.
-
Select the delivery group that you have created and click Edit Delivery Group.
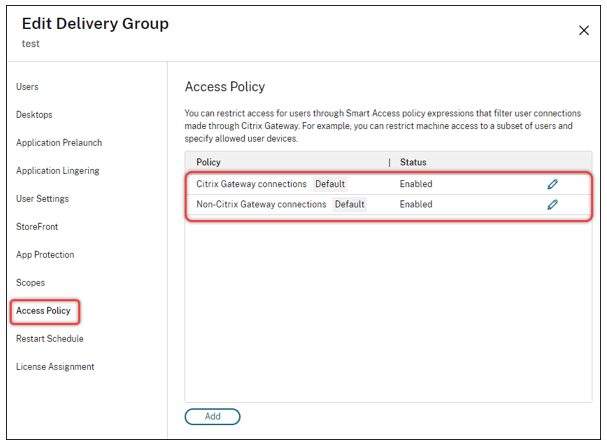
- Click Access Policy.
-
For customers using adaptive access within the Citrix Workspace platform, perform the following steps to restrict access for a delivery group to internal networks only:
- Right-click the delivery group and select Edit.
- Select the access policy in the left pane.
- Click the edit icon to modify the default Citrix Gateway connections policy.
- On the Edit policy page, select Connections meeting the following criteria, select Match any, and then add the criteria.
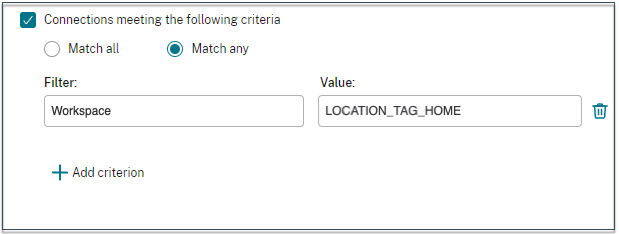
For WorkFromHome users, enter the following values in the respective delivery controller.
Farm: Workspace
Filter: LOCATION_TAG_HOME
For BranchOffice users, enter the following values in the respective delivery controller.
Filter: Workspace
Value: LOCATION_TAG_BRANCHOFFICE
You can now use these tags to restrict access to your applications.
Restrict the type of access for the provided applications
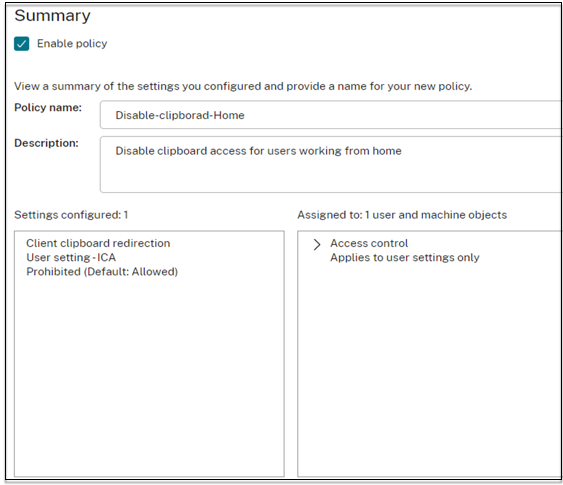
Example: Work from home users must not have clipboard rights.
- In DaaS Studio, navigate to Policies and click Create Policy.
- In the Create Policy page, select the setting for which you want to allow or prohibit access.
-
click Select.
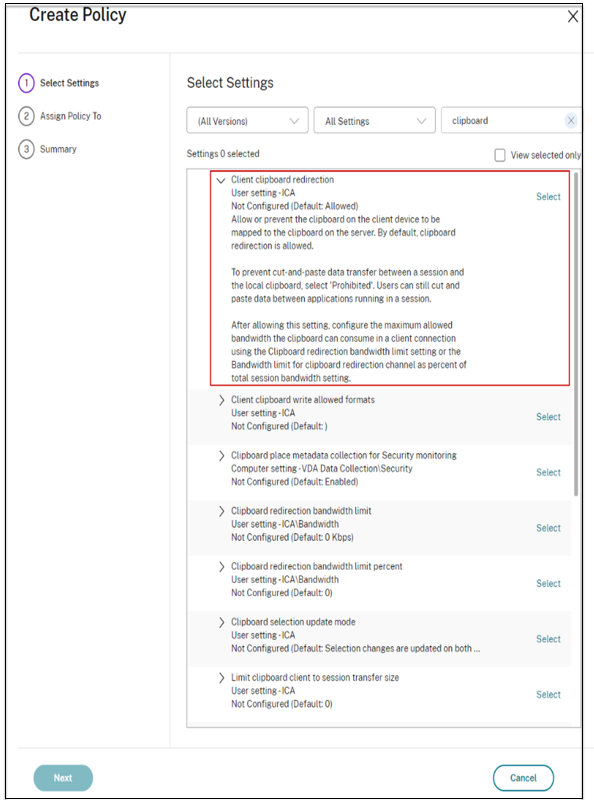
- In the Edit Setting page, click Allowed or Prohibited and then click Save.
- Click Next.
-
In the Assign Policy to page, select Access control and then click Next.
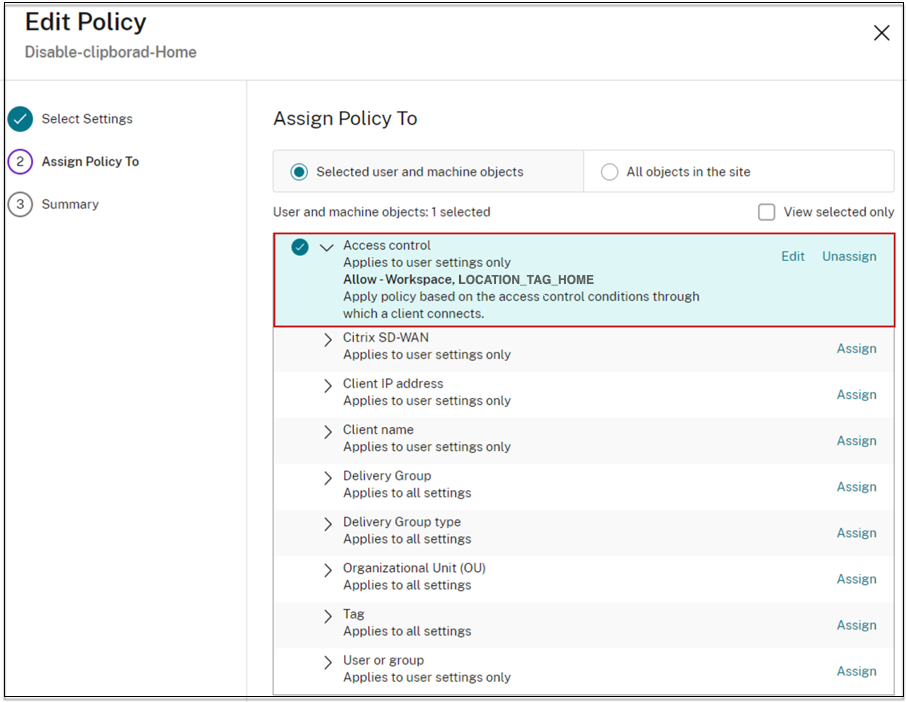
- Define a policy with the following details:
- Mode: - Allow
- Connection type: - With Citrix Gateway
- Farm name: - Workspace
- Access Condition: LOCATION_TAG_HOME (all upper case)
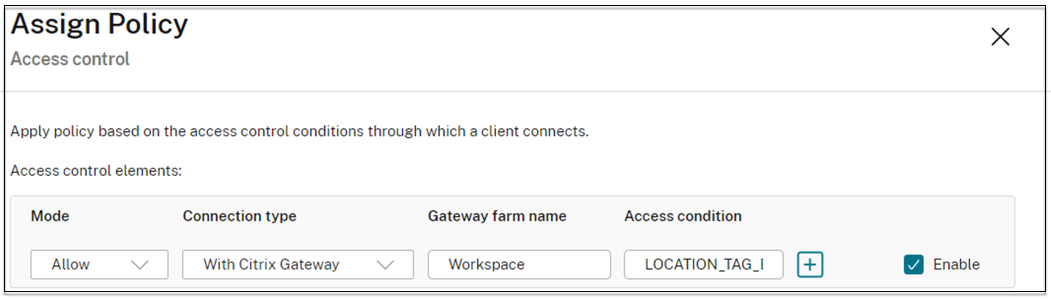
- Click Next and enter a name for the policy.
- Click Finish.
You’re now all set to test your access.
Troubleshooting common errors
-
Issue: You see the message “Cannot Complete your Request”.
Resolution
- Ensure that Adaptive Access is enabled. For details, see Enable Adaptive Access.
- If the feature isn’t enabled, Contact Citrix Support.
-
Issue: No apps or desktops are published.
This issue might occur if the smart tags aren’t pushed from Adaptive Authentication to the workspace or aren’t received at DaaS or Secure Private Access.
Resolution:
- Check if smart access policies are getting hit. For details see https://support.citrix.com/article/CTX138840.
- Check if the Citrix Adaptive Authentication instance is able to connect to
cas.citrix.com. -
Check the Adaptive Authentication instance for details on the smart tags.
- Ensure that in the
set audit syslogParamscommand, the logLevel parameter is set toALLon all instances. -
Log in to the Adaptive Authentication primary instance using putty.
Type shell
cd /var/logcat ns.log | more or cat ns.log | grep -I “smartaccess”
- Ensure that in the
- If these do not resolve the issue, contact Citrix Support.
Configuration changes for a high availability setup
Sometime there might be a delayed file synchronization in a high availability setup in the following directories. As a result, the keys created during Citrix ADM registration aren’t read on time.
- /var/mastools/conf/agent.conf
- /var/mastools/trust/.ssh/private.pem
- /var/mastools/trust/.ssh/public.pem
To address the file synchronization issue, perform the following steps to rerun the set cloud command on the secondary.
> shell cat /var/mastools/conf/agent.conf
<?xml version="1.0" encoding="UTF-8" standalone="no"?>
<mps_agent>
<uuid>temp_str</uuid>
<url>fuji.agent.adm.cloud.com</url>
<customerid>customer_id</customerid>
<instanceid>instance_id</instanceid>
<servicename>MAS</servicename>
<download_service_url>download.citrixnetworkapistaging.net</download_service_url>
<abdp_url>fuji.agent.adm.cloud.com</abdp_url>
<msg_router_url>fuji.agent.adm.cloud.com</msg_router_url>
</mps_agent> Done
> set cloud param -CustomerID customer_id -InstanceID instance_id -Deployment Production