EPA scan as a factor in nFactor authentication
Important:
Endpoint Analysis is intended to analyze the user device against pre-determined compliance criteria and does not enforce or validate the security of end-user devices. It is recommended to use endpoint security systems to protect devices from local admin attacks.
The following are some of the basic entities of nFactor EPA.
EPA Action: EPA Action is an action type introduced for nFactor EPA. It contains the following:
- Client device check expression: This expression is sent to the gateway EPA plug-in for evaluation.
- Success Group: This group, if configured, is inherited to the gateway session if the EPA result is true.
- Quarantine Group: This group, if configured, is inherited to the gateway session if the EPA result is false.
- killProcess: This represents the name of the process that the EPA process must terminate.
- deleteFiles: Specifies comma-separated paths to files that the EPA process must delete.
Groups can be used during the life of the session to determine whether the client meets certain EPA condition. If at a given factor, the EPA fails and the last action does not contain “Quarantine Group”, then authentication is terminated for that user. If a “Quarantine group” exists, authentication is continued and the administrator can check for the group to give limited access. For more details, see EPA execution.
To configure an authentication EPA action using the GUI:
-
Navigate to Security > AAA - Application Traffic > Policies > Authentication > Advanced Policies > Actions > Authentication EPA Action.
-
Configure the following parameters:
- Name: Name of the EPA action.
- Default group: The default group that is chosen when the EPA check is successful.
- Quarantine Group: The quarantine group that is chosen when the EPA check fails.
- Kill Process: A string specifying the name of a process to be terminated by the EPA tool. Multiple processes are separated by commas.
- Delete Files: A string specifying the paths and names of the files to be deleted by the EPA tool. Multiple files are separated by commas.
- Expression: Client security expression to be sent to the client.
To configure an authentication EPA action using the CLI:
add authentication epaAction CWA version check scan -csecexpr sys.client_expr("sys_0_MAC-CWA_version_>=_23.9.0.99")
The preceding CLI example indicates an EPA scan to verify Citrix Workspace™ app version on a macOS machine.
EPA Policy: In nFactor, all the policies are added with the same syntax “add authentication policy”. However, the type of the action qualifies the policy as an EPA policy.
EPA Factor: EPA factor is a regular policy label. There is no entity called EPA factor. Once EPA policy is bound to a factor, it inherits certain properties that make it an EPA factor.
Note:
The term “EPA Factor” is commonly used in this document to refer to a factor with EPA policies.
EPA – Quarantine: When a device fails an endpoint analysis (EPA) scan, a configured quarantine group grants limited access instead of immediately denying access.
If an EPA check fails and the last EPA action includes a quarantine group, the user is added to the quarantine group and next factor is not evaluated. Configure the quarantine group as a self-contained restricted-access level.
Access for quarantined users is controlled by the policies bound to the quarantine group. These policies can restrict application or resource access, enforce remediation-only workflows, or reduce privileges compared to compliant users.
If an EPA check fails and no quarantine group is configured on the last action, authentication fails and access is denied.
EPA in nFactor also uses the following entities:
- LoginSchema: XML representation of logon form. It defines the “view” of the logon form and also has properties of a “factor”.
- Policy label or policy factor: It is a collection of policies that are tried at a given stage of authentication.
- Virtual server label: Virtual server is also a policy label that is one can bind policies to virtual server. However, the virtual server is the collection of various policy labels as it is the entry point for user access.
- next factor: It is used to specify the policylabel/factor to be taken once the given authentication policy succeeds.
- NO_AUTHN policy: Special policy whose action always succeeds.
- Passthrough factor: Is a policylabel/factor whose login schema does not contain view. It is an indication to the NetScaler appliance to continue authentication at the given factor without user intervention.
For more information, see nFactor concepts, entities, and terminology.
EPA Factor mutual exclusivity
EPA Factor contains one or more EPA policies. Once EPA policies are bound to a factor, regular authentication policies are disallowed on that factor. This restriction is to offer the best user experience and clean separation of endpoint analysis. The only exception to this rule is the NO_AUTHN policy. Since NO_AUTHN policy is a special policy used to simulate ‘on-failure-jump’, it is allowed in the EPA factor.
EPA Execution
At any given factor (including the virtual server factor), before serving the logon form, the NetScaler appliance checks if the factor is configured for EPA. If so, it sends a specific response to the client (UI) such that the EPA sequence is triggered. This sequence comprises the client requesting for client device check expressions and sending the results. Client device check expressions for all policies in a factor are sent at once to the client. Once results are obtained at the NetScaler appliance, each of the expressions in all actions are evaluated in a sequence. The first action that results in successful EPA terminates that factor, and DefaultGroup, if configured, is inherited into the session. If a NO_AUTHN policy is encountered, it qualifies as automatic success. If the nextFactor is specified, the appliance continues with that factor. Otherwise, authentication terminates. This condition is applicable for the first factor as well. If there is no authentication policy factor after EPA at the virtual server, authentication is terminated. This is different from classic policy behavior where the user is always shown the login page after EPA. However, in the event of no successful EPA policy, then NetScaler Gateway looks at the Quarantine Group configured for the last EPA policy in that factor or cascade. If the last policy is configured with the Quarantine Group, that group is added to the session and the nextFactor is inspected. If a nextFactor exists, authentication proceeds to that factor. Otherwise, authentication is completed.
Configure EPA scan to run after authentication
You can configure the EPA scan to run after the authentication. In the following example, the EPA scan is used as a final check in a nFactor or multifactor authentication. In this setup, if the EPA scan fails during any such check, the session is terminated.
Note:
When configuring nFactor authentication with multiple EPA policies, it is recommended not to position them sequentially, as this might result in multiple prompts for the user to launch the EPA plug-in. Instead, it is recommended to alternate EPA policies with other authentication methods.
Examples:
Recommended: EPA Factor 1 > LDAP > EPA Factor 2
Not recommended: LDAP > EPA Factor 1 > EPA Factor 2
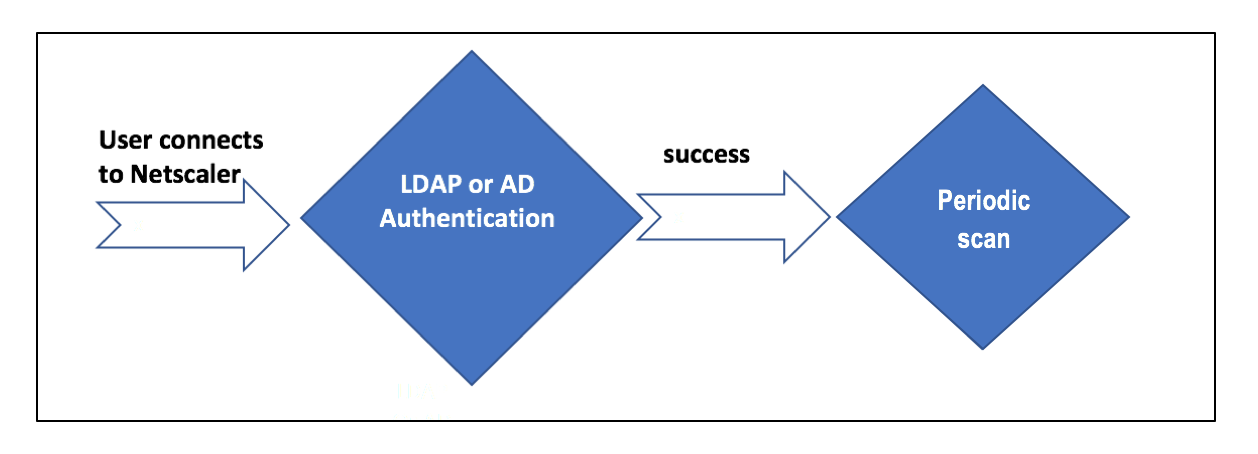
- The user tries to connect to NetScaler® Gateway Virtual IP.
- A login page with user name and password field is rendered to the user to provide login credentials. With these credentials, LDAP, or AD-based authentication is performed at the back-end. If successful, the user is presented with a pop-up to authorize the EPA scan.
- Once the user authorizes, the EPA scan is performed and based on the success or failure of user client settings, access is provided.
- If the scan is successful, the EPA scan is performed periodically to learn that the device check requirements configured are still met.
- If the EPA scan fails during any such check, the session is terminated.
Pre-requisites
It is assumed that the following configuration is in place:
- VPN virtual server, gateway, and authentication virtual server configuration
- LDAP server configurations and associated policies.
The following section captures the required policies and policy label configurations and also the mapping of policies and policy label to an authentication profile.
On the CLI
-
Create an action to perform an EPA scan before LDAP authentication and associate it with an EPA scan policy.
add authentication epaAction pre-ldap-epa-action -csecexpr "sys.client_expr (\"proc_2_firefox\")"

add authentication Policy pre-ldap-epa-pol -rule true -action pre-ldap-epa-action
<!--NeedCopy-->
The preceding expression scans if the process ‘Firefox’ is running. The EPA client checks for the process existence every 2 minutes, signified by the digit ‘2’ in the scan expression.
-
Configure the policy label
pre-ldap-epa-label, which hosts the policy for the EPA scan.add authentication policylabel pre-ldap-epa-label -loginSchema LSCHEMA_INT <!--NeedCopy-->Note:
LSCHEMA_INT is an inbuilt schema with no schema(noschema) that means no additional webpage is presented to the user at this step.
-
Associate the policy configured in step 1 with the policy label configured in step 2. This completes the authentication mechanism.
bind authentication policylabel pre-ldap-epa-label -policyName pre-ldap-epa-pol -priority 100 -gotoPriorityExpression END <!--NeedCopy--> -
Configure an LDAP action and policy.
add authentication ldapAction ldap-act -serverIP 192.0.2.0 -ldapBase "dc=example,dc=net" -ldapBindDn user1@example.net -ldapBindDnPassword 1.cloud -ldapLoginName samAccountName -groupAttrName memberOf -subAttributeName CN -passwdChange ENABLED add authentication Policy ldap-pol -rule true -action ldap-act <!--NeedCopy--> -
Create a login schema with SSO enabled.
add authentication loginSchema ldap-schema -authenticationSchema "/nsconfig/loginschema/LoginSchema/SingleAuth.xml" -SSOCredentials Yes <!--NeedCopy--> -
Configure the policy label
ldap-pol-label, which hosts the policy for the LDAP authentication.add authentication policylabel ldap-pol-label -loginSchema ldap-schema <!--NeedCopy--> -
Bind the login schema configured in step 5 to the policy label configured in step 6.
bind authentication policylabel ldap-pol-label -policyName ldap-pol -priority 100 -gotoPriorityExpression NEXT <!--NeedCopy--> -
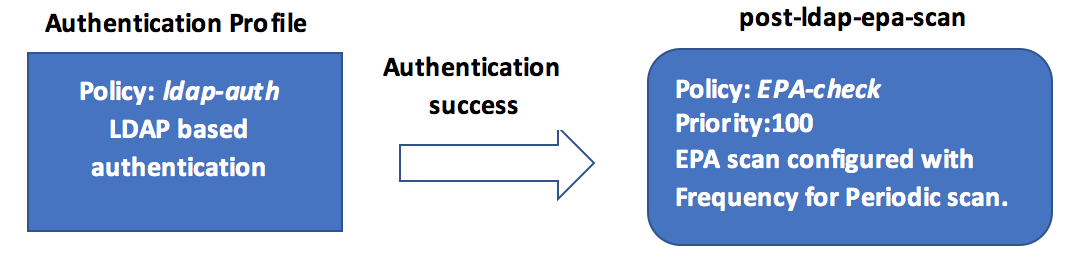
Create an action to perform an EPA scan post the LDAP authentication and associate it with an EPA scan policy.
add authentication epaAction post-ldap-epa-action -csecexpr "sys.client_expr (\"proc_2_chrome\")" add authentication Policy post-ldap-epa-pol -rule true -action post-ldap-epa-action add authentication policylabel post-ldap-epa-label -loginSchema LSCHEMA_INT bind authentication policylabel post-ldap-epa-label -policyName post-ldap-epa-pol -priority 100 -gotoPriorityExpression <!--NeedCopy--> -
Bringing it all together, associate the policy
pre-ldap-epa-polto the authentication virtual server with the next step pointing to the policy labelldap-pol-labelto do an EPA scan.bind authentication vserver user.auth.test -policy pre-ldap-epa-pol -priority 100 -nextFactor ldap-pol-label -gotoPriorityExpression NEXT bind authentication policylabel ldap-pol-label -policyName ldap-pol -priority 100 -gotoPriorityExpression NEXT -nextFactor post-ldap-epa-label <!--NeedCopy-->
Note:
- In periodic EPA configured as multiple factors, the latest factor with periodic EPA configuration is considered.
- Periodic scans can be run only using the EPA plug-in and not on the browser.
- In the first example, EPA is the first factor where the scan looks for the process ‘Firefox’.
- If the EPA scan is successful, it leads to LDAP authentication, followed by the next EPA scan, that looks for the process ‘Chrome’.
- When multiple periodic scans are configured as different factors, the latest scan takes the precedence. In this case, the EPA plug-in scans for the process ‘Chrome’ every 2 minutes after the login is successful.
On the GUI (using nFactor Visualizer)
You can configure advanced EPA scan as a factor using the nFactor visualizer on the GUI. In the following example, we have used LDAP as the first factor and EPA as the next factor.
-
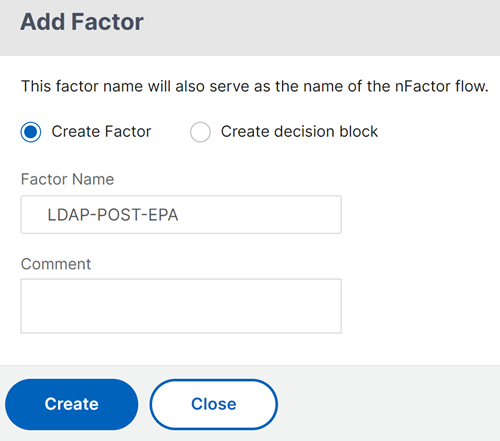
Create a first factor for the nFactor flow.
-
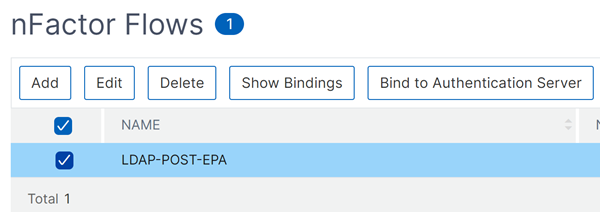
Navigate to Security > AAA-Application Traffic > nFactor Visualizer > nFactor Flows and click Add.
- Click + to add the nFactor flow.
- Add a factor and click Create.
-
-
Create a login schema and a policy for the first factor.
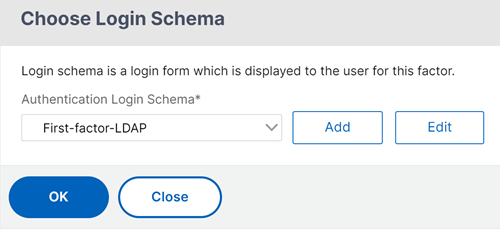
- On the first factor tile, click Add Schema to add a login schema. You can either select an existing authentication login schema from the drop-down list or create a login schema.
-
To create an authentication login schema, click Add. For detailed information about the authentication login schema, see Configuring nFactor authentication.
-
Click Add Policy to add the LDAP policy. If the LDAP policy is already created, you can select the same. Click Add.
Note:
If an LDAP policy is not created, you can create one. Click the Add button next to the Select Policy drop-down list. In the Action field, select LDAP. For details about adding an authentication LDAP server, see
https://support.citrix.com/article/CTX123782.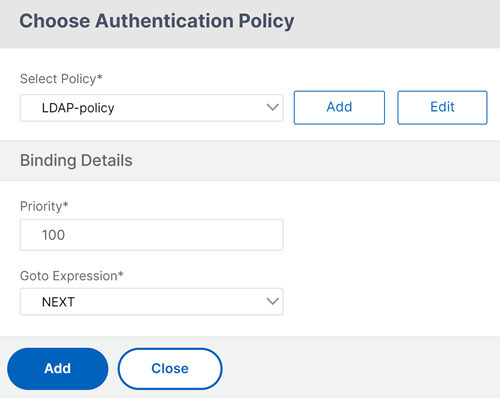
-
Create a next factor and connect it to the first factor.
- Click the green or red-colored + icon to add EPA as the next factor.
- Create the next factor on the Next Factor to Connect page.
- Leave the Add Schema section blank, to have the default no schema applied for this factor.
-
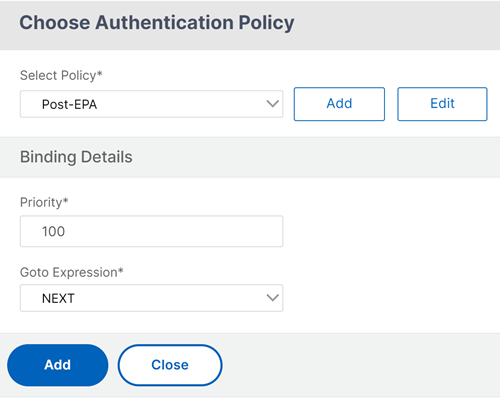
Add a policy for the next factor.
- Click Add policy to add the post authentication EPA policy and action.
- You can either choose from an existing list of policies or create a policy. To choose from the existing policies, select a policy from the Select Policy drop-down list, provide the binding details, and click Add.
- To create a policy, click the Add button next to the Select Policy drop-down list.
-
After the nFactor flow is complete, click Done.
-
Bind the nFactor flow to an authentication server.
- Navigate to Security AAA - Application Traffic > nFactor Visualizer > nFactor Flows.
- Select the nFactor and click Bind to Authentication Server.