Adding NetScaler CPX Instances to NetScaler ADM
You must add the NetScaler CPX instances installed on a Docker host to NetScaler Application Delivery Management (ADM) software if you want to manage and monitor these instances.
You can add instances either while setting up ADM for the first time or later.
To add instances, you must create an instance profile and specify either the host name or IP address of each instance, or a range of IP addresses. This instance profile contains the user name and password of the instances that you want to add to NetScaler ADM. For each instance type, a default profile is available. For example, the ns-root-profile is the default profile for NetScaler instances. This profile is defined by the default ADC administrator credentials. If you have changed the default admin credentials of your instances, you can define custom instance profiles for those instances. If you change the credentials of an instance after the instance is discovered, you must edit the instance profile or create a profile, and then rediscover the instance.
Prerequisites
Make sure that you have:
- Installed the NetScaler ADM software on Citrix XenServer. For more information, see NetScaler ADM Documentation.
- Installed the NetScaler CPX instances on a Docker host.
To add NetScaler CPX instances to ADM:
-
In a web browser, type the IP address of the NetScaler Application Delivery Management (for example,
http://192.168.100.1). -
In the User Name and Password fields, enter the administrator credentials. The default administrator credentials are nsroot and nsroot.
-
Navigate to Networks > Instances > NetScaler and click CPX tab.
-
Click Add to add new CPX instances in NetScaler ADM.
-
The Add NetScaler CPX page opens. Enter the values for the following parameters:
- You can add CPX instances by providing either the reachable IP address of the CPX instance or the IP address of the Docker container where the CPX instance is hosted.
- Select the profile of the CPX instance.
- Select the site where the instances are to be deployed.
- Select the agent.
-
As an option, you can enter the key-value pair to the instance. Adding a key-value pair makes it easy for you to search for the instance later.
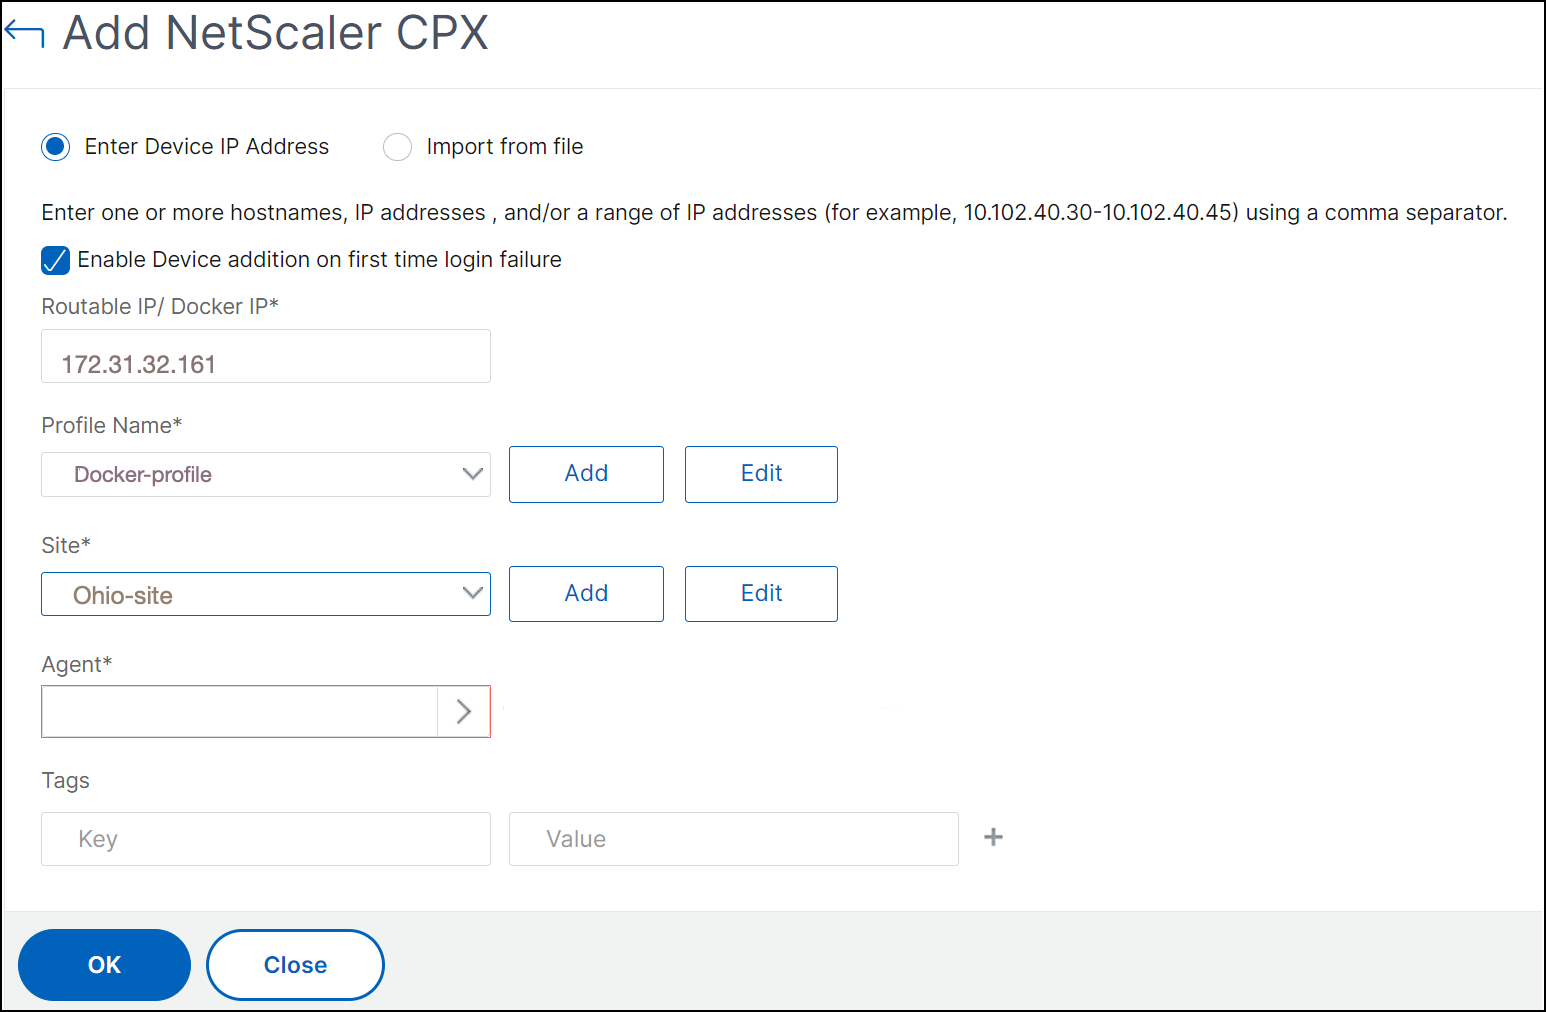
-
Click OK.
Note
If you want to rediscover an instance, choose Networks > Instances > NetScaler > CPX, select the instance you want to rediscover, and then from the Select Action drop-down list, click Rediscover.
Adding NetScaler CPX instances to NetScaler ADM using environment variables
You can also add the NetScaler CPX instances to NetScaler ADM using environment variables. To add instances, you must configure the following environment variables for the NetScaler CPX instance.
-
NS_MGMT_SERVER- ADM IP address/FQDN -
HOST- Node IP address -
NS_HTTP_PORT- Mapped HTTP port on node -
NS_HTTPS_PORT- Mapped HTTPS port on node -
NS_SSH_PORT- Mapped SSH port on node -
NS_SNMP_PORT- Mapped SNMP port on node -
NS_ROUTABLE- (NetScaler CPX pod IP address is not routable from outside.) -
NS_MGMT_USER– ADM username -
NS_MGMT_PASS– ADM password
The following is an example docker run command for adding a NetScaler CPX instance to NetScaler ADM.
 docker run -dt --privileged=true -p 9080:9080 -p 9443:9443 -p 9022:22 -p 9161:161 -e EULA=yes -e NS_MGMT_SERVER=abc-mgmt-server.com -e HOST=10.1.1.1 -e NS_HTTP_PORT=9080 -e NS_HTTPS_PORT=9443 -e NS_SSH_PORT=9022 -e NS_SNMP_PORT=9161 -e NS_ROUTABLE=0 --ulimit core=-1 –name test cpx:latest

<!--NeedCopy-->
Adding NetScaler CPX instances to NetScaler ADM using Kubernetes ConfigMaps
NetScaler CPX supports registration with NetScaler ADM by using volume mounted files through Kubernetes ConfigMaps. To enable this way of registration, NetScaler CPX requires some environment variables which are to be specified along with some volume mounted files through ConfigMaps and Secrets.
The following are the required environment variables and their description:
-
NS_HTTP_PORT- Specifies mapped HTTP port on node. -
NS_HTTPS_PORT- Specifies mapped HTTPS port on node. -
NS_SSH_PORT- Specifies mapped SSH port on node. -
NS_SNMP_PORT- Specifies mapped SNMP port on node.
Apart from the listed environment variables, NetScaler CPX requires information about the ADM agent with which it has to register. This information contains ADM agent’s IP address or FQDN details and credentials. NetScaler CPX acquires this information from the volume mounted files. A ConfigMap containing the IP address or FQDN is mounted as a file in the file-system of the NetScaler CPX instance. A Kubernetes secret containing credentials for the ADM agent is also mounted as a file in the NetScaler CPX instance’s file-system. With all the information required for registration, NetScaler CPX attempts to register with the ADM agent.
The following is an example of a NetScaler CPX YAML file snippet with the ConfigMap and Secret mounted as files:
      …
      env:
      - name: "EULA"
        value: "yes"
      - name: "NS_HTTP_PORT"
        value: "9080"
      - name: "NS_HTTPS_PORT"
        value: "9443"
      - name: "NS_SSH_PORT"
        value: "22"
      - name: "NS_SNMP_PORT"
        value: "161"
      - name: "KUBERNETES_TASK_ID"
        value: ""
      …
      volumeMounts:
        …
        - mountPath: /var/adminfo/server/
          name: adm-agent-config
        - mountPath: /var/adminfo/credentials/
          name: adm-agent-user
        …
  volumes:
  …
  - name: adm-agent-config
    configMap:
      name: adm-agent-config
  - name: adm-agent-user
    secret:
      secretName: adm-secret
In the preceding example, a ConfigMap named adm-agent-config and a secret adm-agent-user are consumed. The following is an example for creating the required ConfigMap and Secret.
ConfigMap: The ConfigMap is created from a file named adm_reg_envs. The file requires the IP address or FQDN of the ADM agent in the following format:
NS_MGMT_SERVER=adm-agent
In the preceding format, the adm-agent is the FQDN of the ADM agent to which the NetScaler CPX instance needs to be registered.
Use the following command to create a ConfigMap:
kubectl create configmap adm-agent-config --from-file=adm_reg_envs
Note: The file name must have the adm_reg_envs variable and it must be mounted to the path: /var/adminfo/server/.
Secret: Use the following command to create a Kubernetes secret. In the following command, user123 is the user name of the ADM agent and pass123 is the password.
kubectl create secret generic adm-secret --from-literal=NS_MGMT_USER=user123 --from-literal=NS_MGMT_PASS=pass123
A NetScaler CPX instance can be deployed in a Kubernetes cluster with the required environment variables and volume mounted files even before deploying the ADM agent in the cluster. If you deploy a NetScaler CPX instance before deploying the ADM agent, NetScaler CPX keeps on trying to get registered until the ADM agent is deployed. Once the ADM agent is deployed, the NetScaler CPX instance uses the configuration data provided through the environment variables and volume mounted files to register with the ADM agent. It helps you to avoid the redeployment of NetScaler CPX with the configuration information.
A NetScaler CPX instance, that is already registered with an ADM agent, can dynamically change the registration to another ADM agent after a change in the configuration. For this, you can update configuration information in the ConfigMap and the Secret for the already deployed NetScaler CPX. You must update the file from which the ConfigMap is created with the IP address or FQDN of the new ADM agent and delete the old ConfigMap and, then create a new ConfigMap. Similarly, the existing secret must be deleted and a new secret must be created with the credentials for the new ADM agent.