Configuring Client Certificates and LDAP Two-Factor Authentication
You can use a secure client certificate with LDAP authentication and authorization, such as using smart card authentication with LDAP. The user logs on and then the user name is extracted from the client certificate. The client certificate is the primary form of authentication and LDAP is the secondary form. The client certificate authentication must take priority over the LDAP authentication policy. When you set the priority of the policies, assign a lower number to the client certificate authentication policy than the number you assign to the LDAP authentication policy.
To use a client certificate, you must have an enterprise Certificate Authority (CA), such as Certificate Services in Windows Server 2008, running on the same computer that is running Active Directory. You can use the CA to create a client certificate.
To use a client certificate with LDAP authentication and authorization, it must be a secure certificate that uses the Secure Sockets Layer (SSL). To use secure client certificates for LDAP, install the client certificate on the user device and install a corresponding root certificate on Citrix® Gateway.
Before configuring a client certificate, do the following:
- Create a virtual server.
- Create an LDAP authentication policy for the LDAP server.
- Set the expression for the LDAP policy to True value.
To configure client certificate authentication with LDAP
- In the configuration utility, on the Configuration tab, expand Citrix Gateway > Policies \ > Authentication.
- In the navigation pane, under Authentication, click Cert.
- In the details pane, click Add.
- In Name, type a name for the policy.
- In Authentication Type, select Cert.
- Next to Server, click New.
- In Name, type a name for the server, and then click Create.
- In the Create Authentication Server dialog box, in Name, type the name of the server.
- Next to Two Factor, select ON.
- In the User Name Field, select Subject:CN and then click Create.
- In the Create Authentication Policy dialog box, next to Named Expressions, select True value, click Add Expression, click Create, and then click Close.
After you create the certificate authentication policy, bind the policy to the virtual server. After binding the certificate authentication policy, bind the LDAP authentication policy to the virtual server.
Important: Bind the certificate authentication policy to the virtual server before you bind the LDAP authentication policy to the virtual server.
To install a root certificate on Citrix Gateway
After you create the certificate authentication policy, you download and install a root certificate from your CA in Base64 format and save it on your computer. You can then upload the root certificate to Citrix Gateway.
- In the configuration utility, on the Configuration tab, in the navigation pane, expand SSL and then click Certificates.
- In the details pane, click Install.
- In Certificate - Key Pair Name, type a name for the certificate.
- In Certificate File Name, click Browse and in the menu, select either Appliance or Local.
- Navigate to the root certificate, click Open, and then click Install.
To add a root certificate to a virtual server
After installing the root certificate on Citrix Gateway, add the certificate to the certificate store of the virtual server.
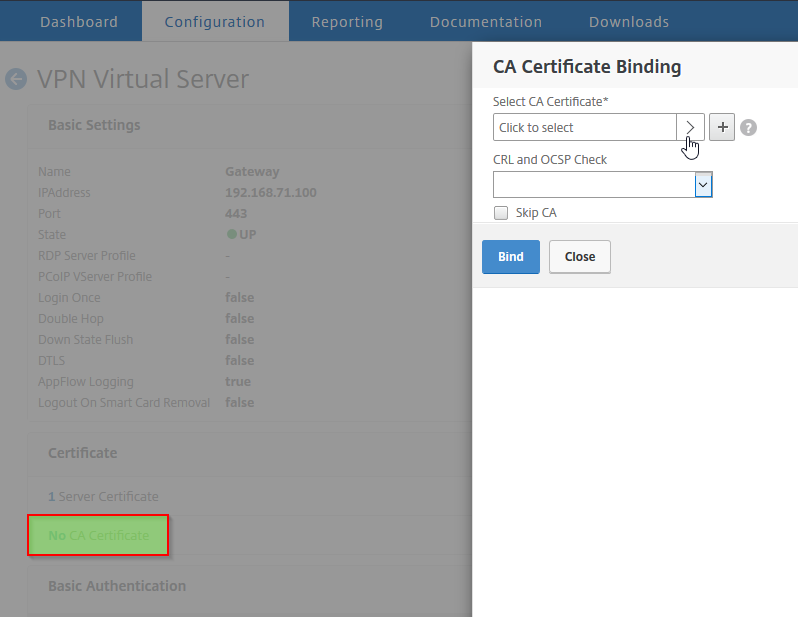
Important: When you add the root certificate to the virtual server for smart card authentication, you must select the certificate from the Select CA Certificate menu, as shown in the following figure.
-
In the configuration utility, on the Configuration tab, in the navigation pane, expand Citrix Gateway and then click Virtual Servers.
-
In the details pane, select a virtual server and then click Open.
-
On the Certificates tab, under Available, select the certificate, next to Add, in the menu, click as CA and then click OK.
-
Repeat Step 2.
-
On the Certificates tab, click SSL Parameters.
-
Under Others, select Client Authentication.
-
Under Others, next to Client Certificate, select Optional and then click OK twice.
-
After configuring the client certificate, test the authentication by logging on to Citrix Gateway with the Citrix Gateway plug-in. If you have more than one certificate installed, you receive a prompt asking you to select the correct certificate. After you select the certificate, the logon screen appears with the user name populated with the information obtained from the certificate. Type the password and then click Login.
If you do not see the correct user name in the User Name field on the logon screen, check the user accounts and groups in your LDAP directory. The groups that are defined on Citrix Gateway must be the same as those in the LDAP directory. In Active Directory, configure groups at the domain root level. If you create Active Directory groups that are not in the domain root level, incorrect reading of the client certificate can result.
If users and groups are not at the domain root level, the Citrix Gateway logon page displays the user name that is configured in the Active Directory. For example, in Active Directory, you have a folder named Users and the certificate says CN=Users. In the logon page, in User Name, the word Users appears.
If you do not want to move your group and user accounts to the root domain level, when configuring the certificate authentication server on Citrix Gateway, leave User Name Field and Group Name Field blank.