nFactor for Gateway Authentication
nFactor authentication enables a whole new set of possibilities for authentication. Administrators using nFactor enjoy authentication, authorization, and auditing (Citrix® ADC AAA) flexibility when configuring authentication factors for virtual servers.
Two policy banks or two factors no longer restrict an administrator. The number of policy banks can be extended to suit different needs. Based on previous factors, nFactor determines a method of authentication. Dynamic login forms and on-failure actions are possible by using nFactor.
Note:
nFactor is not supported for the Citrix ADC Standard Edition. It is supported for Citrix ADC Enterprise Edition and Citrix ADC Platinum Edition.
Use cases
nFactor authentication enables dynamic authentication flows based on the user profile. Sometimes, these can be simple flows to be intuitive to the user. In other cases, they can be coupled with securing active directory or other authentication servers. The following are some requirements specific to Gateway:
-
Dynamic username and password selection. Traditionally, Citrix clients (including Browsers and Receivers) use the active directory (AD) password as the first password field. The second password is reserved for the One-Time-Password (OTP). However, to secure AD servers, OTP is required to be validated first. nFactor can do this without requiring client modifications.
-
Multi-Tenant Authentication End-point. Some organizations use different Gateway servers for Certificate and non-certificate users. With users using their own devices to log in, user’s access levels vary on the Citrix ADC appliance based on the device being used. Gateway can cater to different authentication needs.
-
Authentication based on group membership. Some organizations obtain user properties from AD servers to determine authentication requirements. Authentication requirements can be varied for individual users.
-
Authentication co-factors. Sometimes, different pairs of authentication policies are used to authenticate different sets of users. Providing pair policies increases effective authentication. Dependent policies can be made from one flow. Thus, independent sets of policies become flows of their own that increase efficiency and reduce complexity.
Authentication Response Handling
The Citrix Gateway callback registers handle authentication responses. AAAD (authentication daemon) responses and success/failure/error/dialogue codes are feed to the callback handle. The success/failure/error/dialogue codes direct Gateway to take the appropriate action.
Client Support
The following table details configuration details.
| Client | nFactor Support | Authentication Policy Bind Point | EPA |
|---|---|---|---|
| Browsers | Yes | Authentication | Yes |
| Citrix Workspace app | Yes | VPN | Yes |
| Gateway Plug-in | Yes | VPN | Yes |
Note:
-
Citrix Gateway plug-in supports nFactor authentication from 12.1 build 49.37.
-
Citrix Workspace™ app supports nFactor authentication for the supported operating systems from the following listed versions.
- Windows 4.12
- Linux 13.10
- Mac 1808
- iOS 2007
- Android 1808
- HTML5: Supported through Store Web
- Chrome: Supported through Store Web
Command Line Configuration
The Gateway virtual server needs an authentication virtual server named as an attribute. This is the only configuration required for this model.
add authnProfile <name-of-profile> -authnVsName <name-of-auth-vserver>
<!--NeedCopy-->
The authnVsName is the name of the authentication virtual server. This virtual server must be configured with advanced authentication policies and is used for nFactor authentication.
add vpn vserver <name> <serviceType> <IP> <PORT> -authnProfile <name-of-profile>

set vpn vserver <name> -authnProfile <name-of-profile>
<!--NeedCopy-->
Where authnProfile is the previously created authentication profile.
Interop Challenges
Most of the Legacy Gateway clients, and rfWeb clients, are modeled on responses sent by Gateway. For example, a 302 response to /vpn/index.html is expected for many clients. Also, these clients depend on various Gateway cookies such as pwcount, “NSC_CERT,” and so forth
End Point Analysis (EPA)
EPA in nFactor is not supported for the Citrix ADC authentication, authorization, and auditing module. Hence, the Citrix Gateway virtual server performs EPA. After EPA, the login credentials are sent to the authentication virtual server using the previously mentioned API. Once authentication is complete, Gateway continues to the post authentication process and it establishes the user session.
Misconfiguration Considerations
The Gateway client sends the user credentials only once. Gateway gets either one or two credentials from the client with the login request. In the legacy mode, there are a maximum of two factors. The passwords obtained are used for these factors. However, with nFactor the number of factors that can be configured is practically unlimited. Passwords obtained from the Gateway client are reused (as per configuration) for configured factors. Care must be taken such that one-time-password (OTP) must not be reused multiple times. Likewise, an administrator must ensure that the password reused at a factor is indeed applicable to that factor.
Defining Citrix Clients
The configuration option is provided to help Citrix ADC determine browser clients vs. thick clients such as Receiver.
A pattern set, ns_vpn_client_useragents, is provided for the administrator to configure patterns for all Citrix clients.
Likewise, binding the “Citrix Receiver” string to the above patset to ignore all Citrix clients that have “Citrix Receiver” in the User-Agent.
Restricting nFactor for Gateway
nFactor for Gateway authentication does not happen if the following conditions are present.
-
The authnProfile is not set at Citrix Gateway.
-
Advanced authentication policies are not bound to the authentication virtual server and the same authentication virtual server is mentioned in authnProfile.
-
The User-Agent string in the HTTP request matches the User-Agents configured in
patset ns_vpn_client_useragents.
If these conditions are not met, the classic authentication policy bound to Gateway is used.
If a User-Agent, or portion of it is bound to the previously mentioned patset, requests coming from those user-agents do not participate in the nFactor flow. For example, the following command restricts configuration for all browsers (assuming all browsers contain “Mozilla” in the user-agent string):
bind patset ns_vpn_client_useragents Mozilla
<!--NeedCopy-->
LoginSchema
LoginSchema is a logical representation of the logon form. The XML language defines it. The Syntax of the loginSchema conforms to Citrix’s Common Forms Protocol specification.
LoginSchema defines the “view” of the product. An Administrator can provide a customized description, assistive text, and so forth of the form. This includes the labels of the form itself. A customer can provide the success or the failure message that describes the form presented at a given point.
LoginSchema and nFactor Knowledge Required
Pre-built loginSchema files are found in the following Citrix ADC location /nsconfig/loginschema/LoginSchema/. These pre-built loginSchema files cater to common use cases, and can be modified for slight variations if necessary.
Also, most single factor use cases with few customizations do not need login schema configuration.
The administrator is advised to check the Citrix product documentation for other configuration options that enable Citrix ADC to discover the factors. Once the user submits the credentials, the administrator can configure more than one factor to flexibly choose and process the authentication factors.
Configuring Dual Factor Authentication Without Using LoginSchema
Citrix ADC automatically determines dual factor requirements based on configuration. Once the user presents these credentials, the administrator can configure the first set of policies at the virtual server. Against each policy there can be a “nextFactor” configured as a “passthrough.” A “passthrough” implies that the Citrix ADC appliance must process the logon using the existing credential set without going to the user. By using “passthrough” factors, an administrator can programmatically drive the authentication flow. Administrators are advised to read the nFactor specification or the deployment guides for further details. See https://docs.citrix.com/en-us/netscaler/12-1/aaa-tm/multi-factor-nfactor-authentication.html.
User name Password Expressions
To process the login credentials, the administrator must configure the loginSchema. Single factor or dual factor use cases with few loginSchema customizations does not need a specified XML definition. The LoginSchema has other properties such as userExpression and passwdExpression that can be used to alter the user name or password that the user presents. These are advanced policy expressions and can be used to override the user input as well.
High-level steps in nFactor configuration
The following diagram illustrates the high-level steps involved in nFactor configuration.
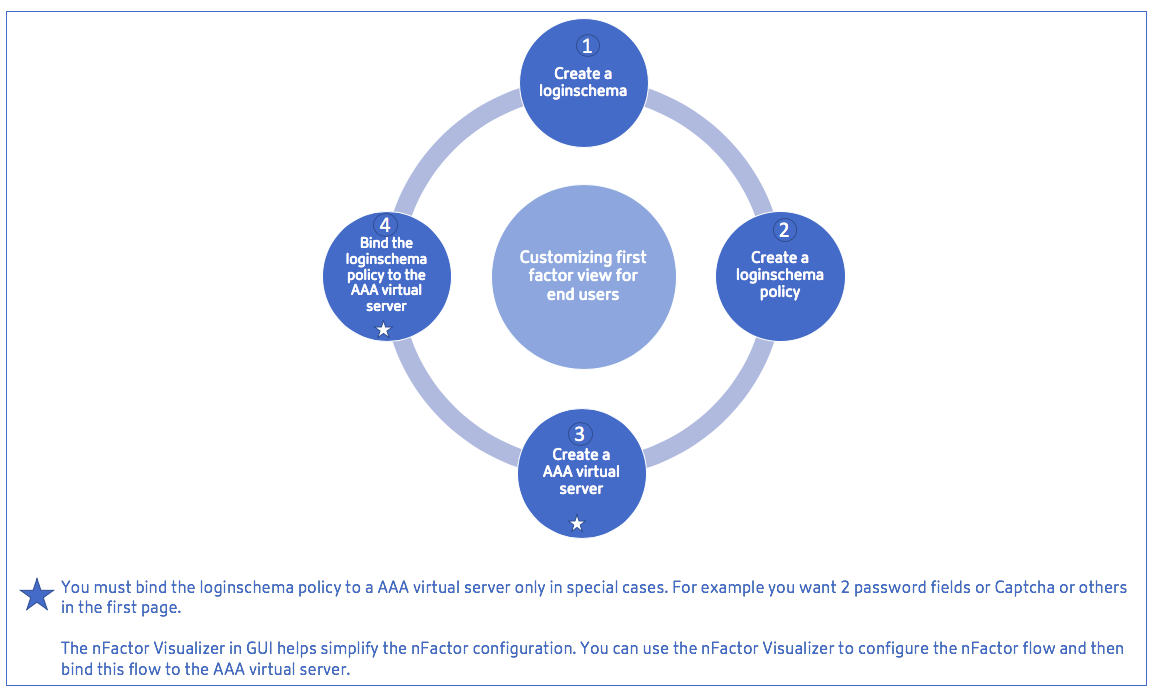
GUI Configuration
The following topics are described in this section:
-
Create a Virtual Server
-
Create Authentication Virtual Server
-
Create Authentication CERT Profile
-
Create an Authentication Policy
-
Add an LDAP authentication server
-
Add an LDAP authentication policy
-
Add a RADIUS authentication server
-
Add a RADIUS Authentication Policy
-
Create an Authentication Login Schema
-
Create a Policy Label
Create a Virtual Server
-
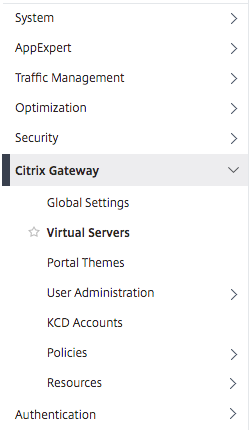
Navigate to Citrix Gateway -> Virtual Servers.
-
Click the Add button to create a gateway virtual server.

-
Enter the following information.
Parameter name Parameter Description Enter the Name of the virtual server. Name for the Citrix Gateway virtual server. Must begin with an ASCII alphabetic or underscore (_) character, and must contain only ASCII alphanumeric, underscore, hash (#), period (.), space, colon (:), at (@), equals (=), and hyphen (-) characters. Can be changed after the virtual server is created. The following requirement applies only to the Citrix ADC CLI: If the name includes one or more spaces, enclose the name in double or single quotation marks (for example, “my server” or ‘my server’). Enter the IP Address Type for the virtual server Select an IP Address or Non-addressable option from the drop-down menu. Enter the IP Address of the virtual server. An Internet Protocol address (IP address) is a numerical label assigned to each device participating in the computer network that uses the Internet Protocol for communication. Enter the Port number for the virtual server. Enter the port number. Enter the Authentication Profile. Authentication Profile entity on virtual server. This entity can be used to offload authentication to Citrix ADC AAA virtual server for multi-factor (nFactor) authentication Enter the RDP Server Profile. Name of the RDP server profile associated with the virtual server. Enter the Maximum Users. Maximum number of concurrent user sessions allowed on this virtual server. The actual number of users allowed to log on to this virtual server depends on the total number of user licenses. Enter the Max Login Attempts. Maximum number of logon attempts. Enter the Failed Login Timeout. Number of minutes an account is locked if the user exceeds the maximum permissible attempts. Enter the Windows EPA plug-in upgrade. Option to set plug-in upgrade behavior for Win. Enter the Linux EPA plug-in upgrade. Option to set plug-in upgrade behavior for Linux. Enter the MAC EPA plug-in upgrade Option to set plug-in upgrade behavior for Mac. Login Once This option enables/disables seamless SSO for this virtual server. ICA Only When set to ON, it implies Basic mode where the user can log on using either Citrix Workspace app or a browser and get access to the published apps configured at the Citrix Virtual Apps and Desktops environment pointed out by the Wihomeparameter. Users are not allowed to connect using the Citrix Gateway plug-in and end point scans cannot be configured. The numbers of users that can log in and access the apps are not limited by the license in this mode. - When set to OFF, it implies SmartAccess mode where the user can log on using either Citrix Workspace app or a browser or a Citrix Gateway plug-in. The admin can configure end point scans to be run on the client systems and then use the results to control access to the published apps. In this mode, the client can connect to the gateway in other client modes namely VPN and clientless VPN. The numbers of users that can log in and access the resources are limited by the CCU licenses in this mode.Enable Authentication Require authentication for users connecting to Citrix Gateway. Double Hop Use the Citrix Gateway appliance in a double-hop configuration. A double-hop deployment provides an extra layer of security for the internal network by using three firewalls to divide the DMZ into two stages. Such a deployment can have one appliance in the DMZ and one appliance in the secure network. Down State Flush Close existing connections when the virtual server is marked DOWN, which means the server might have timed out. Disconnecting existing connections frees resources and in certain cases speeds recovery of overloaded load balancing setups. Enable this setting on servers in which the connections can safely be closed when they are marked DOWN. Do not enable DOWN state flush on servers that must complete their transactions. DTLS This option starts/stops the turn service on the virtual server AppFlow Logging Log AppFlow records that contain standard NetFlow or IPFIX information, such as time stamps for the beginning and end of a flow, packet count, and byte count. Also log records that contain application-level information, such as HTTP web addresses, HTTP request methods and response status codes, server response time, and latency. ICA Proxy Session Migration This option determines if an existing ICA Proxy session is transferred when the user logs on from another device. State The current state of the virtual server, as UP, DOWN, BUSY, and so on. Enable Device Certificate Indicates whether the device certificate check as a part of EPA is on or off. 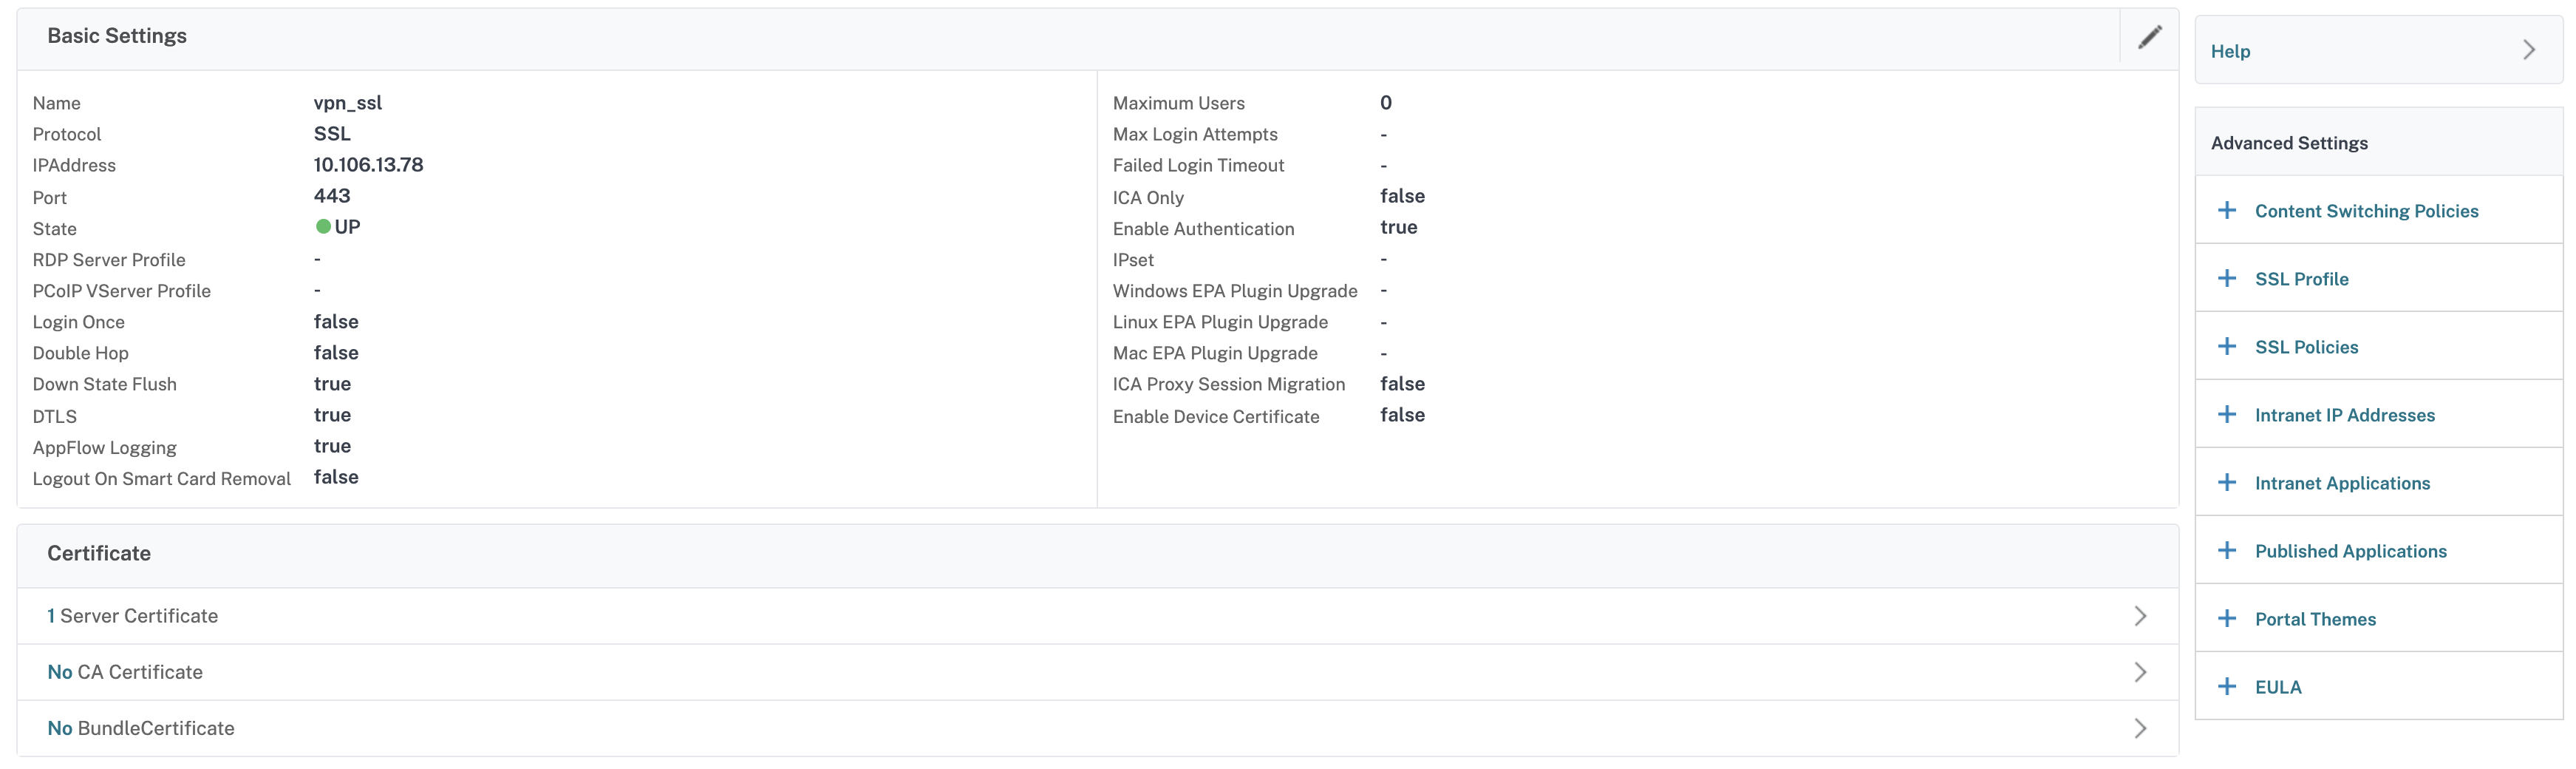
-
Select the No Server Certificate section of the page.

-
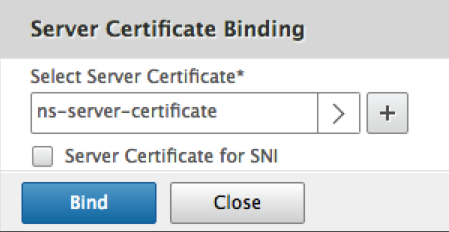
Click > to Select the Server Certificate.
-
Select the SSL Certificate and click the Select button.

-
Click Bind.
-
If you see a warning about No usable ciphers, click OK
-
Click the Continue button.

-
In the Authentication section, click the + icon in the top right.

Create Authentication Virtual Server
-
Navigate to Security -> AAA – Application Traffic -> Virtual Servers.
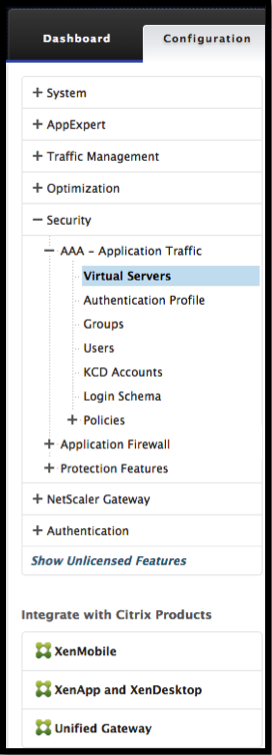
-
Click the Add button.

-
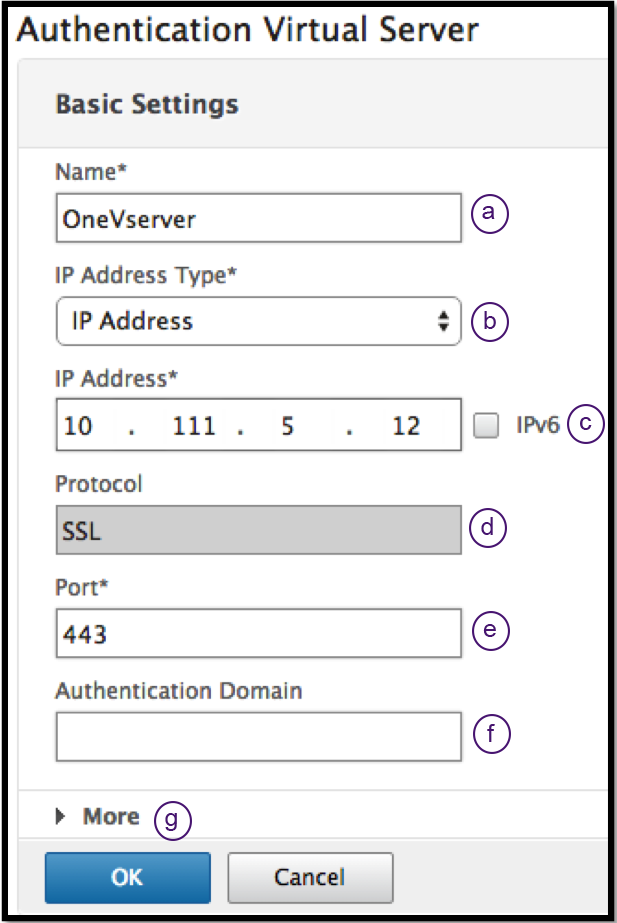
Complete the following Basic Settings to create the Authentication Virtual Server.
Note: The * sign to the right of the setting name indicates mandatory fields.
-
Enter the Name for the new authentication virtual server.
-
Enter the IP Address Type. The IP Address Type can be configured as Non-addressable.
-
Enter the IP Address. The IP Address can be zero.
-
Enter the Protocol type of the authentication virtual server.
-
Enter the TCP Port on which the virtual server accepts connections.
-
Enter the domain of the authentication cookie set by the authentication virtual server.
-
-
Click OK.
-
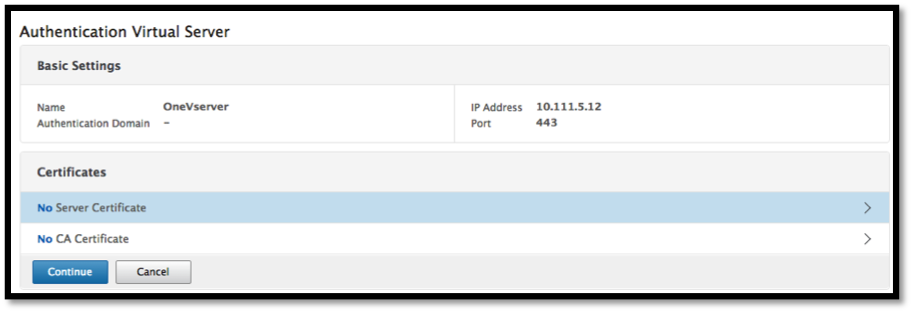
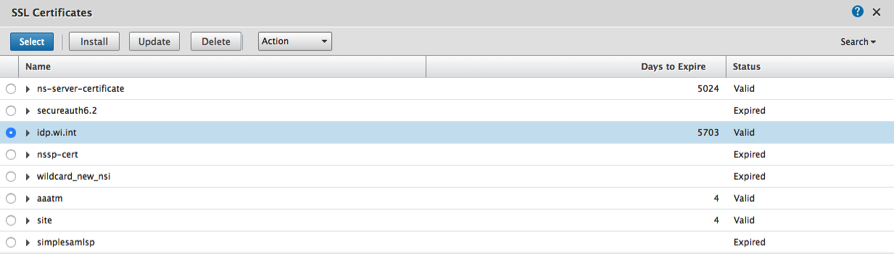
Click the No Server Certificate.
-
Select the desired Server Certificate from the list.
-
Choose the desired SSL Certificate and click the Select button.
Note: The Authentication virtual server does not need a certificate bound to it.
-
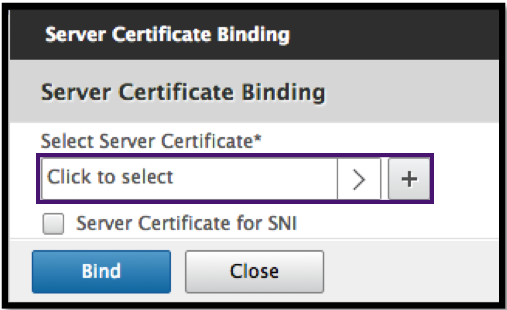
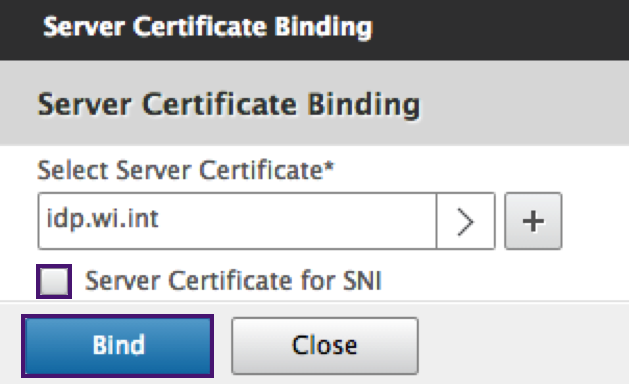
Configure the Server Certificate Binding.
-
Check the Server Certificate for SNI box to bind one or more Cert keys used for SNI processing.
-
Click the Bind button.
-
Create Authentication CERT Profile
-
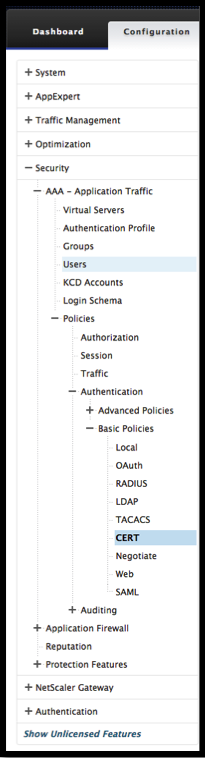
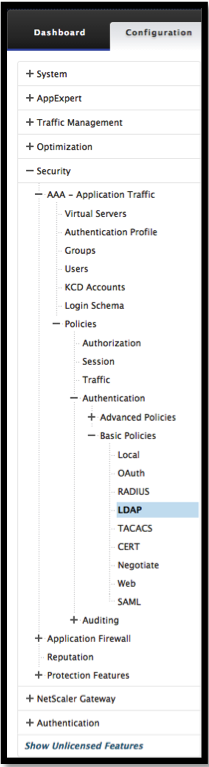
Navigate to Security -> AAA – Application Traffic -> Policies -> Authentication -> Basic Policies -> CERT.
-
Select the Profiles tab and then select Add.

-
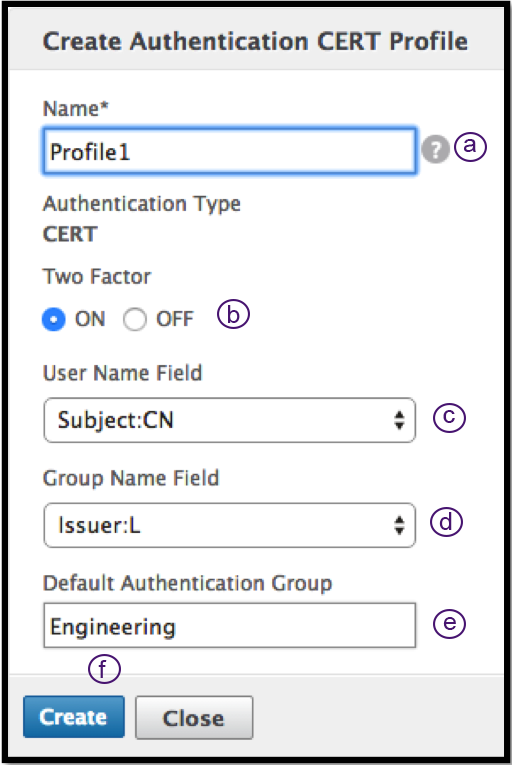
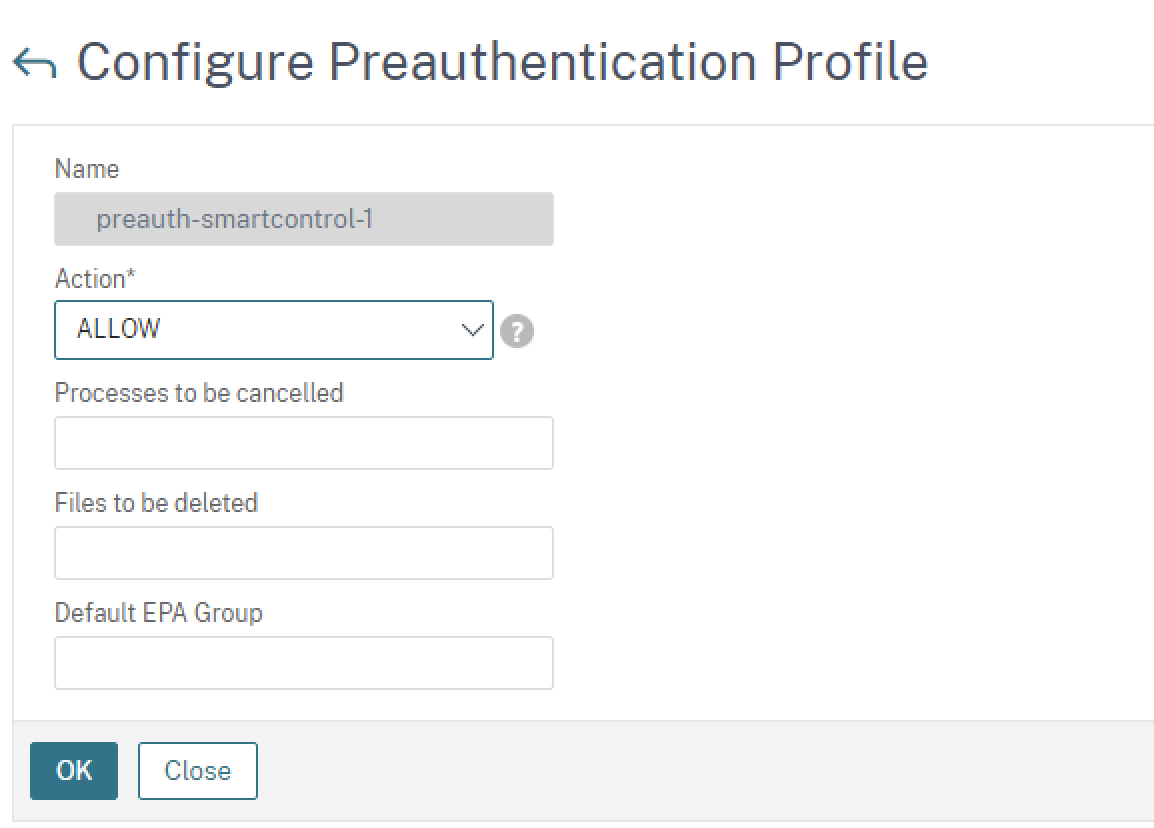
Complete the following fields to create the Authentication CERT Profile. The * sign to the right of the setting name indicates mandatory fields.
-
Name - Name for the client cert authentication server profile (action).
-
Two factor – In this instance the two-factor authentication option is NOOP.
-
User Name Field – enter the client-cert field from which the user name is extracted. Must be set to either ““Subject”” or ““Issuer”” (include both sets of double quotation marks).
-
Group Name Field - enter the client-cert field from which the group is extracted. Must be set to either ““Subject”” or ““Issuer”” (include both sets of double quotation marks).
-
Default Authentication Group - This is the default group that is chosen when the authentication succeeds in addition to the extracted groups.
-
-
Click Create.
Create an Authentication Policy
-
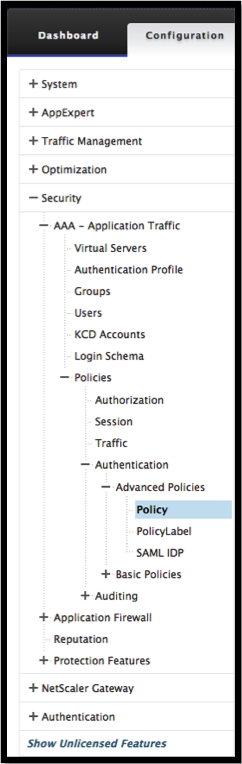
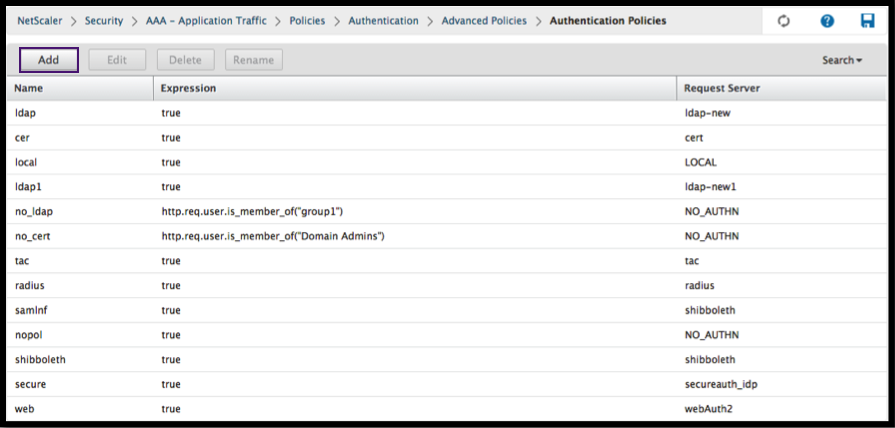
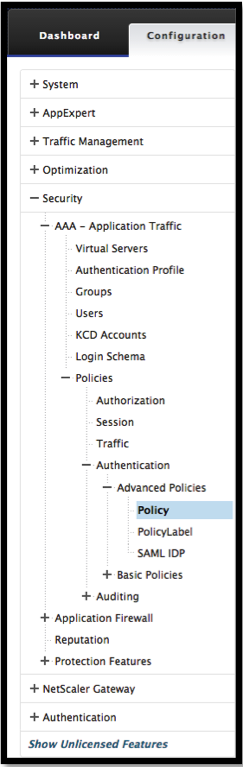
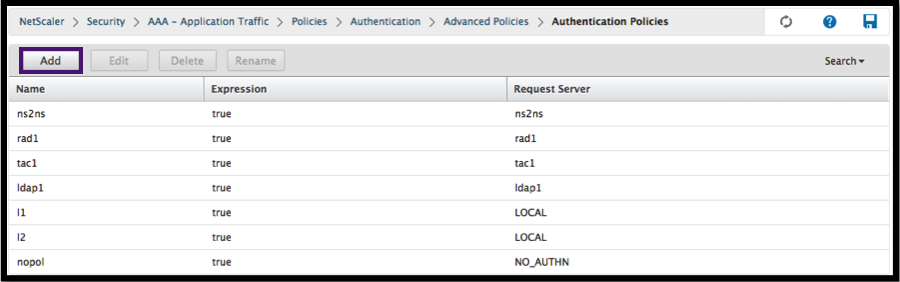
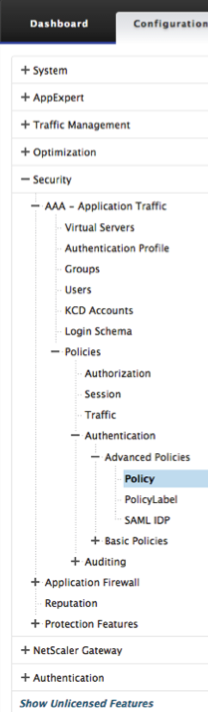
Navigate to Security -> AAA – Application Traffic -> Policies -> Authentication -> Advanced Policies -> Policy.
-
Select the Add button
-
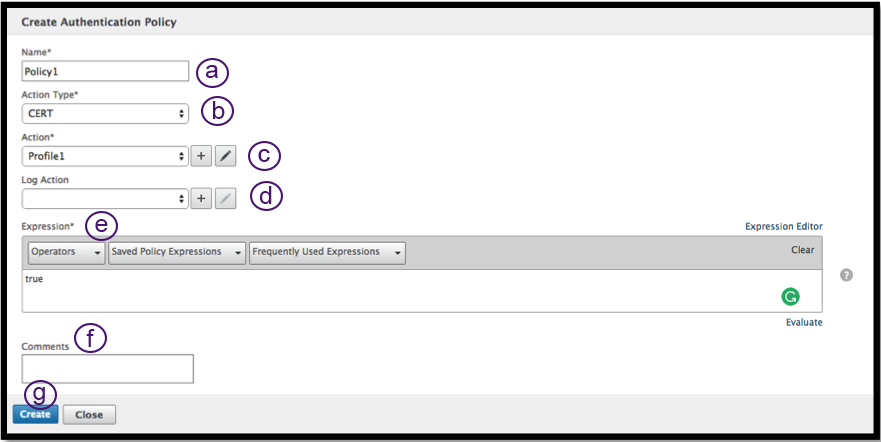
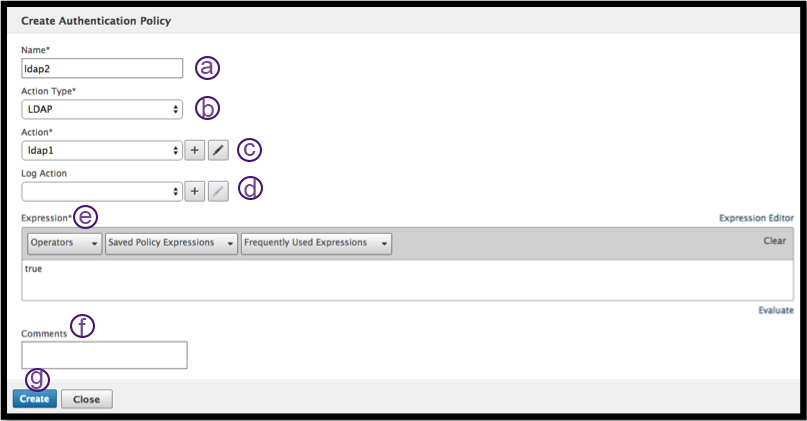
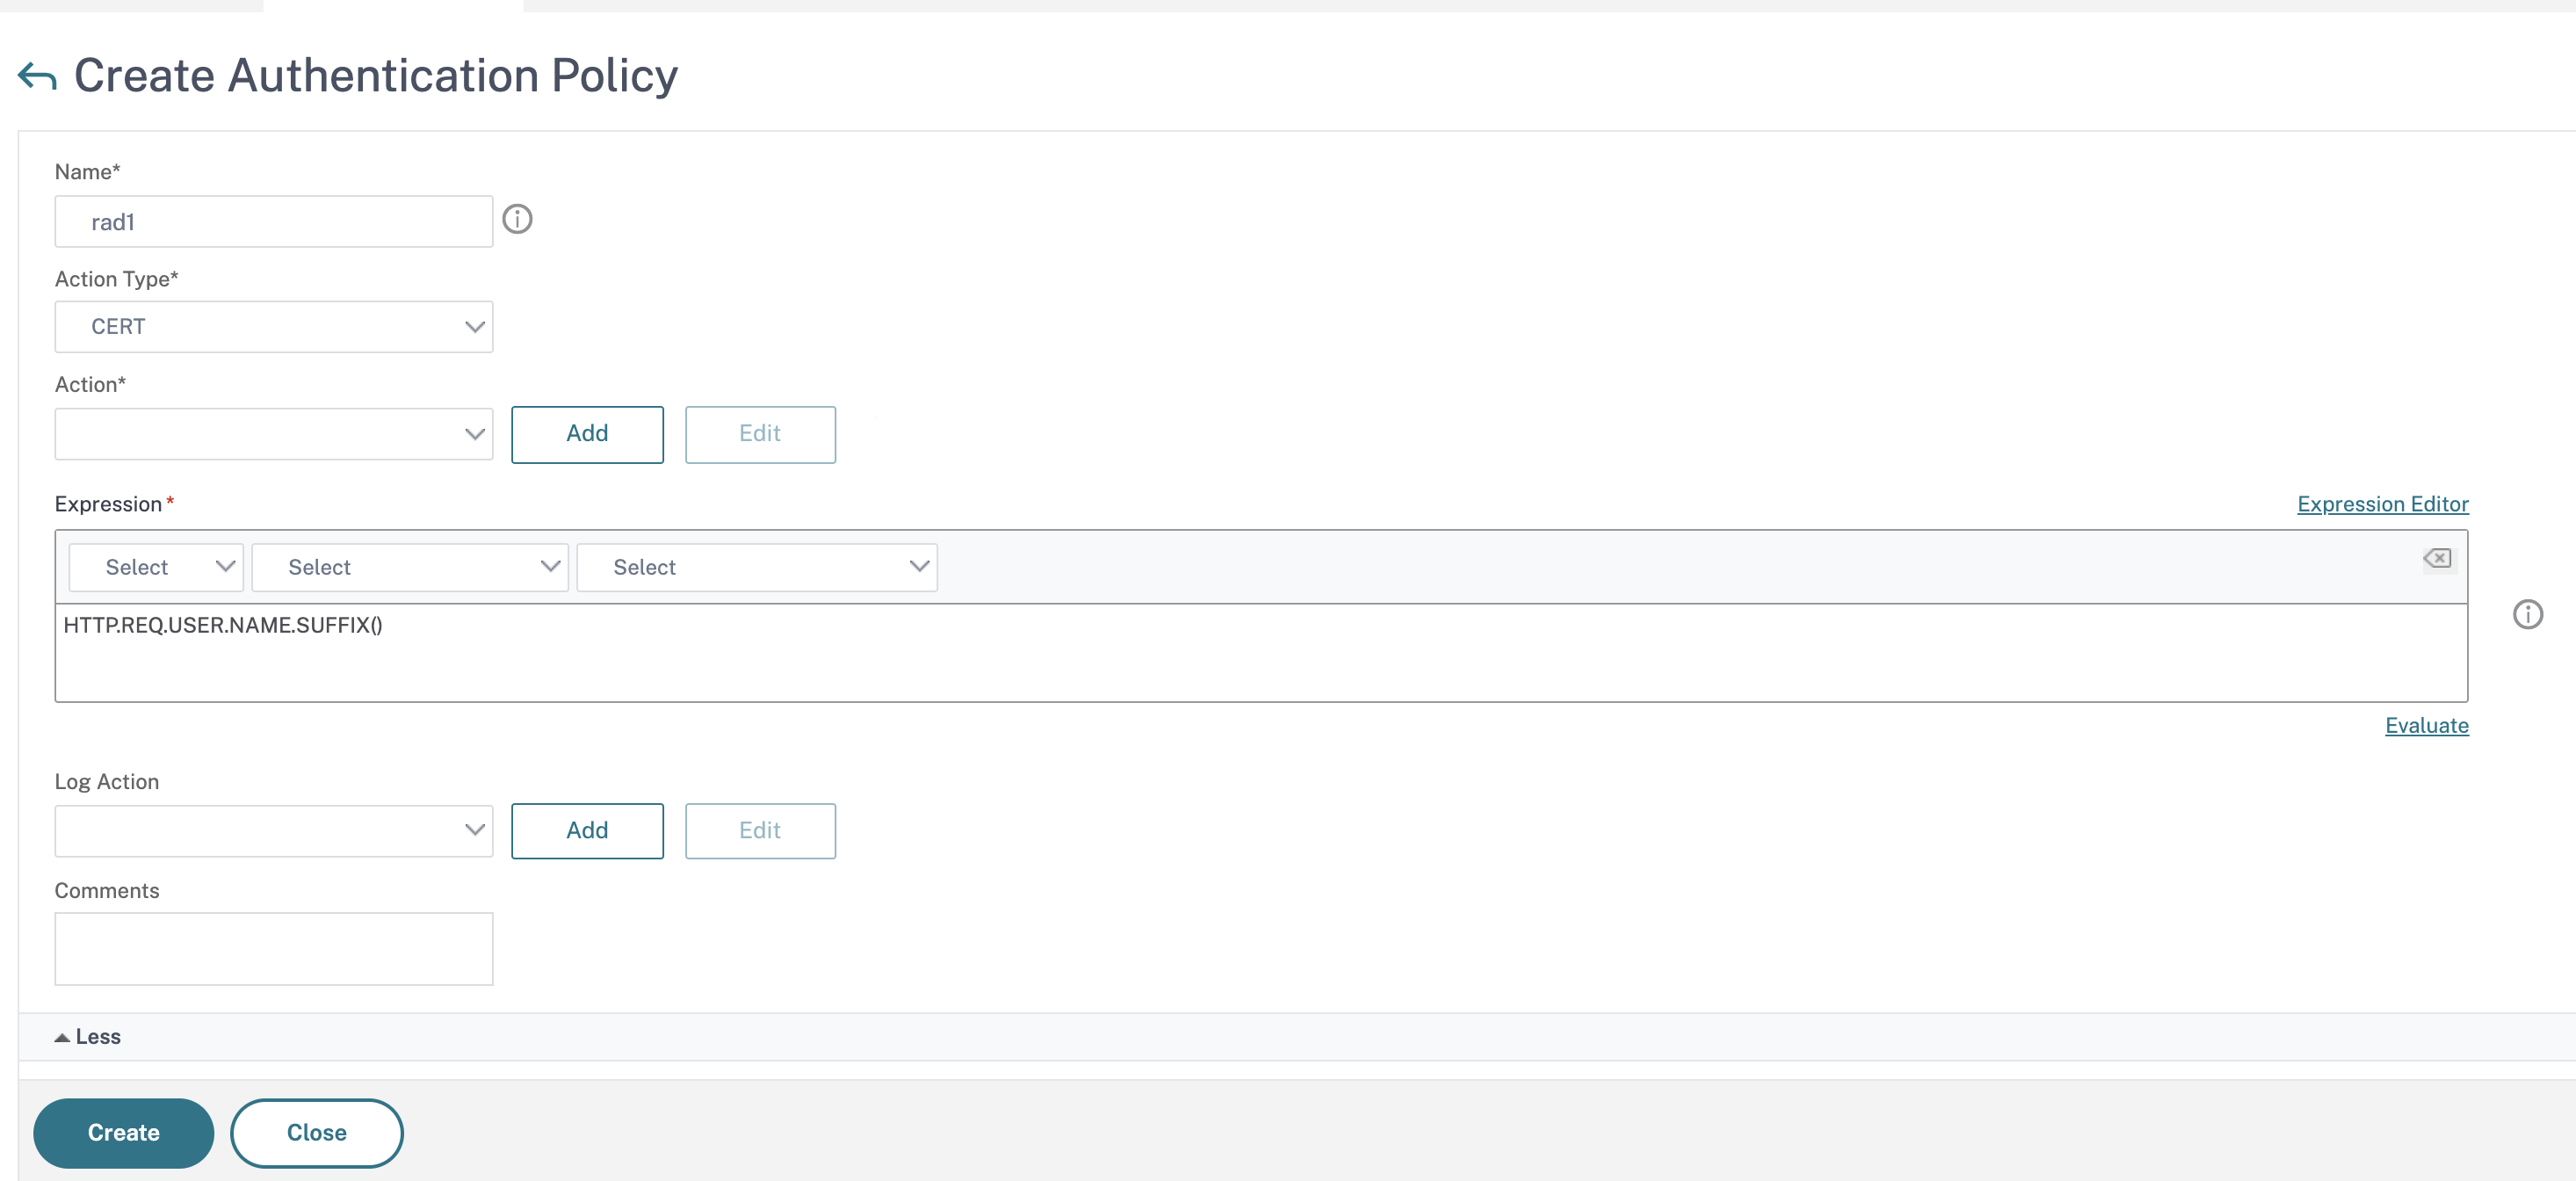
Complete the following information to Create an Authentication Policy. The * sign to the right of the setting name indicates mandatory fields.
a) Name – enter the Name for the advance authentication policy. Must begin with a letter, number, or the underscore character (_), and must contain only letters, numbers, and the hyphen (-), period (.) pound (#), space (), at (@), equals (=), colon (:), and underscore characters. Cannot be changed after the authentication policy is created.
The following requirement applies only to the Citrix ADC CLI: If the name includes one or more spaces, enclose the name in double or single quotation marks (for example, “my authentication policy” or ‘my authentication policy’).
b) Action Type - enter the type of the Authentication Action.
c) Action - enter the name of the authentication action to be performed if the policy matches.
d) Log Action - enter the name of the message log action to use when a request matches this policy.
e) Expression - enter the name of the Citrix ADC named rule, or a default syntax expression, that the policy uses to determine whether to attempt to authenticate the user with the AUTHENTICATION server.
f) Comments – enter any comments to preserve information about this policy.
-
Click Create
Add an LDAP Authentication Server
-
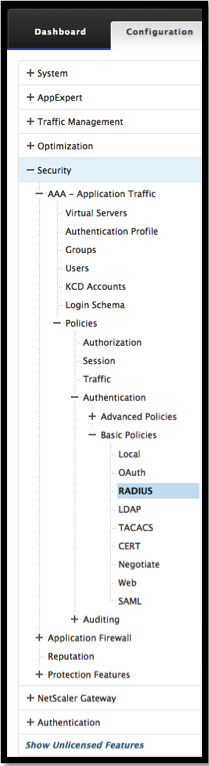
Navigate to Security -> AAA – Application Traffic -> Policies -> Authentication -> Basic Policies -> LDAP.
-
Add an LDAP server by selecting the Server tab and selecting the Add button.

Add an LDAP Authentication Policy
-
Navigate to Security -> AAA – Application Traffic -> Policies -> Authentication -> Advanced Policies -> Policy.
-
Click Add to add an Authentication Policy.
-
Complete the following information to Create an Authentication Policy. The * sign to the right of the setting name indicates mandatory fields.
a) Name - Name for the advance authentication policy. Must begin with a letter, number, or the underscore character (_), and must contain only letters, numbers, and the hyphen (-), period (.) pound (#), space (), at (@), equals (=), colon (:), and underscore characters. Cannot be changed after the authentication policy is created.
The following requirement applies only to the Citrix ADC CLI: If the name includes one or more spaces, enclose the name in double or single quotation marks (for example, “my authentication policy” or ‘my authentication policy’).
b) Action Type - Type of the Authentication Action.
c) Action - Name of the authentication action to be performed if the policy matches.
d) Log Action - Name of message log action to use when a request matches this policy.
e) Expression - Name of the Citrix ADC named rule, or a default syntax expression, that the policy uses to determine whether to attempt to authenticate the user with the AUTHENTICATION server.
f) Comments - Any comments to preserve information about this policy.
-
Click Create
Add a RADIUS Authentication Server
-
Navigate to Security -> AAA – Application Traffic -> Policies -> Authentication -> Basic Policies -> RADIUS.
-
To add a Server select the Servers tab and select the Add button.
-
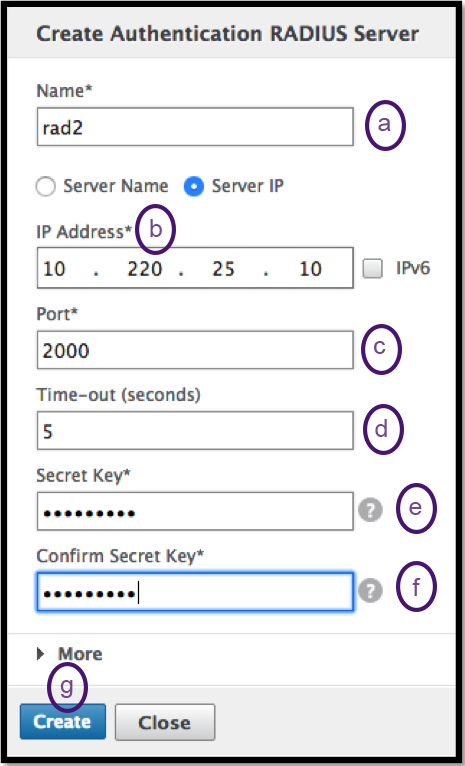
Enter the following to create an Authentication RADIUS Server. The * sign to the right of the setting name indicates mandatory fields.
a) Enter a Name for the RADIUS Action.
b) Enter the Server Name or Server IP Address assigned to the RADIUS server.
c) Enter the Port number on which the RADIUS server listens for connections.
d) Enter the Time-out value in few seconds. This is the value that the Citrix ADC appliance waits for a response from the RADIUS server.
e) Enter the Secret Key that is shared between the RADIUS server and the Citrix ADC appliance. The Secret Key is required to allow the Citrix ADC appliance to communicate with the RADIUS server.
f) Confirm the Secret Key.
-
Click Create
Add a RADIUS Authentication Policy
-
Navigate to Security -> AAA – Application Traffic -> Policies -> Authentication -> Advanced Policies -> Policy.
-
Click Add to create an Authentication Policy.

-
Complete the following information to create an authentication policy. The * sign to the right of the setting name indicates mandatory fields.
a) Name - Name for the advance authentication policy. Must begin with a letter, number, or the underscore character (_), and must contain only letters, numbers, and the hyphen (-), period (.) pound (#), space (), at (@), equals (=), colon (:), and underscore characters. Cannot be changed after the authentication policy is created.
The following requirement applies only to the Citrix ADC CLI: If the name includes one or more spaces, enclose the name in double or single quotation marks (for example, “my authentication policy” or ‘my authentication policy’).
b) Action Type - Type of the Authentication Action.
c) Action - Name of the authentication action to be performed if the policy matches.
d) Log Action - Name of message log action to use when a request matches this policy.
e) Expression - Name of the Citrix ADC named rule, or a default syntax expression, that the policy uses to determine whether to attempt to authenticate the user with the AUTHENTICATION server.
f) Comments - Any comments to preserve information about this policy.
-
Click OK
-
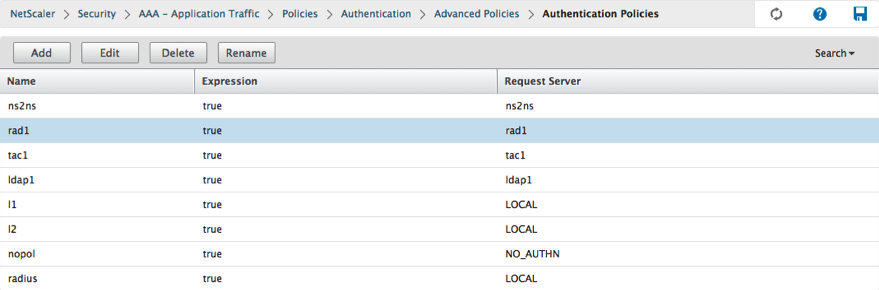
Verify that your Authentication Policy is listed.
Create an Authentication Login Schema
-
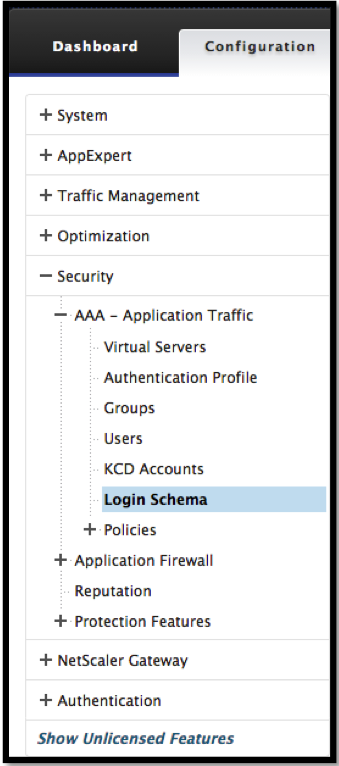
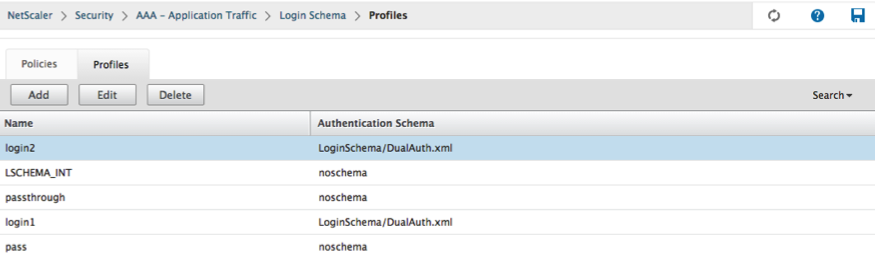
Navigate to Security -> AAA – Application Traffic -> Login Schema.
-
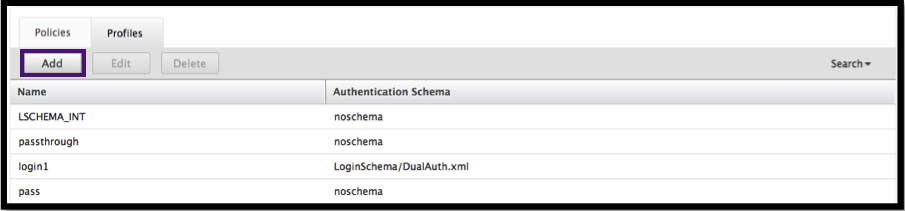
Select the Profiles tab and Click the Add button.
-
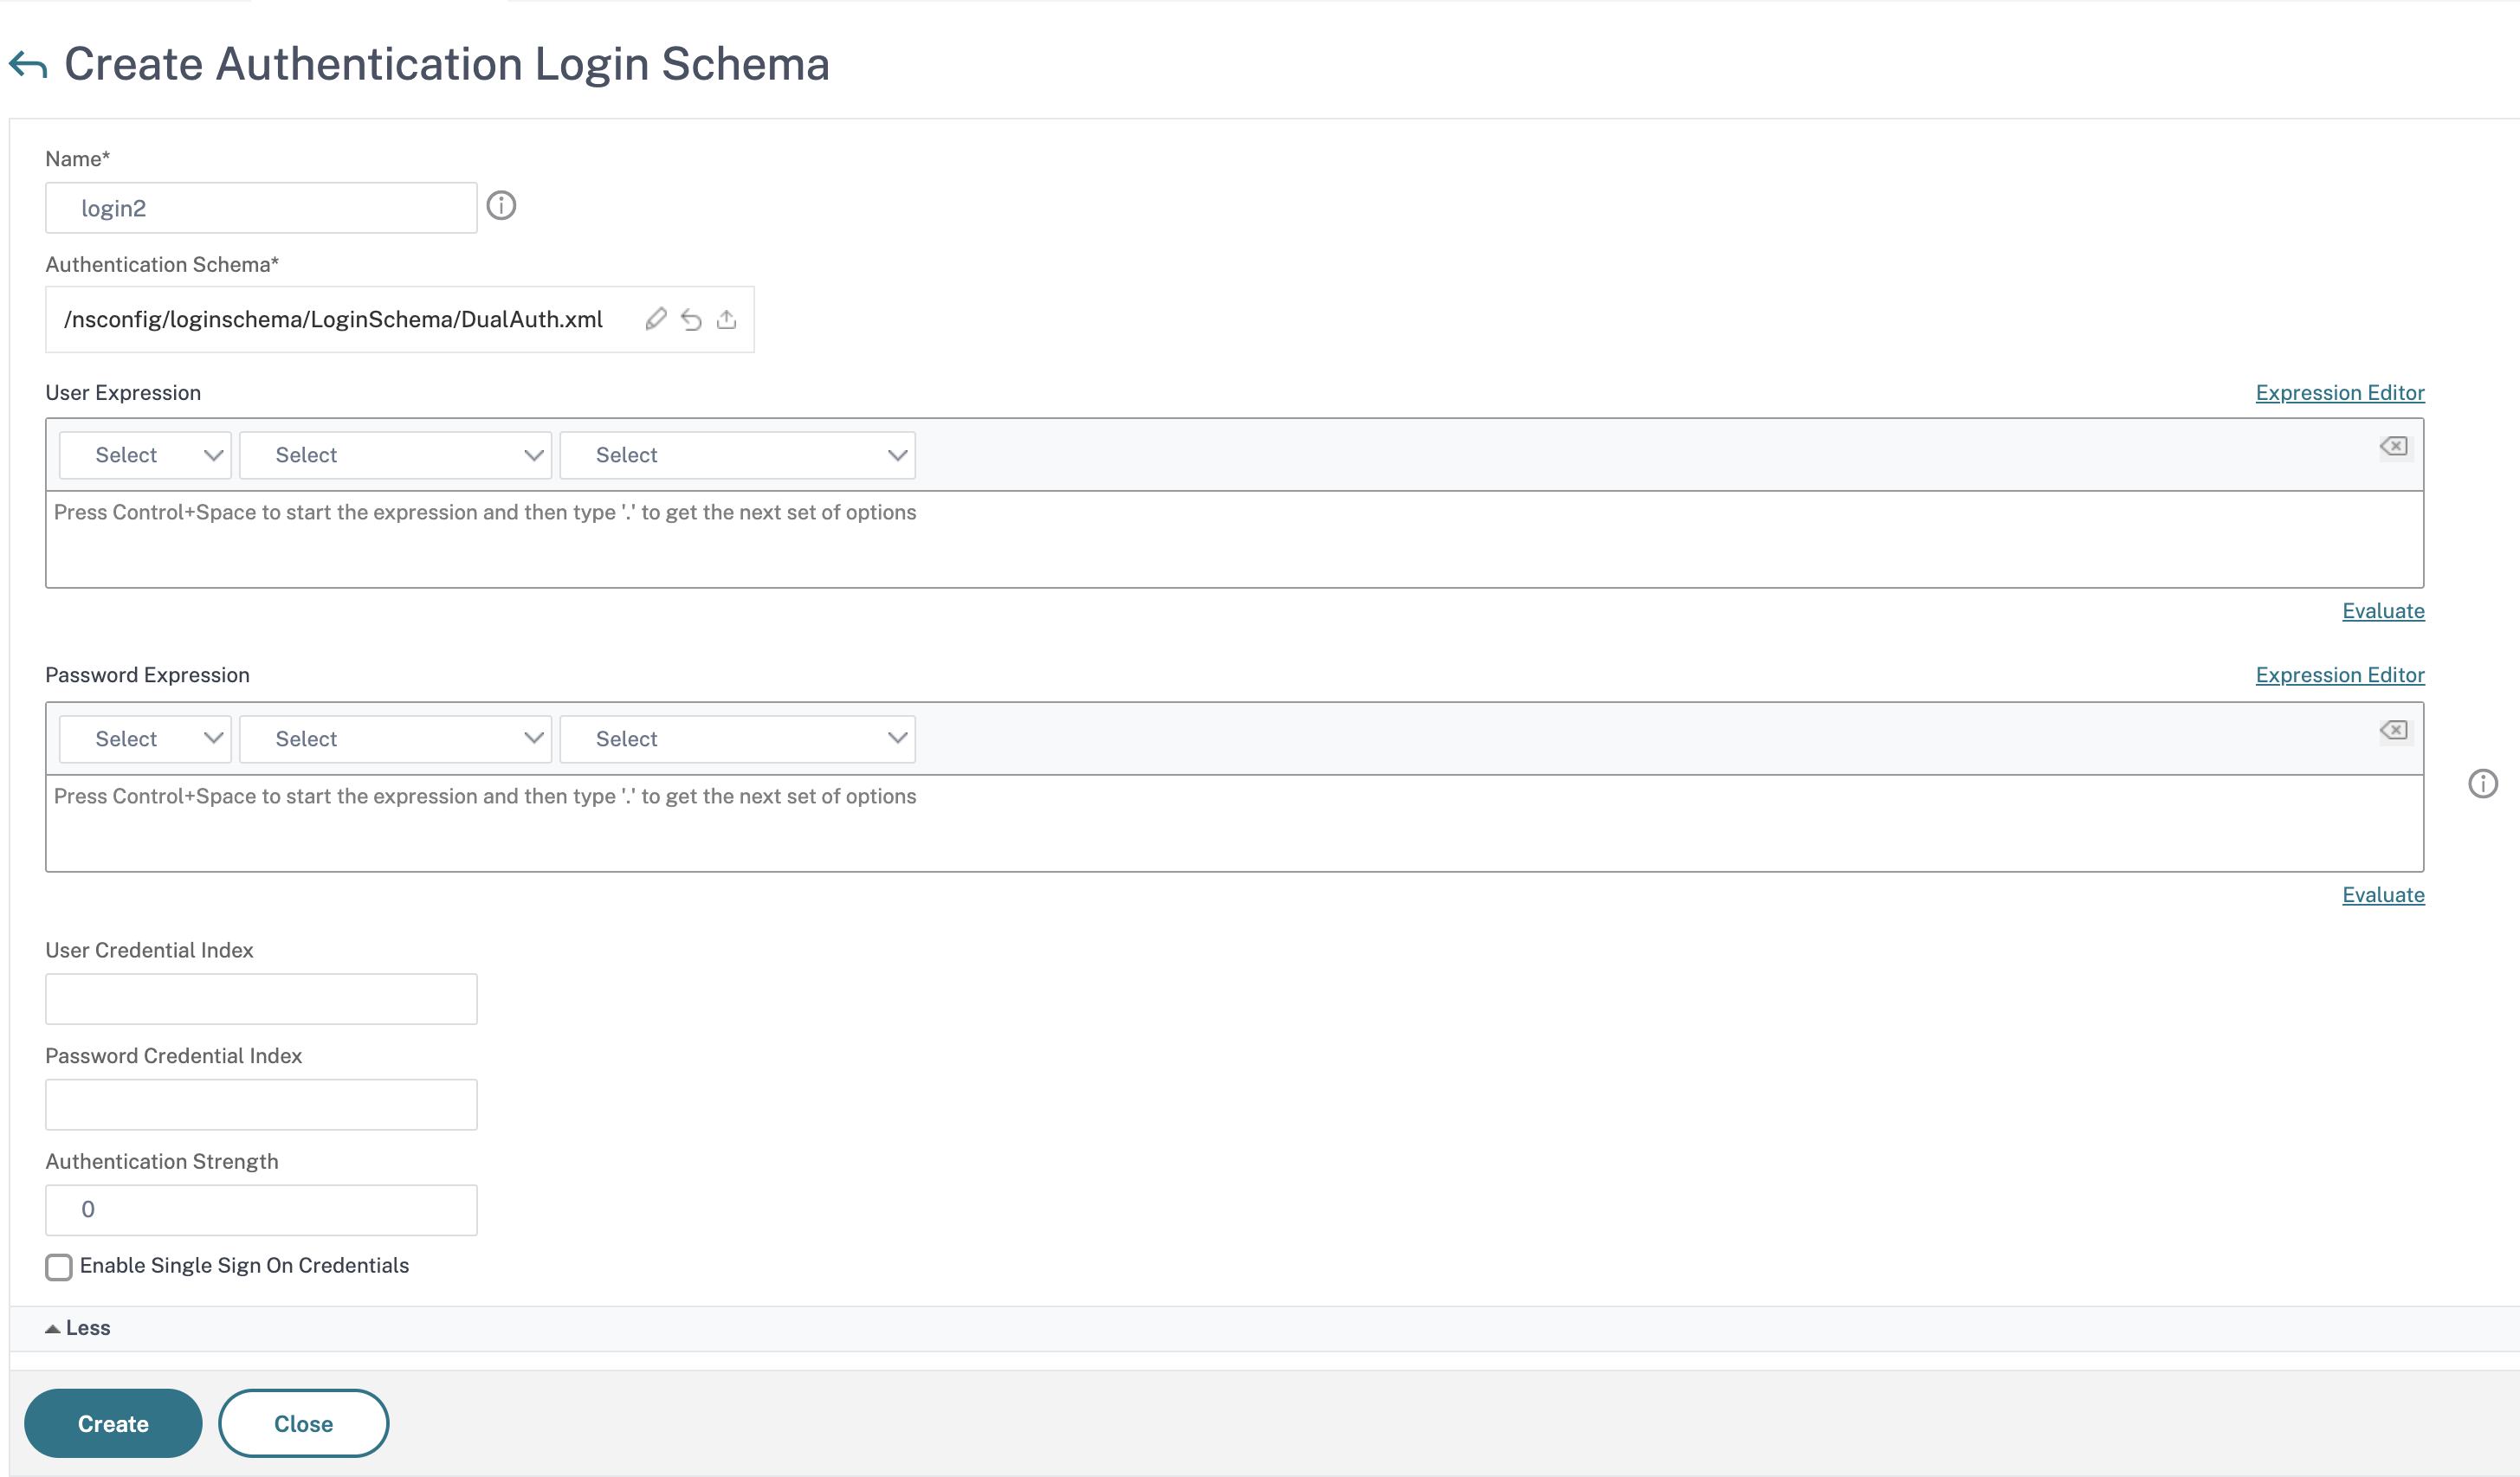
Complete the following fields to create an authentication login schema:
a) Enter Name – this is the name for the new login schema.
b) Enter Authentication Schema - this is the name of the file for reading an authentication schema to be sent for Login Page UI. This file must contain the xml definition of the elements as per the Citrix Forms Authentication Protocol to be able to render the login form. If an administrator does not want to prompt users for other credentials but continue with previously obtained credentials, then
noschemacan be given as an argument. This applies only to loginSchemas that are used with user-defined factors, and not the virtual server factorc) Enter User Expression - The expression for the user name extraction during login
d) Enter Password Expression - this is the expression for password extraction during login
e) Enter User Credential Index - this is the index at which the user entered user name must be stored in session.
f) Enter Password Credential Index - this is the index at which the user entered password must be stored in session.
g) Enter Authentication Strength - this is the weight of the current authentication.
-
Click Create
- Verify that your Login Schema Profile is listed.
Create a Policy Label
A policy label specifies the authentication policies for a particular factor. Each policy label corresponds to a single factor. The policy label specifies the login form that must be presented to the user. The policy label must be bound as the next factor of an authentication policy or of another authentication policy label. Typically, a policy label includes authentication policies for a specific authentication mechanism. However, you can also have a policy label that has authentication policies for different authentication mechanisms.
-
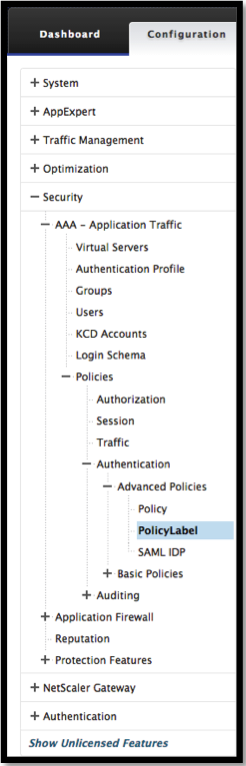
Navigate to Security -> AAA – Application Traffic -> Policies -> Authentication -> Advanced Policies -> Policy Label.
-
Click the Add button.

-
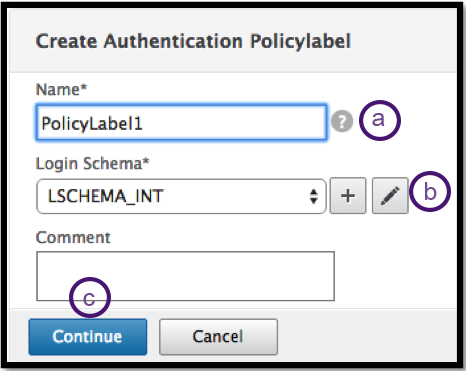
Complete the following fields to create an authentication policy label:
a) Enter the Name for the new authentication policy label.
b) Enter the Login Schema associated with the authentication policy label.
c) Click Continue.
-
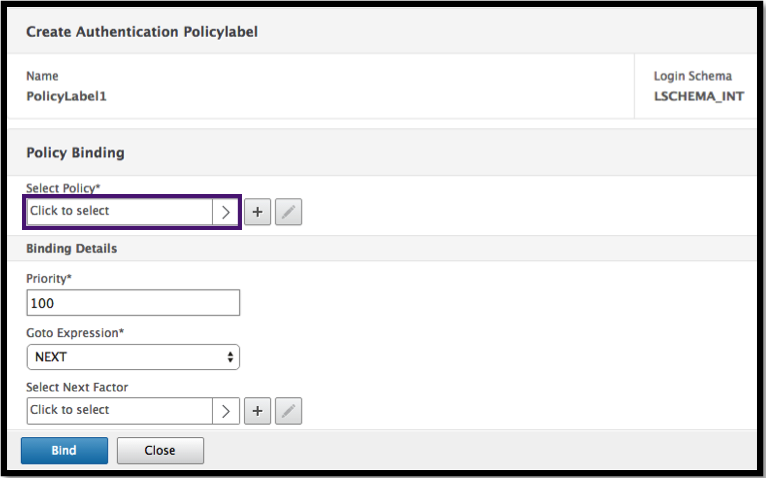
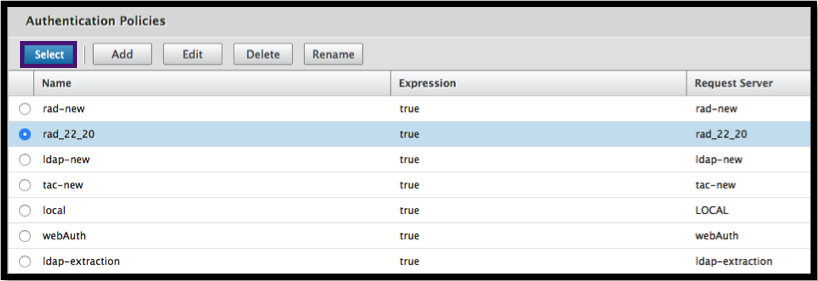
Select a Policy from the drop-down menu.
-
Choose the desired Authentication Policy and click the Select button.
-
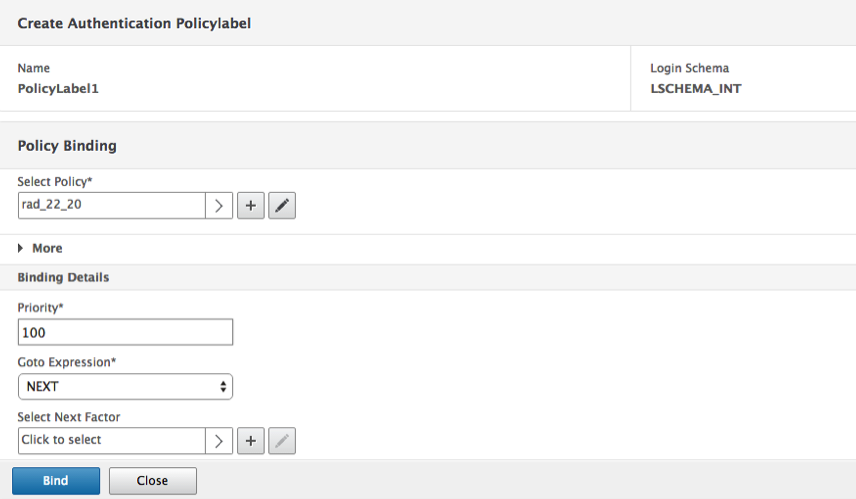
Complete the following fields:
a) Enter the Priority of the policy binding.
b) Enter the Goto Expression – the expression specifies the priority of the next policy that will be evaluated if the current policy rule evaluates to TRUE.
-
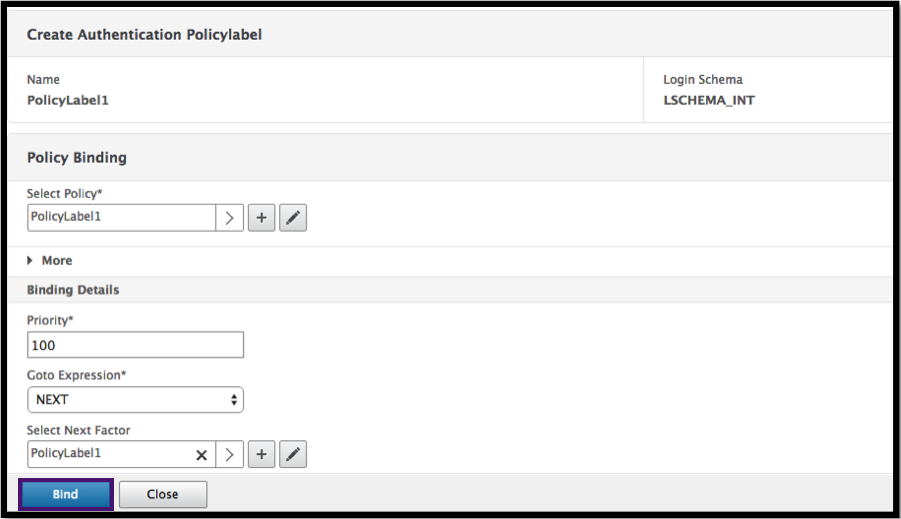
Select the desired Authentication Policy and click the Select button.

-
Click the Bind button.
-
Click Done.
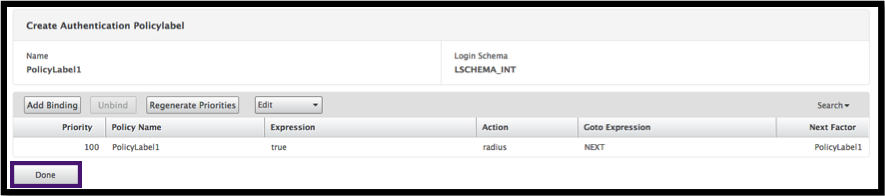
-
Review the Authentication Policy Label.

In this article
- Use cases
- Authentication Response Handling
- Client Support
- Command Line Configuration
- Interop Challenges
- End Point Analysis (EPA)
- Misconfiguration Considerations
- Defining Citrix Clients
- Restricting nFactor for Gateway
- LoginSchema
- LoginSchema and nFactor Knowledge Required
- Configuring Dual Factor Authentication Without Using LoginSchema
- User name Password Expressions
- High-level steps in nFactor configuration
- GUI Configuration
- Create a Virtual Server
- Create Authentication Virtual Server
- Create Authentication CERT Profile
- Create an Authentication Policy
- Add an LDAP Authentication Server
- Add an LDAP Authentication Policy
- Add a RADIUS Authentication Server
- Add a RADIUS Authentication Policy
- Create an Authentication Login Schema
- Create a Policy Label