Configuring the virtual path service between the MCN and client sites
The next step is to configure the Virtual Path Service between the MCN and each of the client (branch) sites. To do this, you use the configuration forms and settings available in the Connections section configuration tree of the Configuration Editor.
To configure the Virtual Path Service between the MCN and a client site, do the following:
- Continuing in the Configuration Editor, click the Connections tab. This displays the Connections section configuration tree.
-
Select the MCN from View Site drop-down menu in the Connections section page. This opens the MCN site in the Connections configuration.
Note
WAN to WAN Forwarding Groups are supported only within a Region and not across Regions. You can use Regions to segregate networks instead of relying on WAN to WAN forwarding groups.
-
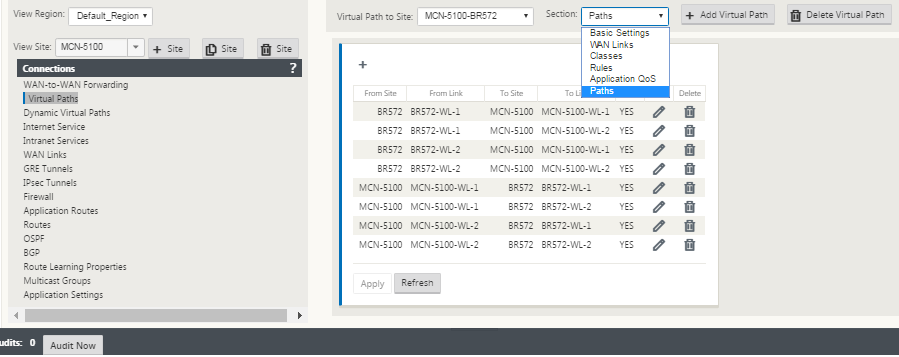
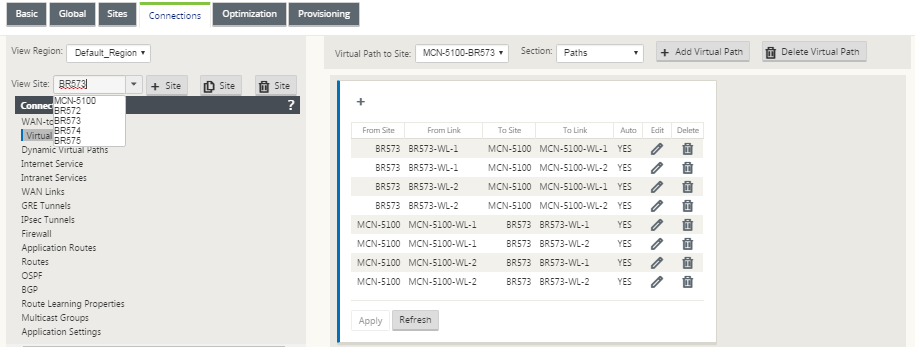
Click Virtual Paths. This opens the Virtual Paths configuration section (child branch) for the MCN site. This section provides settings and forms for configuring the Virtual Path Service between the MCN and each of the Virtual WAN client sites. The following figure shows an example Virtual Paths section for an MCN site.
The following figure shows an example Dynamic Virtual Paths section for a Branch site.
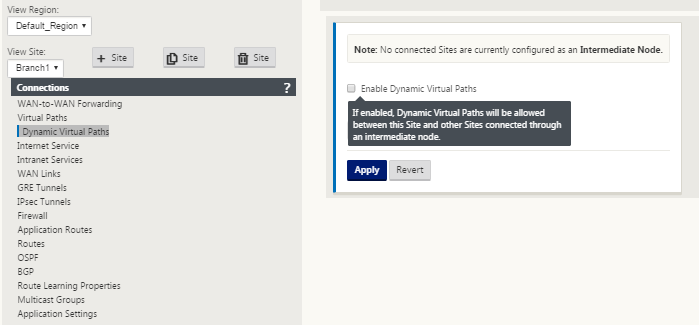
The Dynamic Virtual Paths section allows configuring the following:
-
Dynamic Virtual Paths – (Optional) The settings in this section allow you to enable and disable Dynamic Virtual Paths, and set the maximum allowable Dynamic Virtual Paths for the site. Dynamic Virtual Paths are Virtual Paths that are established directly between sites, based on a configured threshold. The threshold is typically based on the amount of traffic occurring between those sites. Dynamic Virtual Paths are operational only after the specified threshold is reached. Dynamic Virtual Paths are not required for normal operation, so configuring this section is optional.
-
<MCN_Site_Name>_<Branch_Site_Name> – The system initially automatically adds a static Virtual Path between the MCN and a client site, as this Virtual Path is required. The name for the path uses the following form:
<MCN_Site_Name>_<Branch_Site_Name>
Where:
MCN_Site_Name is the name of the MCN for this Virtual WAN.
Branch_Site_Name is the name of a client site identified in the current configuration package.
User configurable default settings are initially applied to the static Virtual Path, as defined in the Virtual Path > Default Sets section of the Connections configuration tree. However, you can customize or add to the defined Default Sets, and also customize the configuration for a specific site and Virtual Path.
Note
To add more static Virtual Paths for a site, you must do so manually. Instructions for manually adding a static Virtual Path are included in the steps as follows.
-
-
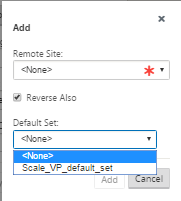
Click + Add Virtual Path next to the name of the static Virtual Path in the Virtual Paths section. This reveals more configuration for the static Virtual Path:
- Remote Site – This section enables you to view and configure the Virtual Path settings from the perspective of a remote site. You can view, customize, and add Class or Rules as required for this specific Virtual Path. You can also add Virtual Paths to the remote site, as needed.
- Reverse Also - When enabled, classes, and rules are mirrored on both sites the virtual path.
- Default Set - Name of the Virtual Path default set that are used to populate rules and classes for the virtual path on the site.
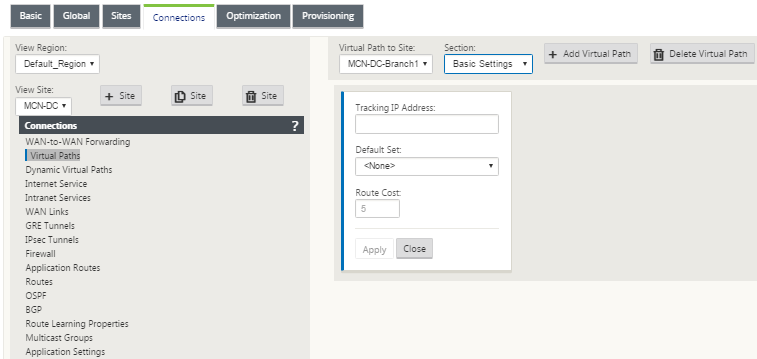
The following figure shows an example MCN static Virtual Path branch and child branches.
-
Select Paths from the Section drop-down menu.
-
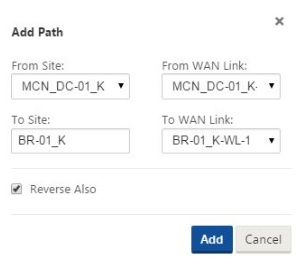
Click + (Add) above the Paths table.
This displays the Add Path dialog box (configuration form).
-
Specify the source and destination site information for the new Virtual Path.
-
Specify the following from the available drop-down menus:
Note
Depending on how the WAN links are configured for the sites, some fields are read-only. Fields that are configurable provide a drop-down menu of the available selections.
- From Site – This is the source site for the Virtual Path. For the required static Virtual Path, this is configured as the MCN site by default.
- From WAN Link – This is the originating WAN Link for the Virtual Path.
-
To Site – This is the destination site for the Virtual Path.
- To WAN Link – This is the destination WAN link for the Virtual Path.
-
Click Add.
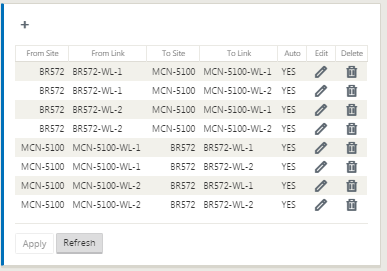
This adds the configured Virtual Path to both the MCN and the associated client site in the Connections > Virtual Paths tree. This also automatically opens the Paths settings configuration form for the From Site for the Virtual Path (in this case, the MCN).
-
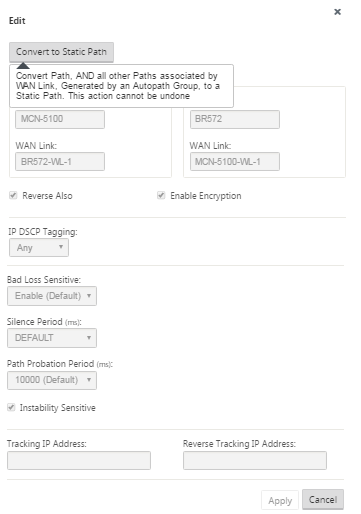
Click Edit (pencil icon), to the right of the MCN-to-client Virtual Path label. This opens the Virtual Path Service configuration form for editing.
-
Configure the settings for the Virtual Path, or accept the defaults.
The Paths configuration form contains the following settings:
-
From Site section:
-
Site – This is the source site for the Virtual Path. For the required static Virtual Path, this is configured as the MCN site by default.
-
WAN Link – This is the originating WAN Link for the Virtual Path.
-
-
To Site section:
-
Site – This is the destination site for the Virtual Path.
-
WAN Link – This is the destination WAN link for the Virtual Path.
-
-
Reverse Also - Select this checkbox to enable Reverse Also for this Virtual Path. If enabled, the system automatically builds a Virtual Path in the opposite direction of the configured path, using the same WAN links as configured for the original path.
-
IP DSCP Tagging – Select a tag from the drop-down menu. This specifies the DSCP tag to set in the IP header for traffic traveling over this Virtual Path.
-
Enable Encryption – Select this checkbox to enable encryption of packets sent along this Virtual Path.
-
Bad Loss Sensitive – Select a setting from the drop-down menu. The options are:
-
Enable– (Default) If enabled, paths are marked BAD due to loss, and will incur a path scoring penalty.
- Disable – Disabling Bad Loss Sensitive can be useful when the loss of bandwidth is intolerable.
-
Custom – Select Custom to specify the percentage of loss over time required to mark a path as BAD. Selecting this option reveals the following more settings:
-
Percent Loss (%) – This specifies the percentage of loss threshold before a path is marked BAD, as measured over the specified time. By default, the percentage is based on the last 200 packets received.
-
Over Time (ms) – Specify the time period (in milliseconds) over which to measure packet loss. Select an option between 100 and 2000 from the drop-down menu for this field.
-
- Silence Period (ms) – This specifies the duration (in milliseconds) before the path state transitions from GOOD to BAD.
The default is 150 milliseconds. Select an option between 150 and 1000 from the drop-down menu for this field.
-
Path Probation Period (ms) – This specifies the wait time (in milliseconds) before a path transitions from BAD to GOOD. Select an option between 500 and 60000 from the drop-down menu for this field. The default is 10,000 milliseconds.
-
Instability Sensitive – Select this checkbox to enable. If enabled, latency penalties due to a path state of BAD and other latency spikes are considered in the path scoring algorithm.
-
Tracking IP Address – Enter a Virtual IP Address on the Virtual Path that can be pinged to determine the state of the path.
-
Reverse Tracking IP Address – If Reverse Also is enabled for the Virtual Path, enter a Virtual IP Address on the path that can be pinged to determine the state of the reverse path.
-
-
-
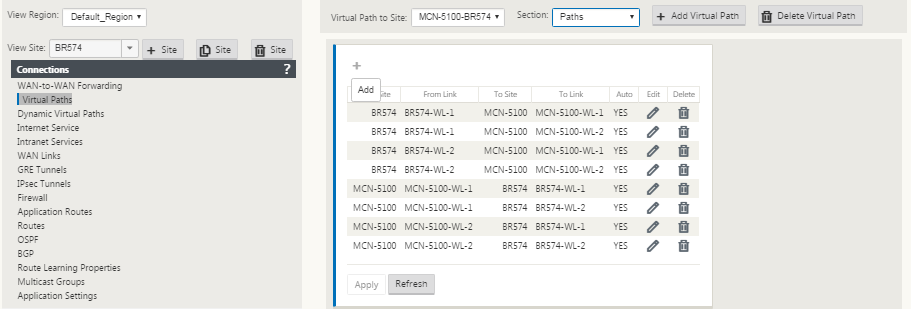
Click Apply. This reveals that the two new From Site and To Site Virtual Paths between the MCN and the client site have been added to the Paths table.
-
Repeat the steps above for each branch you want to connect to the MCN.
Next, you have the option of customizing the Virtual Paths configurations for the client sites, as well as adding and configuring more paths between clients. Instructions are provided in the remaining steps, below.
-
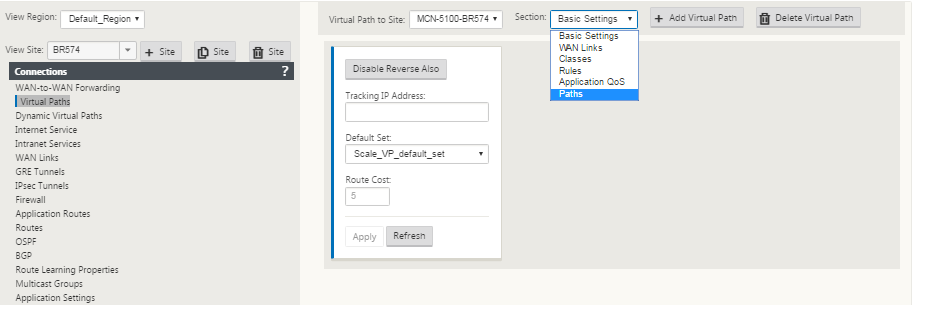
Select a client site branch from the View Site drop-down menu. The configuration for client site branch in the Connections tree opens.
-
Navigate to the Paths settings configuration form for any client site Virtual Path you want to configure.
To navigate to the Paths settings form for the client site, do the following:
-
Select Paths from the Section tab of branch page for the client site.
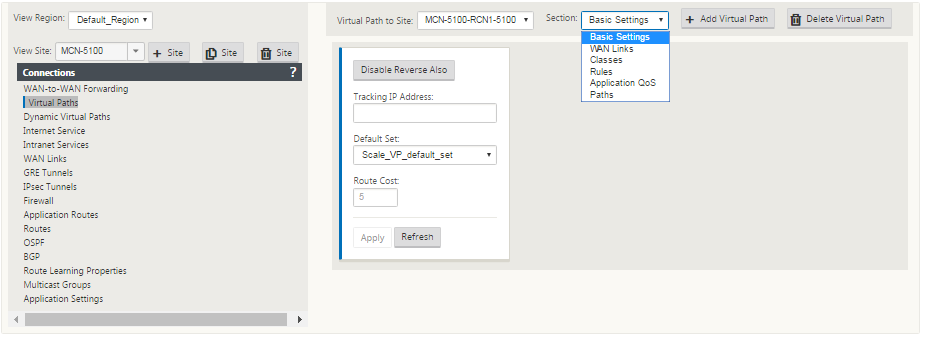
The following figure shows an example Paths settings form for the new From Site path added in the previous steps.
-
Configure the settings for each path you want to customize. Follow the same steps as you did to configure the Virtual Paths for the MCN site.
This completes the basic configuration of the Virtual Paths between the client sites and the MCN.
Note
For information on configuring more settings in the Connections or Provisioning sections of the Configuration Editor, please refer to the Management Web Interface online help for those sections. If you do not want to configure these settings currently, you can proceed to the appropriate step indicated below.
The next step depends on the SD-WAN Edition license you have activated for your deployment, as follows:
-
SD-WAN Premium (Enterprise) Edition – The Premium (Enterprise) Edition includes the full set of WAN Optimization features. If you want to configure WAN Optimization for your sites, please proceed to the Enabling and Configuring WAN Optimization topic. Otherwise, you can proceed directly to Installing the SD-WAN Appliance Packages on the Clients.
-
SD-WAN Edition – This Edition does not include the WAN Optimization features. You can now proceed directly to Installing the SD-WAN Appliance Packages on the Clients.