Configuration
Use the Citrix Secure Internet Access™ (CSIA) configuration policy portal to configure cloud connectors and security policies, and to monitor reports and logs.
To access the configuration policy portal:
-
Sign in to Citrix Cloud™
-
On the Secure Internet Access tile, select Manage
-
In the navigation pane, select Configuration
The Configuration page also lists the details about the cloud nodes that have been configured for you. All the configurations that you perform are connected to these nodes.
-
Select Open Citrix® SIA Configuration to view the configuration policy portal and start configuring the features and security policies

How to get help on configuration
For instructions on configuration or help with any configuration page, you can do one of the following:
-
Access help documentation. On the top right corner of the configuration policy portal, click the menu (where your name appears) and select HelpDocs. You can view the complete help documentation.
Note
The help documentation includes references to iboss terminology, iboss user interface elements, iboss features not supported by Citrix, and iboss Support information.
Review the following article before using the help documentation: Citrix Secure Internet Access and iboss integration. You can access this article only after signing in to Citrix Secure Internet Access.
-
Access contextual help. At the top right corner of each configuration page, select the help icon (?) to view the help documentation pertaining to that page.
-
Contact Citrix Support. Sign in with your Citrix account and open a support case, start a live chat, or explore other options available for receiving help.
Configure Citrix Secure Internet Access Cloud Connector agents
The CSIA Cloud Connector agents are software agents that redirect Internet traffic through Citrix Secure Internet Access.
After your onboarding process is complete, do the following:
-
Install CSIA Cloud Connector agent on Virtual Delivery Agent (VDA): To securely access unsanctioned web and SaaS applications from virtual desktops on Citrix Workspace™, configure CSIA Cloud Connector agents to redirect traffic through Citrix Secure Internet Access.
For detailed configuration steps, see Citrix Secure Internet Access with Citrix Virtual Apps and Desktops.
-
Install CSIA Cloud Connector agent on your host device: To securely access direct Internet traffic from your host systems such as laptop and mobile devices, install Cloud Connector agents on each device.
Configure tunnels for branch office
If you have a Citrix SD-WAN deployment in your branch office, you must configure IPSEC or GRE tunnels. This redirects branch traffic to unsanctioned web and SaaS applications through Citrix Secure Internet Access. You use Citrix SD-WAN Orchestrator™ to configure tunnels.
On Citrix SD-WAN™ Orchestrator, the Citrix Secure Internet Access service is available in Configuration > Delivery Services > Service and Bandwidth.
Note
The service link is only visible if you are an SD-WAN Orchestrator customer and have Citrix Secure Internet Access entitlement.
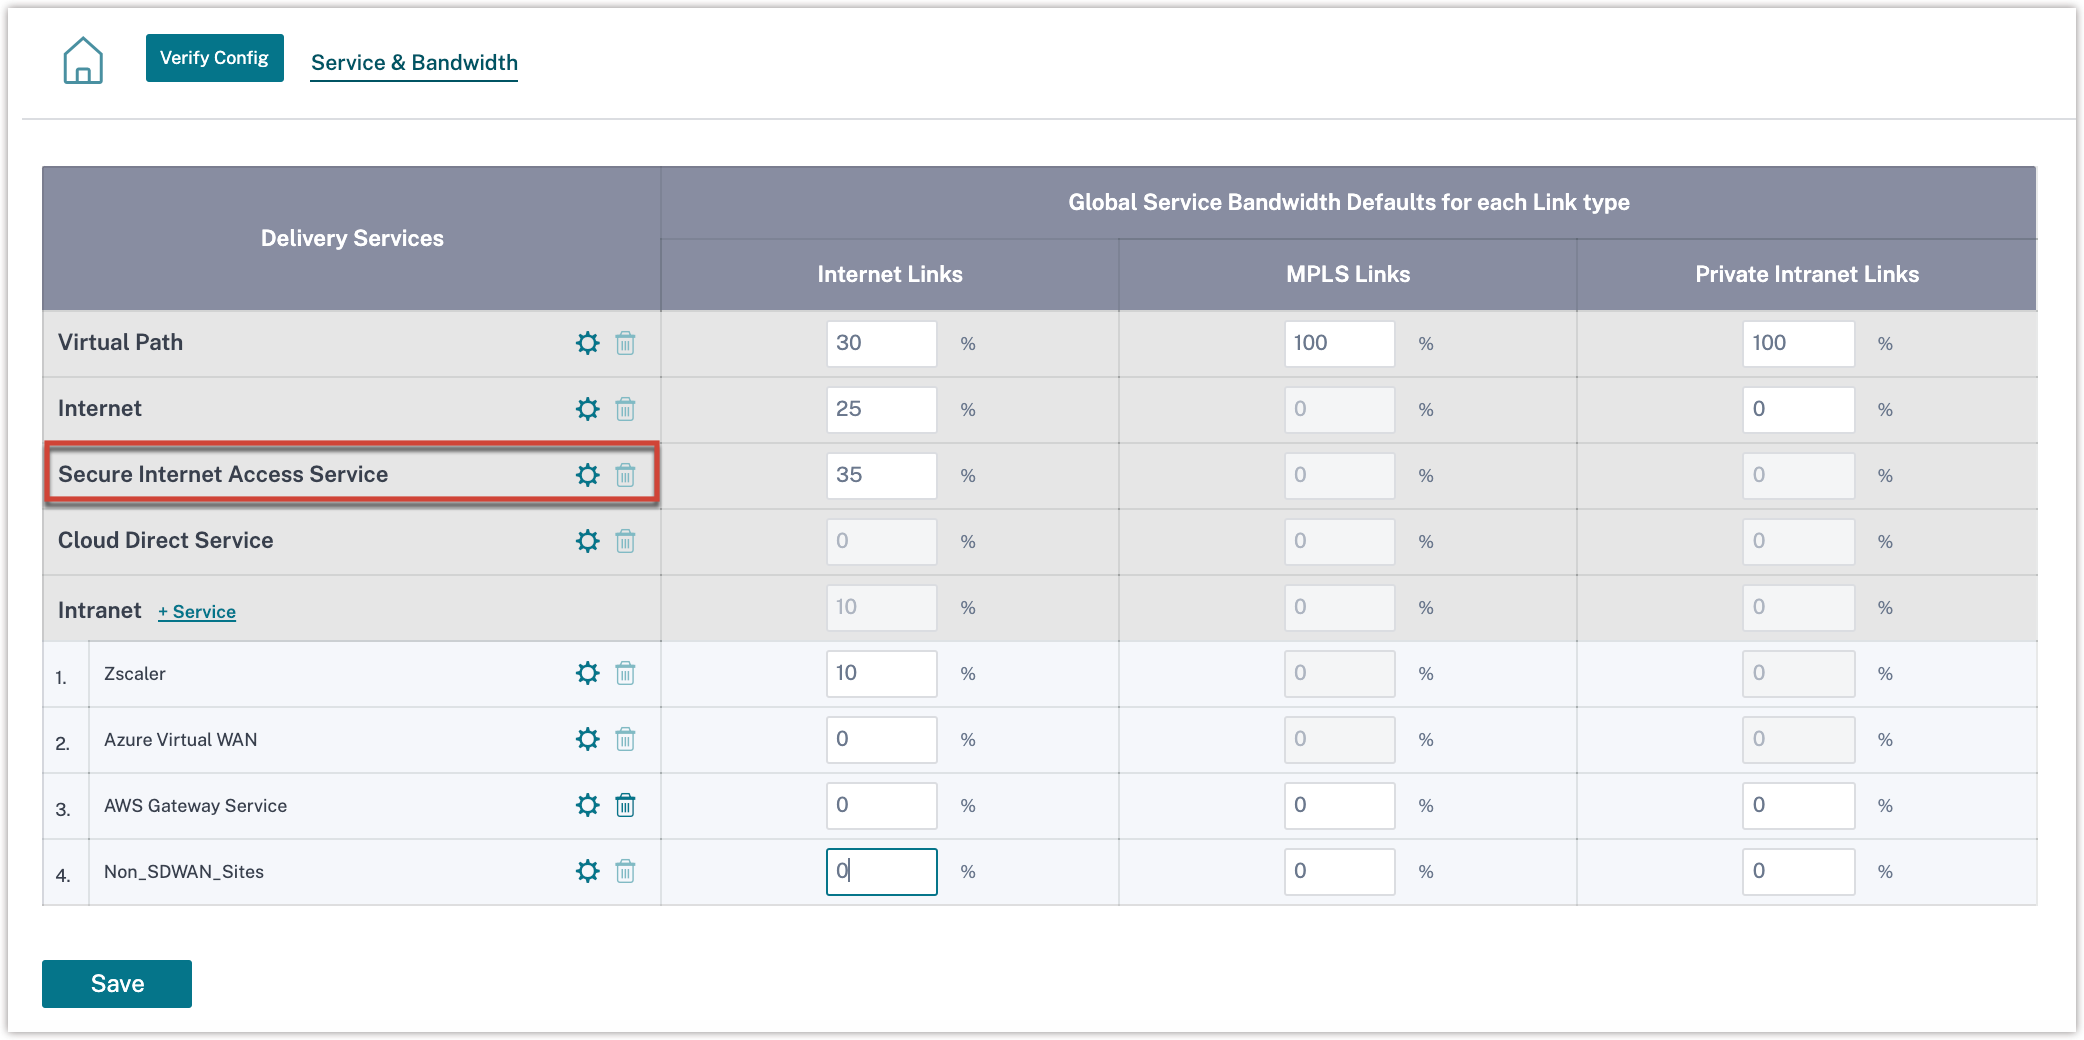
The configuration includes the following high-level steps:
-
Create a Citrix Secure Internet Access service by specifying the bandwidth percentage and provisioning percentage for the Internet Links.
-
Add and map SD-WAN sites to the Citrix Secure Internet Access service and select the appropriate tunnel (IPSEC or GRE). Then, activate the configuration to enable tunnel establishment between Citrix SD-WAN and the Citrix Secure Internet Access PoP.
-
Create application routes to steer traffic through the tunnels.
For detailed instructions, see Delivery services - Citrix Secure Internet Access service.
User reallocation
You can minimize latency for users in particular locations by redistributing cloud nodes within a geographical region.
You can make a request to redistribute both reporting nodes that collect usage data and gateway nodes that perform security functions. Citrix aims to deliver nodes closest to users based on node availability.
Important
Reallocation of nodes causes a brief disruption in the service. The operation is typically performed immediately after account activation, before client connectors are configured and distributed. Citrix recommends that you request reallocation of nodes at the beginning of the deployment to realign the nodes closest to users, and to reallocate nodes infrequently.
You can also move users between nodes or add them to a node if they aren’t already allocated to a node.
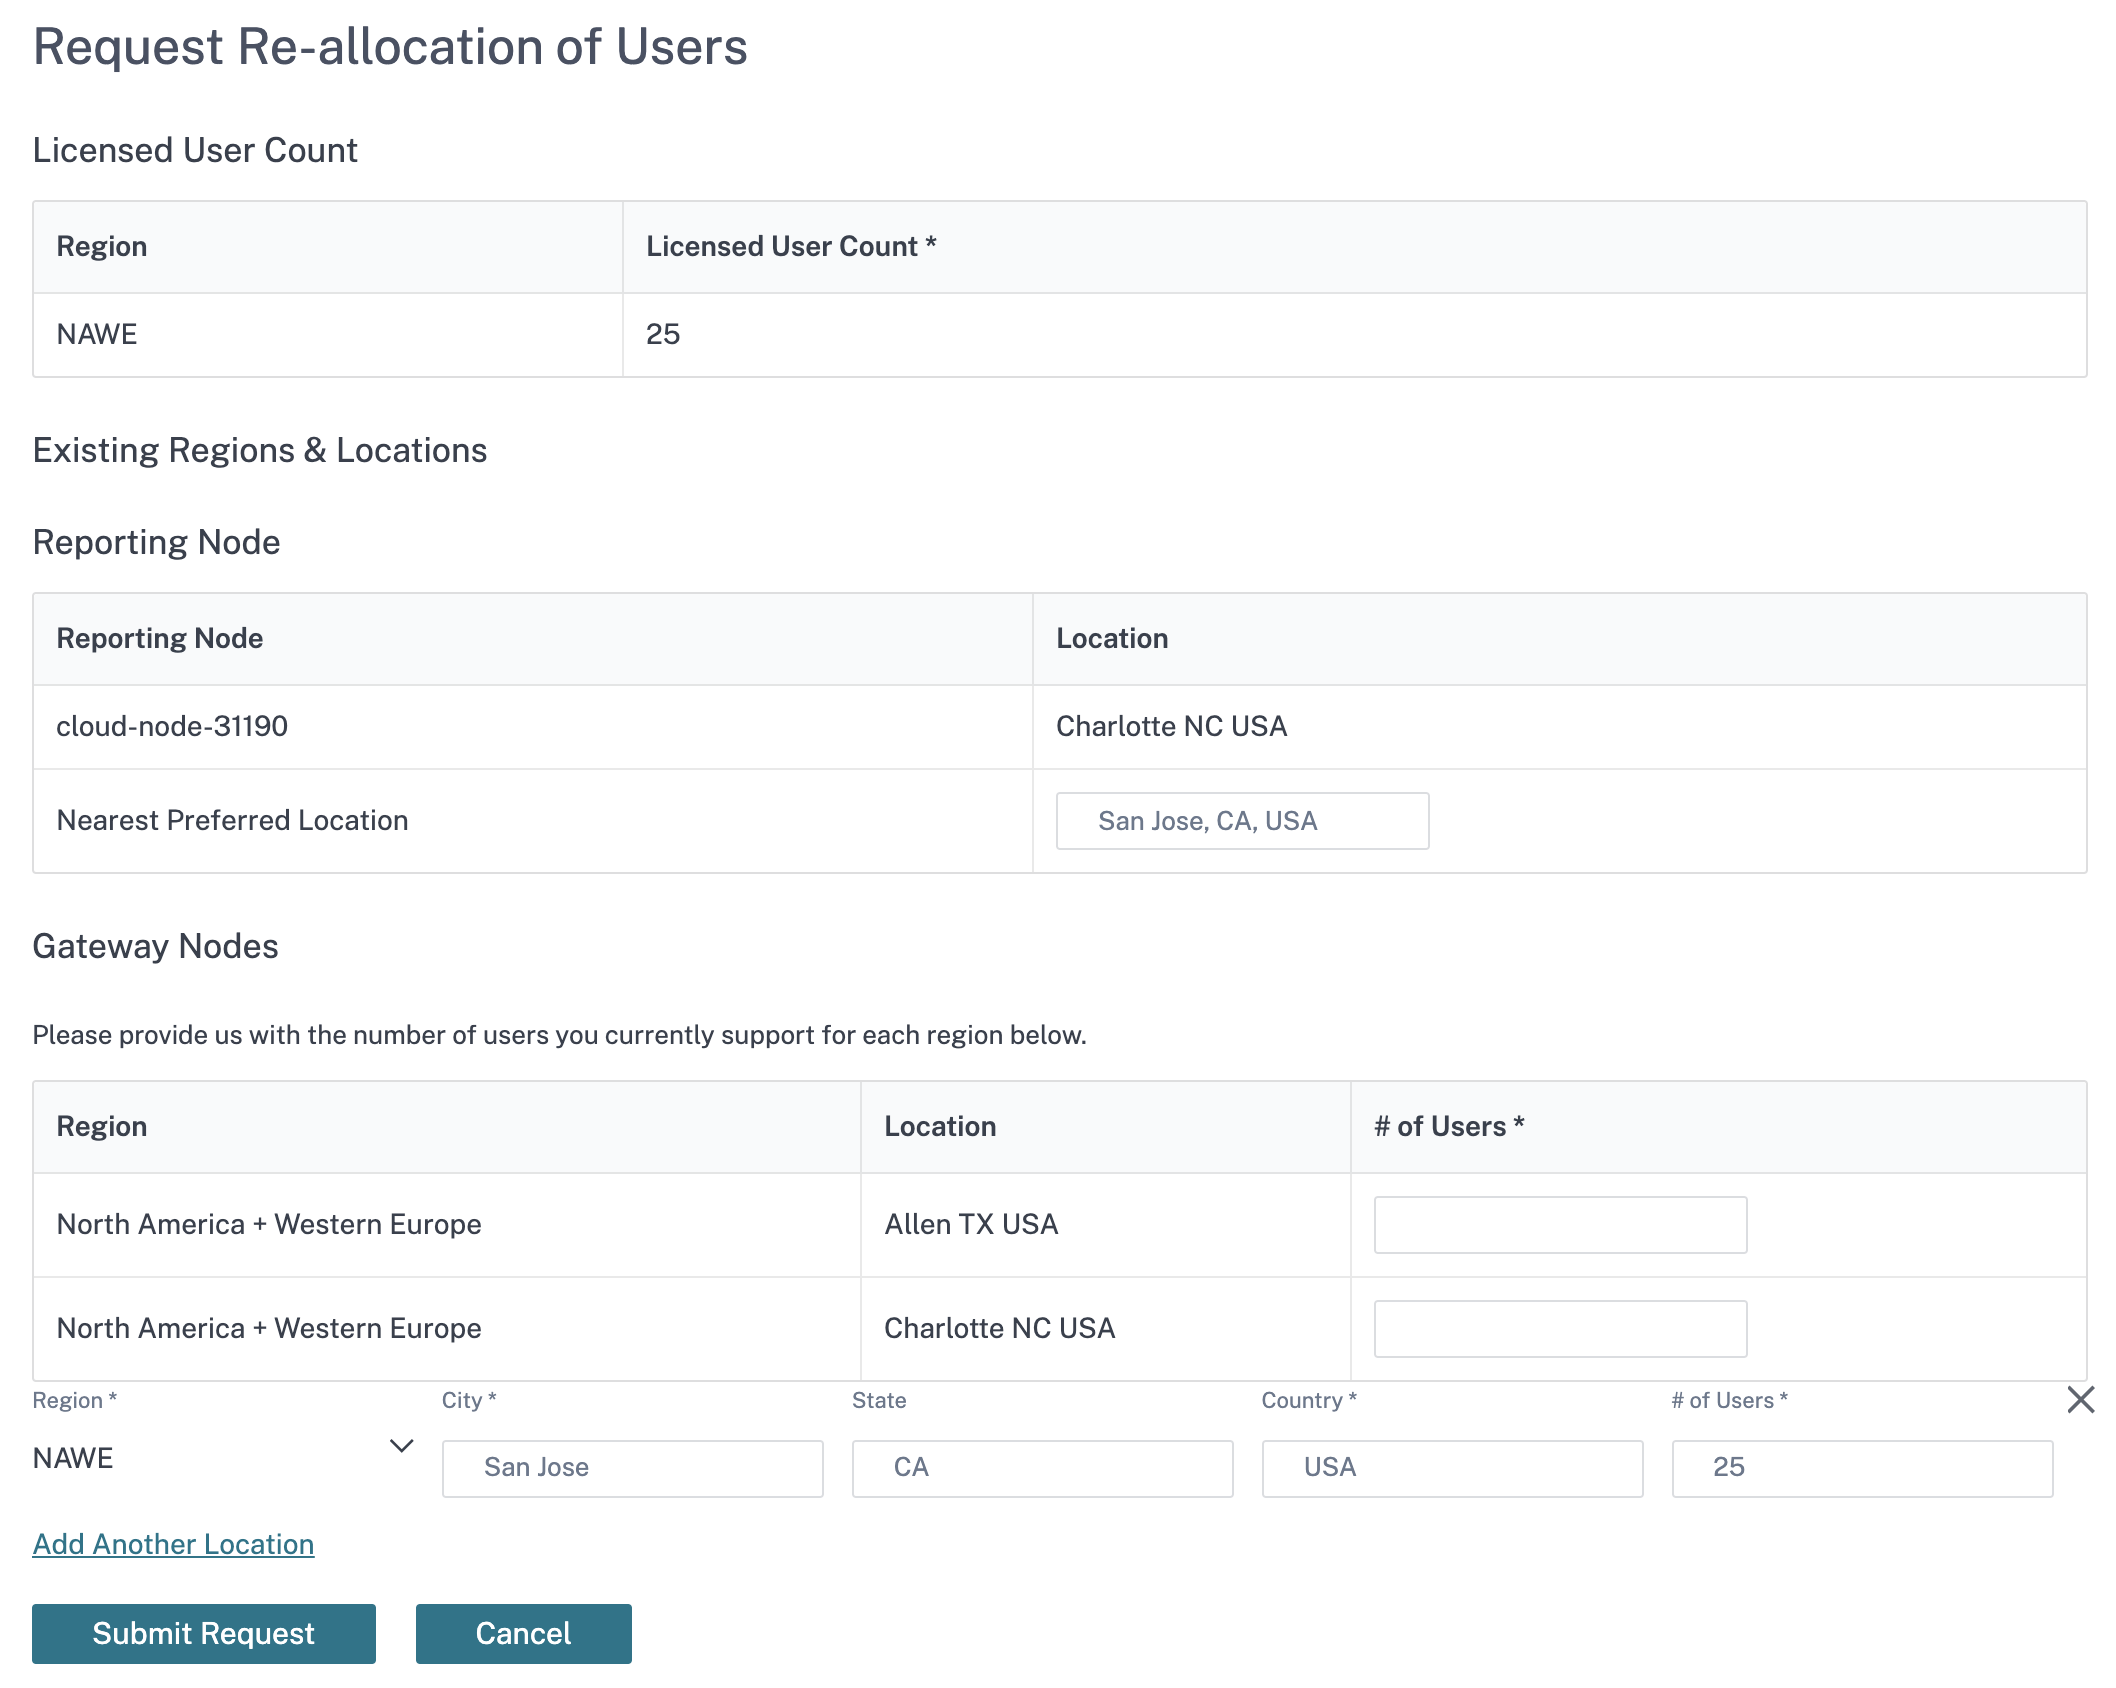
To view, redistribute, and maintain nodes, navigate to the Configuration tab in the left side menu and select Request re-allocation of users above the table.
Note
You can only redistribute nodes within the same geographical region.
Cloud Settings
To configure settings for your Network Time Protocol (NTP) server, platform maintenance, and update releases, navigate to the Configuration tab and select Cloud Settings.
Account Settings
The Account Settings feature helps to change/override the user account name that appears for your account in the Citrix Secure Internet Access service portal.
To override account name, navigate to Configuration > Cloud Settings > Account Settings.
You can view the Citrix Secure Internet Access Account number.

Note
The initially configured account name is still present in the CSIA portal if you have not created any name or the Override Account Name is disabled.
-
Enable the Override Account Name and provide a name. By default the Override Account Name is disabled.
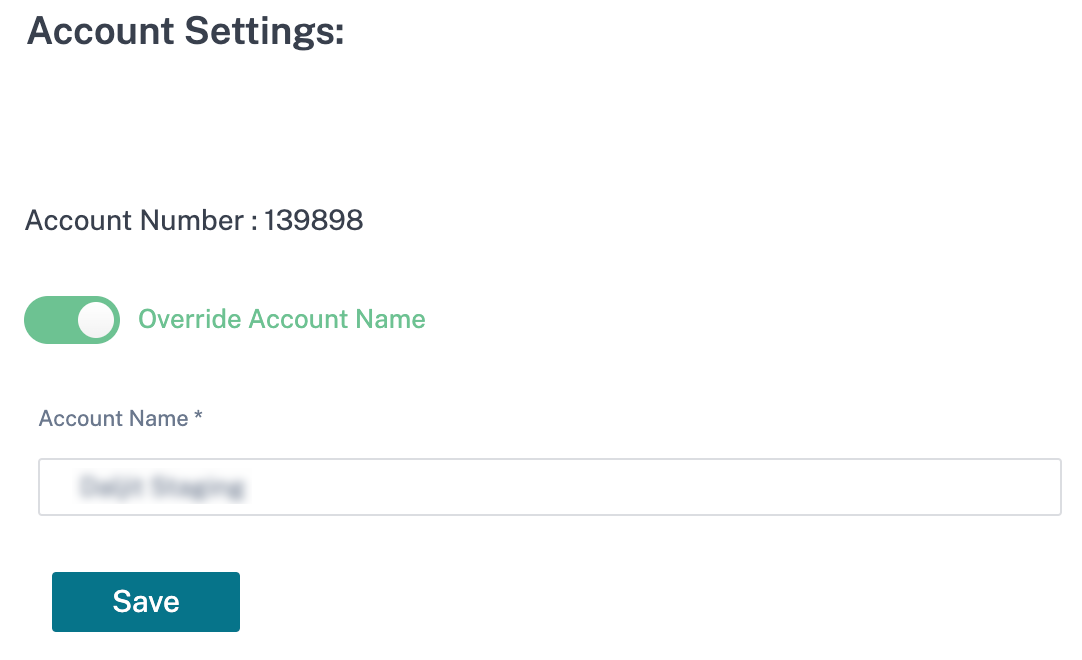
Wait for some time to view the updated account name on the portal. You might have to relogin once the account name is changed.
-
Click Save.
NTP Server
To synchronize the date and time, navigate to NTP Server under Cloud Settings. Enter the time zone, the date format, the address of the NTP server, and daylight savings information.
Time Zone defines the regional standard time used for timestamps. After changing the time zone, the timestamps for events in reports will shift to align with the new time zone and maintain continuity. Timestamps are relative to the new time zone.
Date Format defines the structure of the date in numerical form. This parameter can be set to either mm/dd/yyyy or dd/mm/yyyy.
NTP Server defines the address of the NTP server.
Daylight Savings defines whether time zone adheres to daylight saving. This parameter can be set to either United States or United Kingdom depending on the time zone region.
Platform Maintenance
This functionality allows you to schedule the days and times that maintenance occurs to help ensure that your network is available during peak times.
To schedule automatic maintenance performed on your behalf, navigate to Platform Maintenance under Cloud Settings, and enable Preferred Maintenance Window. Then select your preferred dates and times for automatic maintenance.
Update Release Settings
To choose the types of updates that are installed on your behalf, navigate to Update Release Settings under Cloud Settings, and select one of the following release levels:
- Mandatory, for critical platform updates and security fixes, including new features, feature updates, bug fixes, and performance enhancements.
- Optional, for releases that are recommended but don’t include critical fixes.
- Early Access, for early access to new features, updates, bug fixes, and performance enhancements.
Email Settings
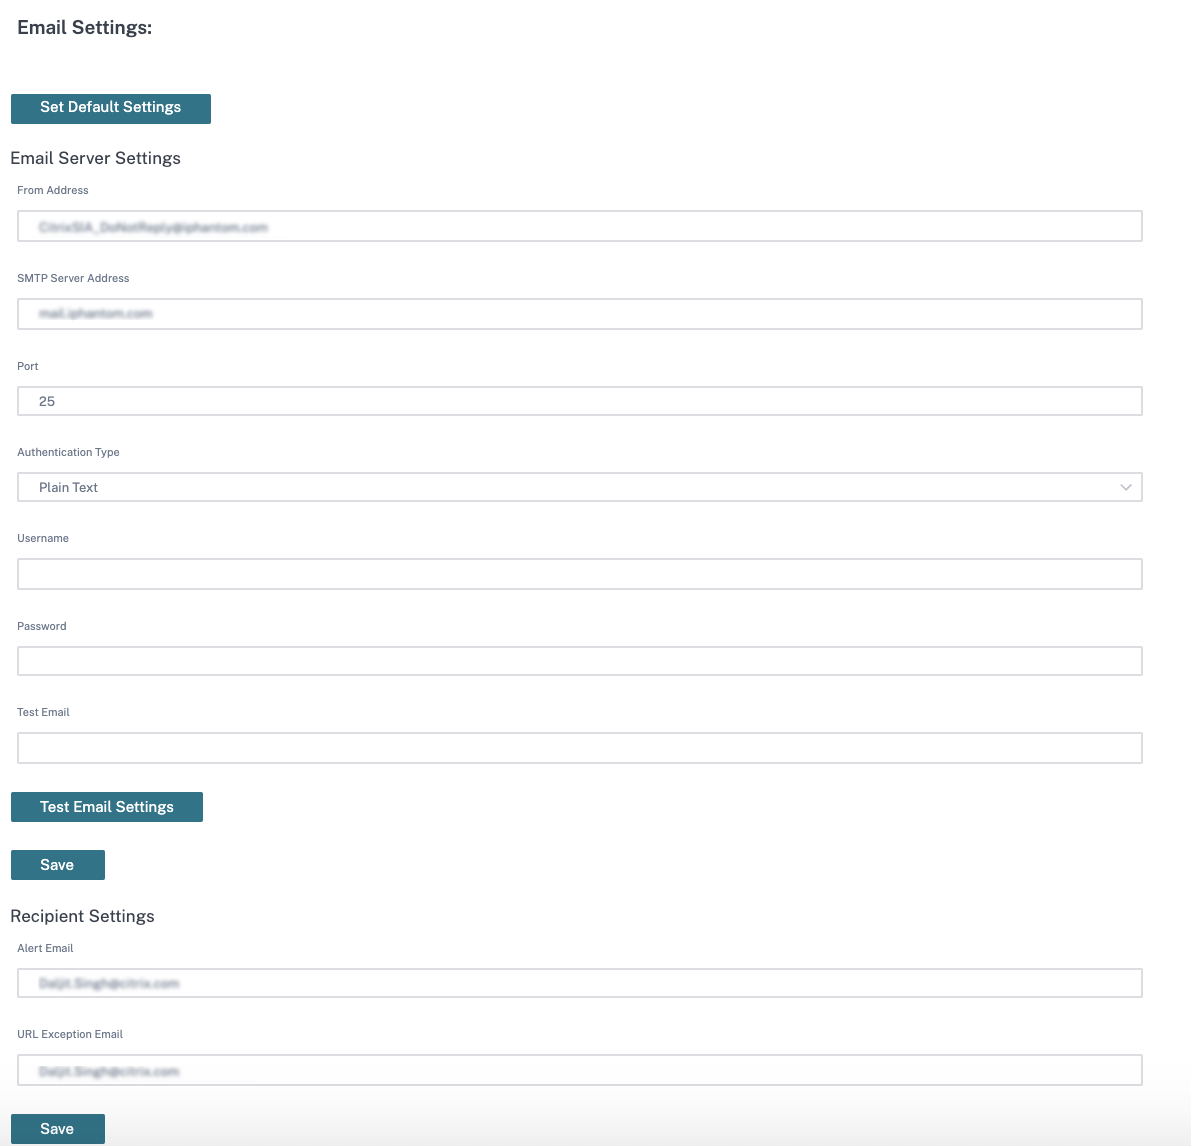
You can configure email server settings to relay emails containing alerts, scheduled reports, and other notifications. To allow web gateways and reporting nodes to send out email notifications, complete the form in Email Settings under Cloud Settings. This process involves configuring the SMTP Server Address so that you can receive email notifications.
You can verify the email settings using the Test Email Settings option. You can also populate the default email settings using the Set Default Settings button.
Configure email addresses to receive User Alerts and URL Exception requests.
- Alert Email: The destination address for alerts that are triggered by high-risk keywords.
- URL Exception Email: The destination address for URL exception requests sent from block pages.
Note
Additional email alerts are available from the Real-Time Alerts page.
Note:
Typically, SMTP servers are configured with IP-based allow lists to prevent spam. You must therefore add the IP addresses of all nodes to the SMTP server’s allow list.
Also to reduce spam, SMTP servers sometimes use other mechanisms, such as DKIM. It might be necessary to exempt web gateways and reporting nodes from these restrictions on the SMTP server.
If you don’t have your own internal SMTP server, you can use one of Google’s SMTP services. You must have a valid Gmail account for this.
Google SMTP servers use ports 25, 465, 587, or a combination of these. The most popular is smtp.gmail.com, which uses ports 465 (with SSL) or 587 (with TLS).
Note:
SMTP servers commonly listen on TCP ports 25, 465, or 587, but can listen to any port that they’re configured to operate on. SMTP over SSL uses port 465 and SMTP over TLS uses port 587. Both ports 465 and 587 require authentication services. Port 25 is unencrypted and requires no authentication.
When working with local web gateways or reporting nodes, ensure that the required ports aren’t restricted.
The configurations for each of the three Google SMTP servers are as follows:
| Fully qualified domain name | Configuration requirements | Authentication requirements |
|---|---|---|
| smtp-relay.gmail.com | Port 25, 465, or 587, with either Secure Socket Layer (SSL) or Transport Layer Security (TLS) protocols, and one or more static IP addresses. | IP address. |
| smtp.gmail.com | Port 465 with SSL or port 587 with TLS. Dynamic IPs are allowed. | Your full Gmail or G Suite email address. |
| aspmx.l.google.com | Mail can only be sent to Gmail or G Suite users. Dynamic IPs are allowed. | None. |
smtp-relay.gmail.com is used to send mail from your organization by authenticating with the associated IP addresses. You can send messages to anyone inside or outside of your domain using port 25, 465, or 587.
smtp.gmail.com is used to send mail to anyone inside or outside of your domain. It requires you to authenticate with your Gmail or G Suite account and password. You can use SMTP over SSL (port 465) or TLS (port 587).
aspmx.l.google.com is used to send messages to Gmail or G Suite users only. This option doesn’t require authentication. You can’t use SSL or TLS with this SMTP server, and so the traffic is in Plain Text, which isn’t recommended.
Anonymized Logging
For regulatory compliance and confidentiality, Anonymized Logging under Cloud Settings encrypts the personal user information that delegated administrators use to monitor network usage.
You must create an encryption key before you enable Anonymized Logging by selecting the Add Key button under the Enable Anonymized Logging toggle. Enter a 64-character value for the encryption key into the Encryption Key field. You can enter your own encryption key or use the Auto Generate Key option.
Important:
Citrix highly recommends that you record the encryption key in a separate location before continuing. You need the encryption key to decrypt the data associated with it for as long as it is active on the platform.
You can configure a key to encrypt the identifiable data of a particular category by enabling the following toggles under Encrypt Categories:
- Personal Information. Enables and disables the encryption of all personally identifiable information, including the user name, full name, and machine name of reported user activity.
- Data Source. Enables and disables the encryption of all information relating to the data source of reported user activity.
- Group Names. Enables and disables the encryption of the group names that are associated with reported user activity.
You can also configure encryption keys to apply only to a particular set of groups in the Group Association tab. When the Select All toggle is enabled, the currently configured encryption key applies to all security groups. When the Select All toggle is disabled, you can select which security groups to encrypt with the encryption key.
After configuring an encryption key, enable Anonymized Logging to monitor network usage based on the anonymized logs of user online activity.
To delete a previously defined encryption key, select the ellipses next to the corresponding encryption key in the table, and select Delete.
Cloud Backup
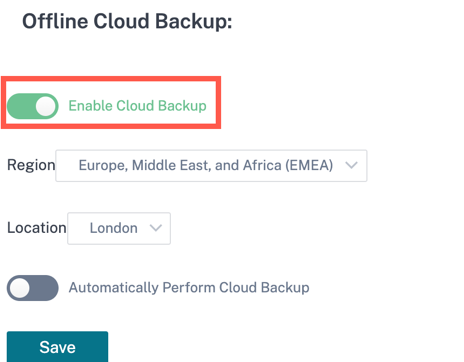
The Offline Cloud Backup settings provide the ability to store/save the backup settings and logs from reporting nodes based on the Region, Location, and Time that you select. With the Offline Cloud Backup option, you can save the cloud backups through CSIA interface.
To enable the cloud backup settings, navigate to Configuration > expand Cloud Settings > select Cloud Backup.
-
Enable the Enable Cloud Backup toggle button and select the Region and Location from the drop-down list.
-
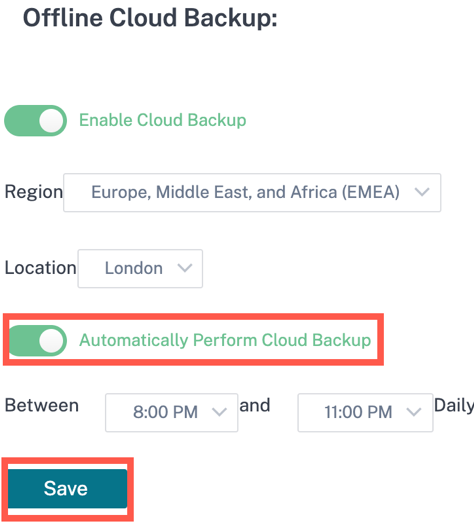
You can also enable the Automatically Perform Cloud Backup toggle button and set the time interval to run and create the daily backup. Click Save.
Remote Browser Isolation
Remote browser isolation is an advanced web protection feature that provides security from any malware/malicious threats. With the Remote browser isolation, Citrix Secure Internet Access Web filtering functionality can be used along with the Secure Browser Service (SBS) to protect the corporate network from browser-based attacks. For more information, see Secure Browser service.
With the remote browser isolation feature, you can set rules for some targeted websites that are not trusted to be isolated and launched only through the remote cloud-based secure browser service. You can create and apply the rule to a combination of user groups and type of traffic that you want to isolate.
You can view the list of rules created to invoke remote browser isolation.
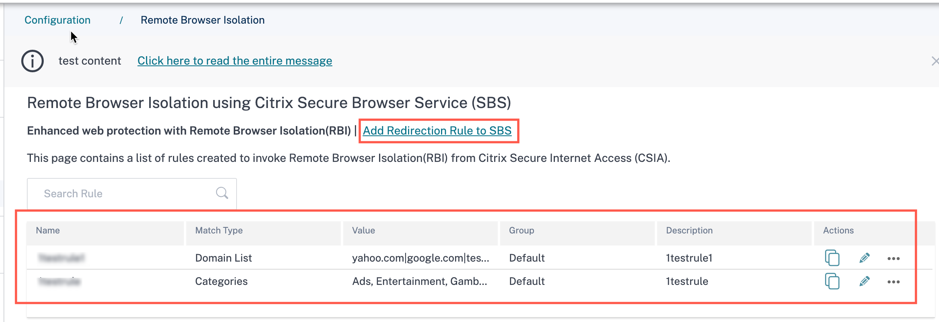
To set the redirection rules for the traffic that needs to be invoked, navigate to Configuration > Remote Browser Isolation > Click Add Redirection Rule to SBS.
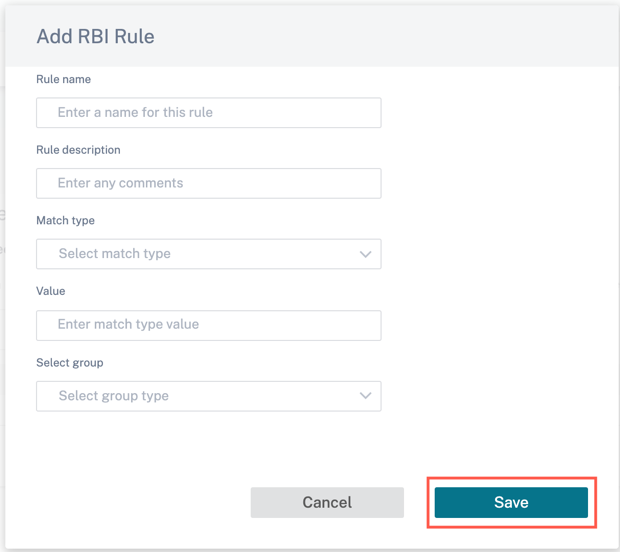
- Rule name: Provide a rule name.
- Rule description: Provide a rule description.
- Match type: Select a match type such as Domain Regex, Domain List, IP Address, URL, or Categories from the drop-down list.
- Value: Enter match value type.
- Select group: Select a group from the drop-down list.
With the Add Redirection Rule to SBS option, you can create the web filtering rules on the secure internet access portal to redirect the traffic to the browser service. For every remote browser isolation rule, there is a secure browser URL associated. That means, when the URLs launched through the secure internet access service, if the URL matches one of the defined remote browser isolation matching rules, the request is then redirected to the associated secure browser service.