Detailed procedures to setup service mesh topology
The prerequisites to deploy the service mesh topology is available at Setting up service graph.
Configure NetScaler agent
To enable communication between Kubernetes cluster and NetScaler Console, you must install and configure an agent. You can configure an agent using a hypervisor, public cloud services (such as Microsoft Azure, AWS), or built-in agent available on NetScaler instances (ideal for HA deployments).
Follow the procedure to configure an agent.
Note
You can also use an existing agent.
The agents are, by default, automatically upgraded to NetScaler Console latest build. You can view the agent details on the Infrastructure > Instances > Agents page. You can also specify the time when you want the agent upgrades to happen. For more information, see Configuring Agent Upgrade Settings.
Configure static routes in the agent
Inside the Kubernetes cluster, all containerized pods use an overlay network. Establishing the communication using those private IP addresses directly is not possible. To enable communication from NetScaler Console to Kubernetes cluster, you must configure static routing in the agent.
Consider that you have the following IP addresses for your Kubernetes cluster:
-
Kubernetes master – 101.xx.xx.112
-
Kubernetes worker 1 – 101.xx.xx.111
-
Kubernetes worker 2 – 101.xx.xx.110
On the Kubernetes master, run the following command to identify the pod network to do the static routing:
kubectl get nodes -o jsonpath="{range .items[*]}{'podNetwork: '}{.spec.podCIDR}{'\t'}{'gateway: '}{.status.addresses[0].address}{'\n'}{end}"
The following is an example output after you run the command:

After successfully configuring an agent:
-
Using an SSH client, log on to the agent
-
Type
shelland press Enter to switch tobash -
Configure the static routing using the command
route add -net <public IP address range> <Kubernetes IP address>For example:
route add -net 192.168.0.0/24 101.xx.xx.112route add -net 192.168.1.0/24 101.xx.xx.111route add -net 192.168.2.0/24 101.xx.xx.110 -
Verify the configuration by using
netstat -rn
-
Append these route commands in
/mpsconfig/svm.conffile.-
In the agent, access the svm.conf file using the following command:
vim /mpsconfig/svm.conf -
Add the static routes in svm.conf file.
For example,
route add -net 192.168.0.0/24 101.xx.xx.112.
-
Configure the required parameters
In the Kubernetes master:
-
Create secret with the agent credentials in every namespace where CPX as an ingress gateway / sidecar is deployed.
kubectl create secret generic admlogin --from-literal=username=<username> --from-literal=password=<password> -n <namespace> -
helm repo add citrix https://citrix.github.io/citrix-helm-charts/ -
Deploy the NetScaler CPX as an Ingress Gateway
helm install citrix-adc-istio-ingress-gateway citrix/citrix-adc-istio-ingress-gateway --version 1.2.1 --namespace <namespace> --set ingressGateway.EULA=YES,citrixCPX=true,ADMSettings.ADMFingerPrint=XX:00:X1:00:XX:0X:X0,ADMSettings.ADMIP=<xx.xx.xx.xx>, ingressGateway.image=quay.io/citrix/citrix-k8s-cpx-ingress,ingressGateway.tag=13.0-58.30The following table lists the configurable parameters in the Helm chart and its default values:
Parameter Description Default Optional/Mandatory (helm) citrixCPX NetScaler CPX FALSE Mandatory for NetScaler CPX xDSAdaptor.image Image of the Citrix xDS adaptor container quay.io/citrix/citrix-istio-adaptor:1.2.1 Mandatory ADMSettings.ADMIP NetScaler Console IP address null Mandatory for NetScaler CPX ADMSettings.ADMFingerPrint The NetScaler Console Fingerprint. Navigate to Infrastructure > Instances > Agents, select the agent, and click View Fingerprint null Optional ingressGateway.EULA End User License Agreement(EULA) terms and conditions. If yes, then user agrees to EULA terms and conditions. NO Mandatory for NetScaler CPX ingressGateway.image Image of NetScaler CPX designated to run as Ingress Gateway quay.io/citrix/citrix-k8s-cpx-ingress:13.0–58.30 Mandatory for NetScaler CPX -
Deploy the Citrix SideCar Injector.
helm install cpx-sidecar-injector citrix/citrix-cpx-istio-sidecar-injector --version 1.2.1 --namespace <namespace> set cpxProxy.EULA=YES,ADMSettings.ADMFingerPrint=xx:xx:xx:xx,ADMSettings.ADMIP=<xx.xx.xx.xx>,cpxProxy.image=quay.io/citrix/citrix-k8s-cpx-ingress,cpxProxy.tag=13.0-58.30The following table lists the configurable parameters in the Helm chart and its default values:
Parameter Description Default value ADMSettings.ADMIP The NetScaler Console IP address NIL cpxProxy.image NetScaler CPX image used as sidecar proxy quay.io/citrix/citrix-k8s-cpx-ingress:13.0–58.30 cpxProxy.imagePullPolicy Image pull policy for NetScaler IfNotPresent cpxProxy.EULA End User License Agreement(EULA) terms and conditions. If yes, then user agrees to EULA terms and conditions. NO cpxProxy.cpxSidecarMode Environment variable for NetScaler CPX. It indicates that NetScaler CPX is running as sidecar mode or not. YES -
Set the label on any Namespace that needs CPX Sidecar Injection.
kubectl label namespace <app-namespace> cpx-injection=enabledAfter performing step 3 and 5, you can see the NetScaler CPX is registered in NetScaler Console.
Deploy a sample application
Consider that you want to deploy the following applications:
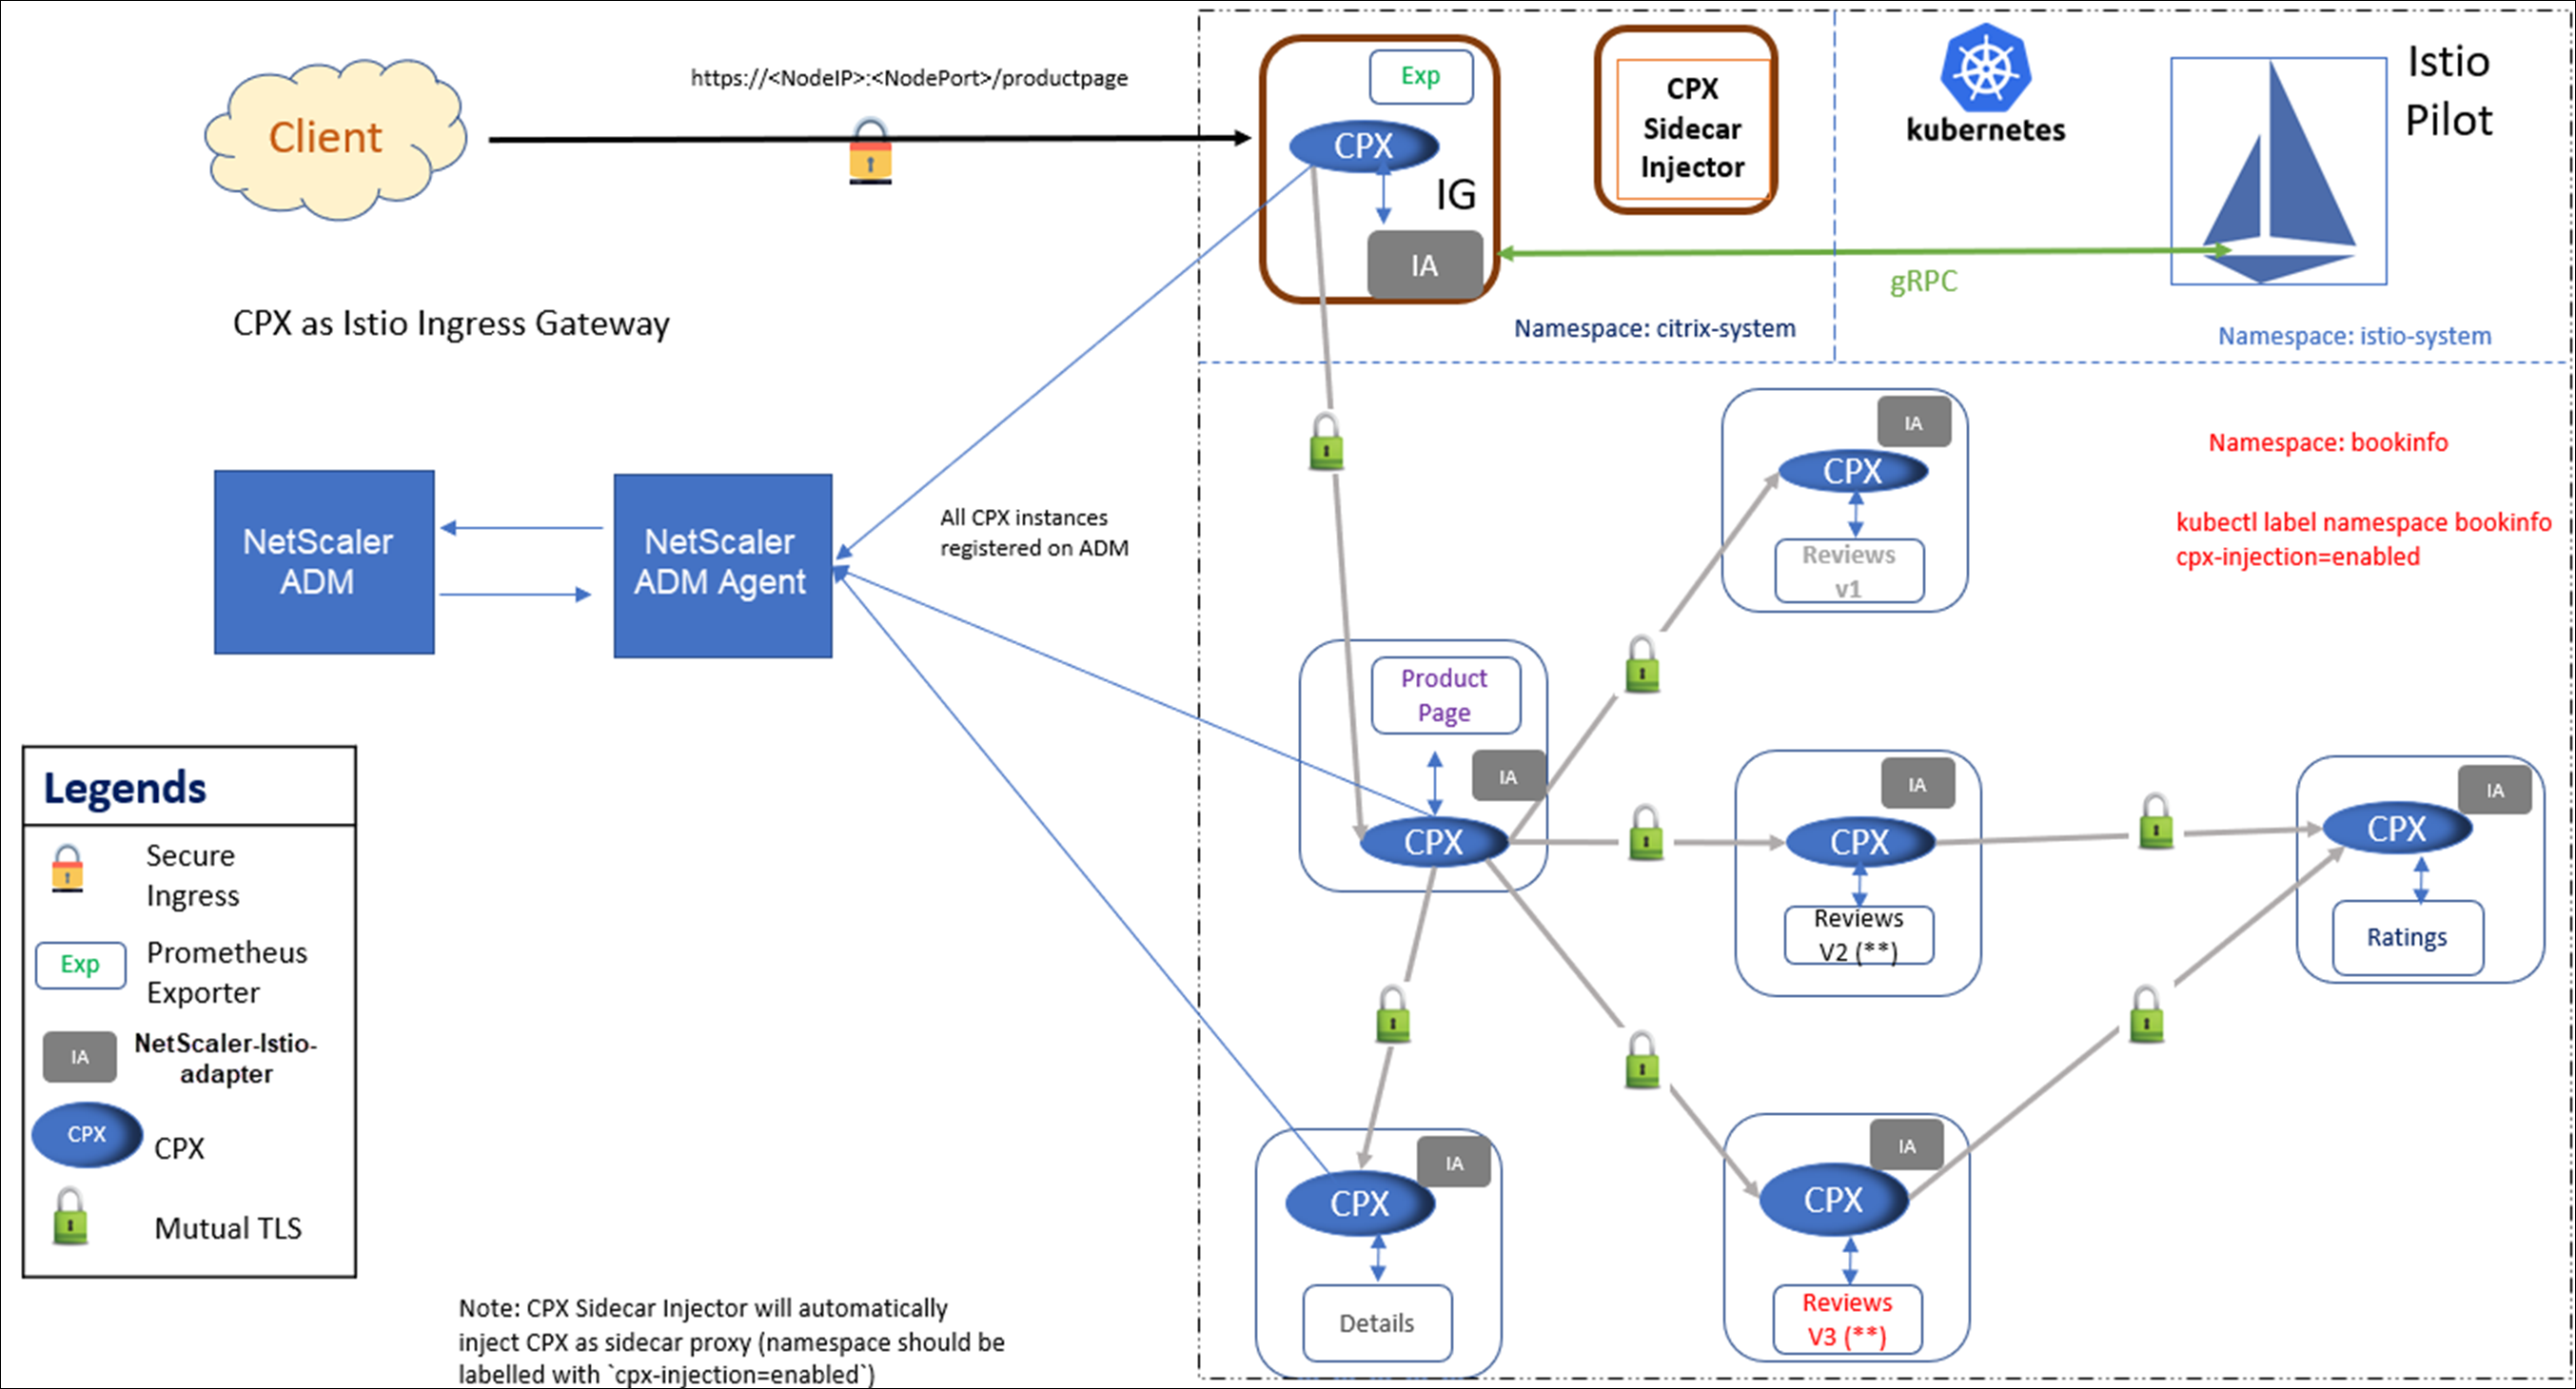
Perform the following procedure to deploy a sample application:
-
kubectl create namespace citrix-system -
kubectl create namespace bookinfo -
kubectl label namespace bookinfo cpx-injection=enabled -
kubectl create secret generic admlogin --from-literal=username=<uername> --from-literal=password=<password> -n citrix-systemNote
You can give a user name and a password of your choice.
-
kubectl create secret generic admlogin --from-literal=username=<username> --from-literal=password=<password> -n bookinfoNote
You can give a user name and a password of your choice.
-
helm install citrix-adc-istio-ingress-gateway citrix/citrix-adc-istio-ingress-gateway --version 1.2.1 --namespace citrix-system --set ingressGateway.EULA=YES,citrixCPX=true,ADMSettings.ADMFingerPrint=xx:xx:xx:xx,ADMSettings.ADMIP=<ADM agent IP address>,ingressGateway.image=quay.io/citrix/citrix-k8s-cpx-ingress,ingressGateway.tag=13.0-58.30Note
You must give your NetScaler Console fingerprint and agent IP address
-
helm install cpx-sidecar-injector citrix/citrix-cpx-istio-sidecar-injector --namespace citrix-system --set cpxProxy.EULA=YES,ADMSettings.ADMFingerPrint=xx:xx:xx:xx,ADMSettings.ADMIP=<ADM agent IP address>,cpxProxy.image=quay.io/citrix/citrix-k8s-cpx-ingress,cpxProxy.tag=13.0-58.30Note
You must give your NetScaler Console fingerprint and agent IP address
-
helm install bookinfo bookinfo/ --namespace bookinfo --set citrixIngressGateway.namespace=citrix-system
Add Kubernetes cluster in NetScaler Console
To add the Kubernetes cluster:
-
Log on to NetScaler Console with administrator credentials.
-
Navigate to Infrastructure > Orchestration > Kubernetes > Cluster. The Clusters page is displayed.
-
Click Add.
-
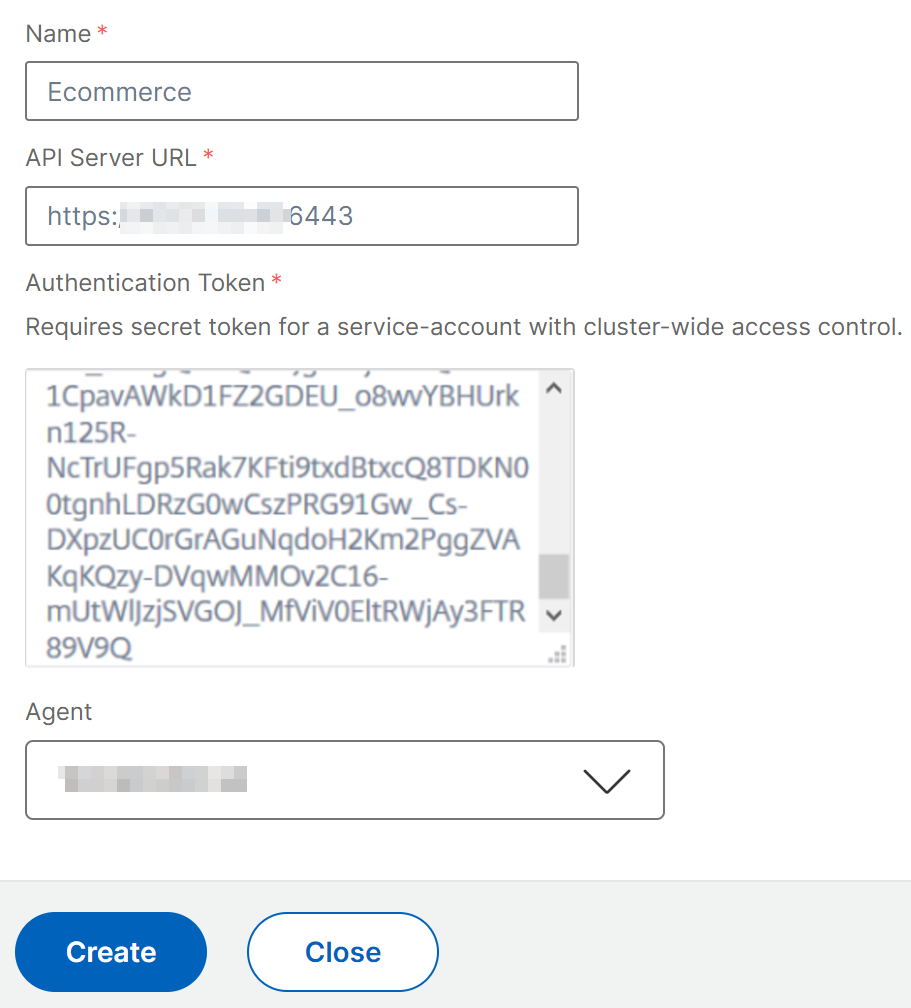
In the Add Cluster page, specify the following parameters:
-
Name - Specify a name of your choice.
-
API Server URL - You can get the API Server URL details from the Kubernetes Master node.
-
On the Kubernetes master node, run the command
kubectl cluster-info.
-
Enter the URL that displays for “Kubernetes master is running at.”
-
-
Authentication Token - Specify the authentication token. The authentication token is required to validate access for communication between Kubernetes cluster and NetScaler Console. To generate an authentication token:
On the Kubernetes master node:
-
Use the following YAML to create a service account:
apiVersion: v1 kind: ServiceAccount metadata: name: <name> namespace: <namespace> <!--NeedCopy--> -
Run
kubectl create -f <yaml file>.The service account is created.
-
Run
kubectl create clusterrolebinding <name> --clusterrole=cluster-admin --serviceaccount=<namespace>:<name>to bind the cluster role to service account.The service account now has the cluster-wide access.
A token is automatically generated while creating the service account.
-
Run
kubectl describe sa <name>to view the token. -
To get the secret string, run
kubectl describe secret <token-name>.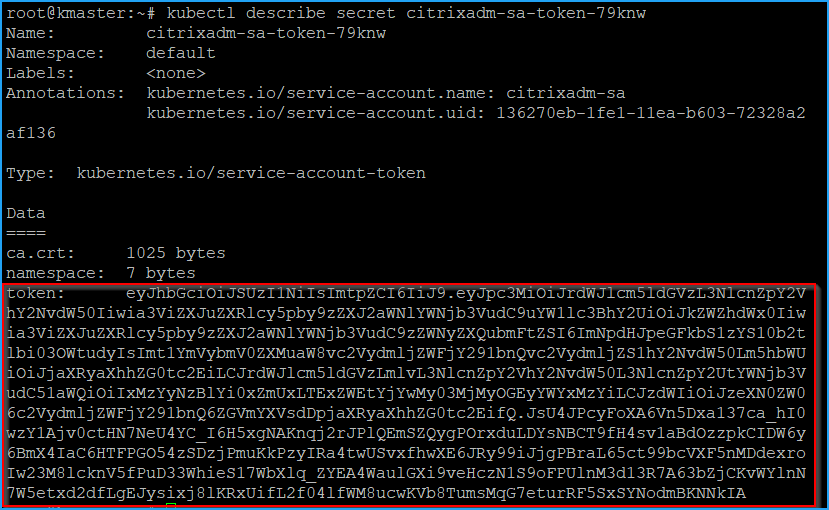
-
-
Select the agent from the list.
Note
Ensure to select the same agent that you have added in the CPX YAML.
-
Click Create.
-
Enable auto select virtual servers for licensing
Note
Ensure you have sufficient virtual server licenses. For more information, see Licensing
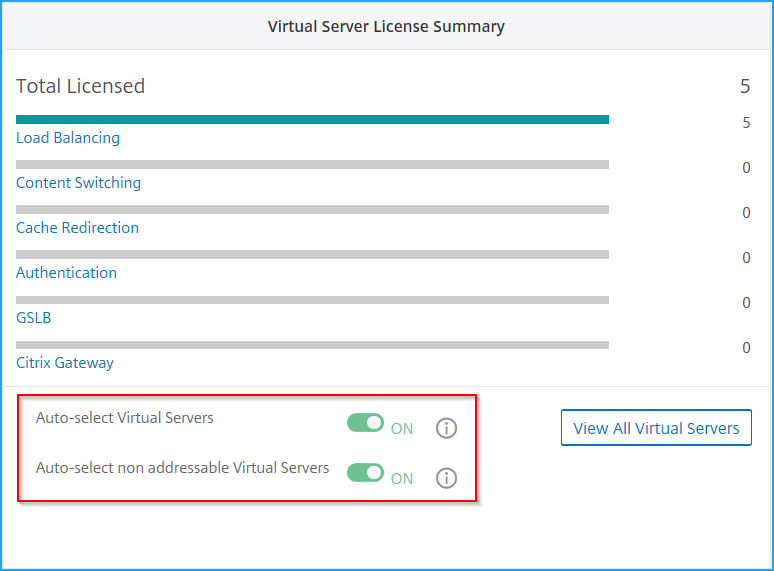
After you add Kubernetes cluster in NetScaler Console, you must ensure to auto-select virtual servers for licensing. Virtual servers must be licensed to display data in Service Graph. To auto-select virtual servers:
-
Navigate to Settings > NetScaler Console Licensing & Analytics Config.
-
Under Virtual Server License Summary, enable Auto-select Virtual Servers and Auto-select non addressable Virtual Servers.
Enable Web Transaction and TCP Transaction settings
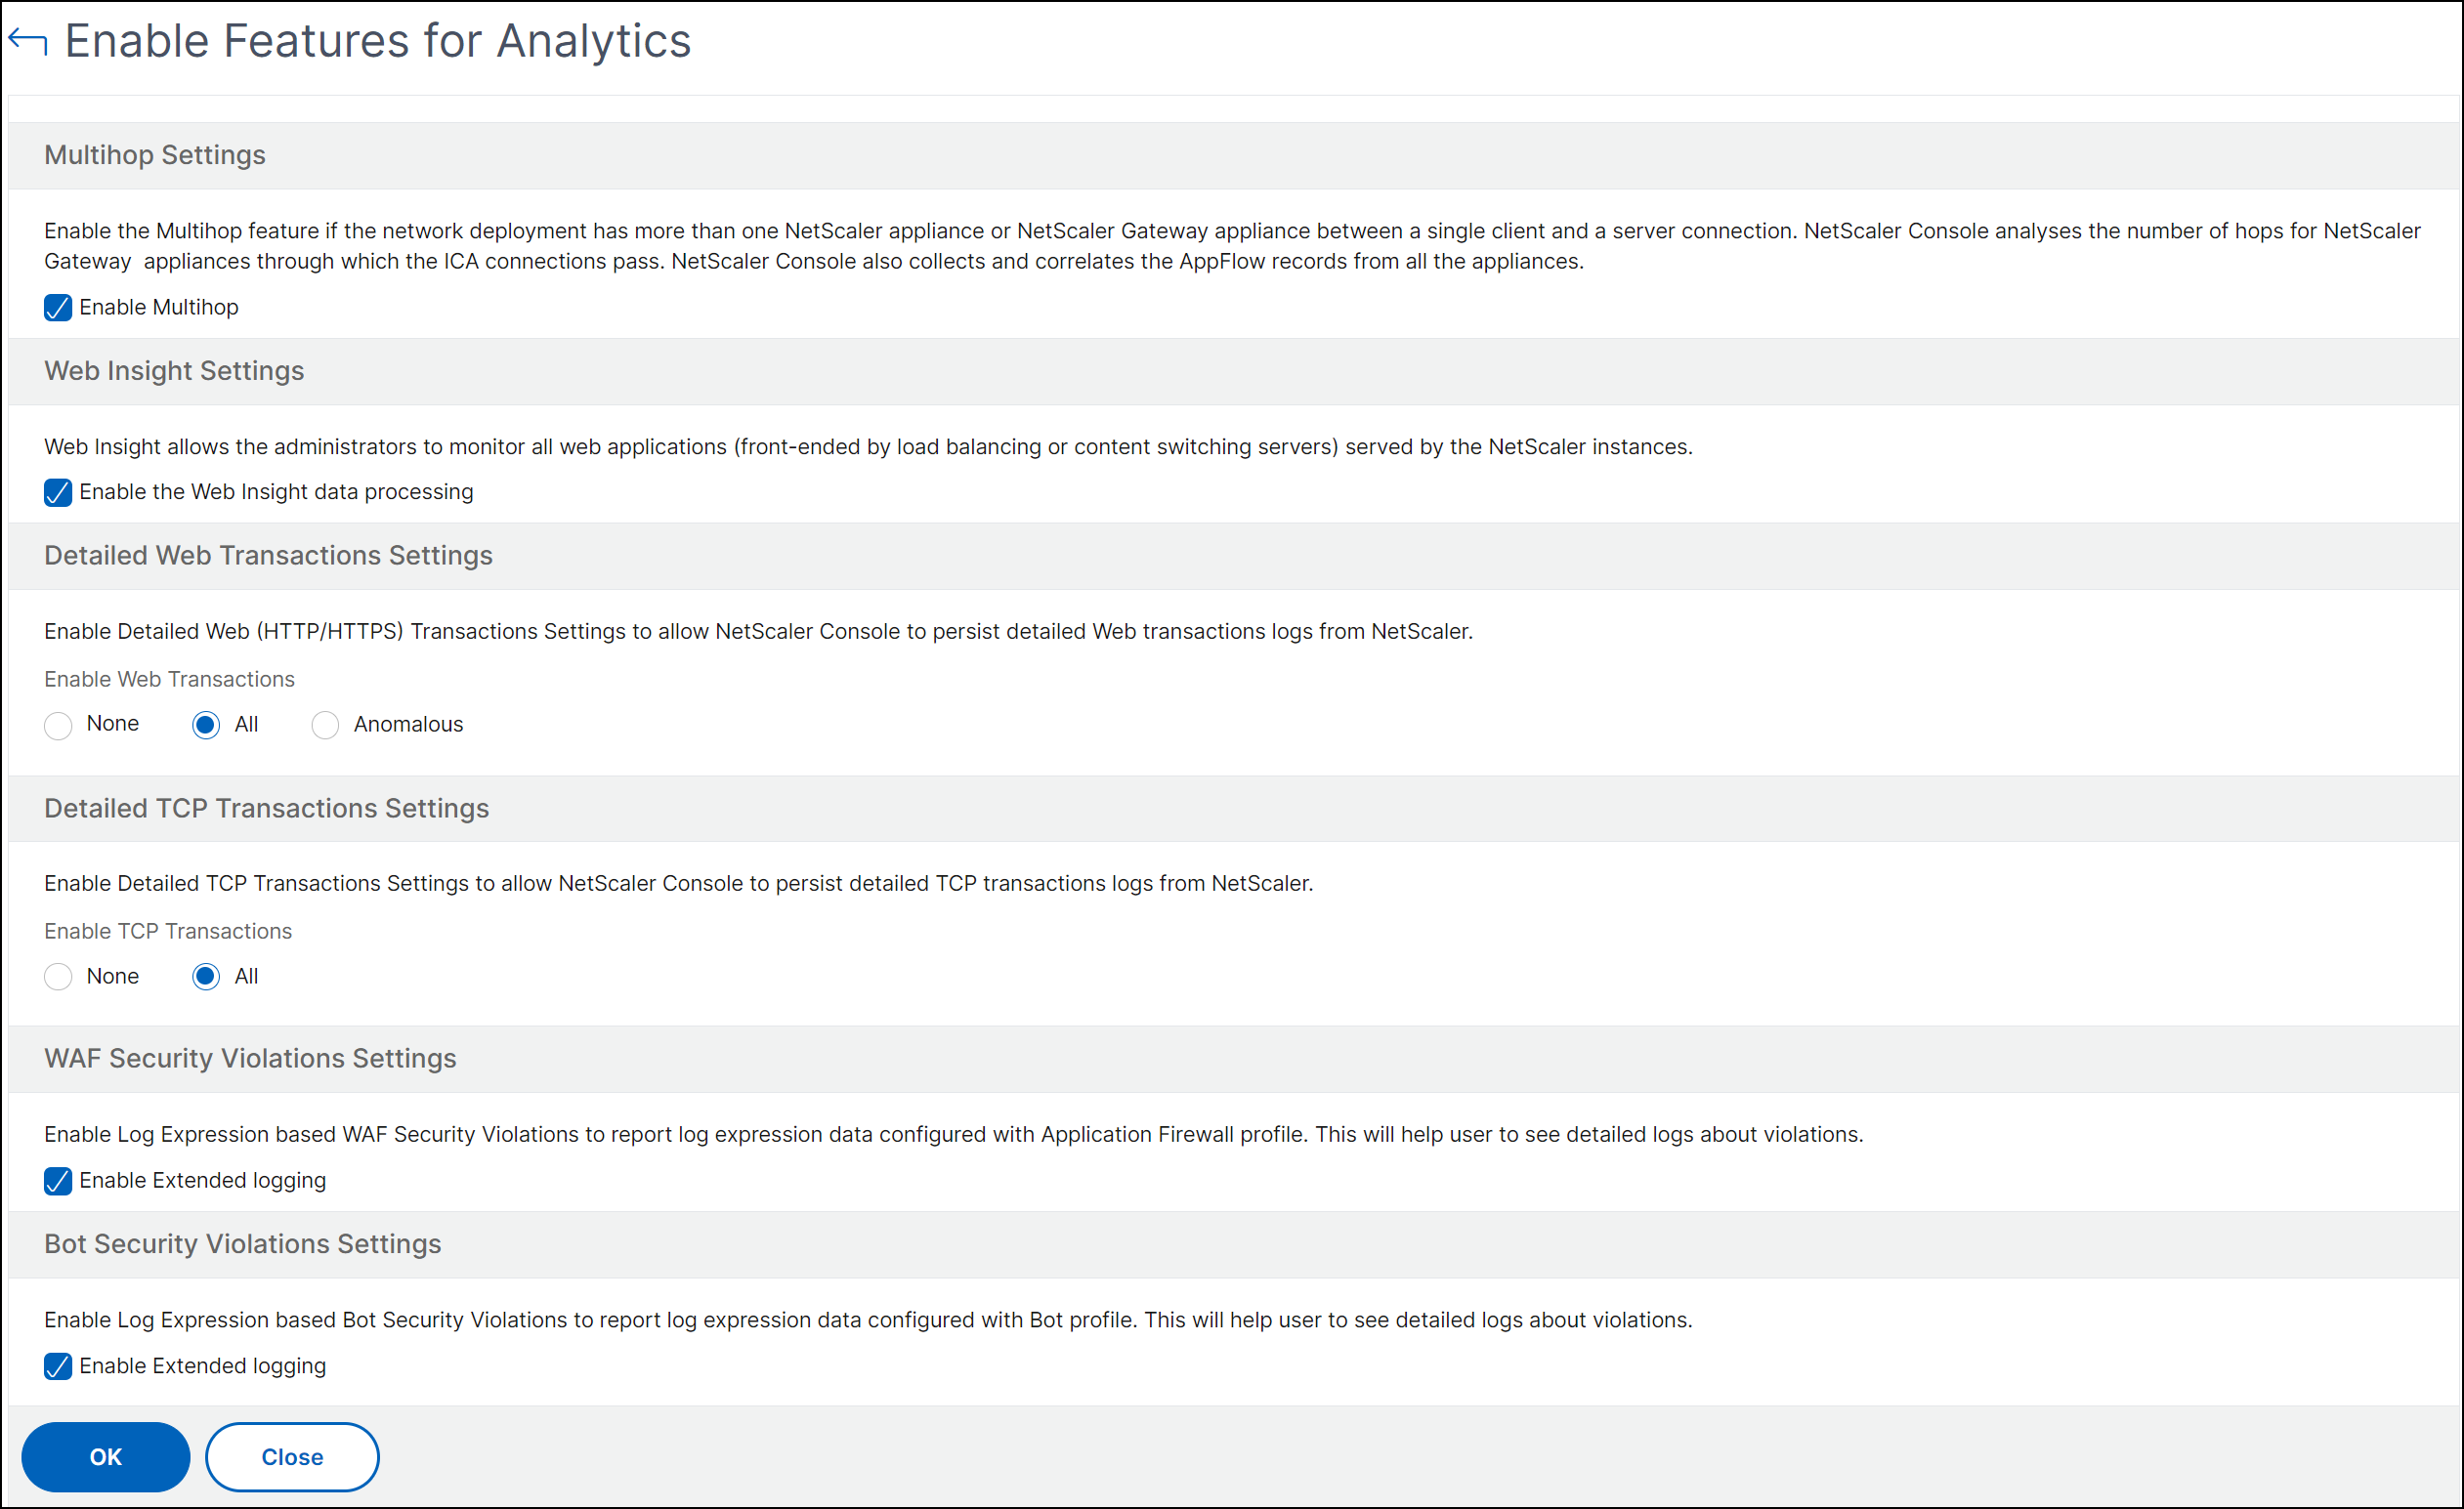
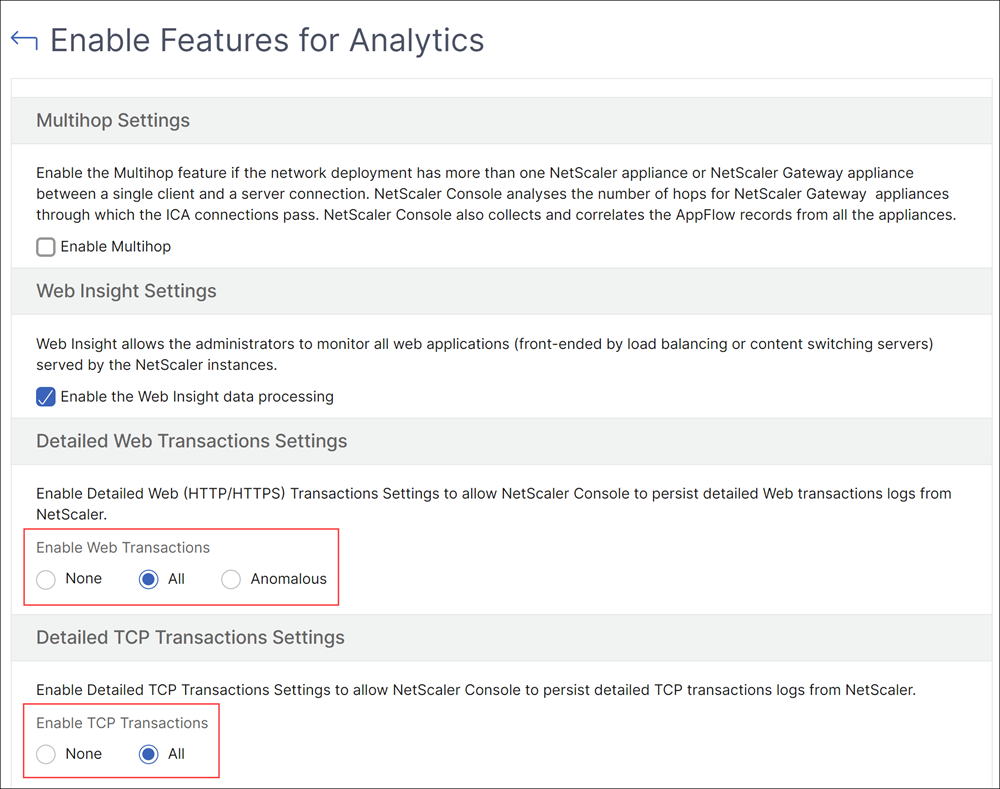
After you add the Kubernetes cluster and enable the auto-select virtual servers, change the Web Transaction Settings and TCP Transactions Settings to All.
-
Navigate to Settings > Analytics Settings.
The Settings page is displayed.
-
Click Enable Features for Analytics.
-
Under Web Transaction Settings, select All.
-
Under TCP Transactions Settings, select All.
-
Click OK.
Send traffic to microservices
Next, you must send traffic to microservices to get the service graph populated in NetScaler Console.
-
Determine the Ingress IP and port
export INGRESS_HOST=$(kubectl get pods -l app=citrix-ingressgateway -n citrix-system -o 'jsonpath={.items[0].status.hostIP}')export INGRESS_PORT=$(kubectl -n citrix-system get service citrix-ingressgateway -o jsonpath='{.spec.ports[?(@.name=="http2")].nodePort}')export SECURE_INGRESS_PORT=$(kubectl -n citrix-system get service citrix-ingressgateway -o jsonpath='{.spec.ports[?(@.name=="https")].nodePort}') -
Access the Bookinfo front end application using curl. The
productpageservice must return 200 OK response.curl -kv https://$INGRESS_HOST:$SECURE_INGRESS_PORT/productpagecurl -v http://$INGRESS_HOST:$INGRESS_PORT/productpage -
Visit
https://$INGRESS_HOST:$SECURE_INGRESS_PORT/productpagefrom a browser.The Bookinfo page is displayed.
-
Ensure that $INGRESS_HOST and $SECURE_INGRESS_PORT is replaced by an IP address and a port value.
After you send traffic to microservices, the service graph is populated approximately in 10 minutes duration.
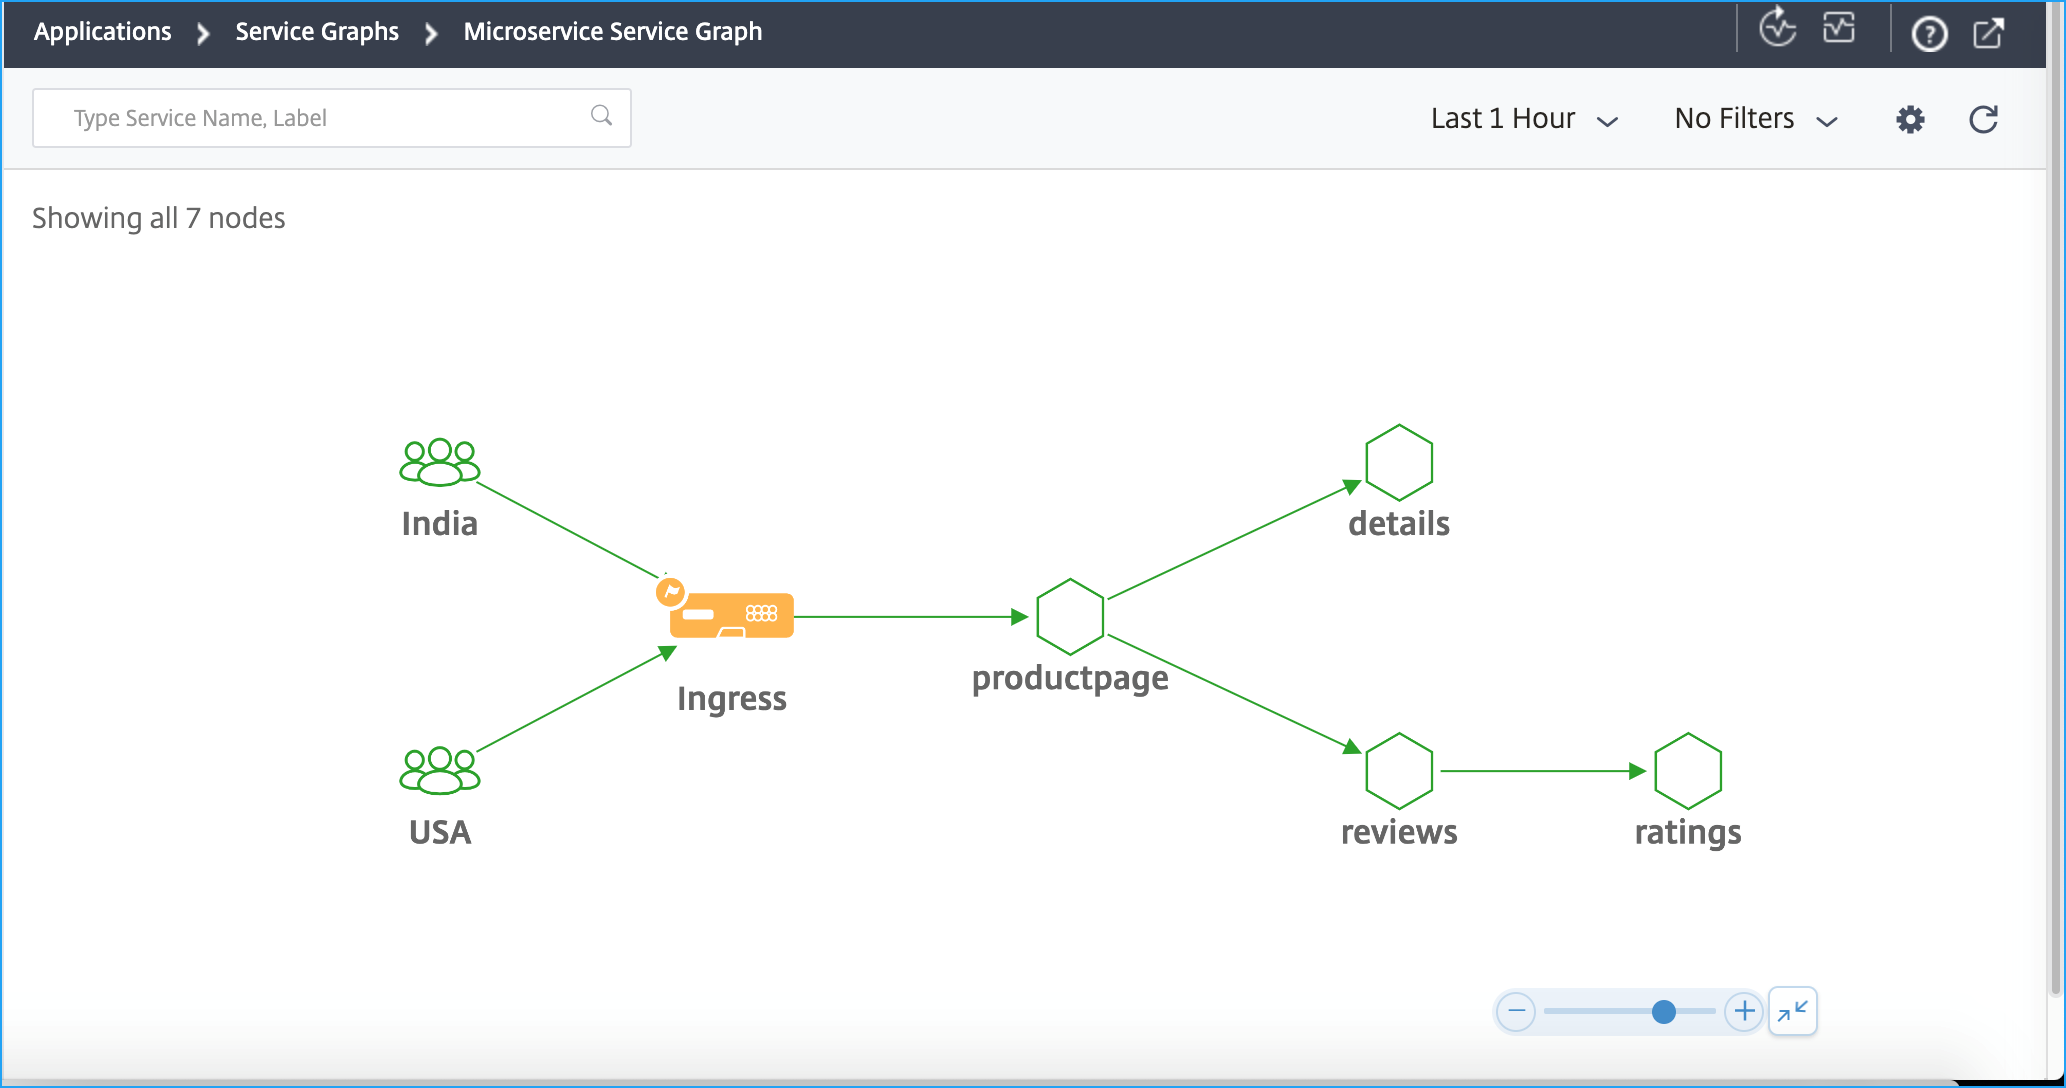
Using the service graph, you can analyze various service details such as metrics, errors, and so on. For more information, see Service graph.