Optimize Citrix ADC VPX performance on VMware ESX, Linux KVM, and Citrix Hypervisors
The Citrix ADC VPX performance greatly varies depending on the hypervisor, allocated system resources, and the host configurations. To achieve the desired performance, first follow the recommendations in the VPX data sheet, and then further optimize it using the best practices provided in this document.
Citrix ADC VPX instance on VMware ESX hypervisors
This section contains details of configurable options and settings, and other suggestions that help you achieve optimal performance of Citrix ADC VPX instance on VMware ESX hypervisors.
- Recommended configuration on ESX hosts
- Citrix ADC VPX with E1000 network interfaces
- Citrix ADC VPX with VMXNET3 network interfaces
- Citrix ADC VPX with SR-IOV and PCI passthrough network interfaces
Recommended configuration on ESX hosts
To achieve high performance for VPX with E1000, VMXNET3, SR-IOV, and PCI passthrough network interfaces, follow these recommendations:
- The total number of virtual CPUs (vCPUs) provisioned on the ESX host must be less than or equal to the total number of physical CPUs (pCPUs) on the ESX host.
-
Non-uniform Memory Access (NUMA) affinity and CPU affinity must be set for the ESX host to achieve good results.
– To find the NUMA affinity of a Vmnic, log in to the host locally or remotely, and type:
#vsish -e get /net/pNics/vmnic7/properties | grep NUMA Device NUMA Node: 0 <!--NeedCopy-->- To set NUMA and vCPU affinity for a VM, see VMware documentation.
Citrix ADC VPX with E1000 network interfaces
Perform the following settings on the VMware ESX host:
- On the VMware ESX host, create two vNICs from one pNIC vSwitch. Multiple vNICs create multiple Rx threads in the ESX host. This increases the Rx throughput of the pNIC interface.
- Enable VLANs on the vSwitch port group level for each vNIC that you have created.
- To increase vNIC transmit (Tx) throughput, use a separate Tx thread in the ESX host per vNIC. Use the following ESX command:
-
For ESX version 5.5:
esxcli system settings advanced set –o /Net/NetTxWorldlet –i <!--NeedCopy--> -
For ESX version 6.0 onwards:
   esxcli system settings advanced set -o /Net/NetVMTxType –i 1
 <!--NeedCopy-->
-
-
To further increase the vNIC Tx throughput, use a separate Tx completion thread and Rx threads per device (NIC) queue. Use the following ESX command:
   esxcli system settings advanced set -o /Net/NetNetqRxQueueFeatPairEnable -i 0
 <!--NeedCopy-->
Remarque :
Make sure that you reboot the VMware ESX host to apply the updated settings.
Two vNICs per pNIC deployment
The following is a sample topology and configuration commands for the Two vNICs per pNIC model of deployment that delivers better network performance.
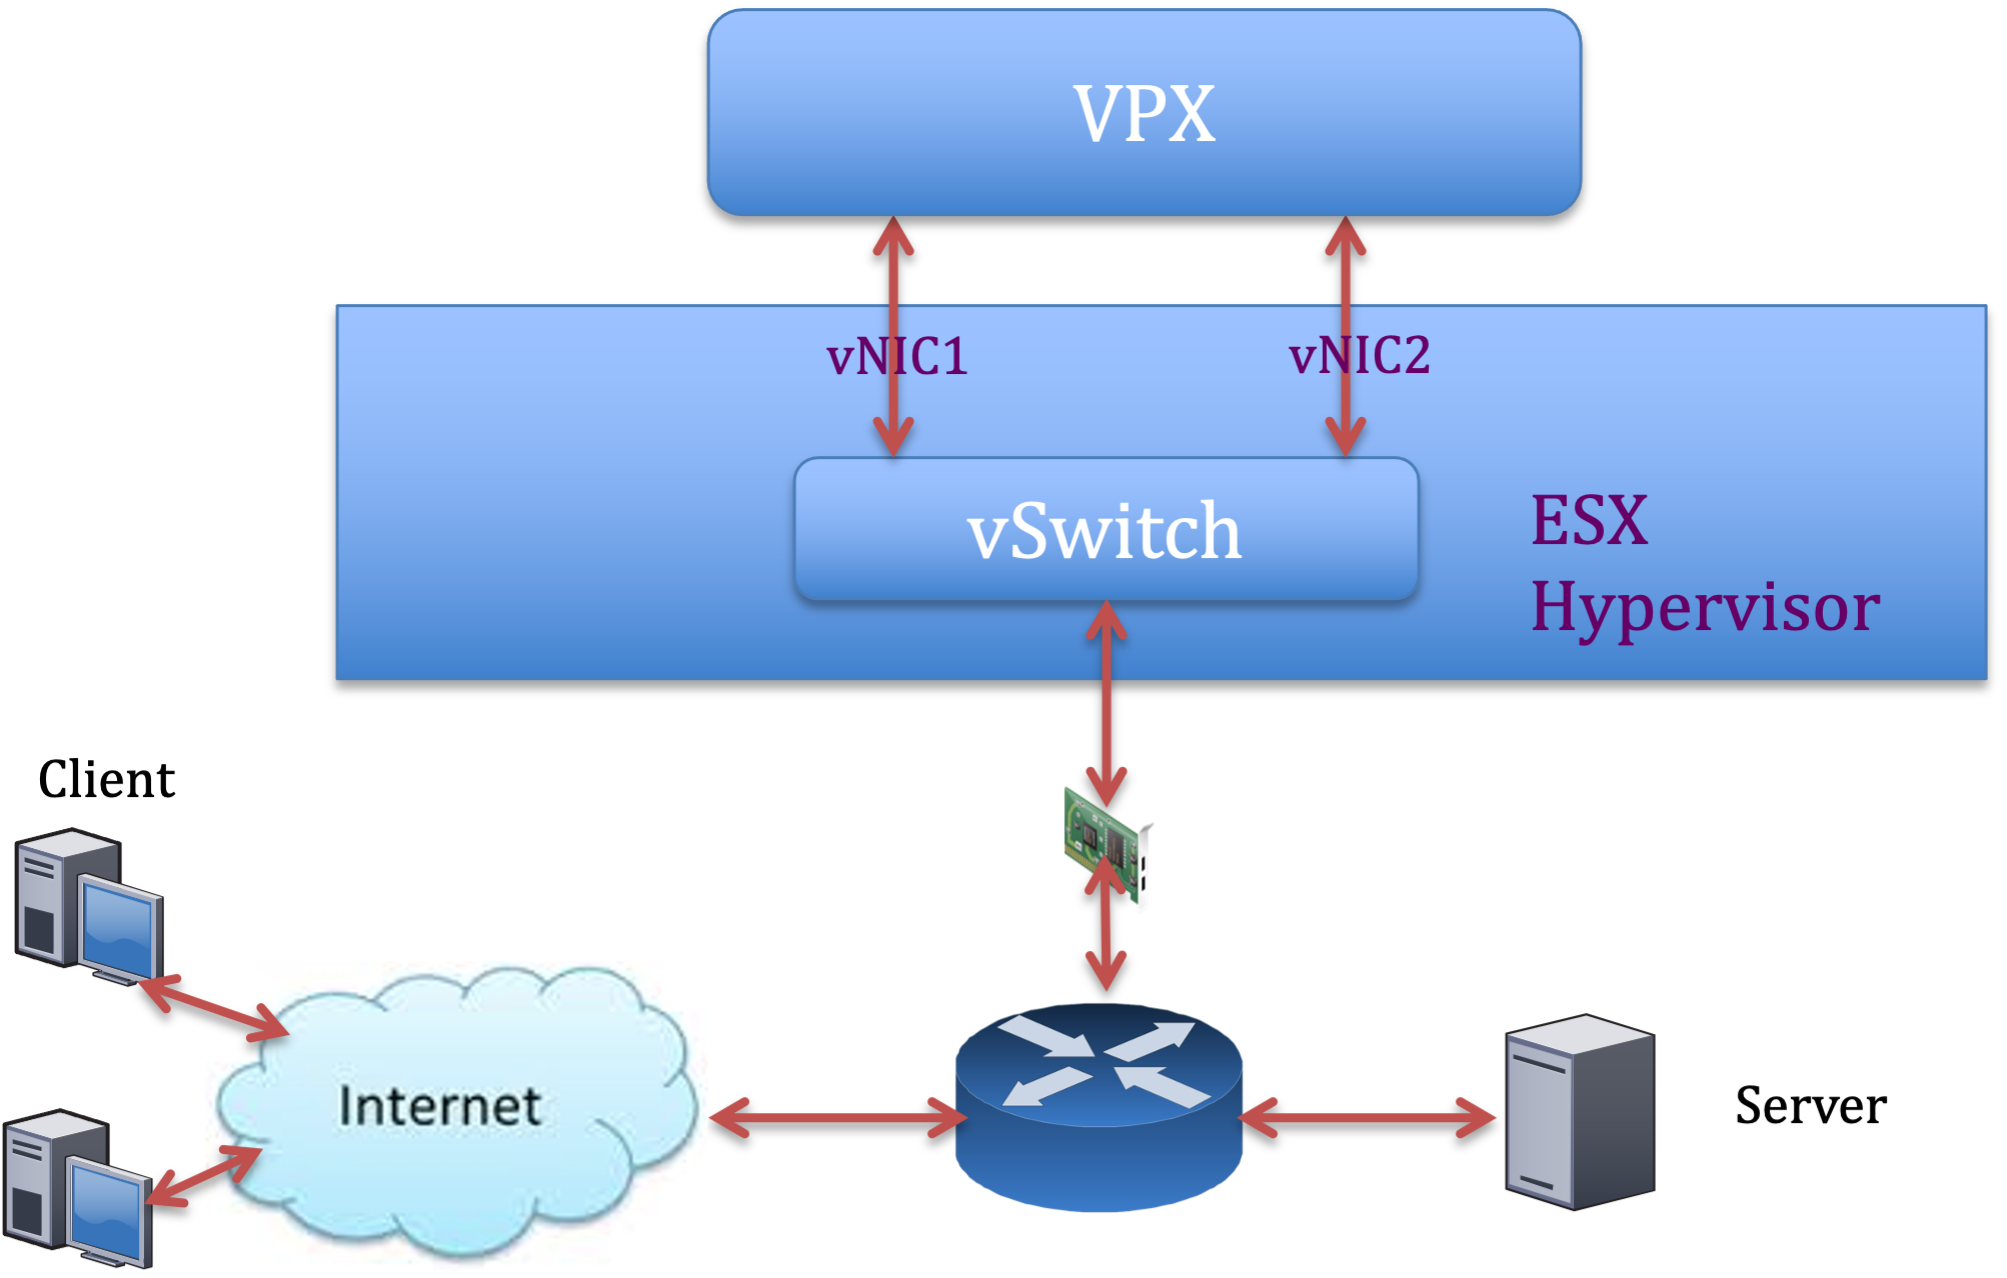
Citrix ADC VPX sample configuration:
To achieve the deployment shown in the preceding sample topology, perform the following configuration on the Citrix ADC VPX instance:
-
On the client side, bind the SNIP (1.1.1.2) to network interface 1/1 and enable the VLAN tag mode.
bind vlan 2 -ifnum 1/1 –tagged bind vlan 2 -IPAddress 1.1.1.2 255.255.255.0 <!--NeedCopy--> -
On the server side, bind the SNIP (2.2.2.2) to network interface 1/1 and enable the VLAN tag mode.
bind vlan 3 -ifnum 1/2 –tagged bind vlan 3 -IPAddress 2.2.2.2 255.255.255.0 <!--NeedCopy--> -
Add an HTTP virtual server (1.1.1.100) and bind it to a service (2.2.2.100).
   add lb vserver v1 HTTP 1.1.1.100 80 -persistenceType NONE -Listenpolicy None -cltTimeout 180
   add service s1 2.2.2.100 HTTP 80 -gslb NONE -maxClient 0 -maxReq 0 -cip DISABLED -usip NO -useproxyport YES -sp ON -cltTimeout 180 -svrTimeout 360 -CKA NO -TCPB NO -CMP NO
   bind lb vserver v1 s1
 <!--NeedCopy-->
Remarque :
Make sure that you include the following two entries in the route table:
- 1.1.1.0/24 subnet with gateway pointing to SNIP 1.1.1.2
- 2.2.2.0/24 subnet with gateway pointing to SNIP 2.2.2.2
Citrix ADC VPX with VMXNET3 network interfaces
To achieve high performance for VPX with VMXNET3 network interfaces, do the following settings on the VMware ESX host:
- Create two vNICs from one pNIC vSwitch. Multiple vNICs create multiple Rx threads in the ESX host. This increases the Rx throughput of the pNIC interface.
- Enable VLANs on the vSwitch port group level for each vNIC that you have created.
- To increase vNIC transmit (Tx) throughput, use a separate Tx thread in the ESX host per vNIC. Use the following ESX commands:
- For ESX version 5.5:
esxcli system settings advanced set –o /Net/NetTxWorldlet –i <!--NeedCopy-->- For ESX version 6.0 onwards:
    esxcli system settings advanced set -o /Net/NetVMTxType –i 1
  <!--NeedCopy-->
On the VMware ESX host, perform the following configuration:
- On the VMware ESX host, create two vNICs from 1 pNIC vSwitch. Multiple vNICs create multiple Tx and Rx threads in the ESX host. This increases the Tx and Rx throughput of the pNIC interface.
- Enable VLANs on the vSwitch port group level for each vNIC that you have created.
-
To increase Tx throughput of a vNIC, use a separate Tx completion thread and Rx threads per device (NIC) queue. Utilisez la commande suivante :
esxcli system settings advanced set -o /Net/NetNetqRxQueueFeatPairEnable -i 0 <!--NeedCopy--> -
Configure a VM to use one transmit thread per vNIC, by adding the following setting to the VM’s configuration:
   ethernetX.ctxPerDev = "1"
 <!--NeedCopy-->
Remarque :
Make sure that you reboot the VMware ESX host to apply the updated settings.
You can configure VMXNET3 as a Two vNICs per pNIC deployment. For more information, see Two vNICs per pNIC deployment.
Citrix ADC VPX with SR-IOV and PCI passthrough network interfaces
To achieve high performance for VPX with SR-IOV and PCI passthrough network interfaces, see Recommended configuration on ESX hosts.
Citrix ADC VPX instance on Linux-KVM platform
This section contains details of configurable options and settings, and other suggestions that help you achieve optimal performance of Citrix ADC VPX instance on Linux-KVM platform.
- Paramètres de performance pour KVM
- Citrix ADC VPX with PV network interfaces
- Citrix ADC VPX with SR-IOV and Fortville PCIe passthrough network interfaces
Paramètres de performance pour KVM
Perform the following settings on the KVM host:
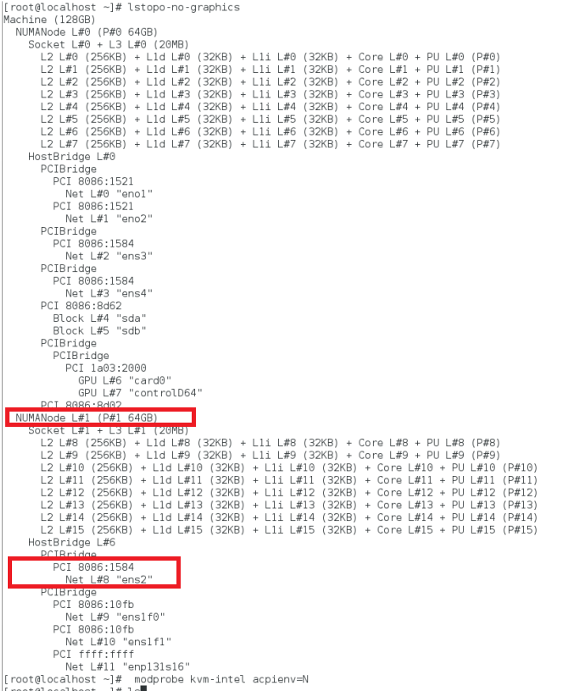
Find the NUMA domain of the NIC using the lstopo command:
Make sure that memory for the VPX and the CPU is pinned to the same location. In the following output, the 10G NIC “ens2” is tied to NUMA domain #1.
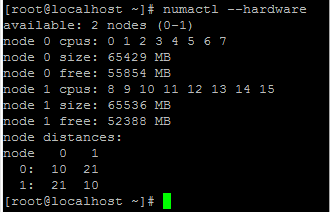
Allocate the VPX memory from the NUMA domain.
The numactl command indicates the NUMA domain from which the memory is allocated. In the following output, around 10 GB RAM is allocated from NUMA node #0.
To change the NUMA node mapping, follow these steps.
-
Modifiez le .xml du VPX sur l’hôte.
/etc/libvirt/qemu/<VPX_name>.xml <!--NeedCopy--> -
Ajoutez la balise suivante :
<numatune> <memory mode="strict" nodeset="1"/> This is the NUMA domain name </numatune> <!--NeedCopy--> -
Arrêtez le VPX.
-
Exécutez la commande suivante :
  virsh define /etc/libvirt/qemu/<VPX_name>.xml
<!--NeedCopy-->
Cette commande met à jour les informations de configuration de la machine virtuelle avec les mappages de nœuds NUMA.
-
Mettez le VPX sous tension. Vérifiez ensuite la sortie de la
numactl –hardwarecommande sur l’hôte pour voir les allocations de mémoire mises à jour pour le VPX.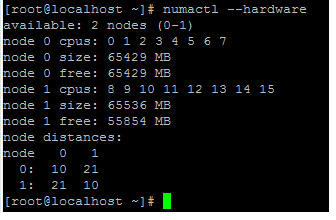
Pin vCPUs of VPX to physical cores.
-
Pour afficher les mappages vCPU vers PCPU d’un VPX, tapez la commande suivante
   virsh vcpupin <VPX name>
 <!--NeedCopy-->
Les vCPU 0—4 sont mappés sur les cœurs physiques 8 à 11.
-
Pour afficher l’utilisation actuelle du PCPU, tapez la commande suivante :
   mpstat -P ALL 5
 <!--NeedCopy-->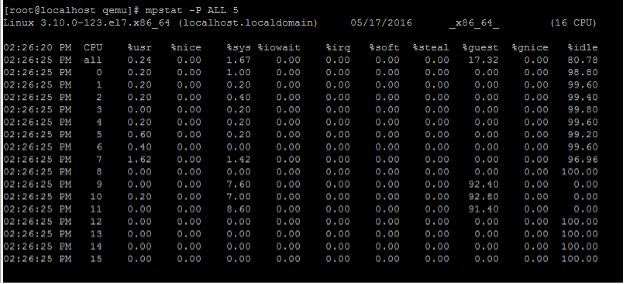
Dans cette sortie, 8 correspond au processeur de gestion et 9 à 11 aux moteurs de paquets.
-
Pour changer le vCPU en épinglage PCPU, il existe deux options.
-
Modifiez-le au moment de l’exécution après le démarrage du VPX à l’aide de la commande suivante :
virsh vcpupin <VPX name> <vCPU id> <pCPU number> virsh vcpupin NetScaler-VPX-XML 0 8 virsh vcpupin NetScaler-VPX-XML 1 9 virsh vcpupin NetScaler-VPX-XML 2 10 virsh vcpupin NetScaler-VPX-XML 3 11 <!--NeedCopy--> -
Pour apporter des modifications statiques au VPX, modifiez le
.xmlfichier comme précédemment avec les balises suivantes :-
Modifiez le fichier .xml du VPX sur l’hôte
/etc/libvirt/qemu/<VPX_name>.xml <!--NeedCopy--> -
Ajoutez la balise suivante :
<vcpu placement='static' cpuset='8-11'>4</vcpu> <cputune> <vcpupin vcpu='0' cpuset='8'/> <vcpupin vcpu='1' cpuset='9'/> <vcpupin vcpu='2' cpuset='10'/> <vcpupin vcpu='3' cpuset='11'/> </cputune> <!--NeedCopy--> -
Arrêtez le VPX.
-
Mettez à jour les informations de configuration de la machine virtuelle avec les mappages de nœuds NUMA à l’aide de la commande suivante :
virsh define /etc/libvirt/qemu/ <VPX_name>.xml <!--NeedCopy--> -
Mettez le VPX sous tension. Vérifiez ensuite la sortie de la
virsh vcpupin <VPX name>commande sur l’hôte pour voir l’épinglage du processeur mis à jour.
-
-
Eliminate host interrupt overhead.
-
Détectez VM_EXITS à l’aide de la
kvm_statcommande.Au niveau de l’hyperviseur, les interruptions de l’hôte sont mappées sur les mêmes processeurs sur lesquels les vCPU du VPX sont épinglés. Cela peut entraîner le retrait périodique des processeurs virtuels sur le VPX.
Pour trouver les sorties de machine virtuelle effectuées par les machines virtuelles exécutant l’hôte, utilisez la
kvm_statcommande.[root@localhost ~]# kvm_stat -1 | grep EXTERNAL kvm_exit(EXTERNAL_INTERRUPT) 1728349 27738 [root@localhost ~]# <!--NeedCopy-->Une valeur supérieure de l’ordre de 1+M indique un problème.
Si une seule VM est présente, la valeur attendue est de 30 à 100 K. Tout ce qui dépasse cela peut indiquer qu’il existe un ou plusieurs vecteurs d’interruption d’hôte mappés sur le même pCPU.
-
Détectez les interruptions de l’hôte et migrez les interruptions de l’hôte.
Lorsque vous exécutez la
concatenatecommande pour le fichier « /proc/interrupts », elle affiche tous les mappages d’interruption de l’hôte. Si un ou plusieurs IRQ actifs sont mappés sur le même PCPU, le compteur correspondant est incrémenté.Move any interrupts that overlap with your Citrix ADC VPX’s pCPUs to unused pCPUs:
echo 0000000f > /proc/irq/55/smp_affinity 0000000f - - > it is a bitmap, LSBs indicates that IRQ 55 can only be scheduled on pCPUs 0 – 3 <!--NeedCopy--> -
Désactivez la balance IRQ.
Désactivez le démon d’équilibrage de l’IRQ, de sorte qu’aucune replanification ne se produise à la volée.
   service irqbalance stop
   service irqbalance show - To check the status
   service irqbalance start - Enable if needed
 <!--NeedCopy-->
Assurez-vous d’exécuter la commande
kvm_statpour vous assurer qu’il n’y a pas beaucoup de compteurs.
Citrix ADC VPX with PV network interfaces
You can configure para-virtualization (PV), SR-IOV, and PCIe passthrough network interfaces as a Two vNICs per pNIC deployment. For more information, see Two vNICs per pNIC deployment.
For optimal performance of PV (virtio) interfaces, follow these steps:
- Identify the NUMA domain to which the PCIe slot/NIC is tied to.
- The Memory and vCPU for the VPX must be pinned to the same NUMA domain.
- Le thread Vhost doit être lié aux processeurs du même domaine NUMA.
Bind the virtual host threads to the corresponding CPUs:
-
Une fois le trafic démarré, exécutez la
topcommande sur l’hôte.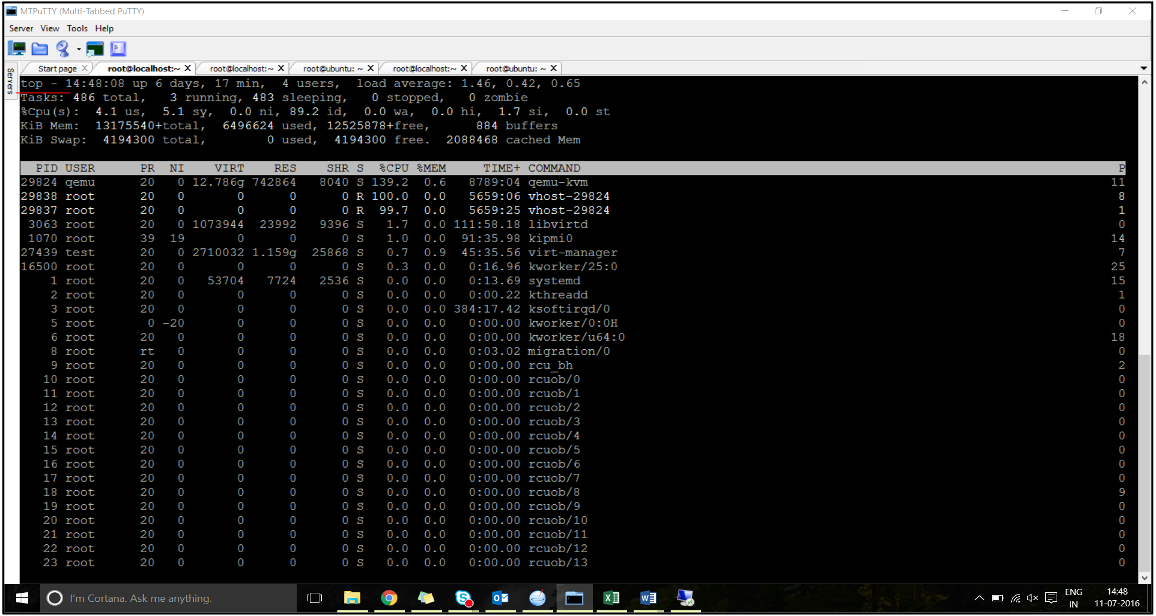
- Identifiez l’affinité du processus hôte virtuel (nommé sous le nom
vhost-<pid-of-qemu>). -
Liez les processus vHost aux cœurs physiques du domaine NUMA identifié précédemment à l’aide de la commande suivante :
  taskset –pc <core-id> <process-id>
<!--NeedCopy-->
Exemple
taskset –pc 12 29838 <!--NeedCopy--> -
Les cœurs de processeur correspondant au domaine NUMA peuvent être identifiés à l’aide de la commande suivante :
  [root@localhost ~]# virsh capabilities | grep cpu
  <cpu>
      </cpu>
          <cpus num='8'>
              <cpu id='0' socket_id='0' core_id='0' siblings='0'/>
              <cpu id='1' socket_id='0' core_id='1' siblings='1'/>
              <cpu id='2' socket_id='0' core_id='2' siblings='2'/>
              <cpu id='3' socket_id='0' core_id='3' siblings='3'/>
              <cpu id='4' socket_id='0' core_id='4' siblings='4'/>
              <cpu id='5' socket_id='0' core_id='5' siblings='5'/>
              <cpu id='6' socket_id='0' core_id='6' siblings='6'/>
              <cpu id='7' socket_id='0' core_id='7' siblings='7'/>
          </cpus>

          <cpus num='8'>
          <cpu id='8' socket_id='1' core_id='0' siblings='8'/>
          <cpu id='9' socket_id='1' core_id='1' siblings='9'/>
          <cpu id='10' socket_id='1' core_id='2' siblings='10'/>
          <cpu id='11' socket_id='1' core_id='3' siblings='11'/>
          <cpu id='12' socket_id='1' core_id='4' siblings='12'/>
          <cpu id='13' socket_id='1' core_id='5' siblings='13'/>
          <cpu id='14' socket_id='1' core_id='6' siblings='14'/>
          <cpu id='15' socket_id='1' core_id='7' siblings='15'/>
          </cpus>

      <cpuselection/>
      <cpuselection/>

<!--NeedCopy-->
Bind the QEMU process to the corresponding physical core:
- Identifiez les cœurs physiques sur lesquels le processus QEMU est exécuté. Pour plus d’informations, reportez-vous à la sortie précédente.
-
Liez le processus QEMU aux mêmes cœurs physiques auxquels vous liez les vCPU, à l’aide de la commande suivante :
  taskset –pc 8-11 29824
<!--NeedCopy-->
Citrix ADC VPX with SR-IOV and Fortville PCIe passthrough network interfaces
For optimal performance of the SR-IOV and Fortville PCIe passthrough network interfaces, follow these steps:
- Identify the NUMA domain to which the PCIe slot/NIC is tied to.
- The Memory and vCPU for the VPX must be pinned to the same NUMA domain.
Sample VPX XML file for vCPU and memory pinning for Linux KVM:
      <domain type='kvm'>
          <name>NetScaler-VPX</name>
          <uuid>138f7782-1cd3-484b-8b6d-7604f35b14f4</uuid>
          <memory unit='KiB'>8097152</memory>
          <currentMemory unit='KiB'>8097152</currentMemory>
          <vcpu placement='static'>4</vcpu>

      <cputune>
          <vcpupin vcpu='0' cpuset='8'/>
          <vcpupin vcpu='1' cpuset='9'/>
          <vcpupin vcpu='2' cpuset='10'/>
          <vcpupin vcpu='3' cpuset='11'/>
      </cputune>

      <numatune>
      <memory mode='strict' nodeset='1'/>
      </numatune>

      </domain>
<!--NeedCopy-->
Citrix ADC VPX instance on Citrix Hypervisors
This section contains details of configurable options and settings, and other suggestions that help you achieve optimal performance of Citrix ADC VPX instance on Citrix Hypervisors.
- Paramètres de performance pour Citrix Hypervisors
- Citrix ADC VPX with SR-IOV network interfaces
- Citrix ADC VPX with para-virtualized interfaces
Paramètres de performance pour Citrix Hypervisors
Find the NUMA domain of the NIC using the “xl” command:
  xl info -n
<!--NeedCopy-->
Pin vCPUs of VPX to physical cores.
  xl vcpu-pin <Netsclaer VM Name>  <vCPU id>  <physical CPU id>
<!--NeedCopy-->
Check binding of vCPUs.
  xl vcpu-list
<!--NeedCopy-->
Allocate more than 8 vCPUs to Citrix ADC VMs.
For configuring more than 8 vCPUs, run the following commands from the Citrix Hypervisor console:
  xe vm-param-set uuid=your_vms_uuid VCPUs-max=16
  xe vm-param-set uuid=your_vms_uuid VCPUs-at-startup=16
<!--NeedCopy-->
Citrix ADC VPX with SR-IOV network interfaces
For optimal performance of the SR-IOV network interfaces, follow these steps:
- Identify the NUMA domain to which the PCIe slot or NIC is tied to.
- Épinglez la mémoire et le processeur virtuel du VPX au même domaine NUMA.
- Liez le vCPU Domain-0 au processeur restant.
Citrix ADC VPX with para-virtualized interfaces
For optimal performance, two vNICs per pNIC and one vNIC per pNIC configurations are advised, as in other PV environments.
To achieve optimal performance of para-virtualized (netfront) interfaces, follow these steps:
- Identify the NUMA domain to which the PCIe slot or NIC is tied to.
- Épinglez la mémoire et le processeur virtuel du VPX au même domaine NUMA.
- Liez le vCPU Domain-0 au processeur restant du même domaine NUMA.
- Épinglez les threads Rx/Tx hôtes de vNIC aux vCPU du domaine 0.
Pin host threads to Domain-0 vCPUs:
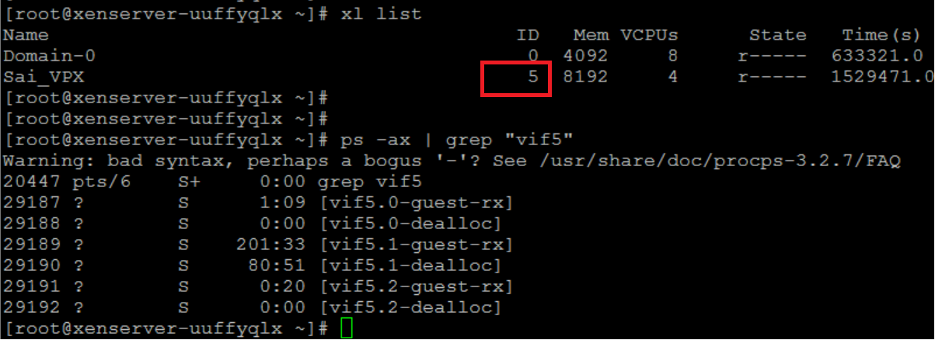
- Recherchez l’ID Xen du VPX à l’aide de la
xl listcommande sur le shell hôte Citrix Hypervisor. -
Identifiez les threads hôtes à l’aide de la commande suivante :
  ps -ax | grep vif <Xen-ID>
<!--NeedCopy-->
Dans l’exemple suivant, ces valeurs indiquent :
- vif5.0 - Les threads de la première interface allouée à VPX dans XenCenter (interface de gestion).
- vif5.1 - Les threads de la deuxième interface affectée à VPX et ainsi de suite.
-
Épinglez les threads aux vCPU du domaine 0 à l’aide de la commande suivante :
  taskset –pc <core-id> <process-id>
<!--NeedCopy-->
Exemple
  taskset -pc 1 29189
<!--NeedCopy-->