Optimize Citrix ADC VPX performance on VMware ESX, Linux KVM, and Citrix Hypervisors
The Citrix ADC VPX performance greatly varies depending on the hypervisor, allocated system resources, and the host configurations. To achieve the desired performance, first follow the recommendations in the VPX data sheet, and then further optimize it using the best practices provided in this document.
Citrix ADC VPX instance on VMware ESX hypervisors
This section contains details of configurable options and settings, and other suggestions that help you achieve optimal performance of Citrix ADC VPX instance on VMware ESX hypervisors.
- Recommended configuration on ESX hosts
- Citrix ADC VPX with E1000 network interfaces
- Citrix ADC VPX with VMXNET3 network interfaces
- Citrix ADC VPX with SR-IOV and PCI passthrough network interfaces
Recommended configuration on ESX hosts
To achieve high performance for VPX with E1000, VMXNET3, SR-IOV, and PCI passthrough network interfaces, follow these recommendations:
- The total number of virtual CPUs (vCPUs) provisioned on the ESX host must be less than or equal to the total number of physical CPUs (pCPUs) on the ESX host.
-
Non-uniform Memory Access (NUMA) affinity and CPU affinity must be set for the ESX host to achieve good results.
– To find the NUMA affinity of a Vmnic, log in to the host locally or remotely, and type:
#vsish -e get /net/pNics/vmnic7/properties | grep NUMA Device NUMA Node: 0 <!--NeedCopy-->- To set NUMA and vCPU affinity for a VM, see VMware documentation.
Citrix ADC VPX with E1000 network interfaces
Perform the following settings on the VMware ESX host:
- On the VMware ESX host, create two vNICs from one pNIC vSwitch. 複数の vNIC により、ESX ホストに複数の Rx スレッドが作成されます。 This increases the Rx throughput of the pNIC interface.
- Enable VLANs on the vSwitch port group level for each vNIC that you have created.
- To increase vNIC transmit (Tx) throughput, use a separate Tx thread in the ESX host per vNIC. Use the following ESX command:
-
For ESX version 5.5:
esxcli system settings advanced set –o /Net/NetTxWorldlet –i <!--NeedCopy--> -
For ESX version 6.0 onwards:
   esxcli system settings advanced set -o /Net/NetVMTxType –i 1
 <!--NeedCopy-->
-
-
To further increase the vNIC Tx throughput, use a separate Tx completion thread and Rx threads per device (NIC) queue. Use the following ESX command:
   esxcli system settings advanced set -o /Net/NetNetqRxQueueFeatPairEnable -i 0
 <!--NeedCopy-->
注
Make sure that you reboot the VMware ESX host to apply the updated settings.
Two vNICs per pNIC deployment
The following is a sample topology and configuration commands for the Two vNICs per pNIC model of deployment that delivers better network performance.
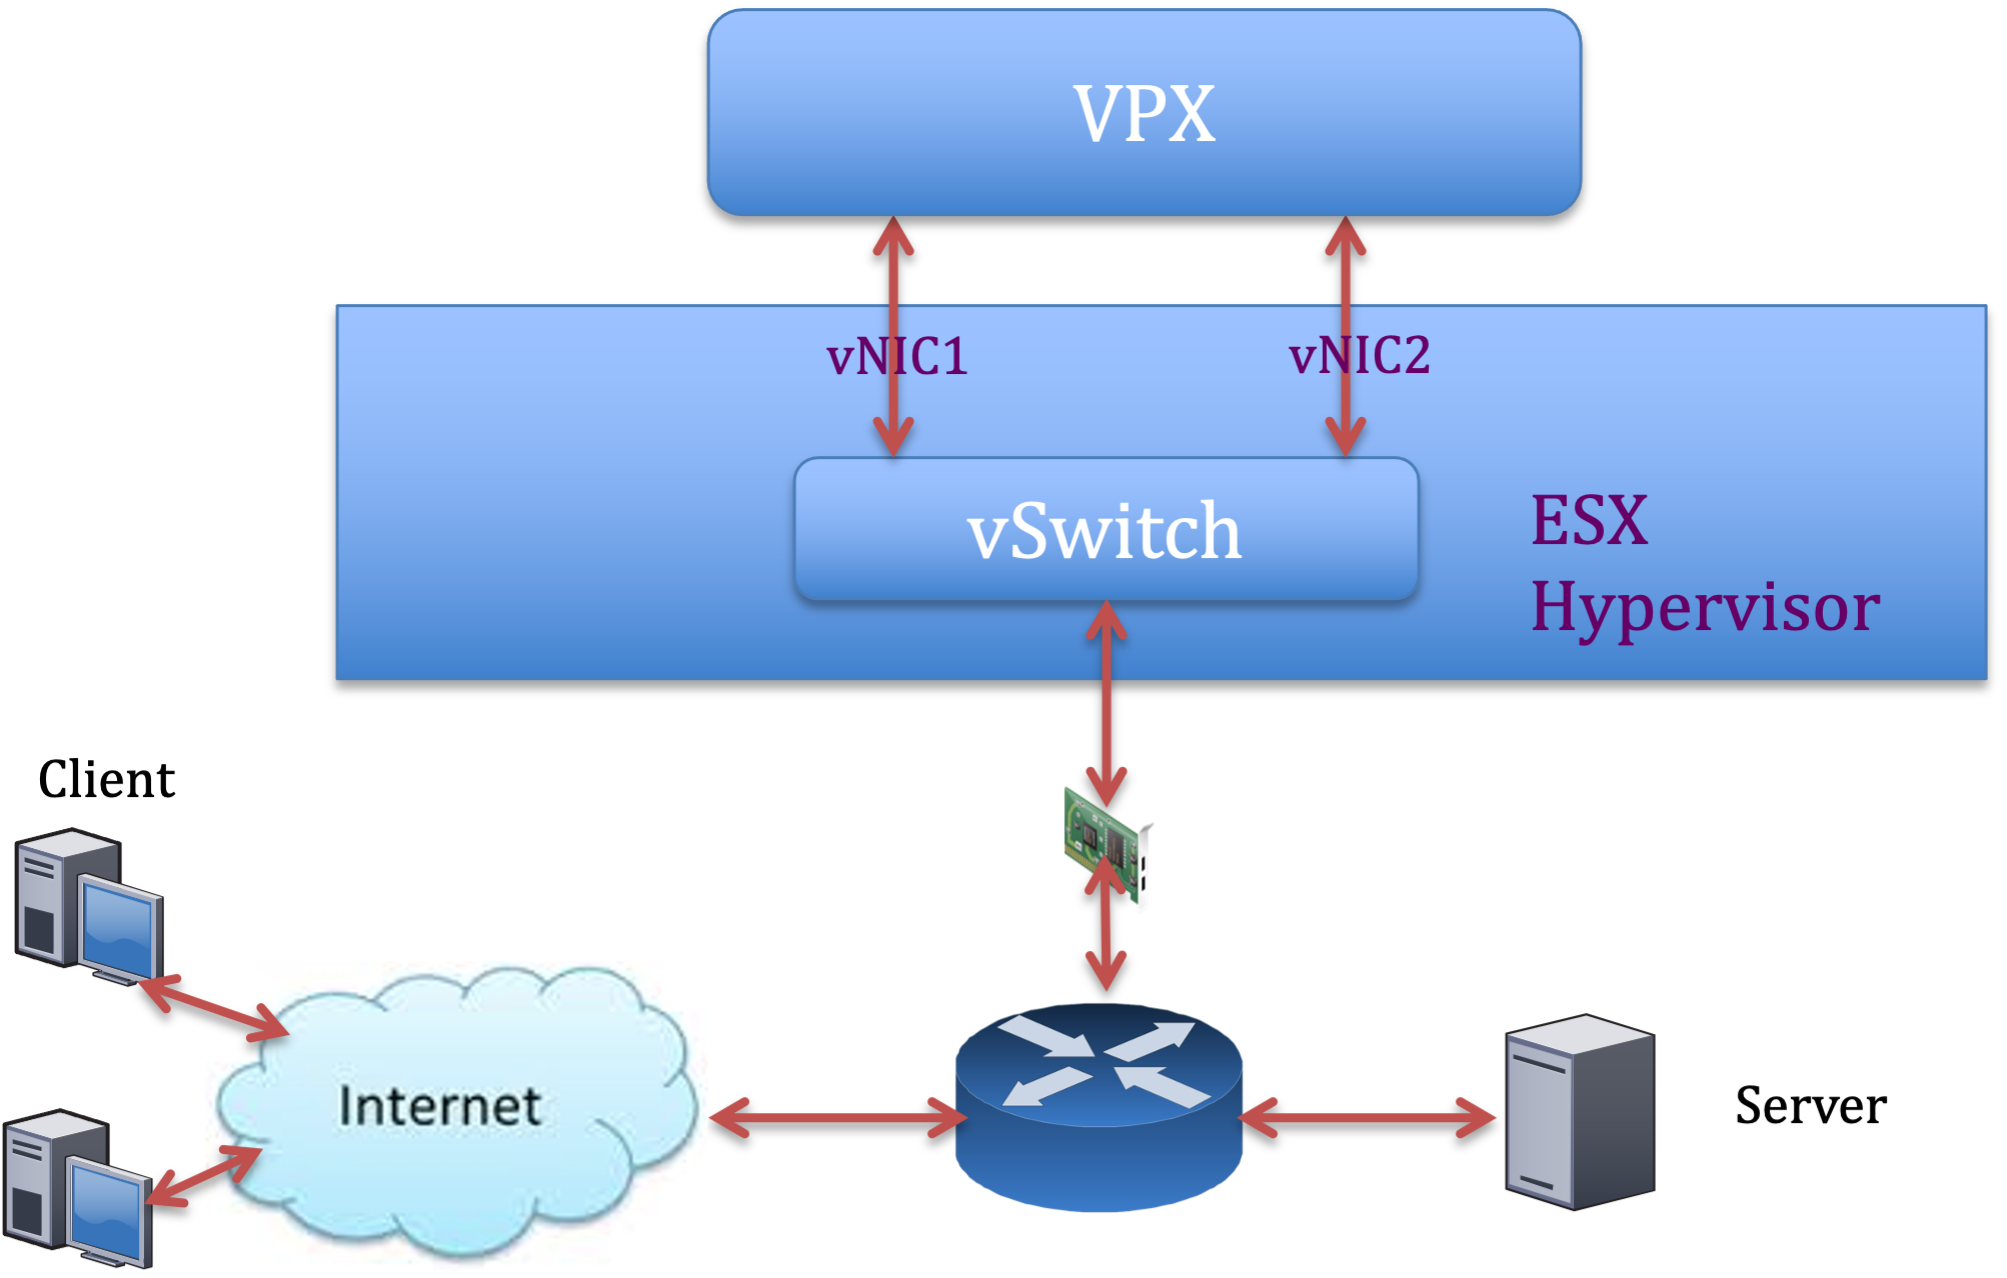
Citrix ADC VPX sample configuration:
To achieve the deployment shown in the preceding sample topology, perform the following configuration on the Citrix ADC VPX instance:
-
On the client side, bind the SNIP (1.1.1.2) to network interface 1/1 and enable the VLAN tag mode.
bind vlan 2 -ifnum 1/1 –tagged bind vlan 2 -IPAddress 1.1.1.2 255.255.255.0 <!--NeedCopy--> -
On the server side, bind the SNIP (2.2.2.2) to network interface 1/1 and enable the VLAN tag mode.
bind vlan 3 -ifnum 1/2 –tagged bind vlan 3 -IPAddress 2.2.2.2 255.255.255.0 <!--NeedCopy--> -
Add an HTTP virtual server (1.1.1.100) and bind it to a service (2.2.2.100).
   add lb vserver v1 HTTP 1.1.1.100 80 -persistenceType NONE -Listenpolicy None -cltTimeout 180
   add service s1 2.2.2.100 HTTP 80 -gslb NONE -maxClient 0 -maxReq 0 -cip DISABLED -usip NO -useproxyport YES -sp ON -cltTimeout 180 -svrTimeout 360 -CKA NO -TCPB NO -CMP NO
   bind lb vserver v1 s1
 <!--NeedCopy-->
注
Make sure that you include the following two entries in the route table:
- 1.1.1.0/24 subnet with gateway pointing to SNIP 1.1.1.2
- 2.2.2.0/24 subnet with gateway pointing to SNIP 2.2.2.2
Citrix ADC VPX with VMXNET3 network interfaces
To achieve high performance for VPX with VMXNET3 network interfaces, do the following settings on the VMware ESX host:
- Create two vNICs from one pNIC vSwitch. 複数の vNIC により、ESX ホストに複数の Rx スレッドが作成されます。 This increases the Rx throughput of the pNIC interface.
- Enable VLANs on the vSwitch port group level for each vNIC that you have created.
- To increase vNIC transmit (Tx) throughput, use a separate Tx thread in the ESX host per vNIC. Use the following ESX commands:
- For ESX version 5.5:
esxcli system settings advanced set –o /Net/NetTxWorldlet –i <!--NeedCopy-->- For ESX version 6.0 onwards:
    esxcli system settings advanced set -o /Net/NetVMTxType –i 1
  <!--NeedCopy-->
On the VMware ESX host, perform the following configuration:
- On the VMware ESX host, create two vNICs from 1 pNIC vSwitch. Multiple vNICs create multiple Tx and Rx threads in the ESX host. This increases the Tx and Rx throughput of the pNIC interface.
- Enable VLANs on the vSwitch port group level for each vNIC that you have created.
-
To increase Tx throughput of a vNIC, use a separate Tx completion thread and Rx threads per device (NIC) queue. 次のコマンドを使用します:
esxcli system settings advanced set -o /Net/NetNetqRxQueueFeatPairEnable -i 0 <!--NeedCopy--> -
Configure a VM to use one transmit thread per vNIC, by adding the following setting to the VM’s configuration:
   ethernetX.ctxPerDev = "1"
 <!--NeedCopy-->
注
Make sure that you reboot the VMware ESX host to apply the updated settings.
You can configure VMXNET3 as a Two vNICs per pNIC deployment. 詳細については、「物理 NIC 展開ごとに 2 つの vNIC」を参照してください。
Citrix ADC VPX with SR-IOV and PCI passthrough network interfaces
To achieve high performance for VPX with SR-IOV and PCI passthrough network interfaces, see Recommended configuration on ESX hosts.
Citrix ADC VPX instance on Linux-KVM platform
This section contains details of configurable options and settings, and other suggestions that help you achieve optimal performance of Citrix ADC VPX instance on Linux-KVM platform.
- KVM のパフォーマンス設定
- Citrix ADC VPX with PV network interfaces
- Citrix ADC VPX with SR-IOV and Fortville PCIe passthrough network interfaces
KVM のパフォーマンス設定
KVM ホストで次の設定を行います。
lstopoコマンドを使用して、NIC の NUMA ドメインを検索します。
Make sure that memory for the VPX and the CPU is pinned to the same location. VPX と CPU のメモリが同じ場所に固定されていることを確認します。 次の出力では、10G NIC「ens2」は NUMA ドメイン #1 に関連付けられています。
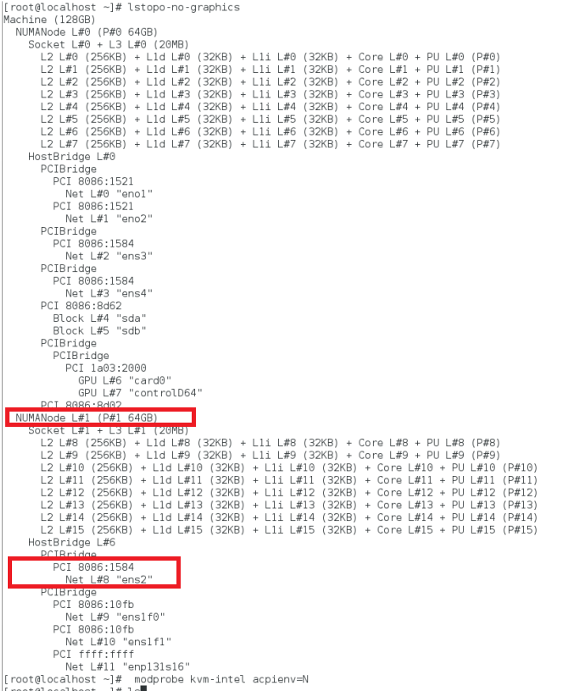
NUMA ドメインから VPX メモリを割り当てます。
numactlコマンドは、メモリの割り当て元の NUMA ドメインを示します。 次の出力では、NUMA ノード #0 から約 10 GB の RAM が割り当てられています。
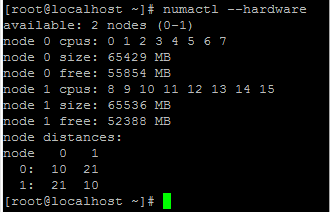
NUMA ノードマッピングを変更するには、次の手順に従います。
-
ホスト上のVPXの.xmlを編集します。
/etc/libvirt/qemu/<VPX_name>.xml <!--NeedCopy--> -
次のタグを追加します。
<numatune> <memory mode="strict" nodeset="1"/> This is the NUMA domain name </numatune> <!--NeedCopy--> -
VPXをシャットダウンします。
-
次のコマンドを実行します:
  virsh define /etc/libvirt/qemu/<VPX_name>.xml
<!--NeedCopy-->
このコマンドは、NUMA ノードマッピングを使用して VM の構成情報を更新します。
-
VPX の電源をオンにします。 次に、ホスト上の
numactl –hardwareコマンド出力を確認して、VPXの更新されたメモリ割り当てを確認します。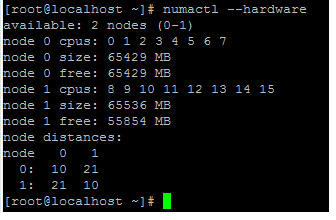
VPX の vCPU を物理コアにピン留めします。
-
VPX の vCPU から pCPU へのマッピングを表示するには、次のコマンドを入力します。
   virsh vcpupin <VPX name>
 <!--NeedCopy-->
vCPU 0 ~ 4 は物理コア 8 ~ 11 にマッピングされます。
-
現在の pCPU 使用率を表示するには、次のコマンドを入力します。
   mpstat -P ALL 5
 <!--NeedCopy-->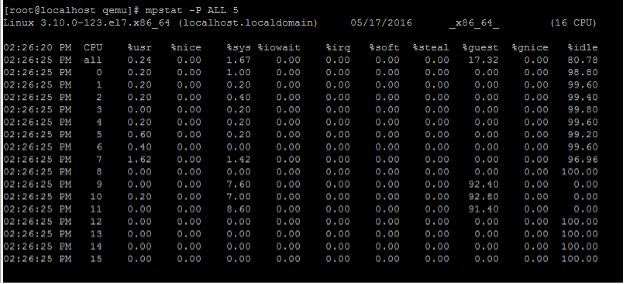
この出力では、8 は管理 CPU、9 ~ 11 はパケットエンジンです。
-
vCPU を pCPU 固定に変更するには、2 つのオプションがあります。
-
次のコマンドを使用して、VPXの起動後に実行時に変更します。
virsh vcpupin <VPX name> <vCPU id> <pCPU number> virsh vcpupin NetScaler-VPX-XML 0 8 virsh vcpupin NetScaler-VPX-XML 1 9 virsh vcpupin NetScaler-VPX-XML 2 10 virsh vcpupin NetScaler-VPX-XML 3 11 <!--NeedCopy--> -
VPXに静的な変更を加えるには、前と同じように次のタグを付けて
.xmlファイルを編集します。-
ホスト上のVPXの.xmlファイルを編集します。
/etc/libvirt/qemu/<VPX_name>.xml <!--NeedCopy--> -
次のタグを追加します。
<vcpu placement='static' cpuset='8-11'>4</vcpu> <cputune> <vcpupin vcpu='0' cpuset='8'/> <vcpupin vcpu='1' cpuset='9'/> <vcpupin vcpu='2' cpuset='10'/> <vcpupin vcpu='3' cpuset='11'/> </cputune> <!--NeedCopy--> -
VPXをシャットダウンします。
-
次のコマンドを使用して、NUMA ノードマッピングを使用して VM の設定情報を更新します。
virsh define /etc/libvirt/qemu/ <VPX_name>.xml <!--NeedCopy--> -
VPX の電源をオンにします。 次に、ホスト上の
virsh vcpupin <VPX name>コマンド出力をチェックして、更新された CPU ピン接続を確認します。
-
-
ホスト割り込みオーバーヘッドを排除します。
-
kvm_statコマンドを使用して VM_EXITS を検出します。ハイパーバイザーレベルでは、ホスト割り込みは、VPX の仮想 CPU が固定されているのと同じ pCPU にマッピングされます。 これにより、VPX 上の vCPU が定期的に追い出される可能性があります。
ホストを実行している仮想マシンによって実行された VM の終了を確認するには、
kvm_statコマンドを使用します。[root@localhost ~]# kvm_stat -1 | grep EXTERNAL kvm_exit(EXTERNAL_INTERRUPT) 1728349 27738 [root@localhost ~]# <!--NeedCopy-->1+M の順の値が大きいほど、問題があることを示します。
単一の VM が存在する場合、予想される値は 30~100 K です。 それ以上の場合は、同じ pCPU にマップされたホスト割り込みベクターが 1 つ以上あることを示している可能性があります。
-
ホスト割り込みを検出し、ホスト割り込みを移行します。
「/proc/interrupts」 ファイルの
concatenateコマンドを実行すると、すべてのホスト割り込みマッピングが表示されます。 1 つ以上のアクティブな IRQ が同じ pCPU にマップされている場合、対応するカウンタが増分します。Move any interrupts that overlap with your Citrix ADC VPX’s pCPUs to unused pCPUs:
echo 0000000f > /proc/irq/55/smp_affinity 0000000f - - > it is a bitmap, LSBs indicates that IRQ 55 can only be scheduled on pCPUs 0 – 3 <!--NeedCopy--> -
IRQ バランスを無効にします。
IRQ バランスデーモンを無効にして、その場で再スケジュールが実行されないようにします。
   service irqbalance stop
   service irqbalance show - To check the status
   service irqbalance start - Enable if needed
 <!--NeedCopy-->
必ず
kvm_statコマンドを実行して、カウンタの数が多くないことを確認します。
Citrix ADC VPX with PV network interfaces
準仮想化(PV)、SR-IOV、および PCIe パススルーネットワークインターフェイスは、物理 NIC ごとに 2 つの vNIC 展開として設定できます。 詳細については、「物理 NIC 展開ごとに 2 つの vNIC」を参照してください。
PV (virtio) インターフェイスの最適なパフォーマンスを得るには、次の手順に従います。
- PCIe スロット/NIC が関連付けられている NUMA ドメインを識別します。
- VPX のメモリと vCPU は、同じ NUMA ドメインに固定する必要があります。
- 仮想ホストスレッドは、同じ NUMA ドメイン内の CPU にバインドする必要があります。
仮想ホストスレッドを対応する CPU にバインドします。
-
トラフィックが開始されたら、ホストで
topコマンドを実行します。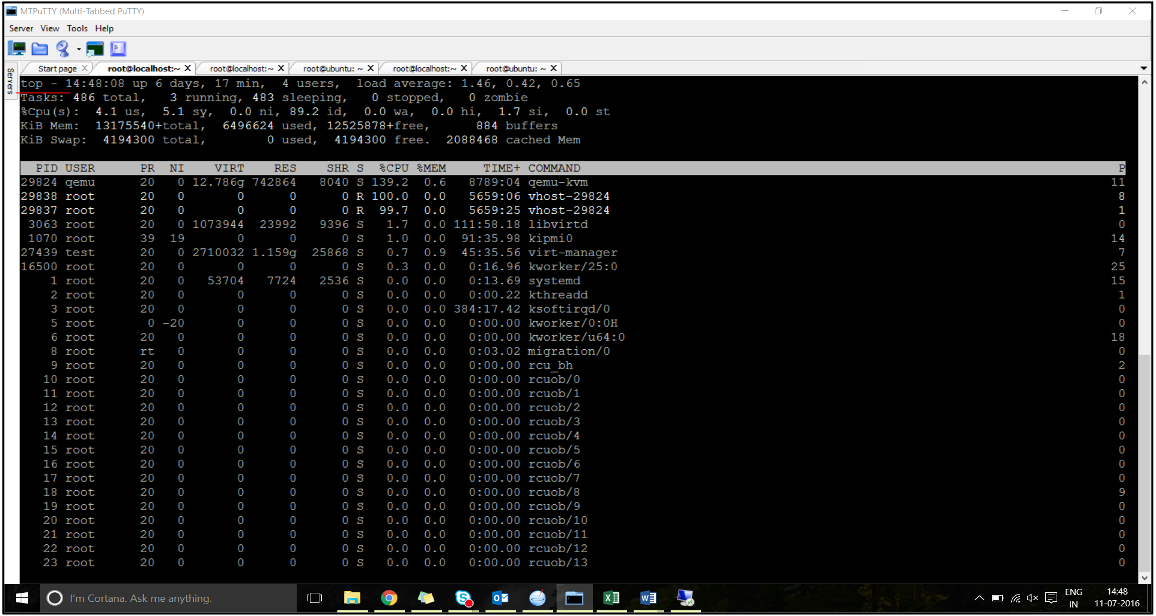
- 仮想ホストプロセス (
vhost-<pid-of-qemu>という名前 ) アフィニティを識別します。 -
次のコマンドを使用して、前に特定した NUMA ドメインの物理コアに vHost プロセスをバインドします。
  taskset –pc <core-id> <process-id>
<!--NeedCopy-->
例
taskset –pc 12 29838 <!--NeedCopy--> -
NUMA ドメインに対応するプロセッサコアは、次のコマンドで識別できます。
  [root@localhost ~]# virsh capabilities | grep cpu
  <cpu>
      </cpu>
          <cpus num='8'>
              <cpu id='0' socket_id='0' core_id='0' siblings='0'/>
              <cpu id='1' socket_id='0' core_id='1' siblings='1'/>
              <cpu id='2' socket_id='0' core_id='2' siblings='2'/>
              <cpu id='3' socket_id='0' core_id='3' siblings='3'/>
              <cpu id='4' socket_id='0' core_id='4' siblings='4'/>
              <cpu id='5' socket_id='0' core_id='5' siblings='5'/>
              <cpu id='6' socket_id='0' core_id='6' siblings='6'/>
              <cpu id='7' socket_id='0' core_id='7' siblings='7'/>
          </cpus>

          <cpus num='8'>
          <cpu id='8' socket_id='1' core_id='0' siblings='8'/>
          <cpu id='9' socket_id='1' core_id='1' siblings='9'/>
          <cpu id='10' socket_id='1' core_id='2' siblings='10'/>
          <cpu id='11' socket_id='1' core_id='3' siblings='11'/>
          <cpu id='12' socket_id='1' core_id='4' siblings='12'/>
          <cpu id='13' socket_id='1' core_id='5' siblings='13'/>
          <cpu id='14' socket_id='1' core_id='6' siblings='14'/>
          <cpu id='15' socket_id='1' core_id='7' siblings='15'/>
          </cpus>

      <cpuselection/>
      <cpuselection/>

<!--NeedCopy-->
QEMU プロセスを対応する物理コアにバインドします。
- QEMU プロセスが実行されている物理コアを特定します。 詳細については、前述の出力を参照してください。
-
次のコマンドを使用して、vCPU をバインドするのと同じ物理コアに QEMU プロセスをバインドします。
  taskset –pc 8-11 29824
<!--NeedCopy-->
Citrix ADC VPX with SR-IOV and Fortville PCIe passthrough network interfaces
SR-IOV および Fortville PCIe パススルーネットワークインターフェイスのパフォーマンスを最適化するには、次の手順を実行します。
- PCIe スロット/NIC が関連付けられている NUMA ドメインを識別します。
- VPX のメモリと vCPU は、同じ NUMA ドメインに固定する必要があります。
Linux KVM の vCPU およびメモリピンニング用のサンプル VPX XML ファイル:
      <domain type='kvm'>
          <name>NetScaler-VPX</name>
          <uuid>138f7782-1cd3-484b-8b6d-7604f35b14f4</uuid>
          <memory unit='KiB'>8097152</memory>
          <currentMemory unit='KiB'>8097152</currentMemory>
          <vcpu placement='static'>4</vcpu>

      <cputune>
          <vcpupin vcpu='0' cpuset='8'/>
          <vcpupin vcpu='1' cpuset='9'/>
          <vcpupin vcpu='2' cpuset='10'/>
          <vcpupin vcpu='3' cpuset='11'/>
      </cputune>

      <numatune>
      <memory mode='strict' nodeset='1'/>
      </numatune>

      </domain>
<!--NeedCopy-->
Citrix ADC VPX instance on Citrix Hypervisors
This section contains details of configurable options and settings, and other suggestions that help you achieve optimal performance of Citrix ADC VPX instance on Citrix Hypervisors.
- Citrix Hypervisorのパフォーマンス設定
- Citrix ADC VPX with SR-IOV network interfaces
- Citrix ADC VPX with para-virtualized interfaces
Citrix Hypervisorのパフォーマンス設定
「xl」コマンドを使用して NIC の NUMA ドメインを見つけます。
  xl info -n
<!--NeedCopy-->
VPX の vCPU を物理コアにピン留めします。
  xl vcpu-pin <Netsclaer VM Name>  <vCPU id>  <physical CPU id>
<!--NeedCopy-->
vCPU のバインドをチェックします。
  xl vcpu-list
<!--NeedCopy-->
Allocate more than 8 vCPUs to Citrix ADC VMs.
8個を超える仮想CPUを構成するには、Citrix Hypervisorコンソールから次のコマンドを実行します。
  xe vm-param-set uuid=your_vms_uuid VCPUs-max=16
  xe vm-param-set uuid=your_vms_uuid VCPUs-at-startup=16
<!--NeedCopy-->
Citrix ADC VPX with SR-IOV network interfaces
SR-IOV ネットワークインターフェイスの最適なパフォーマンスを得るには、次の手順を実行します。
- PCIe スロットまたは NIC が接続されている NUMA ドメインを特定します。
- VPX のメモリと vCPU を同じ NUMA ドメインに固定します。
- ドメイン 0 vCPU を残りの CPU にバインドします。
Citrix ADC VPX with para-virtualized interfaces
最適なパフォーマンスを得るには、他の PV 環境と同様に、pNIC ごとに 2 つの vNIC、および pNIC 構成ごとに 1 つの vNIC を推奨します。
準仮想化 (netfront) インターフェイスの最適なパフォーマンスを実現するには、次の手順を実行します。
- PCIe スロットまたは NIC が接続されている NUMA ドメインを特定します。
- VPX のメモリと vCPU を同じ NUMA ドメインに固定します。
- ドメイン 0 vCPU を同じ NUMA ドメインの残りの CPU にバインドします。
- 仮想 NIC のホスト Rx/Tx スレッドをドメイン 0 vCPU に固定します。
ホストスレッドをドメイン 0 vCPU にピン留めします。
- Citrix Hypervisorホストシェルで
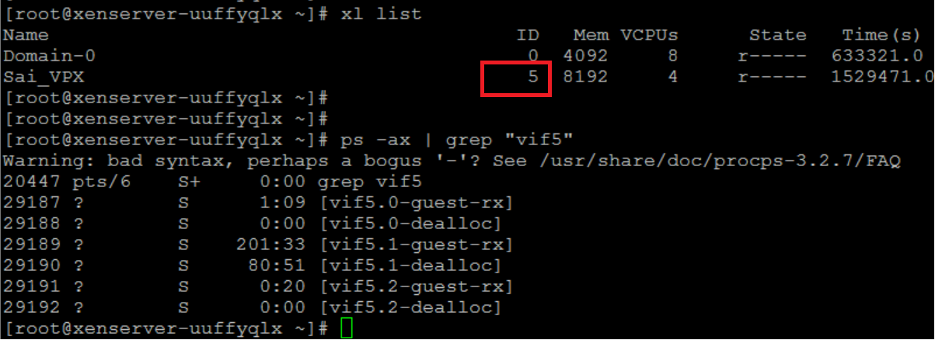
xl listコマンドを使用して、VPXのXen-IDを検索します。 -
次のコマンドを使用して、ホストスレッドを識別します。
  ps -ax | grep vif <Xen-ID>
<!--NeedCopy-->
次の例では、これらの値は次のことを示しています。
- vif5.0 -XenCenter(管理インターフェイス)でVPXに割り当てられた最初のインターフェイスのスレッド。
- vif5.1 -VPXなどに割り当てられた2番目のインターフェイスのスレッド。
-
次のコマンドを使用して、スレッドをドメイン 0 vCPU に固定します。
  taskset –pc <core-id> <process-id>
<!--NeedCopy-->
例
  taskset -pc 1 29189
<!--NeedCopy-->