Optimize Citrix ADC VPX performance on VMware ESX, Linux KVM, and Citrix Hypervisors
The Citrix ADC VPX performance greatly varies depending on the hypervisor, allocated system resources, and the host configurations. To achieve the desired performance, first follow the recommendations in the VPX data sheet, and then further optimize it using the best practices provided in this document. 要获得所需的性能,请首先遵循 VPX 数据手册中的建议,然后使用本文档中提供的最佳实践进一步优化它。
Citrix ADC VPX instance on VMware ESX hypervisors
This section contains details of configurable options and settings, and other suggestions that help you achieve optimal performance of Citrix ADC VPX instance on VMware ESX hypervisors.
- Recommended configuration on ESX hosts
- Citrix ADC VPX with E1000 network interfaces
- Citrix ADC VPX with VMXNET3 network interfaces
- Citrix ADC VPX with SR-IOV and PCI passthrough network interfaces
Recommended configuration on ESX hosts
To achieve high performance for VPX with E1000, VMXNET3, SR-IOV, and PCI passthrough network interfaces, follow these recommendations:
- The total number of virtual CPUs (vCPUs) provisioned on the ESX host must be less than or equal to the total number of physical CPUs (pCPUs) on the ESX host.
-
Non-uniform Memory Access (NUMA) affinity and CPU affinity must be set for the ESX host to achieve good results.
– 要查找 Vmnic 的 NUMA 关联性,请在本地或远程登录到主机,然后键入:
#vsish -e get /net/pNics/vmnic7/properties | grep NUMA Device NUMA Node: 0 <!--NeedCopy-->- To set NUMA and vCPU affinity for a VM, see VMware documentation.
Citrix ADC VPX with E1000 network interfaces
Perform the following settings on the VMware ESX host:
- On the VMware ESX host, create two vNICs from one pNIC vSwitch. Multiple vNICs create multiple Rx threads in the ESX host. This increases the Rx throughput of the pNIC interface. 多个虚拟网卡在 ESX 主机中创建多个 Rx 线程。 这会增加 pNIC 接口的 Rx 吞吐量。
- Enable VLANs on the vSwitch port group level for each vNIC that you have created.
- 要提高 vNIC 传输 (Tx) 吞吐量,请在每个 vNIC 的 ESX 主机中使用单独的 Tx 线程。 使用以下 ESX 命令:
-
For ESX version 5.5:
esxcli system settings advanced set –o /Net/NetTxWorldlet –i <!--NeedCopy--> -
For ESX version 6.0 onwards:
   esxcli system settings advanced set -o /Net/NetVMTxType –i 1
 <!--NeedCopy-->
-
-
To further increase the vNIC Tx throughput, use a separate Tx completion thread and Rx threads per device (NIC) queue. Use the following ESX command: 使用以下 ESX 命令:
   esxcli system settings advanced set -o /Net/NetNetqRxQueueFeatPairEnable -i 0
 <!--NeedCopy-->
注意:
Make sure that you reboot the VMware ESX host to apply the updated settings.
Two vNICs per pNIC deployment
The following is a sample topology and configuration commands for the Two vNICs per pNIC model of deployment that delivers better network performance.
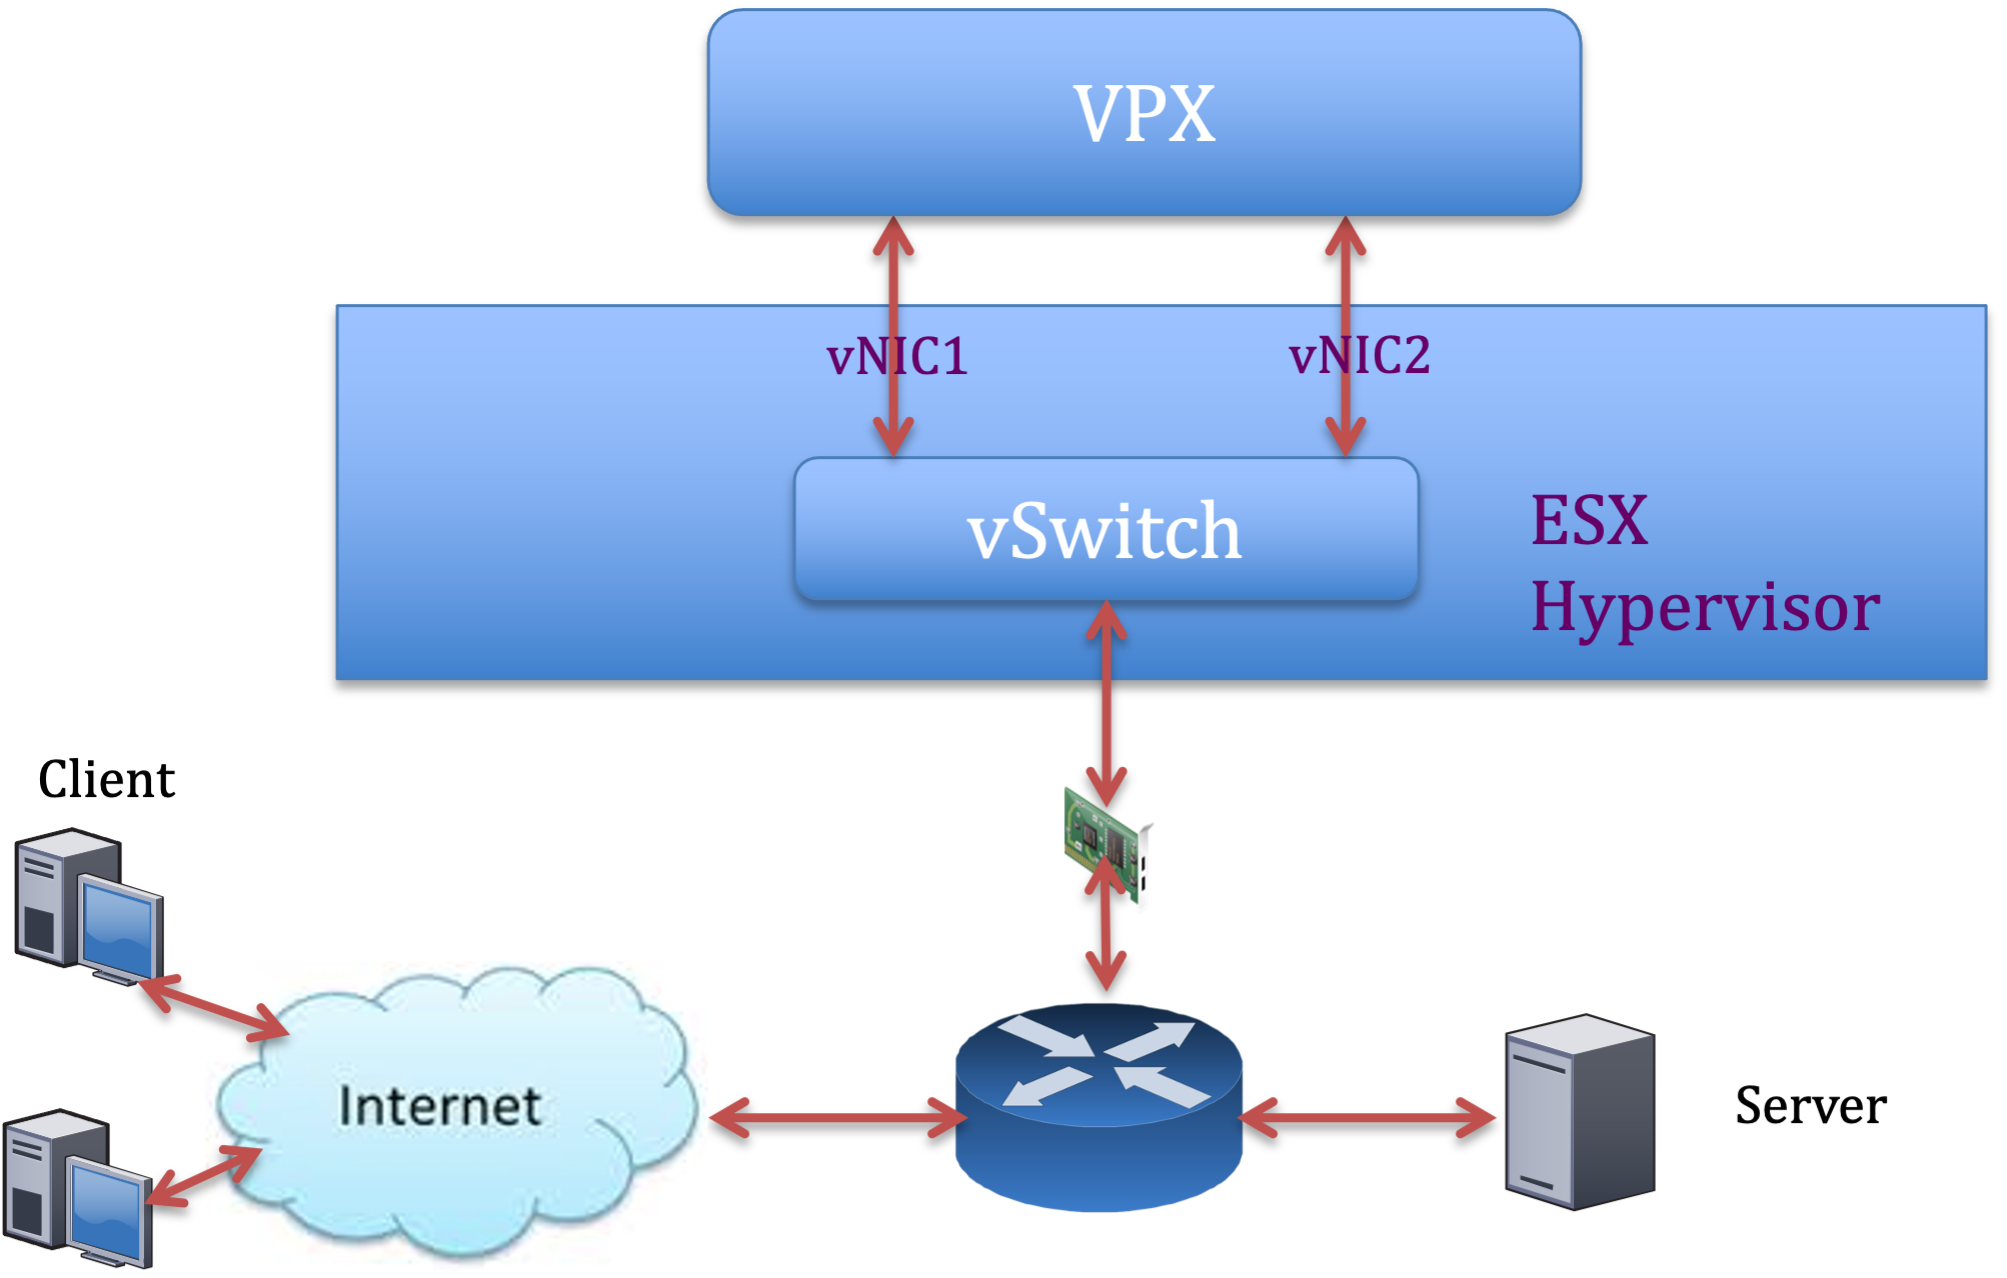
Citrix ADC VPX sample configuration:
To achieve the deployment shown in the preceding sample topology, perform the following configuration on the Citrix ADC VPX instance:
-
On the client side, bind the SNIP (1.1.1.2) to network interface 1/1 and enable the VLAN tag mode.
bind vlan 2 -ifnum 1/1 –tagged bind vlan 2 -IPAddress 1.1.1.2 255.255.255.0 <!--NeedCopy--> -
On the server side, bind the SNIP (2.2.2.2) to network interface 1/1 and enable the VLAN tag mode.
bind vlan 3 -ifnum 1/2 –tagged bind vlan 3 -IPAddress 2.2.2.2 255.255.255.0 <!--NeedCopy--> -
Add an HTTP virtual server (1.1.1.100) and bind it to a service (2.2.2.100).
   add lb vserver v1 HTTP 1.1.1.100 80 -persistenceType NONE -Listenpolicy None -cltTimeout 180
   add service s1 2.2.2.100 HTTP 80 -gslb NONE -maxClient 0 -maxReq 0 -cip DISABLED -usip NO -useproxyport YES -sp ON -cltTimeout 180 -svrTimeout 360 -CKA NO -TCPB NO -CMP NO
   bind lb vserver v1 s1
 <!--NeedCopy-->
注意:
Make sure that you include the following two entries in the route table:
- 1.1.1.0/24 subnet with gateway pointing to SNIP 1.1.1.2
- 2.2.2.0/24 subnet with gateway pointing to SNIP 2.2.2.2
Citrix ADC VPX with VMXNET3 network interfaces
To achieve high performance for VPX with VMXNET3 network interfaces, do the following settings on the VMware ESX host:
- 从一台 pNIC vSwitch 创建两个虚拟网卡。 多个虚拟网卡在 ESX 主机中创建多个 Rx 线程。 这会增加 pNIC 接口的 Rx 吞吐量。
- Enable VLANs on the vSwitch port group level for each vNIC that you have created.
- 要提高 vNIC 传输 (Tx) 吞吐量,请在每个 vNIC 的 ESX 主机中使用单独的 Tx 线程。 使用以下 ESX 命令:
- For ESX version 5.5:
esxcli system settings advanced set –o /Net/NetTxWorldlet –i <!--NeedCopy-->- For ESX version 6.0 onwards:
    esxcli system settings advanced set -o /Net/NetVMTxType –i 1
  <!--NeedCopy-->
On the VMware ESX host, perform the following configuration:
- 在 VMware ESX 主机上,从一台 pNIC 虚拟交换机创建两个虚拟网卡。 On the VMware ESX host, create two vNICs from 1 pNIC vSwitch. Multiple vNICs create multiple Tx and Rx threads in the ESX host. This increases the Tx and Rx throughput of the pNIC interface. 这会增加 pNIC 接口的 Tx 和 Rx 吞吐量。
- Enable VLANs on the vSwitch port group level for each vNIC that you have created.
-
To increase Tx throughput of a vNIC, use a separate Tx completion thread and Rx threads per device (NIC) queue. Use the following command: 使用以下命令:
esxcli system settings advanced set -o /Net/NetNetqRxQueueFeatPairEnable -i 0 <!--NeedCopy--> -
Configure a VM to use one transmit thread per vNIC, by adding the following setting to the VM’s configuration:
   ethernetX.ctxPerDev = "1"
 <!--NeedCopy-->
注意:
Make sure that you reboot the VMware ESX host to apply the updated settings.
You can configure VMXNET3 as a Two vNICs per pNIC deployment. For more information, see Two vNICs per pNIC deployment. 有关详细信息,请参阅 每个 pNIC 部署两个 vNIC。
Citrix ADC VPX with SR-IOV and PCI passthrough network interfaces
To achieve high performance for VPX with SR-IOV and PCI passthrough network interfaces, see Recommended configuration on ESX hosts.
Citrix ADC VPX instance on Linux-KVM platform
This section contains details of configurable options and settings, and other suggestions that help you achieve optimal performance of Citrix ADC VPX instance on Linux-KVM platform.
- KVM 的性能设置
- Citrix ADC VPX with PV network interfaces
- Citrix ADC VPX with SR-IOV and Fortville PCIe passthrough network interfaces
KVM 的性能设置
Perform the following settings on the KVM host:
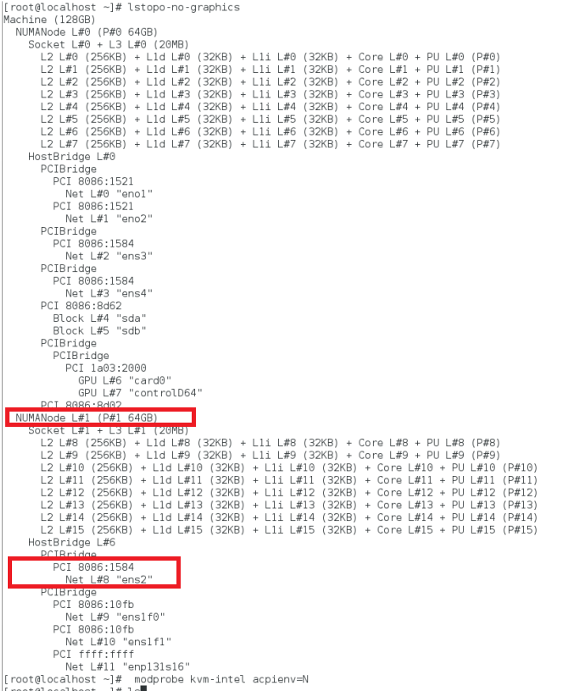
Find the NUMA domain of the NIC using the lstopo command:
Make sure that memory for the VPX and the CPU is pinned to the same location. In the following output, the 10G NIC “ens2” is tied to NUMA domain #1. 在以下输出中,10G 网卡“ens2”与 NUMA 域 #1 关联。
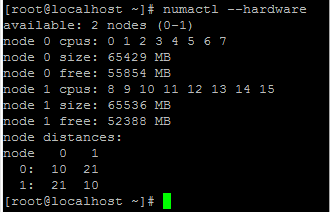
Allocate the VPX memory from the NUMA domain.
该 numactl 命令指示从中分配内存的 NUMA 域。 The numactl command indicates the NUMA domain from which the memory is allocated. In the following output, around 10 GB RAM is allocated from NUMA node #0.
To change the NUMA node mapping, follow these steps.
-
在主机上编辑 VPX 的 .xml。
/etc/libvirt/qemu/<VPX_name>.xml <!--NeedCopy--> -
添加以下标签:
<numatune> <memory mode="strict" nodeset="1"/> This is the NUMA domain name </numatune> <!--NeedCopy--> -
关闭 VPX。
-
运行以下命令:
  virsh define /etc/libvirt/qemu/<VPX_name>.xml
<!--NeedCopy-->
此命令使用 NUMA 节点映射更新 VM 的配置信息。
-
打开 VPX 的电源。 然后检查主机上的
numactl –hardware命令输出以查看 VPX 的更新内存分配。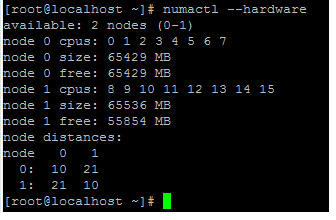
Pin vCPUs of VPX to physical cores.
-
要查看 VPX 的 vCPU 到 pCPU 的映射,请键入以下命令
   virsh vcpupin <VPX name>
 <!--NeedCopy-->
vCPU 0—4 映射到物理内核 8—11。
-
要查看当前的 pCPU 使用情况,请键入以下命令:
   mpstat -P ALL 5
 <!--NeedCopy-->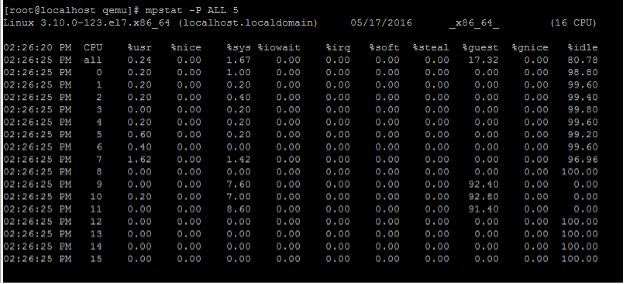
在此输出中,8 是管理 CPU,9—11 是数据包引擎。
-
要将 vCPU 更改为 PCU 固定,有两个选项。
-
使用以下命令在 VPX 启动后在运行时更改它:
virsh vcpupin <VPX name> <vCPU id> <pCPU number> virsh vcpupin NetScaler-VPX-XML 0 8 virsh vcpupin NetScaler-VPX-XML 1 9 virsh vcpupin NetScaler-VPX-XML 2 10 virsh vcpupin NetScaler-VPX-XML 3 11 <!--NeedCopy--> -
要对 VPX 进行静态更改,请使用以下标签像以前一样编辑
.xml文件:-
在主机上编辑 VPX 的 .xml 文件
/etc/libvirt/qemu/<VPX_name>.xml <!--NeedCopy--> -
添加以下标签:
<vcpu placement='static' cpuset='8-11'>4</vcpu> <cputune> <vcpupin vcpu='0' cpuset='8'/> <vcpupin vcpu='1' cpuset='9'/> <vcpupin vcpu='2' cpuset='10'/> <vcpupin vcpu='3' cpuset='11'/> </cputune> <!--NeedCopy--> -
关闭 VPX。
-
使用以下命令使用 NUMA 节点映射更新 VM 的配置信息:
virsh define /etc/libvirt/qemu/ <VPX_name>.xml <!--NeedCopy--> -
打开 VPX 的电源。 然后检查主机上的
virsh vcpupin <VPX name>命令输出以查看更新的 CPU 固定。
-
-
Eliminate host interrupt overhead.
-
使用
kvm_stat命令检测 VM_EXITS。在虚拟机管理程序级别,主机中断映射到固定 VPX vCPU 的相同 PCU。 这可能会导致 VPX 上的 vCPU 定期被踢出。
要查找运行主机的虚拟机完成的 VM 退出,请使用
kvm_stat命令。[root@localhost ~]# kvm_stat -1 | grep EXTERNAL kvm_exit(EXTERNAL_INTERRUPT) 1728349 27738 [root@localhost ~]# <!--NeedCopy-->大小为 1+M 的较高值表示存在问题。
如果存在单个虚拟机,则预期值为 30–100 K。 除此之外的任何值都可能表明有一个或多个主机中断向量映射到同一个 pCPU。
-
检测主机中断并迁移主机中断。
当您运行“/proc/interrupts”文件的
concatenate命令时,它会显示所有主机中断映射。 如果一个或多个活动 IRQ 映射到同一个 PCU,则其对应的计数器会增加。Move any interrupts that overlap with your Citrix ADC VPX’s pCPUs to unused pCPUs:
echo 0000000f > /proc/irq/55/smp_affinity 0000000f - - > it is a bitmap, LSBs indicates that IRQ 55 can only be scheduled on pCPUs 0 – 3 <!--NeedCopy--> -
禁用 IRQ 余额。
禁用 IRQ 余额守护进程,这样即时不会进行重新安排。
   service irqbalance stop
   service irqbalance show - To check the status
   service irqbalance start - Enable if needed
 <!--NeedCopy-->
确保运行
kvm_stat命令以确保计数器不多。
Citrix ADC VPX with PV network interfaces
You can configure para-virtualization (PV), SR-IOV, and PCIe passthrough network interfaces as a Two vNICs per pNIC deployment. For more information, see Two vNICs per pNIC deployment. 有关详细信息,请参阅 每个 pNIC 部署两个 vNIC。
For optimal performance of PV (virtio) interfaces, follow these steps:
- Identify the NUMA domain to which the PCIe slot/NIC is tied to.
- The Memory and vCPU for the VPX must be pinned to the same NUMA domain.
- 虚拟主机线程必须绑定到同一 NUMA 域中的 CPU。
Bind the virtual host threads to the corresponding CPUs:
-
流量启动后,在主机上运行
top命令。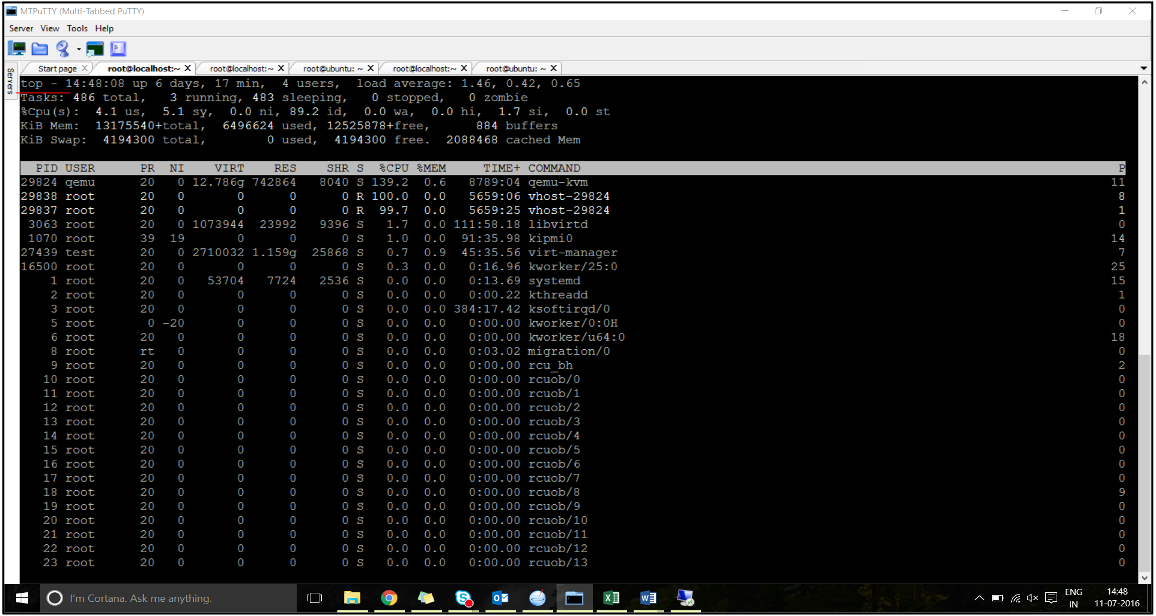
- 确定虚拟主机进程(命名为
vhost-<pid-of-qemu>)关联性。 -
使用以下命令将 vHost 进程绑定到之前确定的 NUMA 域中的物理核心:
  taskset –pc <core-id> <process-id>
<!--NeedCopy-->
Example:
taskset –pc 12 29838 <!--NeedCopy--> -
可以使用以下命令识别与 NUMA 域对应的处理器内核:
  [root@localhost ~]# virsh capabilities | grep cpu
  <cpu>
      </cpu>
          <cpus num='8'>
              <cpu id='0' socket_id='0' core_id='0' siblings='0'/>
              <cpu id='1' socket_id='0' core_id='1' siblings='1'/>
              <cpu id='2' socket_id='0' core_id='2' siblings='2'/>
              <cpu id='3' socket_id='0' core_id='3' siblings='3'/>
              <cpu id='4' socket_id='0' core_id='4' siblings='4'/>
              <cpu id='5' socket_id='0' core_id='5' siblings='5'/>
              <cpu id='6' socket_id='0' core_id='6' siblings='6'/>
              <cpu id='7' socket_id='0' core_id='7' siblings='7'/>
          </cpus>

          <cpus num='8'>
          <cpu id='8' socket_id='1' core_id='0' siblings='8'/>
          <cpu id='9' socket_id='1' core_id='1' siblings='9'/>
          <cpu id='10' socket_id='1' core_id='2' siblings='10'/>
          <cpu id='11' socket_id='1' core_id='3' siblings='11'/>
          <cpu id='12' socket_id='1' core_id='4' siblings='12'/>
          <cpu id='13' socket_id='1' core_id='5' siblings='13'/>
          <cpu id='14' socket_id='1' core_id='6' siblings='14'/>
          <cpu id='15' socket_id='1' core_id='7' siblings='15'/>
          </cpus>

      <cpuselection/>
      <cpuselection/>

<!--NeedCopy-->
Bind the QEMU process to the corresponding physical core:
- 确定运行 QEMU 进程的物理核心。 有关更多信息,请参阅前面的输出。
-
使用以下命令将 QEMU 进程绑定到与 vCPU 绑定到的相同物理核心:
  taskset –pc 8-11 29824
<!--NeedCopy-->
Citrix ADC VPX with SR-IOV and Fortville PCIe passthrough network interfaces
For optimal performance of the SR-IOV and Fortville PCIe passthrough network interfaces, follow these steps:
- Identify the NUMA domain to which the PCIe slot/NIC is tied to.
- The Memory and vCPU for the VPX must be pinned to the same NUMA domain.
Sample VPX XML file for vCPU and memory pinning for Linux KVM:
      <domain type='kvm'>
          <name>NetScaler-VPX</name>
          <uuid>138f7782-1cd3-484b-8b6d-7604f35b14f4</uuid>
          <memory unit='KiB'>8097152</memory>
          <currentMemory unit='KiB'>8097152</currentMemory>
          <vcpu placement='static'>4</vcpu>

      <cputune>
          <vcpupin vcpu='0' cpuset='8'/>
          <vcpupin vcpu='1' cpuset='9'/>
          <vcpupin vcpu='2' cpuset='10'/>
          <vcpupin vcpu='3' cpuset='11'/>
      </cputune>

      <numatune>
      <memory mode='strict' nodeset='1'/>
      </numatune>

      </domain>
<!--NeedCopy-->
Citrix ADC VPX instance on Citrix Hypervisors
This section contains details of configurable options and settings, and other suggestions that help you achieve optimal performance of Citrix ADC VPX instance on Citrix Hypervisors.
- Citrix Hypervisor 的性能设置
- Citrix ADC VPX with SR-IOV network interfaces
- Citrix ADC VPX with para-virtualized interfaces
Citrix Hypervisor 的性能设置
Find the NUMA domain of the NIC using the “xl” command:
  xl info -n
<!--NeedCopy-->
Pin vCPUs of VPX to physical cores.
  xl vcpu-pin <Netsclaer VM Name>  <vCPU id>  <physical CPU id>
<!--NeedCopy-->
Check binding of vCPUs.
  xl vcpu-list
<!--NeedCopy-->
Allocate more than 8 vCPUs to Citrix ADC VMs.
For configuring more than 8 vCPUs, run the following commands from the Citrix Hypervisor console:
  xe vm-param-set uuid=your_vms_uuid VCPUs-max=16
  xe vm-param-set uuid=your_vms_uuid VCPUs-at-startup=16
<!--NeedCopy-->
Citrix ADC VPX with SR-IOV network interfaces
For optimal performance of the SR-IOV network interfaces, follow these steps:
- Identify the NUMA domain to which the PCIe slot or NIC is tied to.
- 将 VPX 的内存和 vCPU 固定到同一个 NUMA 域。
- 将域 0 vCPU 绑定到剩余的 CPU。
Citrix ADC VPX with para-virtualized interfaces
For optimal performance, two vNICs per pNIC and one vNIC per pNIC configurations are advised, as in other PV environments.
To achieve optimal performance of para-virtualized (netfront) interfaces, follow these steps:
- Identify the NUMA domain to which the PCIe slot or NIC is tied to.
- 将 VPX 的内存和 vCPU 固定到同一个 NUMA 域。
- 将域 0 vCPU 绑定到同一 NUMA 域的剩余 CPU。
- 将 vNIC 的主机 Rx/Tx 线程固定到域 0 vCPU。
Pin host threads to Domain-0 vCPUs:
- 使用 Citrix Hypervisor 主机 shell 上的
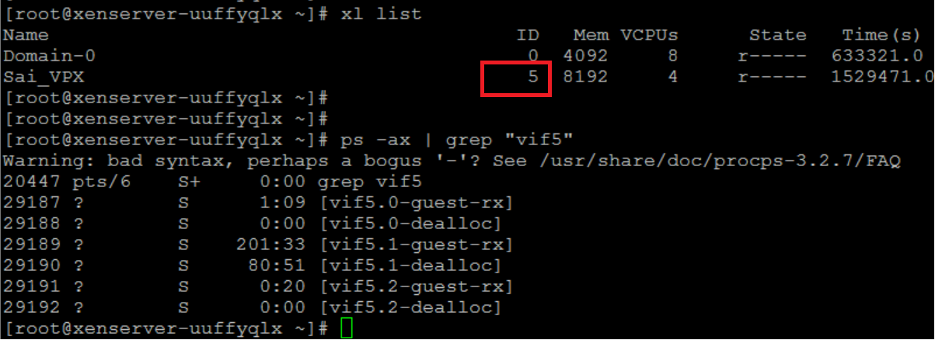
xl list命令查找 VPX 的 Xen-ID。 -
使用以下命令识别主机线程:
  ps -ax | grep vif <Xen-ID>
<!--NeedCopy-->
在以下示例中,这些值表示:
- vif5.0 -在 XenCenter(管理接口)中分配给 VPX 的第一个接口的线程。
- vif5.1 -分配给 VPX 的第二个接口的线程等。
-
使用以下命令将线程固定到 Domain-0 vCPU:
  taskset –pc <core-id> <process-id>
<!--NeedCopy-->
Example:
  taskset -pc 1 29189
<!--NeedCopy-->