Associate an IP Subnet with a Citrix® ADC Interface by Using VLANs
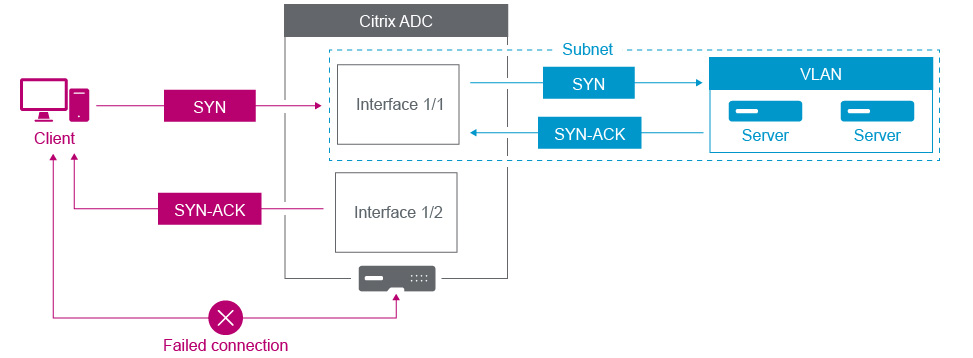
BY default, a Citrix ADC appliance does not provide any differentiation between network interfaces. The appliance functions more like a network hub than a switch. This can lead to Layer 3 network loops where duplicated traffic is transmitted on multiple interfaces.
In such scenarios, depending on network design, it is possible that a request might be transmitted on one interface and the corresponding response is received on a different interface.

For example, a SYN packet sent on one interface and the SYN-ACK response received on a different interface can result in a failed connection, as the appliance expects to receive the SYN-ACK on the same interface that sent the original SYN packet.
To resolve such issues, the appliance can use internal or external VLANs, to associate specific subnets with interfaces.
Before you begin
Before you begin associating an IP Subnet with a Citrix ADC interface by using VLANs, note the following points:
-
The network connectivity might be accidentally lost when associating a VLAN to the subnet or interface that is currently being used to access the Citrix ADC GUI or command line interface. Therefore, in such scenarios, it is highly recommended that the change is made by accessing the command line interface through the serial console of a physical Citrix ADC appliance or through the virtual serial console of a Citrix ADC VPX.
-
Citrix ADC management interfaces lack certain hardware optimization features which make them less desirable for use with production data traffic. As such, it is recommended that the Citrix ADC be configured to only use the management interfaces for management (NSIP) traffic. In the default configuration, there is no logical differentiation between the management interfaces and data interfaces on a hardware NetScaler. To accomplish this goal, it is recommended that the NSIP be on a separate VLAN from data traffic, which allows management traffic to be on a separate interface.
Although the concept is the same, to change the VLAN associations of the subnet that contains the NSIP address, you must configure NSVLAN instead of the below instructions. Such changes will also require a reboot of the Citrix ADC to take effect. For more information, see Configuring NSVLAN.
-
On Citrix ADC SDX, it is highly recommended that the NSIP of each instance be on the same subnet and VLAN as the SDX’s SVM (Management Service GUI) and XenServer. The SVM communicates with instances via the network. If the SVM, XenServer, and instances are not on the same VLAN and subnet, management traffic must flow outside of the SDX. In this situation, network issues can cause Instance state to show up as yellow or red and can prevent the management and configuration changes of the Citrix ADC instances.
Configuration Steps
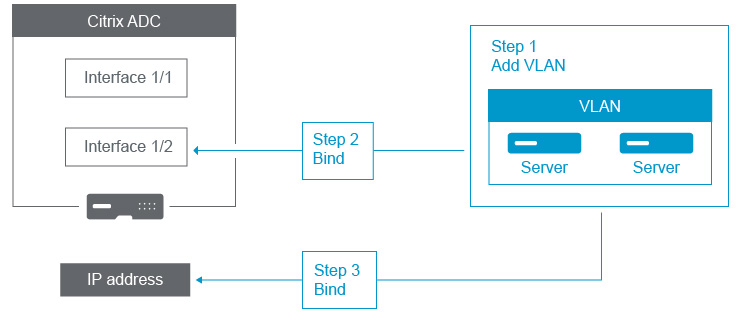
Associate an IP subnet with a Citrix ADC Interface consists of the following tasks:

Add a VLAN. While adding a VLAN, if you are tagging the VLAN, then you must select a VLAN number that is defined in the network switch for the associated switch port. If the VLAN is untagged and is internal to the appliance, then it is recommended that you select the VLAN number that is available in the switch configuration for easy reference.
Bind an interface to the VLAN. While binding, if you are using Link Aggregation, associate the VLAN with the LA channel (for example, LA/1) instead of the physical interface. The VLAN must be associated with only one network interface.
If you want to tag the traffic on the interface, use the tagged (Tag) option. Else, the traffic leaves the appliance untagged and is associated with the native VLAN of the switch port.
Bind an IP address to the VLAN. While binding, if you bind more than one IP address from the same subnet, an error occurs. When an IP address is associated with a VLAN, all IP addresses in that subnet are automatically associated with the VLAN.
Note:
In a high availability (HA) setup, these VLAN configurations are added automatically from the primary node to the secondary node during HA synchronization. For more information about high availability setups, see High Availability.
CLI procedures
To add a VLAN by using the CLI:
At the command prompt, type:
- add vlan <id>
- sh vlan <id>
To bind an interface to a VLAN by using the CLI:
At the command prompt, type:
- bind vlan <id> -ifnum <slot/port>
- sh vlan <id>
To bind an IP address to a VLAN by using the CLI:
At the command prompt, type:
- bind vlan <id> -IPAddress <IPAddress> <netMask>
- sh vlan <id>
Example:
> add vlan 100

> bind vlan 100 -ifnum 1/1

> bind vlan 100 -ipAddress 10.0.1.0 255.255.255.0
<!--NeedCopy-->
GUI procedures
To configure a VLAN by using the GUI:
-
Navigate to System > Network > VLANs, add a new VLAN.
-
To bind a network interface to a VLAN, under Interface Bindings, select the Active option corresponding to the interface that you want to bind to the VLAN.
-
To bind an IP address to a VLAN, under IP Bindings, select the Active option corresponding to the IP address that you want to bind to the VLAN (for example, 10.102.29.54). The Type column displays the IP address type for each IP address in the IP Address column.