Integrate with OpenStack Heat services
The OpenStack Neutron LBaaS enables core load balancing services, such as load balancing, SSL offloading, and content switching, for applications. LBaaS is managed through a REST API, and the API allows tenants to make REST calls to create, update, and delete LBaaS objects. Because LBaaS provides load balancing services, it does not allow use of the more advanced NetScaler features during the orchestration process. The NetScaler Heat plug-in overcomes this limitation.
Heat Orchestration Service
The OpenStack Heat orchestration service allows deployment of complex cloud applications on the basis of templates. The Heat orchestration template (HOT) describes the infrastructure for a cloud application in text files that are readable and writable by humans, and can be managed by version control tools. YAML, a structured language, is used to write these templates. The HOT template allows you to create most of the OpenStack resource types and specifies the relationships among the resources defined within it. The NetScaler Heat plug-in allows you to configure advanced NetScaler functionalities on any NetScaler instance.
NetScaler StyleBooks
NetScaler Console StyleBooks can be used to create and configure NetScaler functionalities. Just like Heat templates, the StyleBooks are also written in YAML. A separate StyleBooks can be created for each functionality, and a single StyleBooks can be used to deploy configurations on multiple NetScaler instances.
During NetScaler integration with OpenStack, NetScaler Console publishes all NetScaler Console StyleBooks as a resource in the Heat service. This includes both the StyleBooks that are shipped with NetScaler Console and the StyleBooks that are created by the user at a later point of time. The Heat template allows you to configure the advanced features of NetScalers using these StyleBooks resources.
Workflow to Configure NetScaler Instances using Heat
The following flowchart illustrates the workflow for deploying the Heat stack:
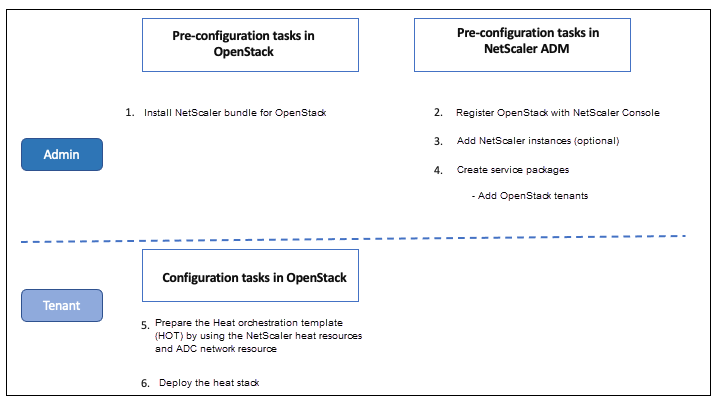
Perform the following tasks as a cloud administrator:
To configure Heat services in OpenStack:
-
Download NetScaler bundles for OpenStack
Install the NetScaler bundles in OpenStack. In NetScaler Console, navigate to Downloads and download the NetScaler driver bundles, untar the bundles, and copy the contents of the Heat folder in the bundle to the Heat engine resources directory in OpenStack. The directory path is as follows: /opt/stack/heat/heat/engine/resources/netscaler_resources
-
Create a section “netscaler_plugin” in the heat.conf file, and update the following parameters in that section:
[netscaler_plugin]
-
When the communication is HTTP, the parameters are updated as follows:
NMAS_BASE_URI=<
http://10.146.103.45:80>NMAS_USERNAME=
NMAS_PASSWORD=
-
When the communication is https, the parameters are updated as follows:
NMAS_BASE_URI=
https://common_name_used_in_certificateNMAS_USERNAME=<openstack_driver_username
NMAS_PASSWORD=<openstack_driver_password>
SSL_CERT_VERIFY=<True_or_False>
CERT_FILE_PATH=<path_of_the_certificate_file>
If user sets ssl_cert_verify to be “False,” NetScaler Console sends verify=False in the request calls, which disables the SSL certificate validation. If ssl_cert_verify is set to “True” and cert_file_path entry is present, NetScaler Console sends this path in the verify parameter of request, otherwise NetScaler Console sends verify=True.
Note
For deploying NetScaler Console in “High Availability” mode, update the following parameters in heat.conf file:
NMAS_BASE_URI=<IP address of the front-end virtual server>
-
-
Restart the Heat service in OpenStack.
When you restart the NetScaler Heat services in OpenStack, all the defined NetScaler Console StyleBooks are imported into Heat as resources. Also, the NetScaler network resource and the certificate resource are imported into OpenStack as NetScaler Heat resources.
-
Register NetScaler Console with OpenStack.
-
In NetScaler Console, navigate to Orchestration > Cloud Orchestration > OpenStack, and click Configure OpenStack Settings.
-
In Configure OpenStack Settings page, you can set the parameters to configure OpenStack. You have two options here: Default and Customized.
-
Select Default if the OpenStack services are running on default ports. Enter the following parameters:
-
OpenStack Controller IP Address
-
Admin user name
-
Password
-
OpenStack Admin Tenant
-
NetScaler Driver and Heat password
Note
This is the same password (NMAS_PASSWORD) that you entered in the heat.conf file.
-
-
-
Create service packages and define the SLAs with your tenant.
A tenant is created in NetScaler Console for each user during OpenStack registration, and the tenant information is used by both the LBaaS driver and the Heat plug-in. The Heat plug-in uses this information to contact NetScaler Console to import StyleBooks as Heat resources in OpenStack.
Note
For more information about creating service packages and other pre-configuration tasks in NetScaler Console and OpenStack, see Integrating NetScaler Console with OpenStack Platform.
-
Observe that all the relevant StyleBooks in NetScaler Console are imported into OpenStack Heat as resources. Also, observe that the NetScaler network resource and NetScaler certificate resource are imported into OpenStack Heat as resources.
Note
Currently, you can use only the StyleBooks that are shipped with NetScaler Console.
Your tenant can now create the Heat template in OpenStack, enter the values of the required Heat parameters, and deploy the Heat stack. When the Heat stack is deployed, the configuration is pushed to NetScaler Console, and the required NetScaler instances are configured.
To prepare Heat template and launch Heat stack:
-
In OpenStack, the tenant can create a Heat orchestration template (HOT) by using the Heat resources.
-
In OpenStack Horizon, the tenant admin can navigate to Project > Orchestration > Stacks to create the Heat template and launch the Heat Stack. There are two ways to create HOT:
- File - Select the updated template from the local directory
- Direct input - Copy and paste the YAML contents from the template in the window
Note
After successfully deploying the stack, the tenant can update the stack by using the Change Stack Template. But the subnet information and the virtual IP address (VIP) that was provided initially during creation of stack cannot be modified.
After the tenant deploys the stack, navigate to Orchestration > Cloud Orchestration > OpenStack > Requests in NetScaler Console to observe the lists of tasks. Also, navigate to Applications > Configuration in NetScaler Console to observe that the NetScaler instances are successfully configured in the form of StyleBooks config packs.
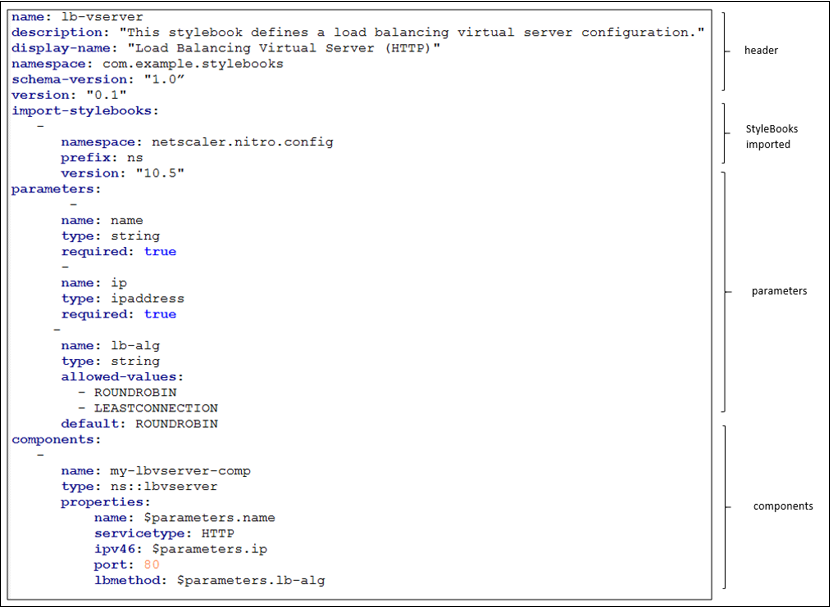
An Example of a NetScaler Console StyleBooks:
The following image shows an example of how a NetScaler Console StyleBooks is constructed and briefly explains the components. For more information about NetScaler Console StyleBooks and how to use the shipped StyleBooks, see StyleBooks.
An Example of a Heat Template:
The following image shows the structure of a Heat template defined in YAML, and points to the StyleBooks resources and NetScaler network resources that are imported as Heat resources.
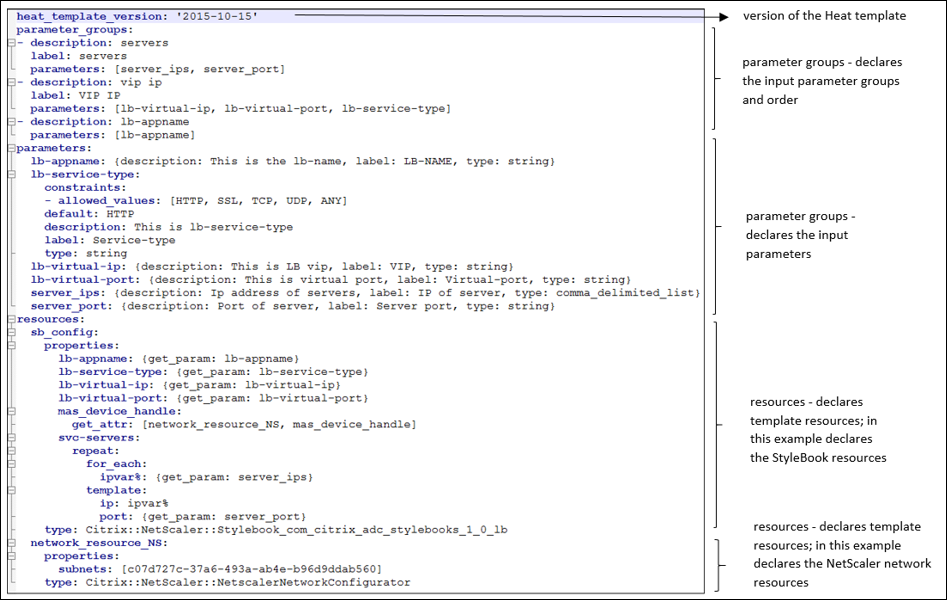
For more information about Heat services and how to create templates, see OpenStack Heat documentation.