Using ICAP for remote content inspection
Internet Content Adaptation Protocol (ICAP) is a simple, lightweight open protocol. It is typically used to transport HTTP messages between the proxy and the devices that provide antimalware support and data leak prevention services. ICAP has created a standard interface for content adaptation to allow greater flexibility in content distribution and for providing a value-added service. An ICAP client forwards HTTP requests and responses to an ICAP server for processing. The ICAP server performs some transformation on requests and sends back responses to the ICAP client, with appropriate action on the request or response.
Using ICAP on the Citrix Secure Web Gateway™ appliance
Note
The content inspection feature requires an SWG Edition license.
The Citrix Secure Web™ Gateway (SWG) appliance acts as an ICAP client and uses policies to interact with ICAP servers. The appliance communicates with third-party ICAP servers that specialize in functions such as antimalware and data leak prevention (DLP). When you use ICAP on an SWG appliance, encrypted files are also scanned. Security vendors earlier bypassed these files. The appliance performs SSL interception, decrypts the client traffic, and sends it to the ICAP server. The ICAP server checks for virus, malware or spyware detection, data leak inspection, or any other content adaptation services. The appliance acts as a proxy, decrypts the response from the origin server, and sends it in plain text to the ICAP server for inspection. Configure policies to select the traffic that is sent to the ICAP servers.
Request mode flow works as follows:

(1) The Citrix® SWG appliance intercepts requests from the client. (2) The appliance forwards these requests to the ICAP server, based on the policies configured on the appliance. (3) The ICAP server responds with a message indicating “No adaptation required,” error, or modified request. The appliance either (4) forwards the content to the origin server that the client requested, or (5) returns an appropriate message to the client.
Response mode flow works as follows:

(1) The origin server responds to the Citrix SWG appliance. (2) The appliance forwards the response to the ICAP server, based on the policies configured on the appliance. (3) The ICAP server responds with a message indicating “No adaptation required,” or error, or modified request. (4) Depending on the response from the ICAP server, the appliance either forwards the content requested to the client, or sends an appropriate message.
Configuring ICAP on the Citrix Secure Web Gateway appliance
The following steps explain how to configure ICAP on the Citrix SWG appliance.
- Enable the content inspection feature.
- Configure a proxy server.
- Configure a TCP service that represents the ICAP server. To establish a secure connection between the SWG appliance and ICAP service, specify the service type as SSL_TCP. For more information about secure ICAP, see the “Secure ICAP” section later in this page.
- Optionally, add a load balancing virtual server to load balance the ICAP servers and bind the ICAP service to this virtual server.
- Configure a custom ICAP profile. The profile must include the URI or the service path for the ICAP service, and the ICAP mode (request or response.) There are no ICAP default profiles similar to the HTTP and TCP default profiles.
- Configure a content inspection action and specify the ICAP profile name. Specify the load balancing virtual server name or the TCP/SSL_TCP service name in the server name parameter.
- Configure a content inspection policy to evaluate client traffic and bind it to the proxy server. Specify the content inspection action in this policy.
Configure ICAP by using the CLI
Configure the following entities:
-
Enable the feature.
enable ns feature contentInspection -
Configure a proxy server.
add cs vserver <name> PROXY <IPAddress>Example:
add cs vserver explicitswg PROXY 192.0.2.100 80 -
Configure a TCP service to represent the ICAP servers.
add service <name> <IP> <serviceType> <port>Specify the service type as SSL_TCP for a secure connection with the ICAP server.
Example:
add service icap_svc1 203.0.113.100 TCP 1344add service icap_svc 203.0.113.200 SSL_TCP 11344 -
Configure a load balancing virtual server.
add lb vserver <name> <serviceType> <IPAddress> <port>Example:
add lbvserver lbicap TCP 0.0.0.0 0Bind the ICAP service to the load balancing virtual server.
bind lb vserver <name> <serviceName>Example:
bind lb vserver lbicap icap_svc -
Add a custom ICAP profile.
add ns icapProfile <name> -uri <string> -Mode ( REQMOD | RESPMOD )Example:
add icapprofile icapprofile1 -uri /example.com -Mode REQMODParameters
name
Name for an ICAP profile. Must begin with an ASCII alphanumeric or underscore (_) character, and must contain only ASCII alphanumeric, underscore, hash (#), period (.), space, colon (:), at sign (@), equal sign (=), and hyphen (-) characters.
CLI users: If the name includes one or more spaces, enclose the name in double or single quotation marks (for example, “my icap profile” or ‘my icap profile’.)
Maximum Length: 127
uri
URI representing the ICAP service path.
Maximum Length: 511 characters
Mode
ICAP mode. Available settings function as follows:
-
REQMOD: In request modification mode, the ICAP client forwards an HTTP request to the ICAP server.
-
RESPMOD: In response modification mode, the ICAP server forwards an HTTP response from the origin server to the ICAP server.
Possible values: REQMOD, RESPMOD
-
-
Configure an action to perform if the policy returns true.
add contentInspection action <name> -type ICAP -serverName <string> -icapProfileName <string>Example:
add contentInspection action CiRemoteAction -type ICAP -serverName lbicap -icapProfileName icapprofile1 -
Configure a policy to evaluate traffic.
add contentInspection policy <name> -rule <expression> -action <string>Example:
add contentInspection policy CiPolicy -rule true -action CiRemoteAction -
Bind the policy to the proxy server.
bind cs vserver <vServerName> -policyName <string> -priority <positive_integer> -type [REQUEST | RESPONSE]Example:
bind cs vserver explicitswg -policyName CiPolicy -priority 200 -type REQUEST
Configure ICAP by using the GUI
Perform the following steps:
-
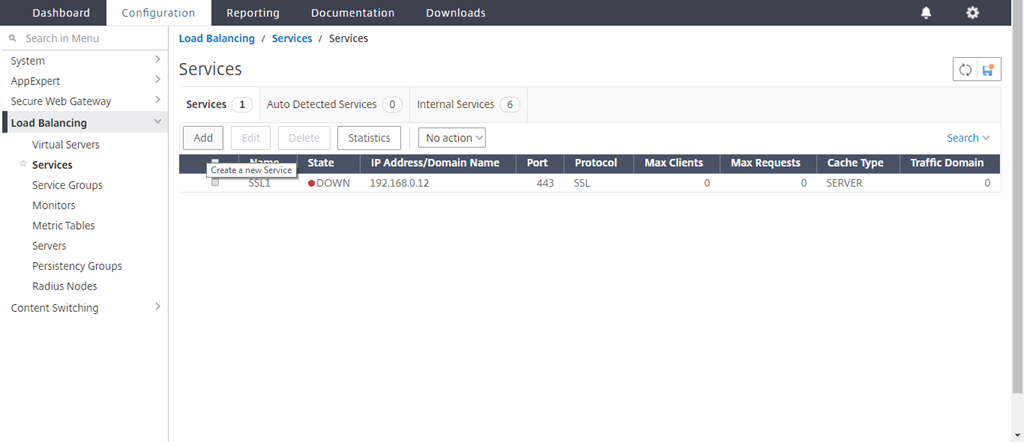
Navigate to Load Balancing > Services and click Add.
-
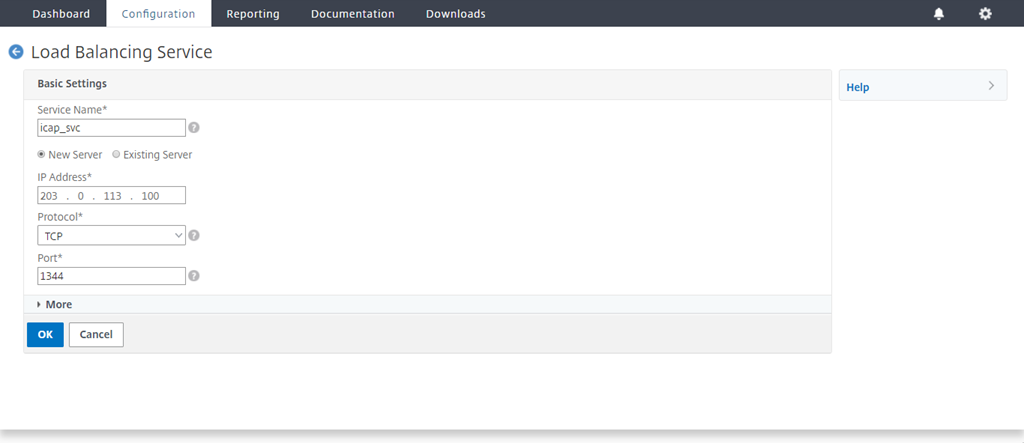
Type a name and IP address. In Protocol, select TCP. In Port, type 1344. Click OK.
For a secure connection to the ICAP servers, select TCP_SSL protocol and specify the port as 11344.
-
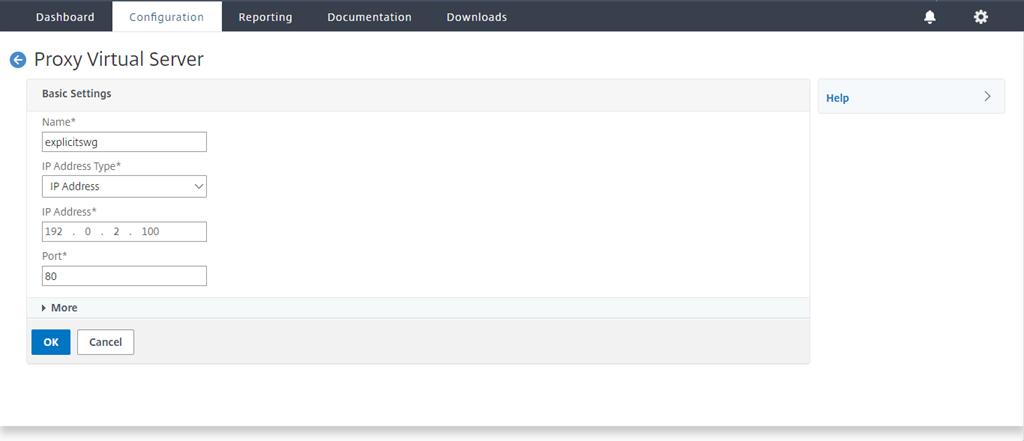
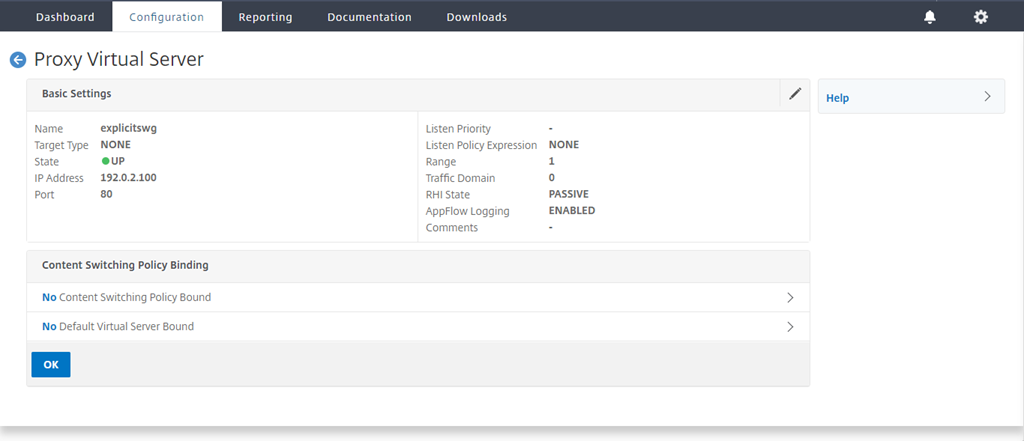
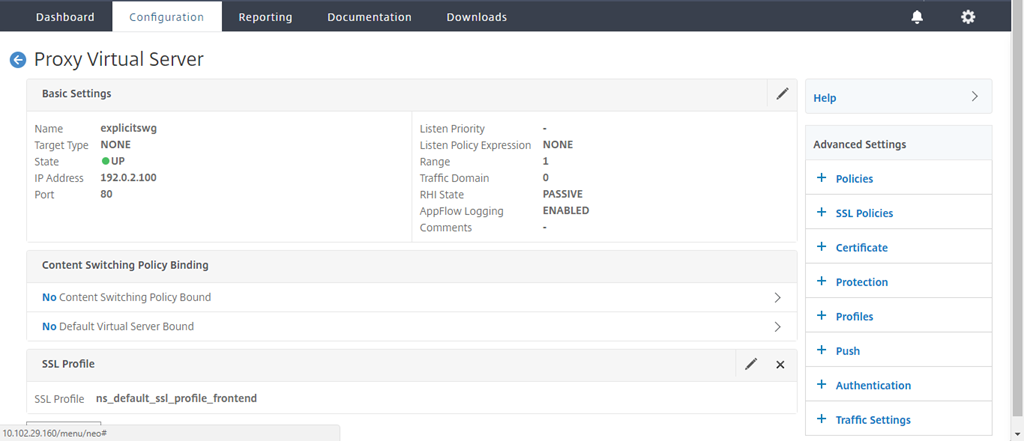
Navigate to Secure Web Gateway > Proxy Virtual Servers. Add a proxy virtual server or select a virtual server and click Edit. After entering details, click OK.
Click OK again.
-
In Advanced Settings, click Policies.
-
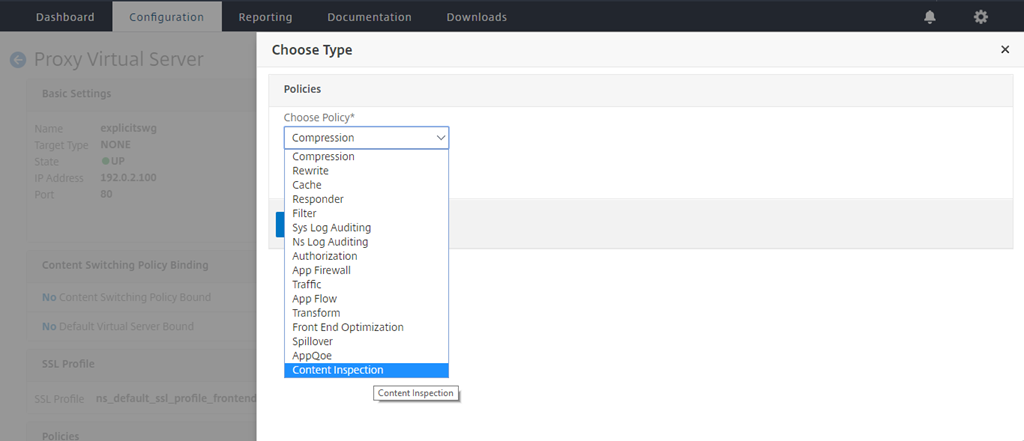
In Choose Policy, select Content Inspection. Click Continue.
-
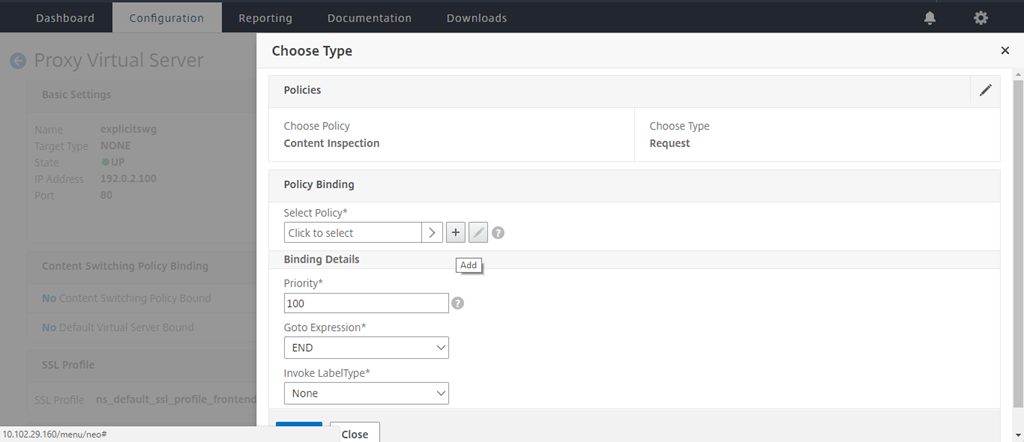
In Select Policy, click the “+” sign to add a policy.
-
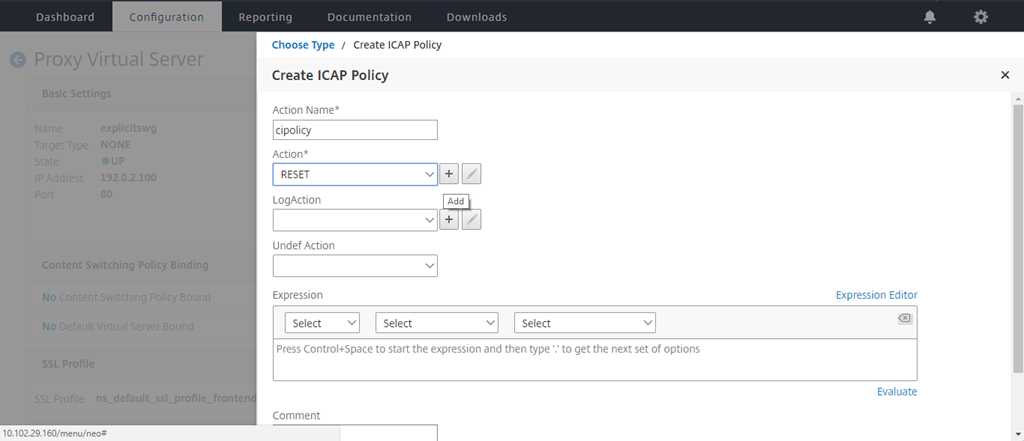
Enter a name for the policy. In Action, click the “+” sign to add an action.
-
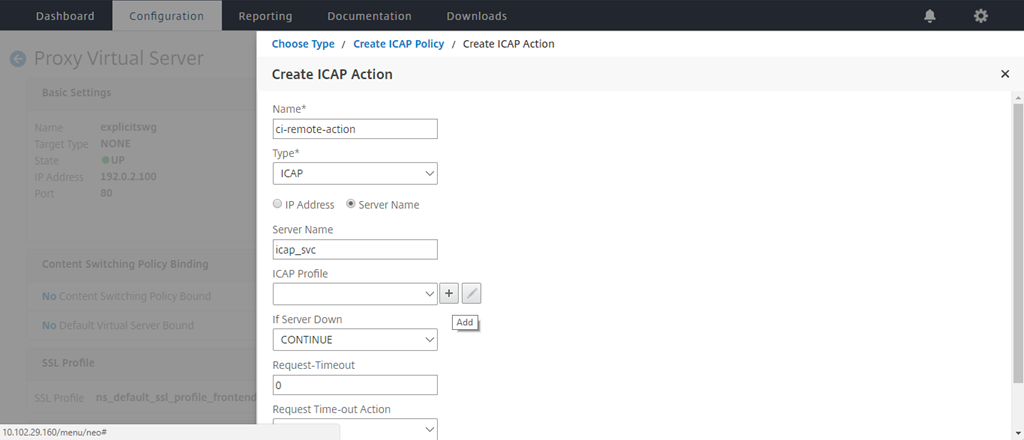
Type a name for the action. In Server Name, type the name of the TCP service created earlier. In ICAP Profile, click the “+” sign to add an ICAP profile.
-
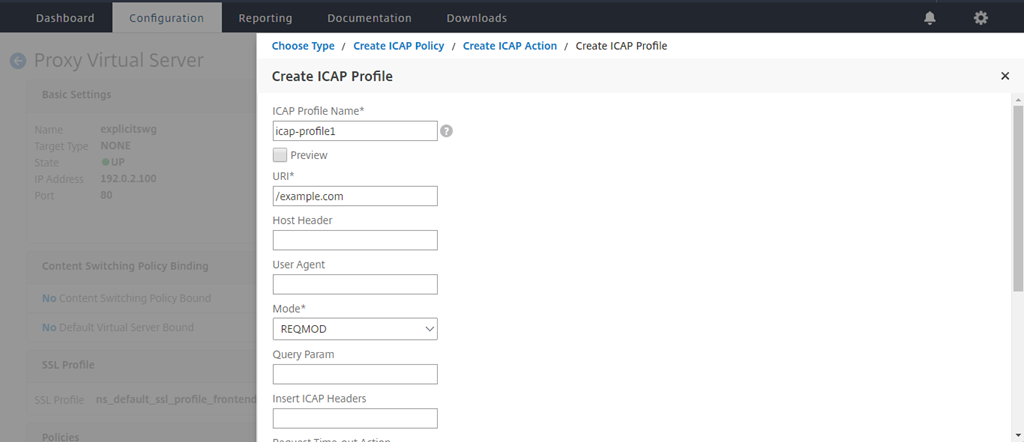
Type a profile name, URI. In Mode, select REQMOD.
-
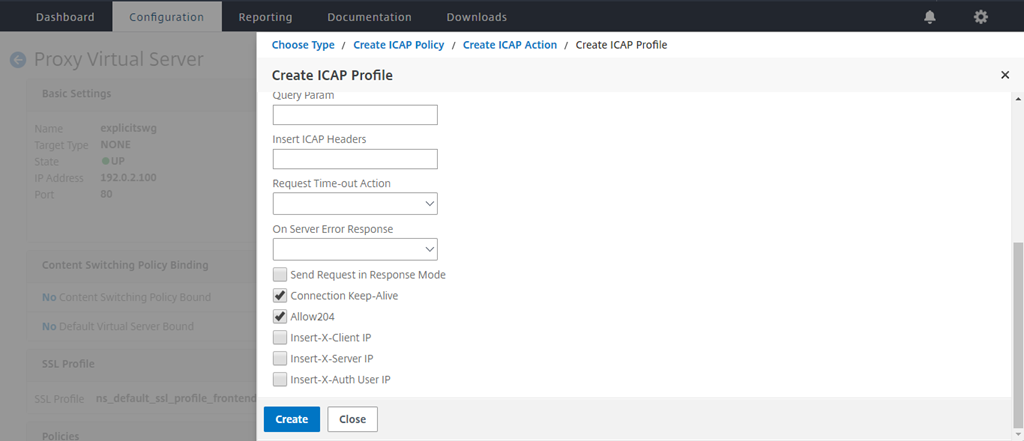
Click Create.
-
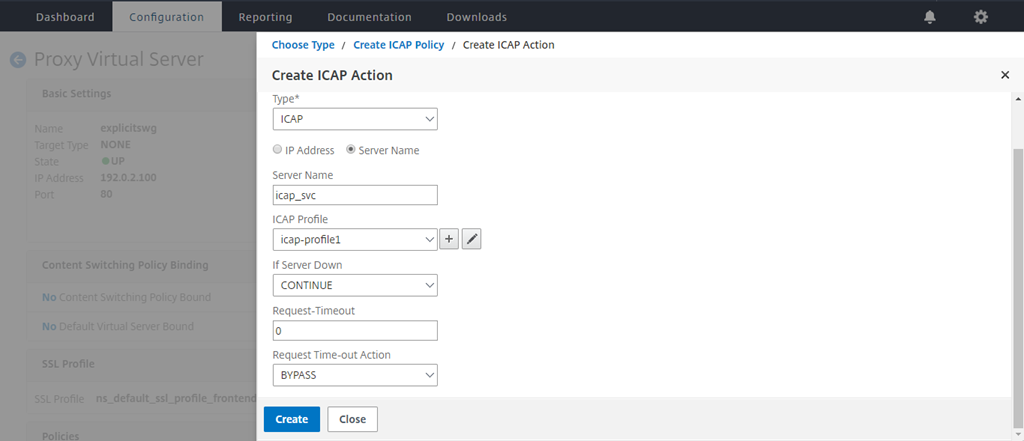
In the Create ICAP Action page, click Create.
-
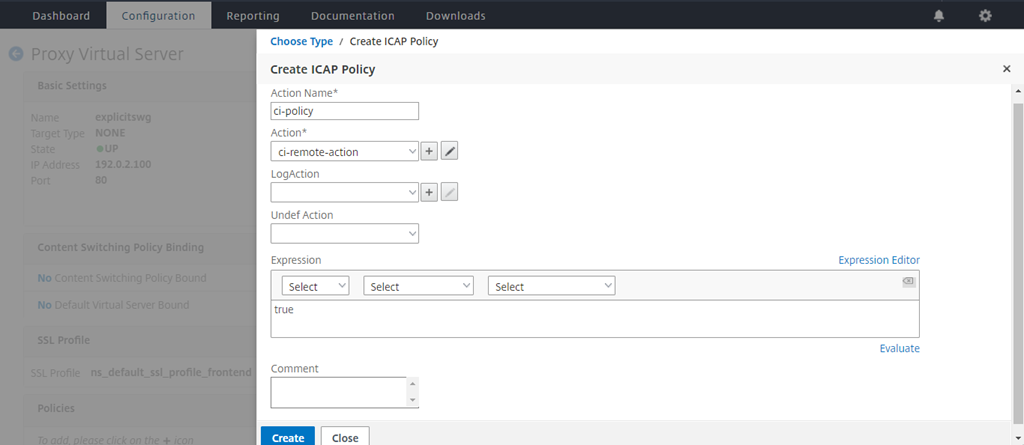
In the Create ICAP Policy page, enter true in the Expression Editor. Then, click Create.
-
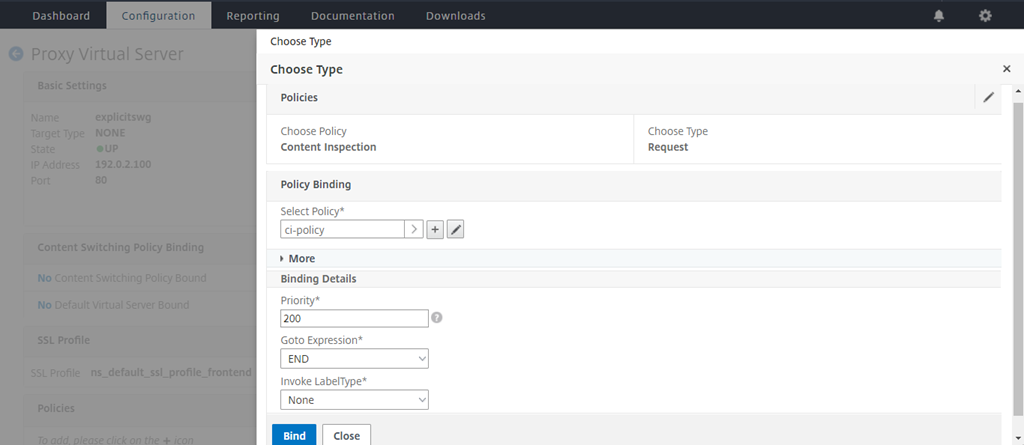
Click Bind.
-
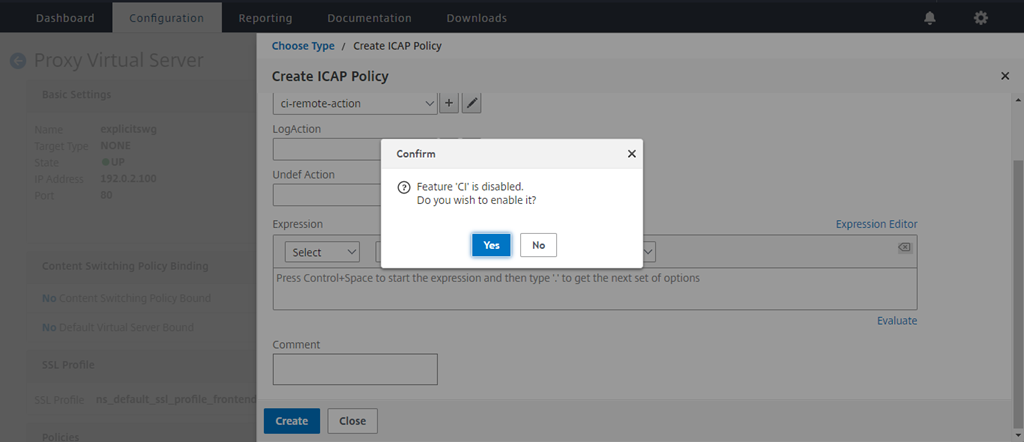
When prompted to enable the content inspection feature, select Yes.
-
Click Done.

Secure ICAP
You can establish a secure connection between the SWG appliance and the ICAP servers. To do this, create an SSL_TCP service instead of a TCP service. Configure a load balancing virtual server of type SSL_TCP. Bind the ICAP service to the load balancing virtual server.
Configure secure ICAP by using the CLI
At the command prompt, type:
add service <name> <IP> SSL_TCP <port>add lb vserver <name> <serviceType> <IPAddress> <port>bind lb vserver <name> <serviceName>
Example:
add service icap_svc 203.0.113.100 SSL_TCP 1344

add lbvserver lbicap SSL_TCP 0.0.0.0 0

bind lb vserver lbicap icap_svc
<!--NeedCopy-->
Configure secure ICAP by using the GUI
- Navigate to Load Balancing > Virtual Servers, and click Add.
- Specify a name for the virtual server, IP address and port. Specify protocol as SSL_TCP.
- Click OK.
- Click inside the Load Balancing virtual Server Service Binding section to add an ICAP service.
- Click “+” to add a service.
- Specify a service name, IP address, protocol (SSL_TCP), and port (default port for secure ICAP is 11344).
- Click OK.
- Click Done.
- Click Bind.
- Click Continue twice.
- Click Done.
Limitations
The following features are not supported:
- ICAP response caching.
- Inserting X-Auth-User-URI header.
- Inserting the HTTP request in the ICAP request in RESPMOD.