Provisioning NetScaler VPX Instances on AWS
When you move your applications to the cloud, the components that are part of your application increase, become more distributed, and need to be dynamically managed.
With NetScaler VPX instances on AWS, you can seamlessly extend your L4-L7 network stack to AWS. With NetScaler VPX, AWS becomes a natural extension of your on-premises IT infrastructure. You can use NetScaler VPX on AWS to combine the elasticity and flexibility of the cloud, with the same optimization, security, and control features that support the most demanding websites and applications in the world.
With NetScaler Console monitoring your NetScaler instances, you gain visibility into the health, performance, and security of your applications. You can automate the setup, deployment, and management of your application delivery infrastructure across hybrid multi-cloud environments.
AWS terminology
The following section provides a brief description of the AWS terms used in this document:
| Term | Definition |
|---|---|
| Amazon Machine Image (AMI) | A machine image, which provides the information required to launch an instance, which is a virtual server in the cloud. |
| Elastic Compute Cloud (EC2) | A web service that provides secure, resizable compute capacity in the cloud. It is designed to make web-scale cloud computing easier for developers. |
| Elastic network interface (ENI) | A virtual network interface that you can attach to an instance in a VPC. |
| Instance type | Amazon EC2 provides a wide selection of instance types optimized to fit different use cases. Instance types comprise varying combinations of CPU, memory, storage, and networking capacity and give you the flexibility to choose the appropriate mix of resources for your applications. |
| Identity and Access Management (IAM) role | An AWS identity with permission policies that determine what the identity can and cannot do in AWS. You can use an IAM role to enable applications running on an EC2 instance to securely access your AWS resources. |
| Security groups | A named set of allowed inbound network connections for an instance. |
| Subnets | A segment of the IP address range of a VPC that EC2 instances can be attached to. You can create subnets to group instances according to security and operational needs. |
| Virtual Private Cloud (VPC) | A web service for provisioning a logically isolated section of the AWS cloud where you can launch AWS resources in a virtual network that you define. |
Prerequisites
This document assumes the following:
-
You possess an AWS account.
-
You have created the required VPC and selected the availability zones.
-
You have added the agent in AWS.
For more information on how to create an account and other tasks, see AWS Documentation.
For more information on how to install an agent on AWS, see Install a NetScaler agent on AWS.
Architecture Diagram
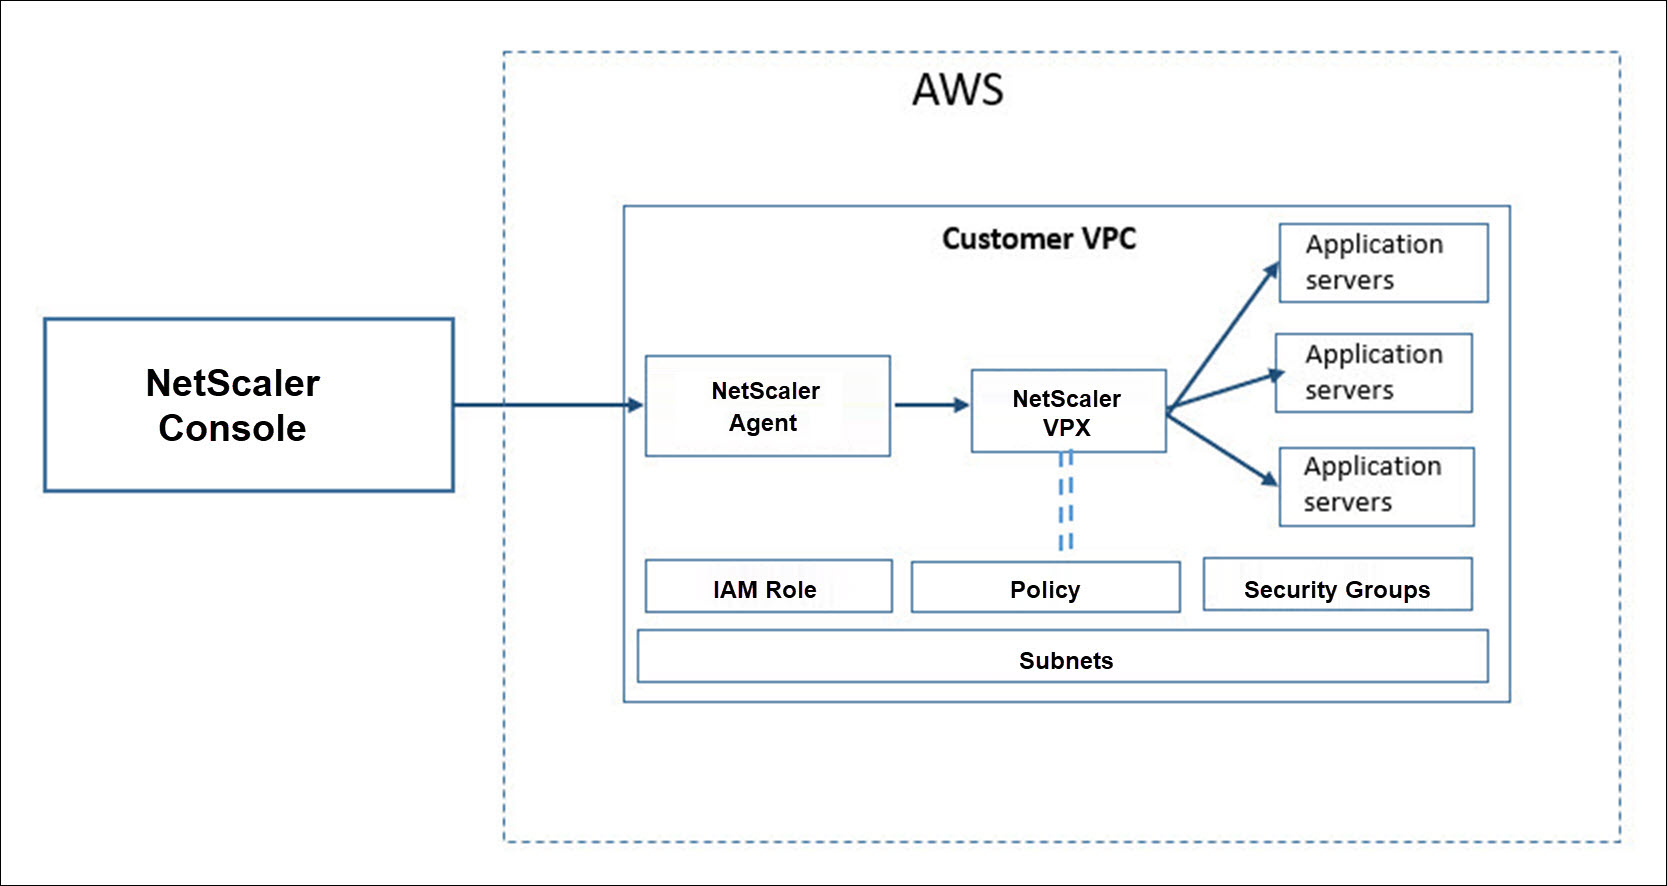
The following image provides an overview of how NetScaler Console connects with AWS to provision NetScaler VPX instances in AWS.
Configuration tasks
Perform the following tasks on AWS before you provision NetScaler VPX instances in NetScaler Console:
-
Create subnets
-
Create security groups
-
Create an IAM role and define a policy
Perform the following tasks on NetScaler Console to provision the instances on AWS:
-
Create site
-
Provision NetScaler VPX instance on AWS
To create subnets
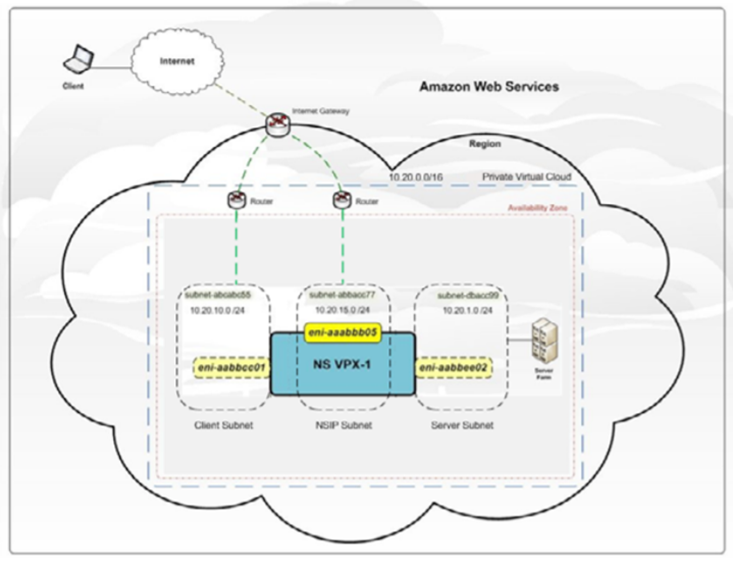
Create three subnets in your VPC. The three subnets that are required to provision NetScaler VPX instances in your VPC - are management, client, and server. Specify an IPv4 CIDR block from the range that is defined in your VPC for each of the subnets. Specify the availability zone in which you want the subnet to reside. Create all the three subnets in the same availability zone. The following image illustrates the three subnets created in your region and their connectivity to the client system.
For more information on VPC and subnets, see VPCs and Subnets.
To create security groups
Create a security group to control inbound and outbound traffic in the NetScaler VPX instance. A security group acts as a virtual firewall for your instance. Create security groups at the instance level, and not at the subnet level. It is possible to assign each instance in a subnet in your VPC to a different set of security groups. Add rules for each security group to control the inbound traffic that is passing through the client subnet to instances. You can also add a separate set of rules that control the outbound traffic that passes through the server subnet to the application servers. Although you can use the default security group for your instances, you might want to create your groups. Create three security groups - one for each subnet. Create rules for both incoming and outgoing traffic that you want to control. You can add as many rules as you want.
For more information on security groups, see Security Groups for your VPC.
To create an IAM role and define a policy
Create an IAM role so that you can establish a trust relationship between your users and the Citrix trusted AWS account and create a policy with Citrix permissions.
-
In AWS, click Services. In the left side navigation pane, select IAM > Roles, and click Create role.
-
You are connecting your AWS account with the AWS account in NetScaler Console. So, select Another AWS account to allow NetScaler Console to perform actions in your AWS account.
Type in the 12-digit NetScaler Console AWS account ID. The Citrix ID is 835822366011. You can also find the Citrix ID in NetScaler Console when you create the cloud access profile.

-
Enable Require external ID to connect to a third-party account. You can increase the security of your role by requiring an optional external identifier. Type an ID that can be a combination of any characters.
-
Click Permissions.
-
In the Attach permissions policies page, click Create policy.
-
You can create and edit a policy in the visual editor or by using JSON.
The list of permissions from Citrix is provided in the following box:
{ "Version": "2012-10-17", "Statement": [ { "Effect": "Allow", "Action": [ "ec2:DescribeInstances", "ec2:DescribeImageAttribute", "ec2:DescribeInstanceAttribute", "ec2:DescribeRegions", "ec2:DescribeDhcpOptions", "ec2:DescribeSecurityGroups", "ec2:DescribeHosts", "ec2:DescribeImages", "ec2:DescribeVpcs", "ec2:DescribeSubnets", "ec2:DescribeNetworkInterfaces", "ec2:DescribeAvailabilityZones", "ec2:DescribeNetworkInterfaceAttribute", "ec2:DescribeInstanceStatus", "ec2:DescribeAddresses", "ec2:DescribeKeyPairs", "ec2:DescribeTags", "ec2:DescribeVolumeStatus", "ec2:DescribeVolumes", "ec2:DescribeVolumeAttribute", "ec2:CreateTags", "ec2:DeleteTags", "ec2:CreateKeyPair", "ec2:DeleteKeyPair", "ec2:ResetInstanceAttribute", "ec2:RunScheduledInstances", "ec2:ReportInstanceStatus", "ec2:StartInstances", "ec2:RunInstances", "ec2:StopInstances", "ec2:UnmonitorInstances", "ec2:MonitorInstances", "ec2:RebootInstances", "ec2:TerminateInstances", "ec2:ModifyInstanceAttribute", "ec2:AssignPrivateIpAddresses", "ec2:UnassignPrivateIpAddresses", "ec2:CreateNetworkInterface", "ec2:AttachNetworkInterface", "ec2:DetachNetworkInterface", "ec2:DeleteNetworkInterface", "ec2:ResetNetworkInterfaceAttribute", "ec2:ModifyNetworkInterfaceAttribute", "ec2:AssociateAddress", "ec2:AllocateAddress", "ec2:ReleaseAddress", "ec2:DisassociateAddress", "ec2:GetConsoleOutput" ], "Resource": "*" } ] } <!--NeedCopy--> -
Copy and paste the list of permissions in the JSON tab and click Review policy.
-
In Review policy page, type a name for the policy, enter a description, and click Create policy.
To create a site in NetScaler Console
Create a site in NetScaler Console and add the details of the VPC associated with your AWS role.
-
In NetScaler Console, navigate to Infrastructure > Sites.
-
Click Add.
-
Select the service type as AWS and enable Use existing VPC as a site.
-
Select the cloud access profile.
-
If the cloud access profile doesn’t exist in the field, click Add to create a profile.
-
In the Create Cloud Access Profile page, type the name of the profile with which you want to access AWS.
-
Type the ARN associated with the role that you have created in AWS.
-
Type the external ID that you provided while creating an Identity and Access Management (IAM) role in AWS. See step 4 in To create an IAM role and define a policy task. Ensure that the IAM role name that you specified in AWS starts with “Citrix-ADM-“ and it correctly appears in the Role ARN.
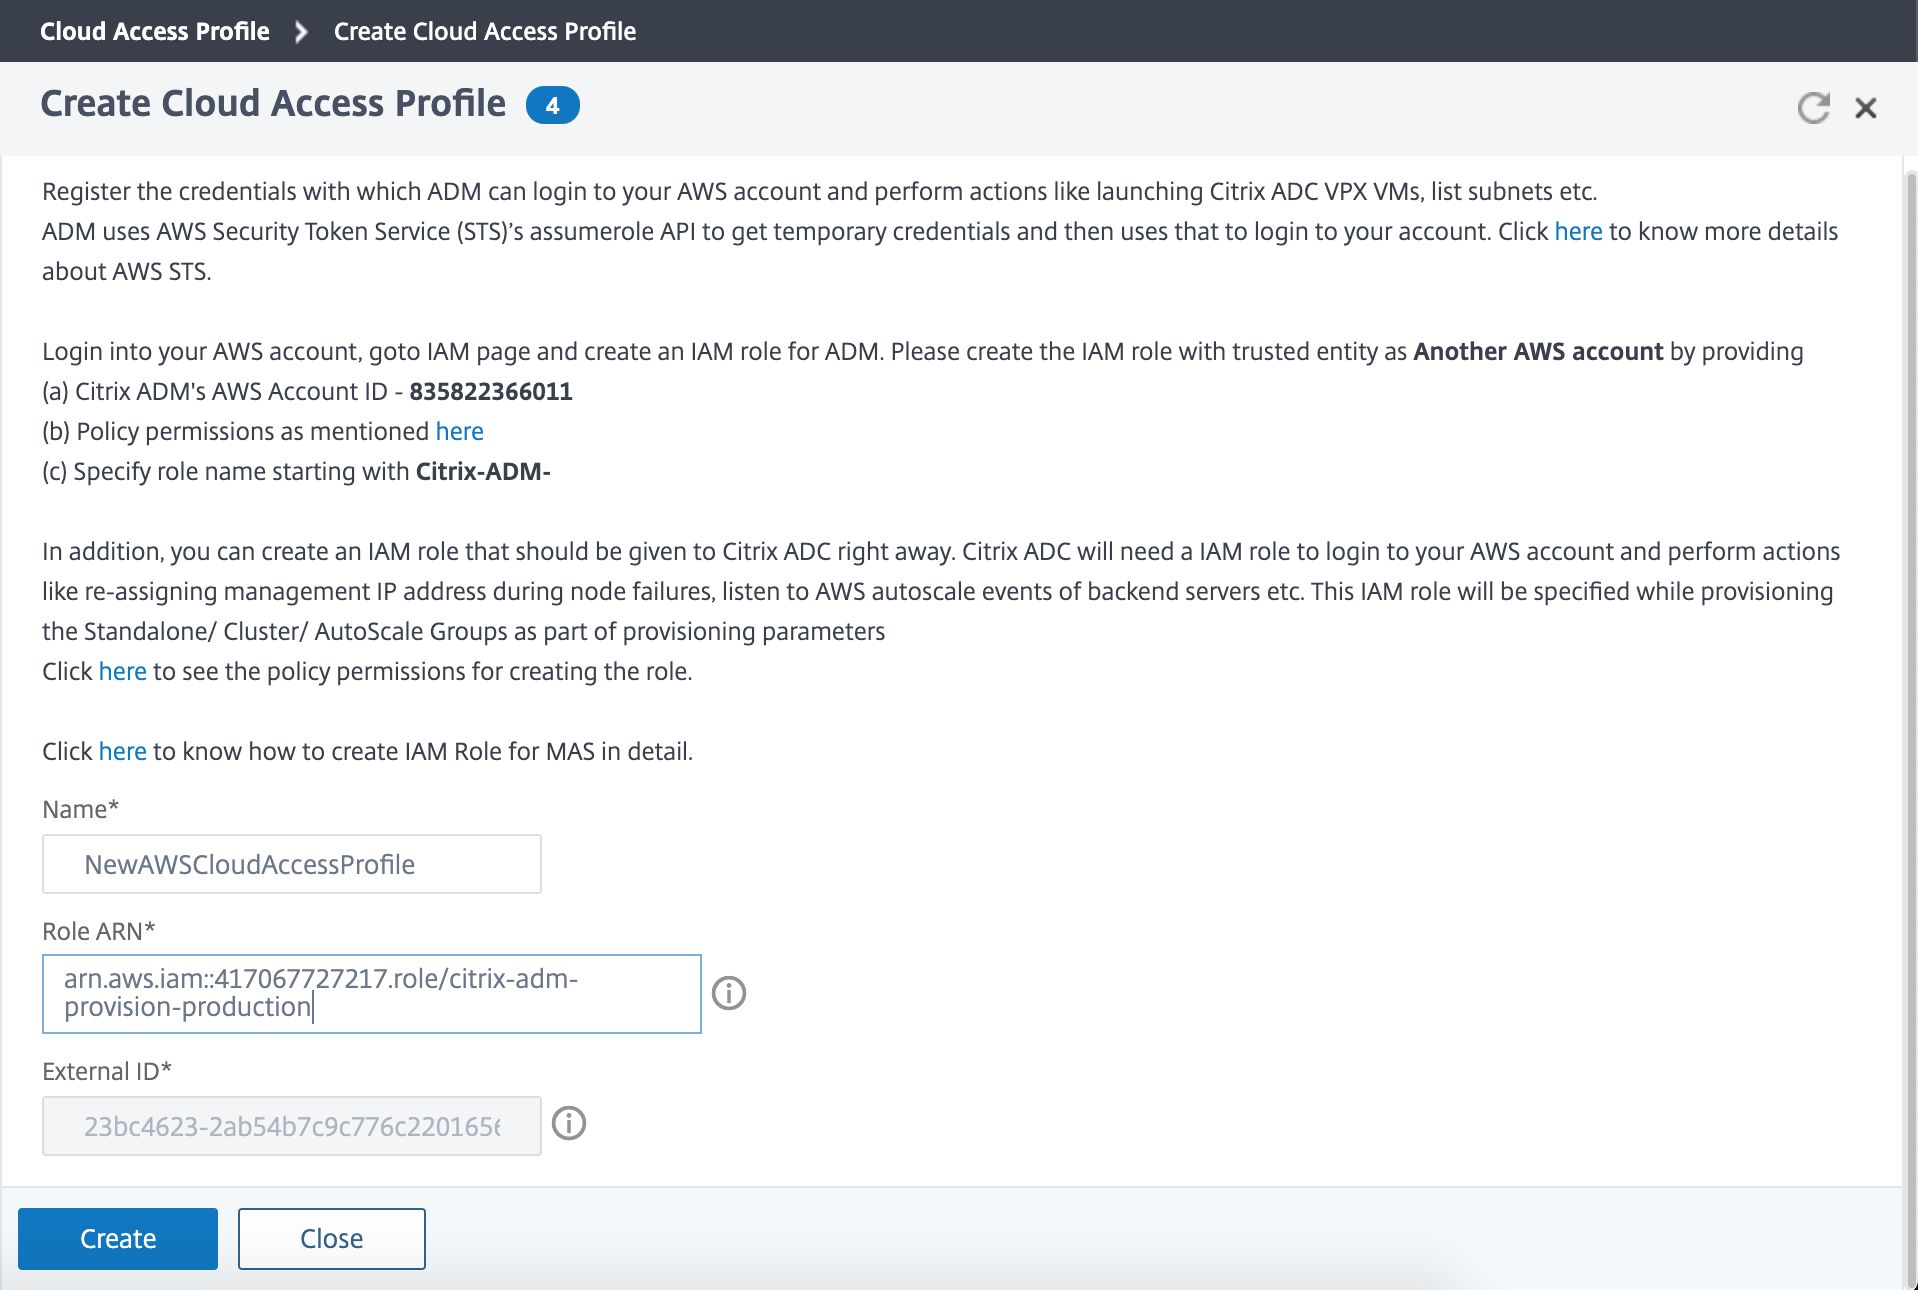
The details of the VPC, such as the region, VPC ID, name and CIDR block, associated with your IAM role in AWS are imported in NetScaler Console.
-
-
Type a name for the site.
-
Click Create.
To provision NetScaler VPX on AWS
Use the site that you have created earlier to provision the NetScaler VPX instances on AWS. Provide the agent details to provision those instances that are bound to that agent.
-
In NetScaler Console, navigate to Infrastructure > Instances > NetScaler.
-
In the VPX tab, click Provision.
This option displays the Provision NetScaler VPX on Cloud page.
-
Select Amazon Web Services (AWS) and click Next.
-
In the Basic Parameters tab,
-
Select the Type of Instance from the list.
-
Standalone: This option provisions a standalone NetScaler VPX instance on AWS.
-
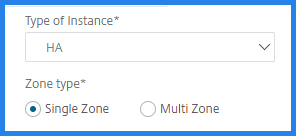
HA: This option provisions the high availability NetScaler VPX instances on AWS.
To provision the NetScaler VPX instances in the same zone, select the Single Zone option under Zone Type.
To provision the NetScaler VPX instances across multiple zones, select the Multi Zone option under Zone type. In the Provision Parameters tab, make sure to specify the network details for each zone that are created on AWS.
-
-
Specify the name of an NetScaler VPX instance.
-
In Site, select the site that you created earlier.
-
In Agent, select the agent that is created to manage the NetScaler VPX instance.
-
In Cloud Access Profile, select the cloud access profile created during site creation.
-
In Device Profile, select the profile to provide authentication.
NetScaler Console uses the device profile when it requires to log on to the NetScaler VPX instance.
-
Click Next.
-
-
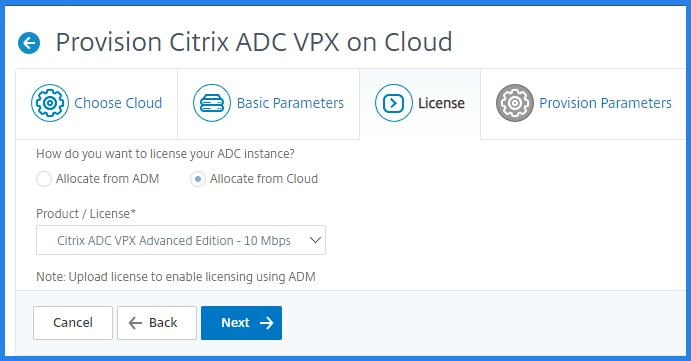
In the License tab, Select one of the following modes to apply license to a NetScaler instance:
-
Using NetScaler Console: The instance that you want to provision checks out the licenses from the NetScaler Console.
-
Using the AWS Cloud: The Allocate from Cloud option uses the NetScaler® product licenses available in the AWS marketplace. The instance that you want to provision uses the licenses from the marketplace.
If you choose to use licenses from the AWS marketplace, specify the product or license in the Provision Parameters tab.
For more information, see Licensing Requirements.
-
-
In the License tab if you select the Allocate from NetScaler Console, specify the following:
-
License Type - Select either bandwidth or virtual CPU licenses:
Bandwidth Licenses: You can select one of the following options from the Bandwidth License Types list:
-
Pooled Capacity: Specify the capacity to allocate to an instance.
From the common pool, the NetScaler instance checks out one instance license and only as much bandwidth is specified.
-
VPX Licenses: When a NetScaler VPX instance is provisioned, the instance checks out the license from the NetScaler Console.
Virtual CPU Licenses: The provisioned NetScaler VPX instance checks out licenses depending on the number of CPUs running in the instance.
Note
When the provisioned instances are removed or destroyed, the applied licenses return to the NetScaler Console license pool. These licenses can be reused to provision new instances.
-
- In License Edition, select the license edition. The NetScaler Console uses the specified edition to provision instances.
-
-
Click Next.
-
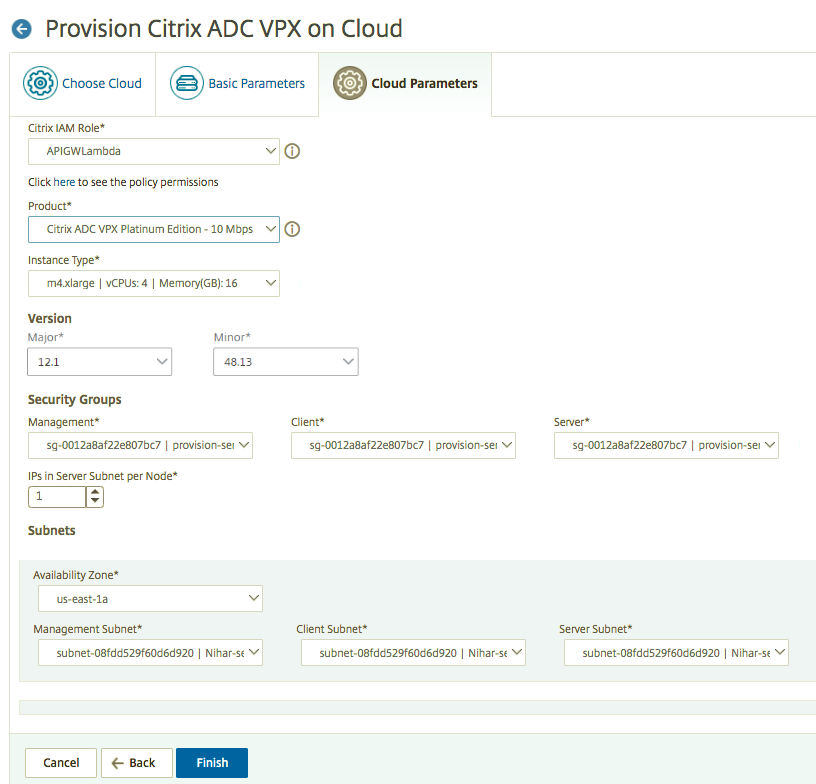
In the Provision Parameters tab,
-
Select the Citrix IAM Role created in AWS. An IAM role is an AWS identity with permission policies that determine what the identity can and cannot do in AWS.
-
In the Product field, select the NetScaler product version that you want to provision.
-
Select the EC2 instance type from the Instance Type list.
This list displays the supported AMI instance types for the selected NetScaler instance.
-
Select the Version of NetScaler that you want to provision. Select both Major and Minor version of NetScaler.
-
In Security Groups, select the Management, Client, and Server security groups that you have created in your virtual network.
-
In IPs in server Subnet per Node, select the number of IP addresses in server subnet per node for the security group.
-
In Subnets, select the Management, Client, and Server subnets for each zone that are created in AWS. You can also select the region from the Availability Zone list.
-
Click Finish.
-
The NetScaler VPX instance is now provisioned on AWS.
Note
Currently, NetScaler Console doesn’t support deprovisioning of NetScaler instances from AWS.
To view the NetScaler VPX provisioned in AWS
-
From the AWS home page, navigate to Services and click EC2.
-
On the Resources page, click Running Instances.
-
You can view the NetScaler VPX provisioned in AWS.
The name of the NetScaler VPX instance is the same that you provided while provisioning an instance in the NetScaler Console.
To view the NetScaler VPX provisioned in NetScaler Console
-
In NetScaler Console, navigate to Infrastructure > Instances > NetScaler.
-
Select NetScaler VPX tab.
-
The NetScaler VPX instance provisioned in AWS is listed here.