Install a NetScaler VPX™ instance on Linux KVM
Note:
This tech preview feature is provided for evaluation purposes only and is not intended for production use.
Overview
Starting with NetScaler® release 15.1, the NetScaler VPX instance for Linux KVM is based on Linux, replacing the FreeBSD-based VPX available in release 14.1 and earlier. NetScaler VPX on KVM can be provisioned using Virtual Machine Manager for a graphical workflow, or virsh for CLI-based and scripted deployments.
In-place upgrade from 14.1 (FreeBSD-based) to 15.1 (Linux-based) is supported. The instance must be on 14.1 build 72.x or later before upgrading.
System requirements
The following tables list the minimum requirements for the KVM host and the NetScaler VPX instance.
KVM host
| Resource | Minimum requirement |
|---|---|
| CPU | 64-bit x86 with hardware virtualization (Intel VT-x or AMD-V) enabled |
| Kernel | 64-bit Linux kernel 2.6.20 or later (3.6.11-4 or later recommended) |
| Tested distributions | Red Hat Enterprise Linux, Ubuntu 24.04 |
VPX instance
| Resource | Minimum requirement |
|---|---|
| vCPU | 2 |
| Memory | 4 GB |
| Storage | 20 GB |
Before you begin
Before you provision a NetScaler VPX instance on Linux KVM, ensure that the following prerequisites are met:
-
KVM and QEMU are installed on the Linux host.
-
The
vhost_netmodule is loaded for optimal network performance.modprobe vhost_net -
Generic Receive Offload (GRO) and Large Receive Offload (LRO) are disabled on the physical interfaces attached to the VPX VM.
ethtool -K <interface> gro off ethtool -K <interface> lro off <!--NeedCopy--> -
A Linux bridge or MacVTap interface is configured on the host.
-
Each VPX instance uses its own dedicated disk image. A single disk image cannot be shared across multiple instances.
-
VPX license files are available and ready to apply to the instance.
Method 1: Install using Virtual Machine Manager
Use Virtual Machine Manager to provision the VPX instance through a graphical workflow. Complete the following steps:
Step 1. Create a new VM.
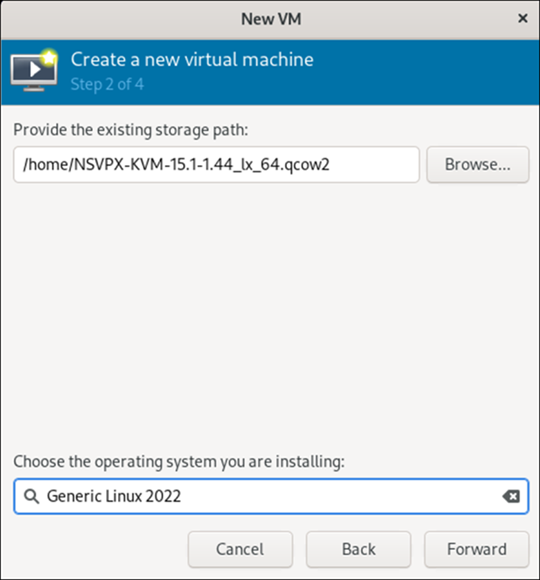
- Open Virtual Machine Manager > File > New Virtual Machine.
- Select Import existing disk image and browse to the
qcow2file. -
Set OS type to Linux and click Forward.
Step 2. Allocate resources.
- Set Memory to 4096 MB and CPUs to 2.
- Click Forward.
Step 3. Customize and configure networking.
- Select Customize configuration before install and click Finish.
- Set Virt Type to KVM and Architecture to x86_64.
- Select the NIC, set Device model to virtio, and choose the appropriate source bridge or MacVTap interface.
- Click Apply > Begin Installation.
Step 4. Apply license.
Log in at https://<NSIP> and apply the VPX license from System > Licenses.
Method 2: Install using virsh
Use virsh to provision the VPX instance from the command line, which is useful for scripted and automated deployments. Complete the following steps:
Step 1. Prepare the domain XML.
-
Copy and rename the XML file:
cp NSVPX-KVM-15.1-<build>_lx_64.xml NetScaler-VPX-15.1.xml <!--NeedCopy--> -
Edit the file. The domain name and all MAC addresses must be unique across all VMs on the host:
<name>NetScaler-VPX-15.1</name>
<mac address='52:54:00:29:74:b3'/>
<source file='/root/NSVPX-KVM-15.1-<build>_lx_64.qcow2'/>
<!--NeedCopy-->
Step 2. Configure networking.
Choose one of the following network interface types and add its interface definition to the domain configuration:
-
MacVTap bridge (recommended):
<interface type='direct'> <mac address='52:54:00:29:74:b3'/> <source dev='eth0' mode='bridge'/> <model type='virtio'/> </interface> <!--NeedCopy--> -
Linux bridge:
 <interface type='bridge'>
    <mac address='52:54:00:2d:43:a4'/>
    <source bridge='br0'/>
    <model type='virtio'/>
 </interface>
 <!--NeedCopy-->
Step 3. Define, start, and connect.
Run the following commands to define the VM from the domain configuration file, start it, and open a console session:
virsh define NetScaler-VPX-15.1.xml
virsh start NetScaler-VPX-15.1
virsh console NetScaler-VPX-15.1
<!--NeedCopy-->
Step 4. Configure management settings.
Configure the NSIP, subnet mask, and gateway when prompted, then select Save and Continue.
Upgrade to NetScaler 15.1 Tech Preview
Perform an in-place upgrade of an existing NetScaler VPX instance to the 15.1 Tech Preview build. Complete the following steps:
Prerequisite:
Ensure that the NetScaler VPX instance is running version 14.1 build 72.x or later.
Step 1. Download the upgrade bundle.
Download the KVM-specific bundle build-15.1-<build>_lx_64.tgz from my.citrix.com by navigating to Downloads > NetScaler > Virtual Appliances.
Important:
Use only the
_lx_64bundle. The standard FreeBSD upgrade bundle is not compatible and fails.
Step 2. Transfer and extract.
Copy the bundle to the VPX shell and extract it under /var/nsinstall/.
tar -xvzf build-15.1-<build>_lx_64.tgz -C /var/nsinstall/
<!--NeedCopy-->
Step 3. Install and reboot.
cd /var/nsinstall/build-15.1-<build>_lx_64
./installns
reboot
<!--NeedCopy-->
Note:
The same upgrade process applies to subsequent upgrades between 15.1 builds.
Limitations
| Limitation | Details |
|---|---|
| Live migration | KVM live migration of a VPX instance is not supported. |
| Shared disk images | Each VPX instance must use its own unique disk image. |
| Forced shutdown | Always shut down the VPX instance gracefully. Do not use Force Off. |
| Interface parameters | Speed, duplex, and autonegotiation settings are not configurable on virtual interfaces. |
| Feature parity | Some features available in 14.1 might not be available in the 15.1 Tech Preview. For details, see the Release summary. |
Related information
For complete KVM deployment details, including SR-IOV, PCI passthrough, DPDK, and VLAN configuration, see the Installing NetScaler VPX on Linux KVM - 14.1 documentation.