This content has been machine translated dynamically.
Dieser Inhalt ist eine maschinelle Übersetzung, die dynamisch erstellt wurde. (Haftungsausschluss)
Cet article a été traduit automatiquement de manière dynamique. (Clause de non responsabilité)
Este artículo lo ha traducido una máquina de forma dinámica. (Aviso legal)
此内容已经过机器动态翻译。 放弃
このコンテンツは動的に機械翻訳されています。免責事項
이 콘텐츠는 동적으로 기계 번역되었습니다. 책임 부인
Este texto foi traduzido automaticamente. (Aviso legal)
Questo contenuto è stato tradotto dinamicamente con traduzione automatica.(Esclusione di responsabilità))
This article has been machine translated.
Dieser Artikel wurde maschinell übersetzt. (Haftungsausschluss)
Ce article a été traduit automatiquement. (Clause de non responsabilité)
Este artículo ha sido traducido automáticamente. (Aviso legal)
この記事は機械翻訳されています.免責事項
이 기사는 기계 번역되었습니다.책임 부인
Este artigo foi traduzido automaticamente.(Aviso legal)
这篇文章已经过机器翻译.放弃
Questo articolo è stato tradotto automaticamente.(Esclusione di responsabilità))
Translation failed!
Configuración de Enviar al Maestro
Normalmente, el tráfico destinado a un VIP llega al dispositivo Citrix ADC en el que está activo el VIP, ya que una solicitud ARP con el VIP y un MAC virtual en ese dispositivo ha llegado al router ascendente. Sin embargo, en algunos casos, como las rutas estáticas configuradas en el enrutador ascendente para la subred VIP o una topología que bloquea esta ruta, el tráfico puede llegar a un dispositivo Citrix ADC en el que el VIP está en estado de copia de seguridad. Si quiere que este dispositivo reenvíe los paquetes de datos al dispositivo en el que está activo el VIP, debe habilitar la opción Enviar al maestro. Este comportamiento es una configuración por nodo y está inhabilitado de forma predeterminada.
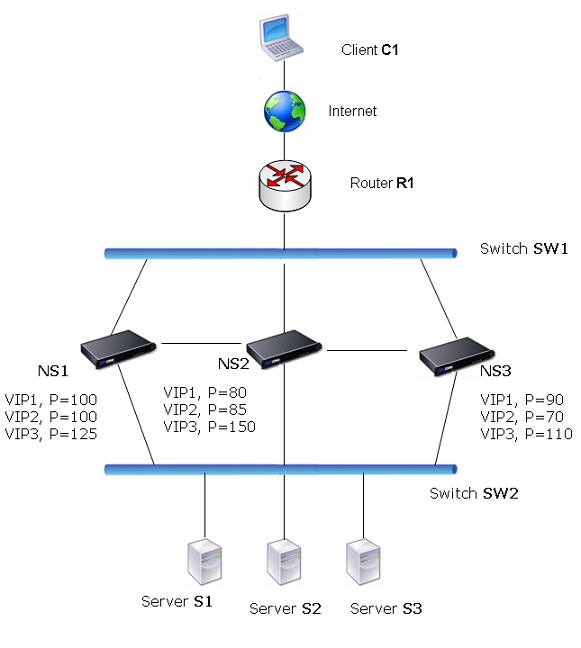
Por ejemplo, en el diagrama siguiente, VIP1 está configurado en NS1, NS2 y NS3 y está activo en NS1. En determinadas circunstancias, el tráfico de VIP1 (activo en NS1) puede llegar a VIP1 en NS3. Cuando la opción Enviar a maestro está habilitada en NS3, NS3 reenvía el tráfico a NS1 a NS2 mediante entradas de ruta para NS1.
Ilustración 1. Una configuración activa-activa con la opción Enviar a maestro habilitada

Para habilitar el envío al maestro mediante la CLI:
En el símbolo del sistema, escriba:
| set vrIDParam -sendToMaster (ENABLED | DISABLED) |
Ejemplo:
> set vrIDParam -sendToMaster ENABLED
 Done
<!--NeedCopy-->
Para habilitar el envío al maestro mediante la GUI:
- Vaya a Sistema > Red, en el grupo Configuración, haga clic en Parámetros del enrutador virtual.
- Seleccione la opción Enviar al maestro.
Compartir
Compartir
En este artículo
This Preview product documentation is Cloud Software Group Confidential.
You agree to hold this documentation confidential pursuant to the terms of your Cloud Software Group Beta/Tech Preview Agreement.
The development, release and timing of any features or functionality described in the Preview documentation remains at our sole discretion and are subject to change without notice or consultation.
The documentation is for informational purposes only and is not a commitment, promise or legal obligation to deliver any material, code or functionality and should not be relied upon in making Cloud Software Group product purchase decisions.
If you do not agree, select I DO NOT AGREE to exit.