安装、链接和更新证书
要安装证书,请参阅 添加或更新证书密钥对。
注意:
NetScaler 支持 PEM、DER 和 PFX (PKCS12) 证书格式。
- PEM 可以有.crt、.pem 或.cer 扩展名。
- DER 的扩展名是.der。
- PFX 可以有.p12 或.pfx 扩展名。
通常,文件扩展名并不重要。文件内容的编码方式不同,这决定了格式,并相应地解析了证书。
链接证书
许多服务器证书是由多个分层证书颁发机构 (CA) 签名的,这意味着这些证书形成如下所示的链:

有时,中间 CA 会分为主证书和辅助中间 CA 证书。然后,证书形成如下所示的链:

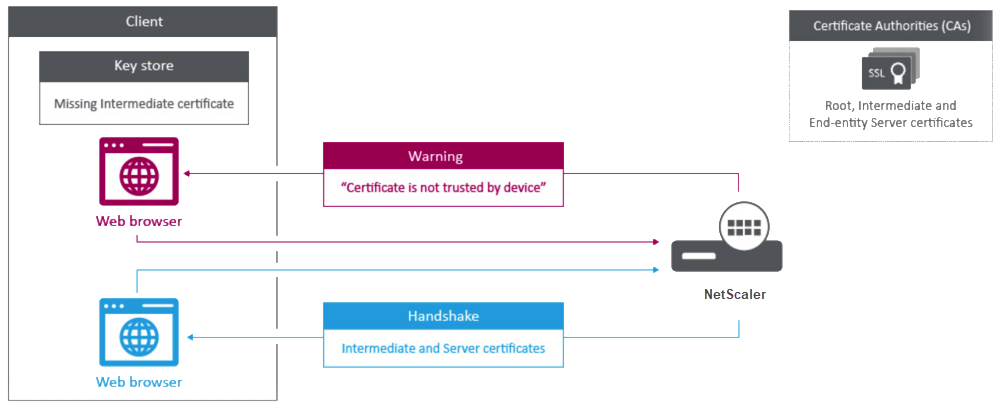
客户端计算机通常在其本地证书存储区中包含根 CA 证书,但不包含一个或多个中间 CA 证书。ADC 设备必须向客户端发送一个或多个中间 CA 证书。
注意: 设备不得向客户端发送根 CA 证书。公钥基础结构 (PKI) 信任关系模型要求通过带外方法在客户端上安装根 CA 证书。例如,证书包含在操作系统或 Web 浏览器中。客户端忽略设备发送的根 CA 证书。
有时,标准 Web 浏览器无法识别为可信 CA 的中间 CA 会颁发服务器证书。在这种情况下,必须使用服务器自己的证书向客户端发送一个或多个 CA 证书。否则,浏览器将终止 SSL 会话,因为它无法对服务器证书进行身份验证。
请参阅以下部分以添加服务器证书和中间证书:
- 手动链接证书
- 自动化证书链接
- 创建证书链
如何链接中间颁发机构证书
手动链接证书
注意: NetScaler FIPS 平台和群集设置中不支持此功能。
您现在可以将一个服务器证书和最多九个中间证书分组到一个文件中,而不是添加和链接单个证书。您可以在添加证书密钥对时指定文件的名称。在执行此操作之前,请确保满足以下先决条件。
- 文件中的证书按以下顺序排列:
- 服务器证书(必须是文件中的第一个证书)
- (可选)服务器密钥
- 中级证书 1 (ic1)
- 中级证书 2 (ic2)
- 中间证书 3 (ic3),依此类推 注意:将为名为“<certificatebundlename>.pem_ic< n>”的每个中间证书创建中间证书文件,其中 n 介于 1 和 9 之间。例如,bundle.pem_ic1,其中 bundle 是证书集的名称,ic1 是证书集中的第一个中间证书。
- 捆绑包选项处于选中状态。
- 文件中存在的中间证书不超过九个。
将解析该文件,并标识服务器证书、中间证书和服务器密钥(如果存在)。首先,添加服务器证书和密钥。然后,将按照中间证书添加到文件的顺序添加中间证书,并进行相应的链接。
如果存在以下任一情况,则会报告错误:
- 设备上存在其中一个中间证书的证书文件。
- 密钥放在文件中的服务器证书之前。
- 中间证书放在服务器证书之前。
- 中间证书在文件中的放置顺序与其创建顺序不同。
- 文件中没有证书。
- 证书的 PEM 格式不正确。
- 文件中的中间证书数量超过了九个。
使用 CLI 添加证书集
在命令提示符下,键入以下命令以创建证书集并验证配置:
add ssl certKey <certkeyName> -cert <string> -key <string> -bundle (YES | NO)

show ssl

show ssl certlink
<!--NeedCopy-->
在以下示例中,证书集 (bundle.pem) 包含以下文件:
链接到 bundle_ic1 的服务器证书(捆绑包)
链接到 bundle_ic2 的第一个中间证书 (bundle_ic1)
链接到 bundle_ic3 的第二个中间证书 (bundle_ic2)
第三个中间证书 (bundle_ic3)
add ssl certKey bundletest -cert bundle9.pem -key bundle9.pem -bundle yes

sh ssl certkey

1)      Name: ns-server-certificate
        Cert Path: ns-server.cert
        Key Path: ns-server.key
        Format: PEM
        Status: Valid,   Days to expiration:5733
        Certificate Expiry Monitor: ENABLED
        Expiry Notification period: 30 days
        Certificate Type: Server Certificate
        Version: 3
        Serial Number: 01
        Signature Algorithm: sha256WithRSAEncryption
        Issuer:  C=US,ST=California,L=San Jose,O=Citrix ANG,OU=NS Internal,CN=default OULLFT
        Validity
                Not Before: Apr 21 15:56:16 2016 GMT
                Not After : Mar  3 06:30:56 2032 GMT
        Subject:  C=US,ST=California,L=San Jose,O=Citrix ANG,OU=NS Internal,CN=default OULLFT
        Public Key Algorithm: rsaEncryption
        Public Key size: 2048

2)      Name: servercert
        Cert Path: complete/server/server_rsa_1024.pem
        Key Path: complete/server/server_rsa_1024.ky
        Format: PEM
        Status: Valid,   Days to expiration:7150
        Certificate Expiry Monitor: ENABLED
        Expiry Notification period: 30 days
        Certificate Type: Server Certificate
        Version: 3
        Serial Number: 1F
        Signature Algorithm: sha1WithRSAEncryption
        Issuer:  C=IN,ST=KAR,O=Citrix R&D Pvt Ltd,CN=Citrix
        Validity
                Not Before: Sep  2 09:54:07 2008 GMT
                Not After : Jan 19 09:54:07 2036 GMT
        Subject:  C=IN,ST=KAR,O=Citrix Pvt Ltd,CN=Citrix
        Public Key Algorithm: rsaEncryption
        Public Key size: 1024

3)      Name: bundletest
        Cert Path: bundle9.pem
        Key Path: bundle9.pem
        Format: PEM
        Status: Valid,   Days to expiration:3078
        Certificate Expiry Monitor: ENABLED
        Expiry Notification period: 30 days
        Certificate Type: Server Certificate
        Version: 3
        Serial Number: 01
        Signature Algorithm: sha256WithRSAEncryption
        Issuer:  C=IN,ST=ka,O=sslteam,CN=ICA9
        Validity
                Not Before: Nov 28 06:43:11 2014 GMT
                Not After : Nov 25 06:43:11 2024 GMT
        Subject:  C=IN,ST=ka,O=sslteam,CN=Server9
        Public Key Algorithm: rsaEncryption
        Public Key size: 2048

4)      Name: bundletest_ic1
        Cert Path: bundle9.pem_ic1
        Format: PEM
        Status: Valid,   Days to expiration:3078
        Certificate Expiry Monitor: ENABLED
        Expiry Notification period: 30 days
        Certificate Type: Intermediate CA
        Version: 3
        Serial Number: 01
        Signature Algorithm: sha256WithRSAEncryption
        Issuer:  C=IN,ST=ka,O=sslteam,CN=ICA8
        Validity
                Not Before: Nov 28 06:42:56 2014 GMT
                Not After : Nov 25 06:42:56 2024 GMT
        Subject:  C=IN,ST=ka,O=sslteam,CN=ICA9
        Public Key Algorithm: rsaEncryption
        Public Key size: 2048

5)      Name: bundletest_ic2
        Cert Path: bundle9.pem_ic2
        Format: PEM
        Status: Valid,   Days to expiration:3078
        Certificate Expiry Monitor: ENABLED
        Expiry Notification period: 30 days
        Certificate Type: Intermediate CA
        Version: 3
        Serial Number: 01
        Signature Algorithm: sha256WithRSAEncryption
        Issuer:  C=IN,ST=ka,O=sslteam,CN=ICA7
        Validity
                Not Before: Nov 28 06:42:55 2014 GMT
                Not After : Nov 25 06:42:55 2024 GMT
        Subject:  C=IN,ST=ka,O=sslteam,CN=ICA8
        Public Key Algorithm: rsaEncryption
        Public Key size: 2048

6)      Name: bundletest_ic3
        Cert Path: bundle9.pem_ic3
        Format: PEM
        Status: Valid,   Days to expiration:3078
        Certificate Expiry Monitor: ENABLED
        Expiry Notification period: 30 days
        Certificate Type: Intermediate CA
        Version: 3
        Serial Number: 01
        Signature Algorithm: sha256WithRSAEncryption
        Issuer:  C=IN,ST=ka,O=sslteam,CN=ICA6
        Validity
                Not Before: Nov 28 06:42:53 2014 GMT
                Not After : Nov 25 06:42:53 2024 GMT
        Subject:  C=IN,ST=ka,O=sslteam,CN=ICA7
        Public Key Algorithm: rsaEncryption
        Public Key size: 2048

7)      Name: bundletest_ic4
        Cert Path: bundle9.pem_ic4
        Format: PEM
        Status: Valid,   Days to expiration:3078
        Certificate Expiry Monitor: ENABLED
        Expiry Notification period: 30 days
        Certificate Type: Intermediate CA
        Version: 3
        Serial Number: 01
        Signature Algorithm: sha256WithRSAEncryption
        Issuer:  C=IN,ST=ka,O=sslteam,CN=ICA5
        Validity
                Not Before: Nov 28 06:42:51 2014 GMT
                Not After : Nov 25 06:42:51 2024 GMT
        Subject:  C=IN,ST=ka,O=sslteam,CN=ICA6
        Public Key Algorithm: rsaEncryption
        Public Key size: 2048

8)      Name: bundletest_ic5
        Cert Path: bundle9.pem_ic5
        Format: PEM
        Status: Valid,   Days to expiration:3078
        Certificate Expiry Monitor: ENABLED
        Expiry Notification period: 30 days
        Certificate Type: Intermediate CA
        Version: 3
        Serial Number: 01
        Signature Algorithm: sha256WithRSAEncryption
        Issuer:  C=IN,ST=ka,O=sslteam,CN=ICA4
        Validity
                Not Before: Nov 28 06:42:50 2014 GMT
                Not After : Nov 25 06:42:50 2024 GMT
        Subject:  C=IN,ST=ka,O=sslteam,CN=ICA5
        Public Key Algorithm: rsaEncryption
        Public Key size: 2048

9)      Name: bundletest_ic6
        Cert Path: bundle9.pem_ic6
        Format: PEM
        Status: Valid,   Days to expiration:3078
        Certificate Expiry Monitor: ENABLED
        Expiry Notification period: 30 days
        Certificate Type: Intermediate CA
        Version: 3
        Serial Number: 01
        Signature Algorithm: sha256WithRSAEncryption
        Issuer:  C=IN,ST=ka,O=sslteam,CN=ICA3
        Validity
                Not Before: Nov 28 06:42:48 2014 GMT
                Not After : Nov 25 06:42:48 2024 GMT
        Subject:  C=IN,ST=ka,O=sslteam,CN=ICA4
        Public Key Algorithm: rsaEncryption
        Public Key size: 2048

10)     Name: bundletest_ic7
        Cert Path: bundle9.pem_ic7
        Format: PEM
        Status: Valid,   Days to expiration:3078
        Certificate Expiry Monitor: ENABLED
        Expiry Notification period: 30 days
        Certificate Type: Intermediate CA
        Version: 3
        Serial Number: 01
        Signature Algorithm: sha256WithRSAEncryption
        Issuer:  C=IN,ST=ka,O=sslteam,CN=ICA2
        Validity
                Not Before: Nov 28 06:42:46 2014 GMT
                Not After : Nov 25 06:42:46 2024 GMT
        Subject:  C=IN,ST=ka,O=sslteam,CN=ICA3
        Public Key Algorithm: rsaEncryption
        Public Key size: 2048

11)     Name: bundletest_ic8
        Cert Path: bundle9.pem_ic8
        Format: PEM
        Status: Valid,   Days to expiration:3078
        Certificate Expiry Monitor: ENABLED
        Expiry Notification period: 30 days
        Certificate Type: Intermediate CA
        Version: 3
        Serial Number: 01
        Signature Algorithm: sha256WithRSAEncryption
        Issuer:  C=IN,ST=ka,O=sslteam,CN=ICA1
        Validity
                Not Before: Nov 28 06:42:45 2014 GMT
                Not After : Nov 25 06:42:45 2024 GMT
        Subject:  C=IN,ST=ka,O=sslteam,CN=ICA2
        Public Key Algorithm: rsaEncryption
        Public Key size: 2048

12)     Name: bundletest_ic9
        Cert Path: bundle9.pem_ic9
        Format: PEM
        Status: Valid,   Days to expiration:3078
        Certificate Expiry Monitor: ENABLED
        Expiry Notification period: 30 days
        Certificate Type: Intermediate CA
        Version: 3
        Serial Number: 01
        Signature Algorithm: sha256WithRSAEncryption
        Issuer:  C=IN,ST=ka,O=sslteam,CN=RootCA4096
        Validity
                Not Before: Nov 28 06:42:43 2014 GMT
                Not After : Nov 25 06:42:43 2024 GMT
        Subject:  C=IN,ST=ka,O=sslteam,CN=ICA1
        Public Key Algorithm: rsaEncryption
        Public Key size: 2048
Done

sh ssl certlink

1)      Cert Name: bundletest    CA Cert Name: bundletest_ic1
2)      Cert Name: bundletest_ic1        CA Cert Name: bundletest_ic2
3)      Cert Name: bundletest_ic2        CA Cert Name: bundletest_ic3
4)      Cert Name: bundletest_ic3        CA Cert Name: bundletest_ic4
5)      Cert Name: bundletest_ic4        CA Cert Name: bundletest_ic5
6)      Cert Name: bundletest_ic5        CA Cert Name: bundletest_ic6
7)      Cert Name: bundletest_ic6        CA Cert Name: bundletest_ic7
8)      Cert Name: bundletest_ic7        CA Cert Name: bundletest_ic8
9)      Cert Name: bundletest_ic8        CA Cert Name: bundletest_ic9
Done
<!--NeedCopy-->
使用 GUI 添加证书集
- 导航到流量管理 > SSL > 证书 > CA 证书。
- 在详细信息窗格中,单击“安装”。
- 在“安装证书”对话框中,键入详细信息,例如证书和密钥文件名,然后选择“证书捆绑包”。
- 单击“安装”,然后单击“关闭”。
自动化证书链接
注意: 此功能在版本 13.0 build 47.x 中可用。
您不再需要手动将证书链接到其颁发者一直链接到根证书。如果设备上存在中间 CA 证书和根证书,则可以单击最终用户证书中的 链接 按钮。
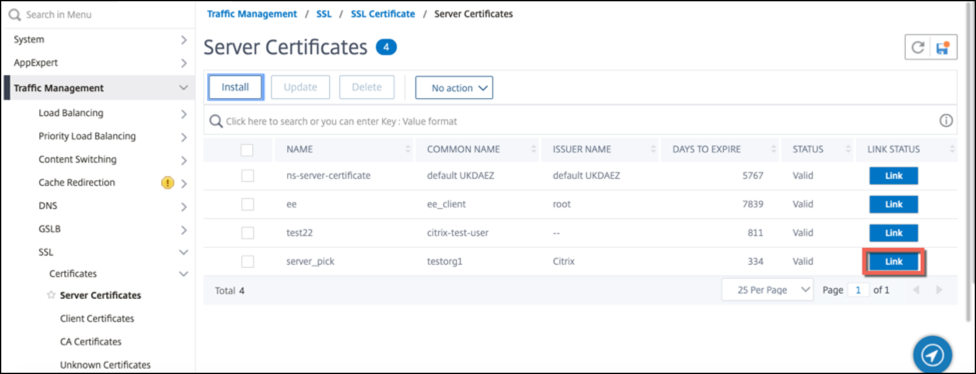
潜在的链出现。
单击“链接证书”以链接所有证书。
创建证书链
您可以创建证书链,而不是使用一组证书(单个文件)。该链将服务器证书链接到其颁发者(中间 CA)。此方法要求在 ADC 设备上安装中间 CA 证书文件,并且客户端应用程序必须信任证书链中的一个证书。例如,将 Cert-Mediate-A 链接到 Cert-Mediate-B,其中 Cert-Mediate-B 链接到 Cert-Mediate-C,后者是客户端应用程序信任的证书。
注意: 设备支持在发送给客户端的证书链中最多发送 10 个证书(一个服务器证书和九个 CA 证书)。
使用 CLI 创建证书链
在命令提示符下,键入以下命令以创建证书链并验证配置。(对链中的每个新链接重复第一个命令。)
link ssl certkey <certKeyName> <linkCertKeyName>
show ssl certlink
<!--NeedCopy-->
示例:
link ssl certkey siteAcertkey CAcertkey
Done

show ssl certlink

linked certificate:
       1) Cert Name: siteAcertkey CA Cert Name: CAcertkey
Done
<!--NeedCopy-->
使用 GUI 创建证书链
- 导航到流量管理 > SSL > 证书。
- 选择服务器证书,然后在 操作 列表中选择 链接,然后指定 CA 证书名称。
支持 SSL 证书捆绑包
注意
此功能可从版本 13.1 build 12.x 中获得。
证书捆绑包的当前设计有以下缺点:
- 添加证书捆绑包会在配置中添加多个命令。因此,如果两个捆绑包共享一个通用的中间证书,则无法添加另一个证书捆绑包。
- 删除证书捆绑包是一个手动过程。您必须按特定顺序手动删除文件。
- 不支持更新证书捆绑包。
- 不支持群集。
证书捆绑包的新设计解决了所有这些问题。新实体在证书捆绑包文件上工作。因此,无需为每个中间证书创建文件。使用这个新实体,移除也很简单。
两个证书捆绑包可以共享中间证书链的一部分。您还可以使用同样属于证书捆绑包的相同服务器证书和密钥来添加证书密钥对。
在以下示例中:
- 证书捆绑包 bundle1.pem 包含服务器证书 (S1) 和中间证书 (IC1 和 IC2)。
- 服务器证书是 server_cert.pem (S1)。
- 中间证书是 ic1.pem (IC1) 和 ic2.pem (IC2)。
您可以添加包含 S1、IC1 和 IC2 的证书捆绑包。
add ssl certkeybundle b1 -bundlefile bundle1.pem
您还可以使用 S1 和 IC1 添加证书密钥对。
add ssl certkey server-cert -cert server_cert.pem
add ssl certkey ic1 -cert ic1.pem
重要!
- 如果不符合以下顺序,则创建捆绑包将失败:
- 服务器证书 (SC) 必须放在捆绑包文件的顶部。
-
IC[1-9]是中间证书。IC[i]由IC[i+1]发行。证书必须按顺序放置,并且捆绑包中必须存在所有中间证书。
- 证书只能是 PEM 格式。
- 服务器证书密钥 (SCK) 可以放在捆绑包中的任何位置。
- 最多支持 9 个中间证书。
使用 CLI 添加证书捆绑包
在命令提示符下,键入:
add ssl certKeyBundle <bundle_name> -bundlefile <bundle_file_name> -passplain <>
示例:
add ssl certkeyBundle cert_bundle -bundlefile bundle_4096.pem
使用 GUI 添加证书捆绑包
- 导航到流量管理 > SSL > 证书密钥包。
- 单击安装。
- 指定分发包的名称,浏览到该捆绑包在设备或本地计算机上的位置,然后选择一个文件。
- 单击创建。
使用 CLI 更新证书捆绑包
注意:
更新命令在 13.1 版本 52.x 及更高版本中可用。
在命令提示符下,键入:
update ssl certKeyBundle [-bundlefile <input_filename>]
示例:
update ssl certKeyBundle cert_bundle -bundlefile bundle_4096_updated.pem
使用 GUI 更新证书捆绑包
- 导航到流量管理 > SSL > 证书密钥包。
- 选择一个捆绑包,然后单击“更新”。
- 浏览到捆绑包在设备或本地计算机上的位置,然后选择一个文件。
- 单击确定。
使用 CLI 删除证书捆绑包
在命令提示符下,键入:
rm ssl certKeyBundle <bundle_name>
示例:
rm ssl certkeybundle cert_bundle
使用 GUI 删除证书捆绑包
- 导航到流量管理 > SSL > 证书密钥包。
- 选择一个捆绑包,然后单击“删除”。
- 在确认对话框中,单击“是”。
将证书捆绑包绑定到 SSL 虚拟服务器
在命令提示符下,键入:
bind ssl vserver <vip-name> -certkeybundleName <certkeybundle_name> [ -SNICertkeybundle]
示例:
bind ssl vserver v_server -certkeyBundleName cert_bundle

show ssl certkeyBundle cert_bundle

1) Name: cert_bundle
        Bundle path: bundle_4096.pem
        Certificate:
                Status: Valid,   Days to expiration:278
                Serial Number: 83
                Subject:  C=IN,ST=KAR,O=CITRIX,CN=4096.com
                Issuer:  C=IN,ST=KAR,O=CITRIX,CN=ia24096.com
                Signature Algorithm: sha256WithRSAEncryption
                Validity
                        Not Before: Jul 13 10:17:57 2021 GMT
                        Not After : Jul 13 10:17:57 2022 GMT
                Public Key Algorithm: rsaEncryption
                Public Key size: 4096
                SAN ENTRIES: None


        CA Certificate:
                Status: Valid,   Days to expiration:278
                Serial Number: 82
                Subject:  C=IN,ST=KAR,O=CITRIX,CN=ia24096.com
                Issuer:  C=IN,ST=KAR,O=CITRIX,CN=ia14098.com
                Signature Algorithm: sha256WithRSAEncryption
                Validity
                        Not Before: Jul 13 10:15:37 2021 GMT
                        Not After : Jul 13 10:15:37 2022 GMT
                Public Key Algorithm: rsaEncryption
                Public Key size: 4096
                SAN ENTRIES: None

        CA Certificate:
                Status: Valid,   Days to expiration:278
                Serial Number: 81
                Subject:  C=IN,ST=KAR,O=CITRIX,CN=ia14098.com
                Issuer:  C=IN,ST=KAR,O=CITRIX,CN=root4098.com
                Signature Algorithm: sha256WithRSAEncryption
                Validity
                        Not Before: Jul 13 10:13:20 2021 GMT
                        Not After : Jul 13 10:13:20 2022 GMT
                Public Key Algorithm: rsaEncryption
                Public Key size: 4096
                SAN ENTRIES: None

        CA Certificate:
                Status: Valid,   Days to expiration:278
                Serial Number: 00
                Subject:  C=IN,ST=KAR,O=CITRIX,CN=root4098.com
                Issuer:  C=IN,ST=KAR,O=CITRIX,CN=root4098.com
                Signature Algorithm: sha256WithRSAEncryption
                Validity
                        Not Before: Jul 13 10:10:23 2021 GMT
                        Not After : Jul 13 10:10:23 2022 GMT
                Public Key Algorithm: rsaEncryption
                Public Key size: 2048
                SAN ENTRIES: None

1)      Vserver Name: v_server
<!--NeedCopy-->
将证书捆绑包作为 SNI 证书捆绑包绑定到 SSL 虚拟服务器
在命令提示符下,键入:
bind ssl vserver <vip-name> -certkeybundleName b2 -SNICertkeybundle
示例:
bind ssl vserver v_server -certkeyBundleName cert_bundle -sniCertkeybundle

sh ssl certkeybundle cert_bundle

1) Name: cert_bundle
        Bundle path: bundle_4096.pem
        Certificate:
                Status: Valid,   Days to expiration:278
                Serial Number: 83
                Subject:  C=IN,ST=KAR,O=CITRIX,CN=4096.com
                Issuer:  C=IN,ST=KAR,O=CITRIX,CN=ia24096.com
                Signature Algorithm: sha256WithRSAEncryption
                Validity
                        Not Before: Jul 13 10:17:57 2021 GMT
                        Not After : Jul 13 10:17:57 2022 GMT
                Public Key Algorithm: rsaEncryption
                Public Key size: 4096
                SAN ENTRIES: None


        CA Certificate:
                Status: Valid,   Days to expiration:278
                Serial Number: 82
                Subject:  C=IN,ST=KAR,O=CITRIX,CN=ia24096.com
                Issuer:  C=IN,ST=KAR,O=CITRIX,CN=ia14098.com
                Signature Algorithm: sha256WithRSAEncryption
                Validity
                        Not Before: Jul 13 10:15:37 2021 GMT
                        Not After : Jul 13 10:15:37 2022 GMT
                Public Key Algorithm: rsaEncryption
                Public Key size: 4096
                SAN ENTRIES: None

        CA Certificate:
                Status: Valid,   Days to expiration:278
                Serial Number: 81
                Subject:  C=IN,ST=KAR,O=CITRIX,CN=ia14098.com
                Issuer:  C=IN,ST=KAR,O=CITRIX,CN=root4098.com
                Signature Algorithm: sha256WithRSAEncryption
                Validity
                        Not Before: Jul 13 10:13:20 2021 GMT
                        Not After : Jul 13 10:13:20 2022 GMT
                Public Key Algorithm: rsaEncryption
                Public Key size: 4096
                SAN ENTRIES: None

        CA Certificate:
                Status: Valid,   Days to expiration:278
                Serial Number: 00
                Subject:  C=IN,ST=KAR,O=CITRIX,CN=root4098.com
                Issuer:  C=IN,ST=KAR,O=CITRIX,CN=root4098.com
                Signature Algorithm: sha256WithRSAEncryption
                Validity
                        Not Before: Jul 13 10:10:23 2021 GMT
                        Not After : Jul 13 10:10:23 2022 GMT
                Public Key Algorithm: rsaEncryption
                Public Key size: 2048
                SAN ENTRIES: None

1)    Vserver Name: v_server
2)    Vserver Name: v_server
<!--NeedCopy-->
从 SSL 虚拟服务器取消绑定证书捆绑包
在命令提示符下,键入:
unbind ssl vserver <vip-name> -certkeybundleName <certkeybundle_name> [ -SNICertkeybundle]
示例:
unbind ssl vserver v_server -certkeybundleName cert_bundle
证书捆绑的用户场景
以下场景说明了 ADC 设备如何处理与证书捆绑包相关的请求。
场景 1:证书密钥对和包含相同服务器证书的证书捆绑包绑定到同一 SSL 虚拟服务器
将证书密钥对和包含相同服务器证书的证书捆绑到同一 SSL 虚拟服务器时,命令的顺序决定最终绑定。
例如,
- 证书捆绑包 bundle1.pem 包含服务器证书 S1 和中间证书 IC1 和 IC2。
- 证书文件 server_cert.pem 包含 S1。
bundle1.pem 和 server_cert.pem 都有相同的服务器证书 S1。
如果以下命令按指定顺序运行,则绑定到 SSL 虚拟服务器的服务器证书将替换绑定到该虚拟服务器的证书捆绑包。
add ssl certkeybundle b1 -bundlefile bundle1.pemadd ssl certkey server_cert -cert server_cert.pembind ssl vserver v1 -certkeybundle b1bind ssl vserver v1 -cert server_cert
场景 2:两个证书捆绑包包含相同的中间证书链
您可以使用相同的中间证书链添加两个证书捆绑包。这两个捆绑包充当独立的实体。
在以下示例中,证书捆绑包 1 按顺序包含服务器证书 S1 和中间证书 IC1 和 IC2。证书捆绑包 2 按顺序包含服务器证书 S2 和中间证书 IC1 和 IC2。
- 证书捆绑包 bundle1.pem (S1、IC1、IC2)
- 证书捆绑包 bundle2.pem (S2、IC1、IC2)
在 SSL 握手过程中选择 bundle-1 中的 S1 时,bundle-1 的中间证书链将发送到客户端。
add ssl certkeybundle bundle-1 -bundlefile bundle1.pem
add ssl certkeybundle bundle-2 -bundlefile bundle2.pem
场景 2:两个证书捆绑包包含链中一些常见的中间证书
您可以添加两个证书捆绑包,并在证书链中添加一些常见的中间证书。
在以下示例中,bundle-1 包含服务器证书 S1 和中间证书 IC1 和 IC2。证书捆绑包 2 包含服务器证书 S2 和中间证书 IC1、IC2 和 IC3。
证书捆绑包 bundle1.pem(S1、IC1、IC2) 证书捆绑包 bundle2.pem(S2、IC1、IC2、IC3)
add ssl certkeybundle bundle-1 -bundlefile bundle1.pem
add ssl certkeybundle bundle-2 -bundlefile bundle2.pem
在 SSL 握手过程中选择 bundle-1 中的 S1 时,bundle-1 的中间证书链将发送到客户端。也就是说, (S1→IC1→IC2) 被发送到客户端。未添加 IC3。
在 SSL 握手过程中选择 bundle-2 中的 S2 时,bundle-2 的中间证书链只会发送到客户端。也就是说, (S1→IC1→IC2→IC3) 被发送到客户端。
证书捆绑包的限制
- 不支持监视证书捆绑包中证书的状态。
- 证书捆绑包只能绑定到 SSL 虚拟服务器。
- 不支持 OCSP 装订。
注意
13.1 版本 52.x 版本中的证书包支持更新操作。现在,您可以直接更新证书包。以前,您必须先取消绑定并删除捆绑包,然后添加和绑定证书包。
更新现有服务器证书
要手动更改现有服务器证书,必须执行以下步骤:
- 取消旧证书与虚拟服务器的绑定。
- 从设备中删除证书。
- 将新证书添加到设备。
- 将新证书绑定到虚拟服务器。
要减少替换证书密钥对时的停机时间,您可以更新现有证书。如果要将证书替换为颁发给其他域的证书,则必须在更新证书之前禁用域检查。
要接收有关即将到期的证书的通知,您可以启用到期监视器。
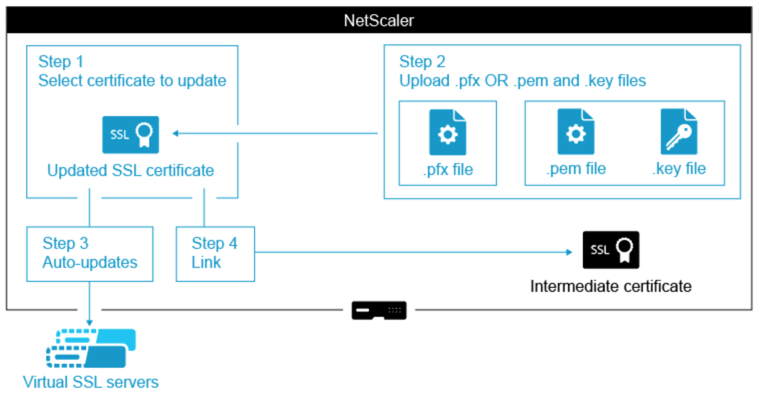
从已配置的 SSL 虚拟服务器或服务中删除或取消绑定证书时,虚拟服务器或服务将变为非活动状态。它们在绑定新的有效证书后处于活动状态。为减少停机时间,您可以使用更新功能替换绑定到 SSL 虚拟服务器或 SSL 服务的证书密钥对。
如何在 NetScaler 设备上更新 SSL 证书的概述图。
如何更新现有证书
使用 CLI 更新现有的证书密钥对
在命令提示符下,键入以下命令以更新现有证书密钥对并验证配置:
update ssl certkey <certkeyName> -cert <string> -key <string>

show ssl certKey <certkeyName>
<!--NeedCopy-->
示例:
update ssl certkey siteAcertkey -cert /nsconfig/ssl/cert.pem -key /nsconfig/ssl/pkey.pem

Done

show ssl certkey siteAcertkey

Name: siteAcertkey       Status: Valid
           Version: 3
           Serial Number: 02
           Signature Algorithm: md5WithRSAEncryption
           Issuer: /C=US/ST=CA/L=Santa Clara/O=siteA/OU=Tech
           Validity
                Not Before: Nov 11 14:58:18 2001 GMT
                Not After: Aug 7 14:58:18 2004 GMT
           Subject: /C=US/ST-CA/L=San Jose/O=CA/OU=Security
           Public Key Algorithm: rsaEncryption
           Public Key size: 2048
Done
<!--NeedCopy-->
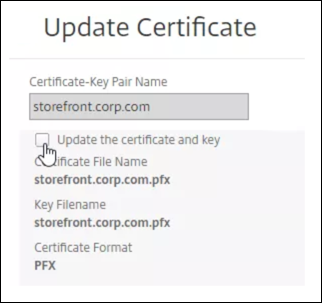
使用 GUI 更新现有的证书密钥对
-
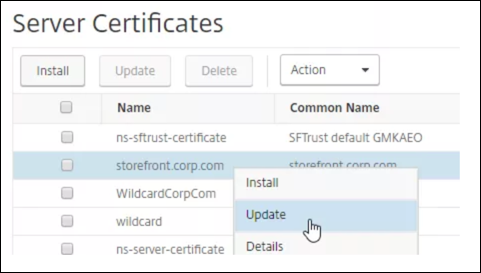
导航到流量管理 > SSL > 证书 > 服务器证书。
-
选择要更新的证书,然后单击 更新。
-
选择 更新证书和密钥。
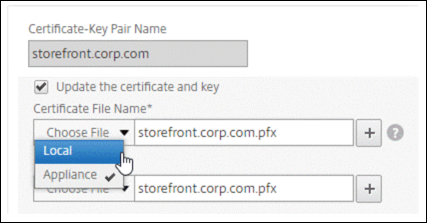
-
在证书文件名中,单击选择文件 > 本地,然后浏览到更新的 .pfx 文件或证书 PEM 文件。
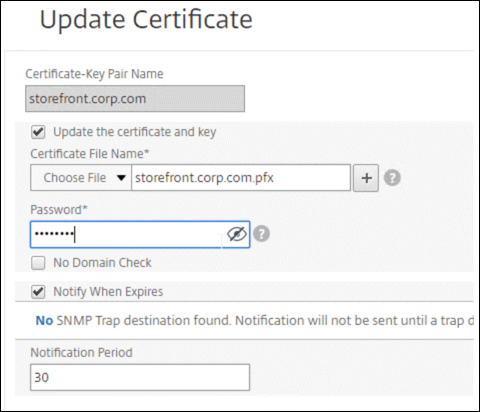
-
如果上载.pfx 文件,系统将提示您指定.pfx 文件密码。
-
如果您上载证书 pem 文件,则还必须上载证书密钥文件。如果密钥已加密,则必须指定加密密码。
-
-
如果新证书的公用名与旧证书不匹配,请选择“无域检查”。
-
单击确定。此证书绑定到的所有 SSL 虚拟服务器都会自动更新。
-
替换证书后,您可能需要将证书链接更新到新的中间证书。有关在不中断链接的情况下更新中间证书的详细信息,请参阅在不 中断链接的情况下更新中间证书。
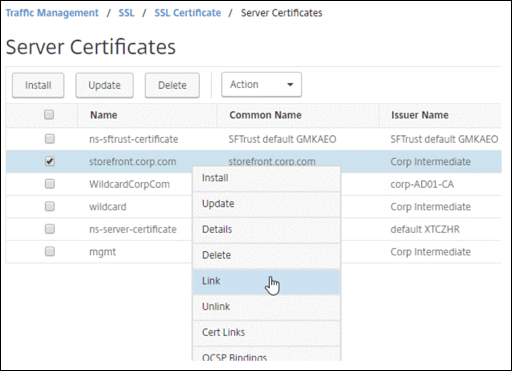
-
右键单击更新的证书,然后单击 Cert 链接,以查看它是否链接到中间证书。
-
如果证书未链接,则右键单击更新的证书,然后单击 链接 将其链接到中间证书。如果看不到链接选项,则必须首先在 CA 证书节点下的设备上安装新的中间证书 。
-
更新现有 CA 证书
更新现有 CA 证书的步骤与更新现有服务器证书的步骤相同。唯一的区别是,对于 CA 证书,您不需要密钥。

禁用域名检查
在设备上替换 SSL 证书时,新证书上提及的域名必须与要替换的证书的域名匹配。例如,如果您有颁发给 abc.com 的证书,并且正在使用颁发给 def.com 的证书进行更新,则证书更新将失败。
但是,如果您希望托管特定域的服务器托管新域,请在更新其证书之前禁用域检查。
使用 CLI 禁用证书的域名检查
在命令提示符下,键入以下命令以禁用域检查并验证配置:
update ssl certKey <certkeyName> -noDomainCheck

show ssl certKey <certkeyName>
<!--NeedCopy-->
示例:
update ssl certKey sv -noDomainCheck

Done

show ssl certkey sv

Name: sv
Cert Path: /nsconfig/ssl/complete/server/server_rsa_512.pem
Key Path: /nsconfig/ssl/complete/server/server_rsa_512.ky
Format: PEM
Status: Valid,   Days to expiration:9349
Certificate Expiry Monitor: DISABLED
Done
<!--NeedCopy-->
使用 GUI 禁用证书的域检查
- 导航到 流量管理 > SSL > 证书,选择一个证书,然后单击 更新。
- 选择“不进行域名检查”。
将 ADC 设备的默身份验证书替换为与设备主机名匹配的可信 CA 证书
以下过程假定默身份验证书 (ns-server-certificate) 已绑定到内部服务。
- 导航到 流量管理 > SSL > SSL 证书 > 创建证书请求。
- 在通用名称中,键入
test.citrixadc.com。 - 将 CSR 提交给受信任的证书颁发机构。
- 收到来自受信任的 CA 的证书后,将文件复制到
/nsconfig/ssl目录中。 - 导航到 流量管理 > SSL > 证书 > 服务器证书。
- 选择默认服务器证书 (
ns-server-certificate),然后单击 更新。 - 在“更新证书”对话框的“证书文件名”中,浏览到签名后从 CA 接收的证书。
- 在“密钥文件名”字段中,指定默认私钥文件名 (
ns-server.key)。 - 选择“不进行域名检查”。
- 单击确定。
启用到期监视器
SSL 证书在特定时期内有效。典型的部署包括处理 SSL 事务的多个虚拟服务器,绑定到它们的证书可能会在不同的时间过期。当配置的证书即将到期时,设备上配置的过期监视器会在设备的 syslog 和 ns 审核日志中创建条目。
如果要为证书过期创建 SNMP 警报,则必须单独配置它们。
使用 CLI 为证书启用过期监视器
在命令提示符下,键入以下命令以启用证书的过期监视器并验证配置:
set ssl certKey <certkeyName> [-expiryMonitor ( ENABLED | DISABLED ) [-notificationPeriod <positive_integer>]]

show ssl certKey <certkeyName>
<!--NeedCopy-->
示例:
set ssl certKey sv -expiryMonitor ENABLED –notificationPeriod 60
Done
<!--NeedCopy-->
使用 GUI 为证书启用过期监视器
- 导航到 流量管理 > SSL > 证书,选择一个证书,然后单击 更新。
- 选择“过期时通知”,然后根据需要指定通知周期。
在不中断链接的情况下更新中间证书
您可以在不破坏任何现有链接的情况下更新中间证书。要替换的证书颁发的链接证书中的“AuthorityKeyIdentifier”扩展名不得包含颁发机构证书序列号(“authorityCertSerialNumber”)字段。如果“AuthorityKeyIdentifier”扩展包含序列号字段,则旧证书和新证书的证书序列号必须相同。如果满足上述条件,则可以在链接中更新任意数量的证书,一次更新一个。以前,如果更新了中间证书,链接就会断开。
例如,有四种证书:CertA、CertB、CertC 和 CertD。证书 CertA 是 CertB 的颁发者,CertB 是 CertC 的颁发者,依此类推。如果要在不中断链接的情况下将中间证书 CertB 替换为 CertB_new,则必须满足以下条件:
如果满足以下两个条件,CertB 的证书序列号必须与 CertB_new 的证书序列号匹配:
-
AuthorityKeyIdentifier扩展名存在于CertC中。 - 此扩展插件包含序列号字段。
如果证书中的公用名发生更改,则在更新证书时指定 nodomaincheck。
在上面的示例中,要将 CertD 中的“www.example.com”更改为“*.example.com”,请选择“不进行域名检查”参数。
使用 CLI 更新证书
在命令提示符下,键入:
update ssl certKey <certkeyName> -cert <string> [-password] -key <string>  [-noDomainCheck]
<!--NeedCopy-->
示例:
update ssl certkey siteAcertkey -cert /nsconfig/ssl/cert.pem -key /nsconfig/ssl/pkey.pem -noDomainCheck
<!--NeedCopy-->
显示证书链
证书包含颁发机构的名称以及向其颁发证书的主体。要验证证书,您必须查看该证书的颁发者并确认您是否信任该颁发者。如果您不信任颁发者,则必须查看颁发者证书的颁发者。沿链向上移动,直到获得根 CA 证书或您信任的颁发者。
作为 SSL 握手的一部分,当客户端请求证书时,设备会提供证书以及设备上存在的颁发者证书链。管理员可以查看设备上存在的证书的证书链,并安装任何缺失的证书。
使用 CLI 查看设备上存在的证书的证书链
在命令提示符下,键入:
show ssl certchain <cert_name>
<!--NeedCopy-->
示例
有 3 个证书:c1、c2 和 c3。证书 c3 是根 CA 证书并签署 c2,c2 签名 c1。以下示例说明了
show ssl certchain c1 命令在不同场景中的输出。
场景 1:
证书 c2 链接到 c1,c3 链接到 c2。
证书 c3 是根 CA 证书。
如果运行以下命令,将显示到根 CA 证书的证书链接。
show ssl certchain c1

Certificate chain details of certificate name c1 are:
    1) Certificate name: c2               linked; not a root certificate
    2) Certificate name: c3               linked; root certificate
Done
<!--NeedCopy-->
场景 2:
证书 c2 链接到 c1。
证书 c2 不是根 CA 证书。
如果运行以下命令,则会显示证书 c3 是根 CA 证书但未链接到 c2 的信息。
show ssl certchain c1

Certificate chain  details of certificate name c1 are:
    1) Certificate Name: c2               linked; not a root certificate
    2) Certificate Name: c3               not linked; root certificate
    Done
<!--NeedCopy-->
场景 3:
证书 c1、c2 和 c3 未链接,但存在于设备上。
如果运行以下命令,将显示以证书 c1 颁发者开头的所有证书的相关信息。还指定不链接证书。
show ssl certchain c1

Certificate chain details of certificate name c1 are:
    1) Certificate Name: c2               not linked; not a root certificate
    2) Certificate Name: c3               not linked; root certificate
    Done
<!--NeedCopy-->
场景 4:
证书 c2 链接到 c1。
设备上不存在证书 c3。
如果运行以下命令,将显示链接到 c1 的证书的相关信息。系统会提示您使用在 c2 中指定的使用者名称添加证书。在这种情况下,系统会要求用户添加根 CA 证书 c3。
show ssl certchain c1

Certificate chain details of certificate name c1 are:
    1) Certificate Name: c2               linked; not a root certificate
    2) Certificate Name: /C=IN/ST=ka/O=netscaler/CN=test
       Action: Add a certificate with this subject name.
Done
<!--NeedCopy-->
场景 5:
证书未链接到证书 c1,并且设备上不存在 c1 的颁发者证书。
如果运行以下命令,系统会提示您在证书 c1 中添加使用者名称的证书。
sh ssl certchain c1

Certificate chain details of certificate name c1 are:
    1) Certificate Name: /ST=KA/C=IN
       Action: Add a certificate with this subject name.
<!--NeedCopy-->