Integrate NetScaler BLX with Fastly Next-Gen WAF agent
NetScaler BLX offers a unified, enterprise-grade solution for application delivery and security by integrating the Fastly Next-Gen WAF (formerly known as the Signal Sciences) agent to run together on a single Linux OS host. The solution directly fulfills critical customer requirements by providing a tightly coupled, high-performance WAF solution. This unique design ensures low latency, dramatically simplifies deployment, and significantly reduces the Total Cost of Ownership (COGS) compared to complex multi-VM or alternative vendor solutions. For maximum performance, the solution is typically deployed on bare metal servers, using DPDK technology to ensure high throughput and low latency.
Key benefits
This integrated solution provides:
- Optimized performance and low latency: NetScaler BLX and Fastly Next-Gen WAF agent run on the same server for maximum efficiency.
- Reduced cost: Co-residency eliminates the need for a separate VM for the Fastly agent.
- Simplified deployment and management: NetScaler BLX can co-exist with other applications on the same server.
- Enhanced security: Combines Fastly Next-Gen WAF protection (DDoS, SQL injection, XSS) with NetScaler capabilities.
Architecture overview
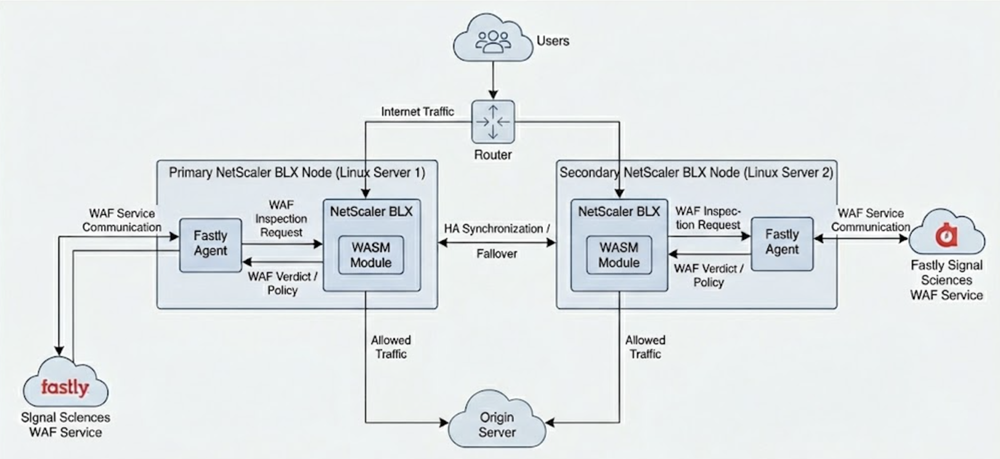
The following diagram illustrates the architecture of the Fastly NextGen WAF integration with BLX.
How to configure NetScaler BLX to integrate with the Fastly NextGen WAF agent
-
Install the Fastly agent.
Refer to the Fastly agent installation guide for detailed steps.
-
Configure the Fastly agent on the NetScaler BLX host.
-
Edit the
/etc/sigsci/agent.conffile as described in the Fastly agent setup guide. -
Add the following parameters:
accesskeyid = "<replace this with accesskeyid>"
secretaccesskey = "<replace this with secretaccesskey>"
rpc-address = "tcp:0.0.0.0:5555"
<!--NeedCopy-->
-
-
Integrate the Fastly agent with NetScaler BLX.
- Configure the load balancing virtual server and services.
- Create a Web Assembly (WASM) module and add content inspection profiles (called
wasmProfiles) for both request and response traffic. - Add a service for the Fastly agent.
- Add content inspection actions for request and response.
- Add content inspection policies for request and response.
- Bind the request and response policies to the load balancing virtual server.
Configuration example:
If your HTTP load balancing virtual server is named v1 and the service is named s1, use the following commands:
add wasm module ns_fastly -moduleFile ns_sigsci.wasm -signatureFile ns_sigsci_wasm.sig
add contentinspection wasmProfile ciresprof -maxBodyLen 0 -wasmModule ns_fastly
add contentinspection wasmProfile cireqprof -wasmModule ns_fastly
add service fastly_agent 192.0.0.3 TCP 5555
add contentinspection action ciresact -type WASM -wasmProfileName ciresprof -serverName fastly_agentthec
<!--NeedCopy-->