Configure LDAP after offloading SSL to a load balancing virtual server
In a NetScaler appliance, the AAAD process is used for performing basic authentication like LDAP, RADIUS, TACACS for management access or authentication authorization and gateway access. As AAAD runs on the management CPU, there might be issues with intermittent authentication failures. To avoid these failures, the load balancing virtual server can be used to offload the SSL functionality from AAAD.
Advantages of offloading SSL to a load balancing virtual server
- Enhanced AAAD performance. In AAAD, for every authentication request for the LDAP server of SSL type, a new SSL session is established. As the AAAD process runs on the management CPU, establishing the SSL session impacts performance during high requests to the AAAD. Offloading SSL functionality to load balancing virtual server enhances the performance of the AAAD process.
- Render client certificate to server. The client LDAP library in AAAD only performs server certificate validation, there is no support for rendering client certificate to server. Because SSL mutual authentication requires rendering the client certificate for establishing the SSL connection, offloading SSL functionality to the load balancing virtual server enables rendering of the client certificate to the server.
Configure LDAP after offloading SSL to the load balancing virtual server
Note: After you create a load balancing virtual server IP address for LDAP and point the LDAP request server to the virtual server IP address, the traffic is sourced from the SNIP.
Prerequisites
- Ensure that secure LDAP is enabled on the domain controllers, which the NetScaler appliance uses for authentication. By default, with an enterprise CA, all the domain controllers enroll for a certificate using the domain controller certificate template.
- Ensure that secure LDAP is working by using the ldp.exe and connecting to the domain controller over port 636 and SSL.
Configure LDAP after offloading SSL to the load balancing virtual server by using the GUI
-
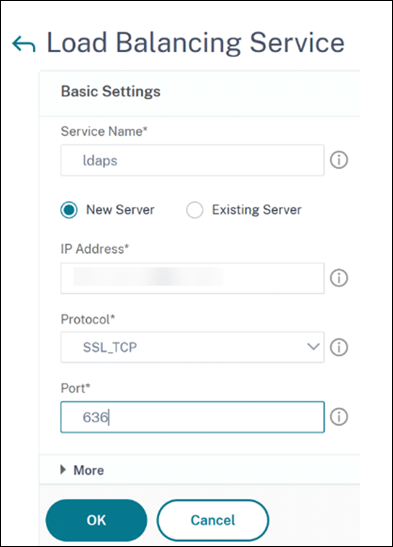
Create a load balancing service with the protocol set to SSL_TCP.
- Navigate to Traffic management > Load Balancing > Services and click Add.
- Specify the IP address of the domain controller and set the port number to 636.
- Click OK.

-
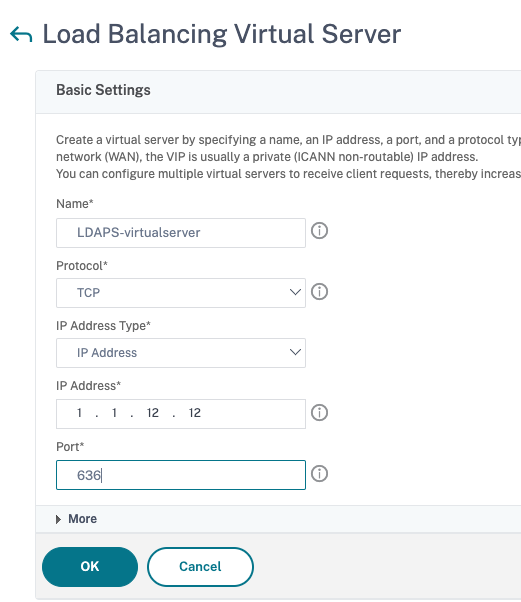
Create a load balancing virtual server for LDAPS load balancing service.
- Navigate to Traffic Management > Load Balancing >Virtual Servers.
- Set the protocol to TCP, enter the IP address, set the port to 636, and click OK.

-
Bind the LDAPS service to the load balancing virtual server.
- Navigate to Traffic Management > Load Balancing > Virtual Servers.
- Select the LDAP virtual server. The Load Balancing Virtual Server page appears.
- In the Services and Service Groups section, click No Load Balancing Virtual Server Service Binding. The Service Binding page appears.
- Select the load balancing service. Update the other required fields and click Bind.
- Click Done.
-
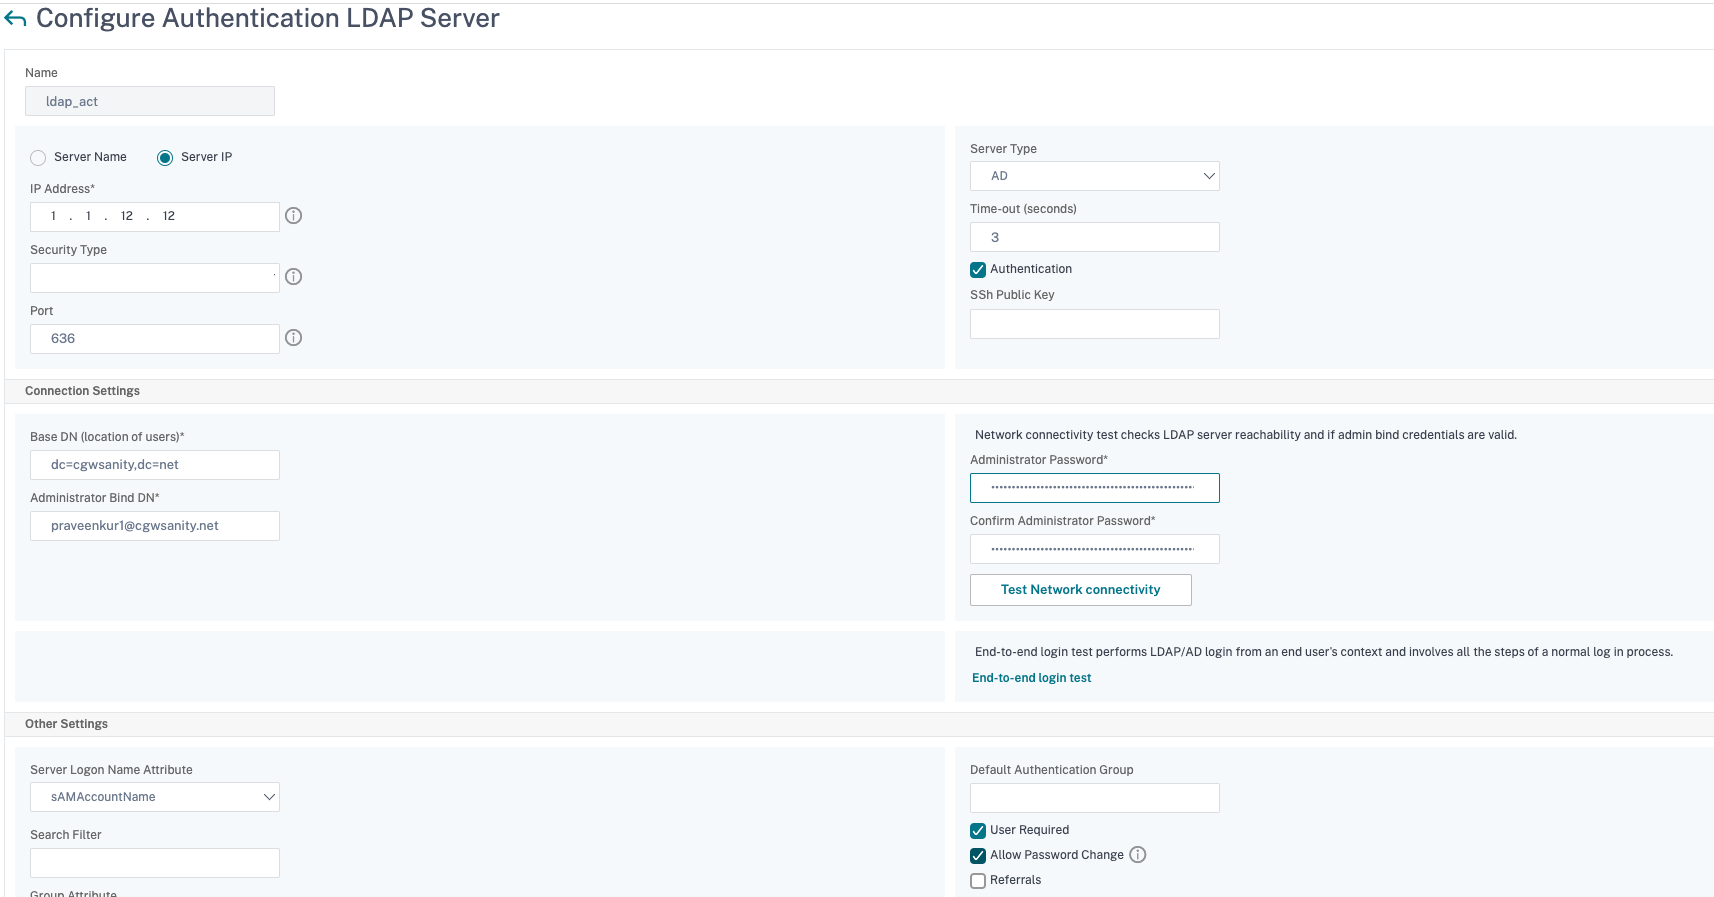
Now change the LDAP authentication policy server to point to the load balancing virtual server for secure LDAP. The security type must be PLAINTEXT.
- Navigate to NetScaler Gateway > Polices > Authentication > LDAP.
- On the Servers tab, select the LDAP server and click Edit.
- Change the IP address to the LDAPS VIP hosted on the NetScaler appliance created earlier.
- Change Security Type to PLAINTEXT, change Port to 636, select the Allow Password Change checkbox, if necessary (SLDAP allows password changes).
- Click Test Network Connectivity to verify connectivity.
- Click OK.

You can check the authentication dashboard to confirm that the status of the LDAP server is UP. Also, check the authentication logs to confirm that the authentication is working as intended.
Configure LDAP after offloading SSL to the load balancing virtual server by using the CLI
-
Configure an LDAP server for the AAAD process. The following sample configuration establishes the SSL connection with a load balancing virtual server without SSL mutual authentication.
add authentication ldapAction ldap_act -serverIP 1.1.12.12 -serverPort 636 -secTYPE PLAINTEXT -ldapBase "dc=aaatm-test,dc=com" -ldapBindDn administrator@aaatm-test.com -ldapBindDnPassword <password> -ldapLoginName samAccountName <!--NeedCopy--> -
Configure a load balancing virtual server for the LDAP virtual server. The load balancing virtual server is of type TCP.
add lb vserver ldaps TCP 1.1.12.12 636 -persistenceType NONE -cltTimeout 9000 <!--NeedCopy--> -
Configure a service for the load balancing virtual server. The service type is SSL-TCP.
add service ldaps 1.1.10.1 SSL_TCP 636 <!--NeedCopy--> -
Configure a CA certificate for the service and set the “serverAuth” parameter for the server certificate validation.
bind ssl service ldaps -certkeyName ca-cert -CA set ssl service ldaps -serverAuth enabled <!--NeedCopy--> -
Attach the certificate to the service that is rendered to the LDAP server.
bind ssl service ldaps -certkeyName usr_cert [client-certificate for client-authentication] <!--NeedCopy--> -
Bind the service to the load balancing virtual server.
bind lb vserver ldaps ldaps
<!--NeedCopy-->