
Configure support for HTTP strict transport security (HSTS)
HTTP Strict Transport Security (HSTS) helps protect websites against various attacks, such as SSL stripping, cookie hijacking, and protocol downgrade. Using HSTS, a server can enforce the use of an HTTPS connection for all communication with a client. That is, the site can be accessed only by using HTTPS.
NetScaler appliances support HSTS as an in-built option in SSL profiles and SSL virtual servers. Support for HSTS is required for A+ certification from SSL Labs.
Enable HSTS in an SSL front-end profile or on an SSL virtual server. If you enable SSL profiles, then you must enable HSTS on an SSL profile instead of enabling it on an SSL virtual server.
Specify the time (in seconds) for which a browser must not accept unencrypted connections. Use the
maxage parameter to specify that HSTS is in force for that duration for that client. By default, the HSTS header applies only to the root domain. You can specify whether subdomains must be included. For example, you can specify that subdomains for www.example.com, such as www.abc.example.com and www.xyx.example.com, can be accessed only using HTTPS by setting the IncludeSubdomains parameter to YES. The subdomains must support HTTPS. However, they do not each need to have HSTS enabled.
If you access any websites that support HSTS, the response header from the server contains an entry similar to the following:
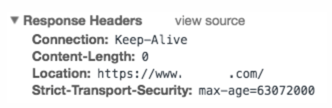
The client stores this information for the time specified in the max-age parameter. For subsequent requests to that website, the client checks its memory for an HSTS entry. If an entry is found, it accesses that website only by using HTTPS. For example, if you set the
maxage parameter to 31536000, the browser remembers to use only HTTPS to access the domain for one year.
You can configure HSTS at the time of creating an SSL profile or an SSL virtual server by using the add command. You can also configure HSTS on an existing SSL profile or SSL virtual server by modifying it using the set command.
Configure HSTS by using the CLI
At the command prompt, type:
add ssl vserver <vServerName> -maxage <positive_integer> -IncludeSubdomains ( YES | NO)
 set ssl vserver <vServerName> -HSTS ( ENABLED | DISABLED )
OR
add ssl profile <name> -maxage <positive_integer> -IncludeSubdomains ( YES | NO )
 set ssl profile <name> -HSTS ( ENABLED | DISABLED )

 Arguments

 HSTS

          State of HTTP Strict Transport Security (HSTS) on an SSL virtual server or SSL profile. Using HSTS, a server can enforce the use of an HTTPS connection for all communication with a client.

           Possible values: ENABLED, DISABLED

           Default: DISABLED

 maxage

           Set the maximum time, in seconds, in the strict transport security (STS) header during which the client must send only HTTPS requests to the server.

           Default: 0

           Minimum: 0

           Maximum: 4294967294

 IncludeSubdomains

          Enable HSTS for subdomains. If set to Yes, a client must send only HTTPS requests for subdomains.

           Possible values: YES, NO

           Default: NO
In the following examples, the client must access the website and its subdomains for 157,680,000 seconds only by using HTTPS.
add ssl vserver VS-SSL –maxage 157680000 –IncludeSubdomain YES
 set ssl vserver VS-SSL –HSTS ENABLED
add sslProfile hstsprofile –maxage 157680000 –IncludeSubdomain YES
 set sslProfile hstsprofile –HSTS ENABLED
Configure HSTS by using the GUI
-
Navigate to Traffic Management > Load Balancing > Virtual Servers.
-
Select a virtual server of type SSL and click Edit.
Perform the following steps if the default SSL profile is enabled on the appliance.
-
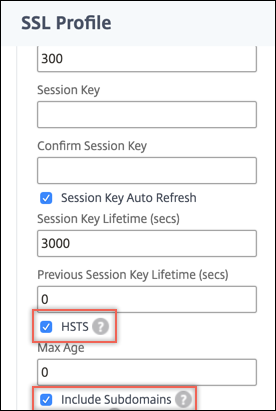
Select an SSL profile and click Edit.
-
In Basic Settings, click the pencil icon to edit the settings. Scroll down and select HSTS and Include Subdomains.
Perform the following steps if the default SSL profile is not enabled on the appliance.
-
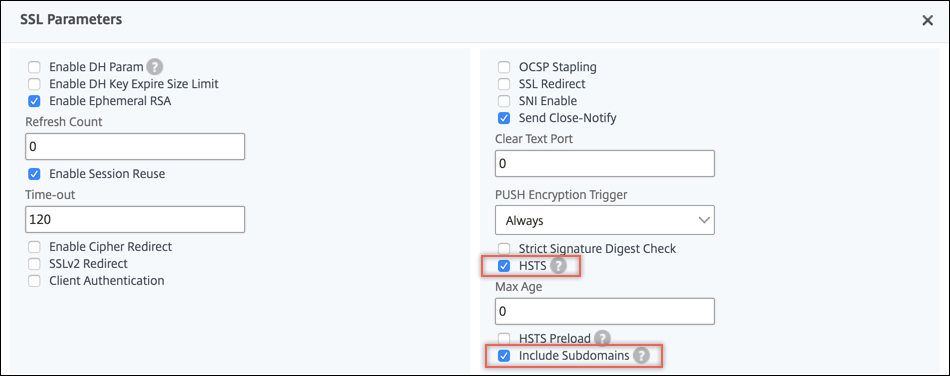
In Advanced Settings, select SSL Parameters.
-
Select HSTS and Include Subdomains.
Support for HSTS preload
An HSTS header protects the web application by preventing browsers from making unencrypted connections to a domain. However, if a user is accessing the website for the first time, the browser has not yet seen the HSTS header. An attacker might take over the connection before the web server can tell the browser to use HTTPS.
To address this problem, the NetScaler appliance supports adding an HSTS preload in the HTTP response header. To include the preload, you must set the
preload parameter in the SSL virtual server or SSL profile to YES. The appliance then includes the preload in the HTTP response header to the client. You can configure this feature using both the CLI and the GUI. For more information about HSTS preload, see <https://hstspreload.org/>.
Following are examples of valid HSTS headers with preload:
Strict-Transport-Security: max-age=63072000; includeSubDomains; preload
Strict-Transport-Security: max-age=63072000; preload
Configure HSTS preload by using the CLI
At the command prompt, type:
add ssl vserver <vServerName> -maxage <positive_integer> -preload ( YES | NO )
 set ssl vserver <vServerName> -HSTS ( ENABLED | DISABLED )
OR
add ssl profile <name> -maxage <positive_integer> -IncludeSubdomains ( YES | NO ) -preload ( YES | NO )
 set ssl profile <name> -HSTS ( ENABLED | DISABLED )
Configure HSTS preload by using the GUI
Perform the following steps if the default SSL profile is enabled on the appliance.
-
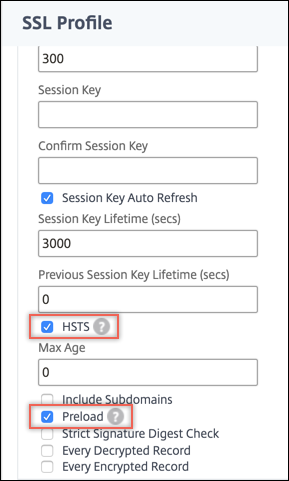
Navigate to System > Profiles > SSL Profiles. Select an SSL profile and click Edit.
-
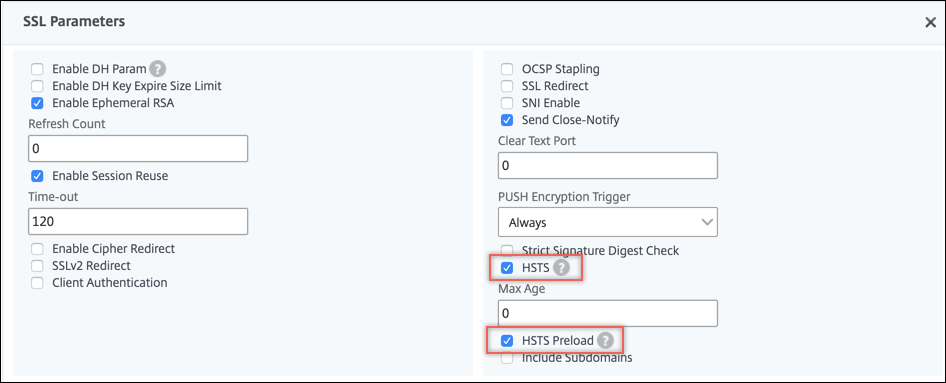
In Basic Settings, click the pencil icon to edit the settings. Scroll down and select HSTS and Preload.
Perform the following steps if the default SSL profile is not enabled on the appliance.
-
Navigate to Traffic Management > Load Balancing > Virtual Servers.
-
Select a virtual server of type SSL and click Edit.
-
In Advanced Settings, select SSL Parameters.
-
Select HSTS and Preload.
Use case
User1 wants to securely visit some websites using a web browser. The site exemple.com offers a secure browsing experience to their clients.
User1 has an account with exemple.com and regularly transacts using this website. User1 needs to transfer money to a friend and accesses exemple.com by typing www.exemple.com in a web browser. The browser converts the URL to
<http://www.exemple.com>. The browser detects the name exemple.com and communicates with the DNS server to get the IP address for the host server. The browser contacts the IP address by using port 80. The banking website redirects the request to <https://www.exemple.com>. An SSL handshake is performed resulting in establishing an SSL connection. The padlock in the URL changes to green and shows locked. User1 can now enter the credentials to make a transaction.
Problem Scenario
Even if a website turns on HTTPS, a client might still try to connect over HTTP. The website can redirect the request to HTTPS, but this redirect is insecure because an attacker can capture the user information or redirect the user to a fake website. For example, a man-in-the-middle can intercept the resolving request for exemple.com and send User1 its own server IP address. When a request is made to this IP address on port 80, the man-in-the-middle can redirect User1 to a similar named website on port 443, such as
<https://www.example.com> (note the slight change in spelling). User1 might not notice the discrepancy (example.com instead of exemple.com) and enter the credentials.
Solution
Perform the following steps on the NetScaler appliance to protect your website against attacks. At the CLI prompt, type:
add ssl profile sample-profile -maxage 63072000 -IncludeSubdomains YES -preload YES
 set ssl profile sample-profile -HSTS ENABLED
Because HSTS is enabled, the appliance includes the preload in the HTTP response to the client. Also, HSTS is in force for the duration specified and subdomains are also included. As a result, only HTTPS connections are accepted from a client.