
Import and convert SSL files
You can now import SSL resources, such as certificates, private keys, CRLs, and DH keys, from remote hosts even if FTP access to these hosts is not available. This feature is especially helpful in environments where shell access to the remote host is restricted. Default folders are created in /nsconfig/ssl as follows:
-
For certificate files: /nsconfig/ssl/certfile
-
For private keys: the /nsconfig/ssl/keyfile
-
For CRLs: /var/netscaler/ssl/crlfile
-
For DH keys: /nsconfig/ssl/dhfile
Imports from both HTTP and HTTPS servers are supported. However, the import fails if the file is on an HTTPS server that requires client certificate authentication for access.
Note:
The import command is not stored in the configuration (ns.conf) file, because reimporting the file after a restart might cause an error.
Import a certificate file
You can use the CLI and GUI to import a file (resource) from a remote host.
Import a certificate file from a remote host by using the CLI
At the command prompt, type:
import ssl certFile [<name>] [<src>]
Example:
import ssl certfile my-certfile http://www.example.com/file_1show ssl certfile
Name : my-certfile
URL : http://www.example.com/file_1
To remove a certificate file, use the
rm ssl certFile command, which accepts only the 'name' argument.
Import a key file from a remote host by using the CLI
At the command prompt, type:
import ssl keyFile [<name>] [<src>]
Example:
import ssl keyfile my-keyfile http://www.example.com/key_fileshow ssl keyfile
Name : my-keyfile
URL : http://www.example.com/key_file
To remove a key file, use the
rm ssl keyFile command, which accepts only the 'name' argument.
Import a CRL file from a remote host by using the CLI
At the command prompt, type:
import ssl crlFile [<name>] [<src>]
To remove a CRL file, use the
rm ssl crlFile command, which accepts only the \<name\> argument.
Example:
import ssl crlfile my-crlfile http://www.example.com/crl_file

 show ssl crlfile

     Name : my-crlfile
     URL : http://www.example.com/crl_file
Import a DH file from a remote host by using the CLI
At the command prompt, type:
import ssl dhFile [<name>] [<src>]
Example:
import ssl dhfile my-dhfile http://www.example.com/dh_file
 show ssl dhfile
      Name : my-dhfile
      URL : http://www.example.com/dh_file
To remove a DH file, use the
rm ssl dhFile command, which accepts only the \<name\> argument.
Import an SSL resource by using the GUI
Navigate to Traffic Management > SSL > Imports, and then select the appropriate tab.
Import PKCS#8 and PKCS#12 certificates
If you want to use certificates and keys that you already have on other secure servers or applications in your network, you can export them, and then import them to the NetScaler appliance. You might have to convert exported certificates and keys before you can import them to the NetScaler appliance.
For the details of how to export certificates from secure servers or applications in your network, see the documentation of the server or application from which you want to export.
Note:
For installation on the NetScaler appliance, key and certificate names cannot contain spaces or special characters other than those characters supported by the UNIX file system. Follow the appropriate naming convention when you save the exported key and certificate.
A certificate and private key pair is commonly sent in the PKCS#12 format. The appliance supports PEM and DER formats for certificates and keys. To convert PKCS#12 to PEM or DER, or PEM or DER to PKCS#12, see the "Convert SSL certificates for import or export" section later in this page.
The NetScaler appliance does not support PEM keys in PKCS#8 format. However, you can convert these keys to a supported format by using the OpenSSL interface, which you can access from the CLI or the configuration utility. Before you convert the key, you need to verify that the private key is in PKCS#8 format. Keys in PKCS#8 format typically start with the following text:
-----BEGIN ENCRYPTED PRIVATE KEY-----


 leuSSZQZKgrgUQ==


 -----END ENCRYPTED PRIVATE KEY-----
Open the OpenSSL interface from the CLI
-
Open an SSH connection to the appliance by using an SSH client, such as PuTTY.
-
Log on to the appliance by using the administrator credentials.
-
At the command prompt, type shell.
-
At the shell prompt type
openssl.
Open the OpenSSL interface from the GUI
Navigate to Traffic Management > SSL and, in the Tools group, select OpenSSL interface.
Convert a non-supported PKCS#8 key format to an encrypted supported key format by using the OpenSSL interface
At the OpenSSL prompt, type one of the following commands, depending on whether the non-supported key format is of type RSA or ECDSA:
OpenSSL>rsa- in <PKCS#8 Key Filename> -des3 -out <encrypted Key Filename>

 OpenSSL>ec -in <PKCS#8 Key Filename> -des3 -out <encrypted Key Filename>
Parameters for converting an unsupported key format to a supported key format
-
PKCS#8 Key Filename: The input file name of the incompatible PKCS#8 private key.
-
encrypted Key Filename: The output file name of the compatible encrypted private key in PEM format.
-
unencrypted Key Filename: The output file name of the compatible unencrypted private key in PEM format.
Convert SSL certificates for import or export
A NetScaler appliance supports the PEM and DER formats for SSL certificates. Other applications, such as client browsers and some external secure servers, require various public key cryptography standard (PKCS) formats. The appliance can convert the PKCS#12 format to PEM or DER format for importing a certificate to the appliance, and can convert PEM or DER to PKCS#12 for exporting a certificate. For more security, conversion of a file for import can include encryption of the private key with the DES or DES3 algorithm.
Note:
If you use the GUI to import a PKCS#12 certificate, and the password contains a dollar sign ($), back quote (`), or escape () character, the import might fail. If it does, the ERROR: Invalid password message appears. If you must use a special character in the password, be sure to prefix it with an escape character () unless all imports are performed by using the CLI.
Convert the format of a certificate by using the CLI
At the command prompt, type the following command:
convert ssl pkcs12 <outfile> [-import [-pkcs12File <inputFilename>] [-des | -des3] [-export [-certFile <inputFilename>] [-keyFile <inputFilename>]]
During the operation, you are prompted to enter an import password or an export password. For an encrypted file, you are also prompted to enter a passphrase.
Example:
convert ssl pkcs12 Cert-Import-1.pem -import -pkcs12File Cert-Import-1.pfx -des

 convert ssl pkcs12 Cert-Client-1.pfx -export -certFile Cert-Client-1 -keyFile Key-Client-1
Convert the format of a certificate by using the GUI
-
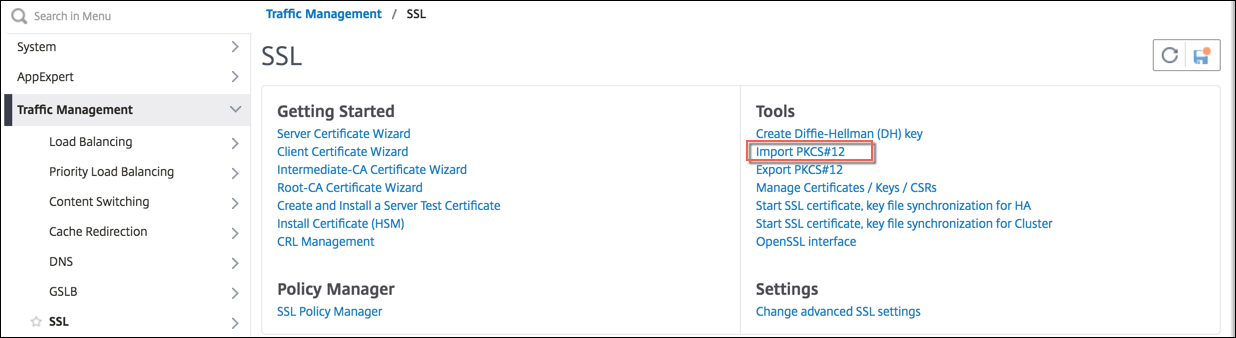
Navigate to Traffic Management > SSL and, in the Tools group, select Import PKCS#12.
-
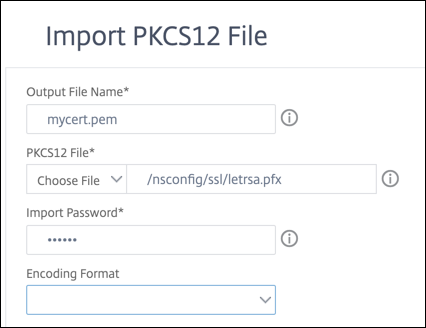
Specify the PEM certificate name in the Output File Name field.
-
Browse to the location of the PFX certificate on your local computer or the appliance.
-
Click OK.
-
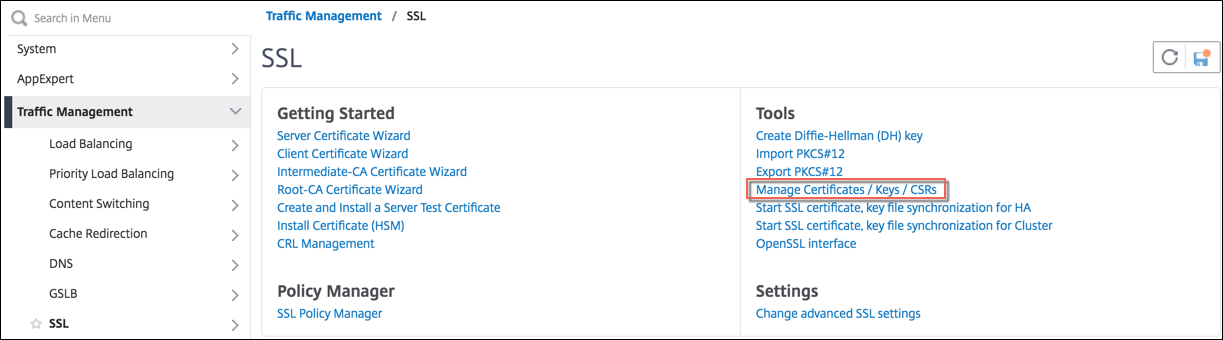
Click Manage Certificates / Keys / CSRs to view the converted PEM file.
-
You can view the uploaded PFX file and the converted PEM file.

-
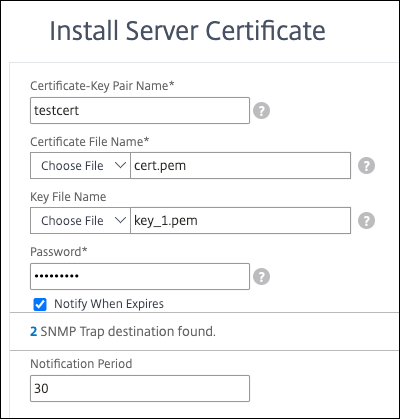
Navigate to SSL > Certificates > Server Certificates and click Install.
-
Specify a Certificate-Key Pair Name.
-
Browse to the location of the PEM file.
-
Specify the password when prompted.
-
Click Install.
-
Bind the certificate-key pair to an SSL virtual server.