
Create a certificate
A certificate authority (CA) is an entity that issues digital certificates for use in public key cryptography. Applications, such as web browsers, that conduct SSL transactions trust certificates issued or signed by a Certificate Authority. These applications maintain a list of the CAs that they trust. If any of the trusted CAs sign the certificate being used for the secure transaction, the application proceeds with the transaction.
Caution: Citrix recommends that you use certificates obtained from authorized CAs, such as Verisign, for all your SSL transactions. Use certificates generated on the NetScaler appliance for testing purposes only, not in any live deployment.
To import an existing certificate and key, see Import a Certificate.
Perform the following steps to create a certificate and bind it to an SSL virtual server. The only special characters allowed in the file names are underscore and dot. Special characters are not allowed as the first character in the file name.
-
Create a private key.
-
Create a certificate signing request (CSR).
-
Submit the CSR to a certificate authority.
-
Create a certificate-key pair.
-
Bind the certificate-key pair to an SSL virtual server
The following diagram illustrates the workflow.
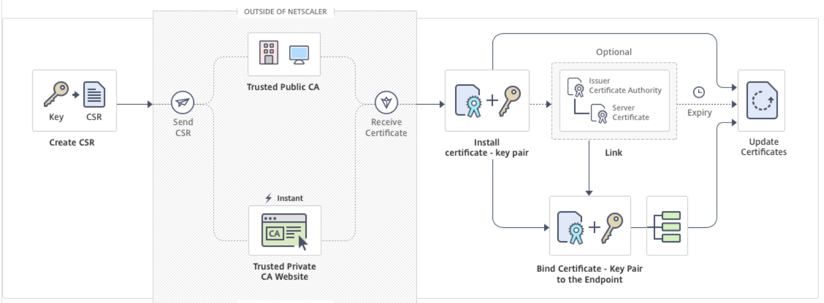
How to create and install a new certificate
Create a private key
Notes:
-
From release 12.1 build 49.x, you can use the AES256 algorithm with PEM key format to encrypt a private key on the appliance. AES with 256-bit key is more mathematically efficient and secure compared to the 56-bit key of the Data Encryption Standard (DES).
-
From release 12.1 build 50.x, you can create an RSA key in PKCS#8 format.
The private key is the most important part of a digital certificate. By definition, this key is not to be shared with anyone and must be kept securely on the NetScaler appliance. Any data encrypted with the public key can be decrypted only by using the private key.
The certificate that you receive from the CA is valid only with the private key that was used to create the CSR. The key is required for adding the certificate to the NetScaler appliance.
The appliance supports only the RSA encryption algorithms for creating private keys. You can submit either type of private key to the certificate authority (CA). The certificate that you receive from the CA is valid only with the private key that was used to create the CSR. The key is required for adding the certificate to the NetScaler appliance.
Important:
-
Be sure to limit access to your private key. Anyone who has access to your private key can decrypt your SSL data.
-
The length of the SSL key name allowed includes the length of the absolute path name if the path is included in the key name.
All SSL certificates and keys are stored in the
/nsconfig/ssl folder on the appliance. For added security, you can use the DES or triple DES (3DES) algorithm to encrypt the private key stored on the appliance.
Create an RSA private key by using the CLI
At the command prompt, type:
create ssl rsakey <keyFile> <bits> [-exponent ( 3 | F4 )] [-keyform (DER | PEM )] [-des | -des3 | -aes256] {-password } [-pkcs8]
Example:
create rsakey testkey 2048 -aes256 -password 123456 -pkcs8
Create an RSA private key by using the GUI
-
Navigate to Traffic Management > SSL > SSL Files.
-
In the Keys tab, select Create RSA Key.
-
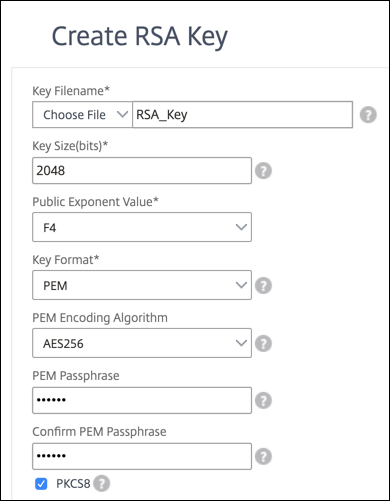
Enter values for the following parameters and click Create.
-
Key Filename - Name for and, optionally, path to the RSA key file. /nsconfig/ssl/ is the default path.
-
Key Size - Size, in bits, of the RSA key. Can range from 512 bits to 4096 bits.
-
Public Exponent Value - Public exponent for the RSA key. The exponent is part of the cipher algorithm and is required for creating the RSA key.
-
Key Format - The format in which the RSA key file is stored on the appliance.
-
PEM Encoding Algorithm - Encrypt the generated RSA key by using the AES 256, DES, or Triple-DES (DES3) algorithm. By default, private keys are unencrypted.
-
PEM Passphrase - If the private key is encrypted, enter a pass phrase for the key.
-
Select an AES256 encoding algorithm in an RSA key by using the GUI
-
Navigate to Traffic Management > SSL > SSL Files > Create RSA Key.
-
In Key Format, select PEM.
-
In PEM Encoding Algorithm, select AES256.
-
Select PKCS8.
Create a certificate signing request by using the CLI
At the command prompt, type:
create ssl certreq <reqFile> -keyFile <input_filename> | -fipsKeyName <string>) [-keyForm (DER | PEM) {-PEMPassPhrase }] -countryName <string> -stateName <string> -organizationName <string> -organizationUnitName <string> -localityName <string> -commonName <string> -emailAddress <string> {-challengePassword } -companyName <string> -digestMethod ( SHA1 | SHA256 )
Example:
create ssl certreq priv_csr_sha256 -keyfile priv_2048_2 -keyform PEM -countryName IN -stateName Karnataka -localityName Bangalore -organizationName Citrix -organizationUnitName NS -digestMethod SHA256
Create a certificate signing request by using the GUI
-
Navigate to Traffic Management > SSL.
-
In SSL Certificate, click Create Certificate Signing Request (CSR).
-
In Digest Method, select SHA256.
See Create a CSR for more information.
Support for subject alternative name in a certificate signing request
The subject alternative name (SAN) field in a certificate allows you to associate multiple values, such as domain names and IP addresses, with a single certificate. In other words, you can secure multiple domains, such as www.example.com, www.example1.com, www.example2.com, with a single certificate.
Some browsers, such as Google Chrome, no longer support a common name in a certificate signing request (CSR). They enforce SAN in all publicly trusted certificates.
The NetScaler appliance supports adding SAN values when creating a CSR. You can send a CSR with a SAN entry to a certificate authority to obtain a signed certificate with that SAN entry. When the appliance receives a request, it checks for a matching domain name in the SAN entries in the server certificate. If a match is found, it sends the certificate to the client and completes the SSL handshake. You can use the CLI or the GUI to create a CSR with SAN values.
Note: The NetScaler appliance processes only DNS based SAN values.
Create a CSR with the subject alternative name by using the CLI
create ssl certReq <reqFile> (-keyFile <input_filename> | -fipsKeyName <string>) [-subjectAltName <string>] [-keyform ( DER | PEM ) {-PEMPassPhrase }] -countryName <string> -stateName <string> -organizationName <string> [-organizationUnitName <string>] [-localityName <string>] [-commonName <string>] [-emailAddress <string>] {-challengePassword } [-companyName <string>] [-digestMethod ( SHA1 | SHA256 )]
Parameters:
subjectAltName: The subject alternative name (SAN) is an extension to X.509 that allows various values to be associated with a security certificate using a subjectAltName field. These values are called "Subject Alternative Names" (SAN). Names include:
-
IP addresses (Prefix with "IP:" Example: IP:198.51.10.5 IP:192.0.2.100)
-
DNS names (Prefix with "DNS:" Example: DNS:www.example.com DNS:www.example.org DNS:www.example.net)
On the command line, enter values within quotation marks. Separate two values with a space. Quotation marks are not required in the GUI. Maximum Length: 127
Example:
create certReq test1.csr -keyFile test1.ky -countryName IN -stateName Kar -organizationName citrix -commonName ctx.com -subjectAltName "DNS:*.example.com DNS:www.example.org DNS:www.example.net"
Note:
On a FIPS appliance, you must replace the key file name with the FIPS key name if you create the FIPS key directly on the appliance.
create certReq <csrname> -fipsKeyName fipskey.ky -countryName IN -stateName Kar -organizationName citrix -commonName ctx.com -subjectAltName "DNS:www.example.com DNS:www.example.org DNS:www.example.net"
Create a CSR by using the GUI
-
Navigate to Traffic Management > SSL > SSL Files.
-
In the CSR tab, click Create Certificate Signing Request (CSR).
-
Enter the values and click Create.
Limitations
To use SAN when creating an SSL certificate, you must explicitly specify the SAN values. The values are not read automatically from the CSR file.
Submit the CSR to the Certificate Authority
Most certificate authorities (CA) accept certificate submissions by email. The CA returns a valid certificate to the email address from which you submit the CSR.
The CSR is stored in the
/nsconfig/ssl folder.
Generate a test certificate
Note:
To generate a server test certificate, see Generating a Server Test Certificate.
The NetScaler appliance has a built-in CA tools suite that you can use to create self-signed certificates for testing purposes.
Caution: Because the NetScaler appliance signs these certificates, and not an actual CA, you must not use them in a production environment. If you attempt to use a self-signed certificate in a production environment, users receive a "certificate invalid" warning each time the virtual server is accessed.
The appliance supports creation of the following types of certificates
-
Root-CA certificates
-
Intermediate-CA certificates
-
End-user certificates
-
server certificates
-
client certificates
-
Before generating a certificate, create a private key and use that to create a certificate signing request (CSR) on the appliance. Then, instead of sending the CSR out to a CA, use the NetScaler CA Tools to generate a certificate.
Create a certificate by using a wizard
-
Navigate to Traffic Management > SSL.
-
In the details pane, under Getting Started, select the wizard for the type of certificate that you want to create.
-
Follow the instructions on the screen.
Create a root-CA certificate by using the CLI
At the command prompt, type the following command:
create ssl cert <certFile> <reqFile> <certType> [-keyFile <input_filename>] [-keyform ( DER | PEM )] [-days <positive_integer>]
In the following example, csreq1 is the CSR and rsa1 is the private key that was created earlier.
Example:
create ssl cert cert1 csreq1 ROOT_CERT -keyFile rsa1 -keyForm PEM -days 365

   Done
Create an intermediate-CA certificate by using the CLI
create ssl cert <certFile> <reqFile> <certType> [-keyFile <input_filename>] [-keyform ( DER | PEM )] [-days <positive_integer>] [-certForm ( DER | PEM )] [-CAcert <input_filename>] [-CAcertForm ( DER | PEM )] [-CAkey <input_filename>] [-CAkeyForm ( DER | PEM )] [-CAserial <output_filename>]
In the following example, csr1 is the CSR created earlier. Cert1 and rsakey1 are the certificate and corresponding key of the self-signed (root-CA) certificate, and pvtkey1 is the private key of the intermediate-CA certificate.
Example:
create ssl cert certsy csr1 INTM_CERT -CAcert cert1 -CAkey rsakey1 -CAserial 23
 Done

 create ssl rsakey pvtkey1 2048 -exponent F4 -keyform PEM
 Done
Create a root-CA certificate by using the GUI
Navigate to Traffic Management > SSL and, in the Getting Started group, select Root-CA Certificate Wizard, and configure a root CA certificate.
Create an intermediate-CA certificate by using the GUI
Navigate to Traffic Management > SSL and, in the Getting Started group, select Intermediate-CA Certificate Wizard, and configure an intermediate CA certificate.
Create an end-user certificate
An end-user certificate can be a client certificate or a server certificate. To create a test end-user certificate, specify the Intermediate CA certificate or the self-signed root-CA certificate.
Note: To create an end-user certificate for production use, specify a trusted CA certificate and send the CSR to a certificate authority (CA).
Create a test end-user certificate by using the command line interface
create ssl cert <certFile> <reqFile> <certType> [-keyFile <input_filename>] [-keyform ( DER | PEM )] [-days<positive_integer>] [-certForm ( DER | PEM )] [-CAcert <input_filename>] [-CAcertForm ( DER | PEM )] [-CAkey<input_filename>] [-CAkeyForm ( DER | PEM )] [-CAserial <output_filename>]
If there is no intermediate certificate, use the certificate (cert1) and private key (rsakey1) values of the root-CA certificate in
CAcert and CAkey.
Example:
create ssl cert cert12 csr1 SRVR_CERT -CAcert cert1 -CAkey rsakey1 -CAserial 23

 Done
If there is an intermediate certificate, use the certificate (
certsy) and private key (pvtkey1) values of the intermediate certificate in CAcert and CAkey.
Example:
create ssl cert cert12 csr1 SRVR_CERT -CAcert certsy -CAkey pvtkey1 -CAserial 23

 Done
Create a self-signed SAN Certificate using OpenSSL
To create a self-signed SAN certificate with multiple subject alternate names, perform the following steps:
-
Create an OpenSSL configuration file on your local computer by editing the fields related as per the company requirements.Note: In the following example, the configuration file is "req.conf".
[req]
 distinguished_name = req_distinguished_name
 x509_extensions = v3_req
 prompt = no
 [req_distinguished_name]
 C = US
 ST = VA
 L = SomeCity
 O = MyCompany
 OU = MyDivision
 CN = www.company.com
 [v3_req]
 keyUsage = keyEncipherment, dataEncipherment
 extendedKeyUsage = serverAuth
 subjectAltName = @alt_names
 [alt_names]
 DNS.1 = www.company.net
 DNS.2 = company.com
DNS.3 = company.net -
Upload the file to the /nsconfig/ssl directory on the NetScaler appliance.
-
Log on to NetScaler CLI as
nsrootuser and switch to the shell prompt. -
Run the following command to create the certificate:
cd /nsconfig/ssl
openssl req -x509 -nodes -days 730 -newkey rsa:2048 -keyout cert.pem -out cert.pem -config req.conf -extensions 'v3_req' -
Run the following command to verify the certificate:
openssl x509 -in cert.pem -noout –text
 Certificate:
 Data:
 Version: 3 (0x2)
 Serial Number:
 ed:90:c5:f0:61:78:25:ab
 Signature Algorithm: md5WithRSAEncryption
 Issuer: C=US, ST=VA, L=SomeCity, O=MyCompany, OU=MyDivision, CN=www.company.com
 Validity
 Not Before: Nov 6 22:21:38 2012 GMT
 Not After : Nov 6 22:21:38 2014 GMT
 Subject: C=US, ST=VA, L=SomeCity, O=MyCompany, OU=MyDivision, CN=www.company.com
 Subject Public Key Info:
 Public Key Algorithm: rsaEncryption
 RSA Public Key: (2048 bit)
 Modulus (2048 bit):
 …
 Exponent: 65537 (0x10001)
 X509v3 extensions:
 X509v3 Key Usage:
 Key Encipherment, Data Encipherment
 X509v3 Extended Key Usage:
 TLS Web Server Authentication
 X509v3 Subject Alternative Name:
 DNS:www.company.net, DNS:company.com, DNS:company.net
 Signature Algorithm: md5WithRSAEncryption …