This content has been machine translated dynamically.
Dieser Inhalt ist eine maschinelle Übersetzung, die dynamisch erstellt wurde. (Haftungsausschluss)
Cet article a été traduit automatiquement de manière dynamique. (Clause de non responsabilité)
Este artículo lo ha traducido una máquina de forma dinámica. (Aviso legal)
此内容已经过机器动态翻译。 放弃
このコンテンツは動的に機械翻訳されています。免責事項
이 콘텐츠는 동적으로 기계 번역되었습니다. 책임 부인
Este texto foi traduzido automaticamente. (Aviso legal)
Questo contenuto è stato tradotto dinamicamente con traduzione automatica.(Esclusione di responsabilità))
This article has been machine translated.
Dieser Artikel wurde maschinell übersetzt. (Haftungsausschluss)
Ce article a été traduit automatiquement. (Clause de non responsabilité)
Este artículo ha sido traducido automáticamente. (Aviso legal)
この記事は機械翻訳されています.免責事項
이 기사는 기계 번역되었습니다.책임 부인
Este artigo foi traduzido automaticamente.(Aviso legal)
这篇文章已经过机器翻译.放弃
Questo articolo è stato tradotto automaticamente.(Esclusione di responsabilità))
Translation failed!
Customize plug-in’s MSI file
You can change parameters in the WANOP Client Plug-in distribution file, which is in the standard Microsoft Installer (MSI) format. Customization requires the use of an MSI editor.
Note
The altered parameters in your edited. MSI file apply only to new installations. When existing plug-in users update to a new release, their existing settings are retained. Therefore, after changing the parameters, you should advise your users to uninstall the old version before installing the new one.
Best practices:
Create a DNS entry that resolves to the nearest plug-in-enabled appliance. For example, define “Repeater.mycompany.com” and have it resolve to your appliance, if you have only one appliance. Or, if you have, say, five appliances, have Repeater.mycompany.com resolve to one of your five appliances, with the appliance selected on the basis of closeness to the client or to the VPN unit. For example, a client using an address associated with a particular VPN should see Repeater.mycompany.com resolve to the IP address of the WANOP Client Plug-in appliance connected to that VPN . Build this address into your plug-in binary with an MSI editor, such as Orca. When you add, move, or remove appliances, changing this single DNS definition on your DNS server updates the appliance list on your plug-ins automatically.
You can also have the DNS entry resolve to multiple appliances, but this is undesirable unless all appliances are configured identically, because the plug-in takes some of it characteristics from the leftmost appliance in the list and applies them globally (including SSL compression characteristics). This can lead to undesirable and confusing results, especially if the DNS server rotates the order of IP addresses for each request.
Install the Orca MSI editor:
There are many MSI editors, including Orca, which is part of Microsoft’s free Platform SDK and can be downloaded from Microsoft.
To install the Orca MSI editor:
-
Download the PSDK-x86.exe version of the SDK and execute it. Follow the installation instructions.
-
Once the SDK is installed, the Orca editor must be installed. It will be under Microsoft Platform SDK\Bin\Orca.Msi. Launch Orca.msi to install the actual Orca editor (orca.exe).
-
Running Orca–Microsoft provides its Orca documentation online. The following information describes how to edit the most important WANOP Client Plug-in Plug-in parameters.
-
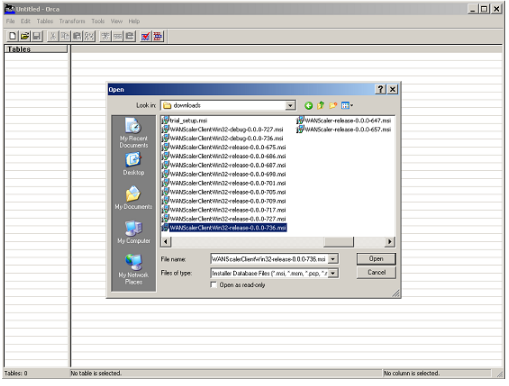
Launch Orca with Start > All Programs > Orca. When a blank Orca window appears, open the WANOP Client Plug-in Plug-in MSI file with File > Open.
Figure 1. Using Orca

-
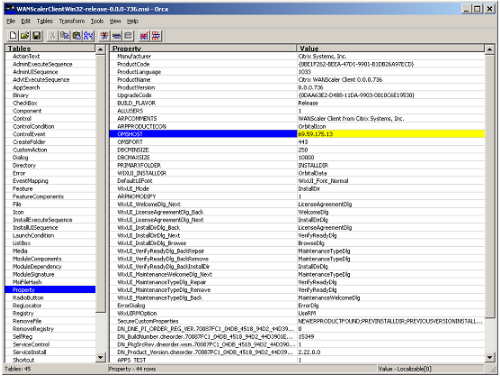
On the Tables menu, click Property. A list of all the editable properties of the .MSI file appears. Edit the parameters shown in the following table. To edit a parameter, double-click on its value, type the new value, and press Enter.
For more information, see the table.
-
On the Tables menu, click Property. A list of all the editable properties of the .MSI file appears. Edit the parameters shown in the following table. To edit a parameter, double-click on its value, type the new value, and press Enter.
For more information, see the table.
Figure 2: Editing Parameters in Orca:

-
-
When done, use the File: Save As command to save your edited file with a new filename; for example, test.msi.
Your plug-in software has now been customized.
Note
Some users have seen a bug in orca that causes it to truncate files to 1 MB. Check the size of the saved file. If it has been truncated, make a copy of the original file and use the Save command to overwrite the original.
Once you have customized the appliance list with Orca and distributed the customized MSI file to your users, the user does not need to type in any configuration information when installing the software.
Share
Share
In this article
This Preview product documentation is Cloud Software Group Confidential.
You agree to hold this documentation confidential pursuant to the terms of your Cloud Software Group Beta/Tech Preview Agreement.
The development, release and timing of any features or functionality described in the Preview documentation remains at our sole discretion and are subject to change without notice or consultation.
The documentation is for informational purposes only and is not a commitment, promise or legal obligation to deliver any material, code or functionality and should not be relied upon in making Cloud Software Group product purchase decisions.
If you do not agree, select I DO NOT AGREE to exit.