Add policies to an API deployment
You can configure various security policies for your API traffic. This configuration requires you to specify the traffic selection criteria and the parameters required for a policy. Do the following steps to add a policy to an API definition:
-
Navigate to Security > API Security > Policies.
-
Click Add.
-
Specify the name for a policy group.
-
Select a Deployment from the list.
-
Select an Upstream Service from the list for which you want to configure policies.
-
Click Add to select traffic selectors and a policy type.
Traffic selector - The traffic selection criteria includes API resource paths or path prefixes, methods, and policy.
You can use any of the following options to specify traffic selection criteria:
-
API Resources – Select an API resource and its methods for which you want to apply a policy. You can search API resources and methods with a key word.
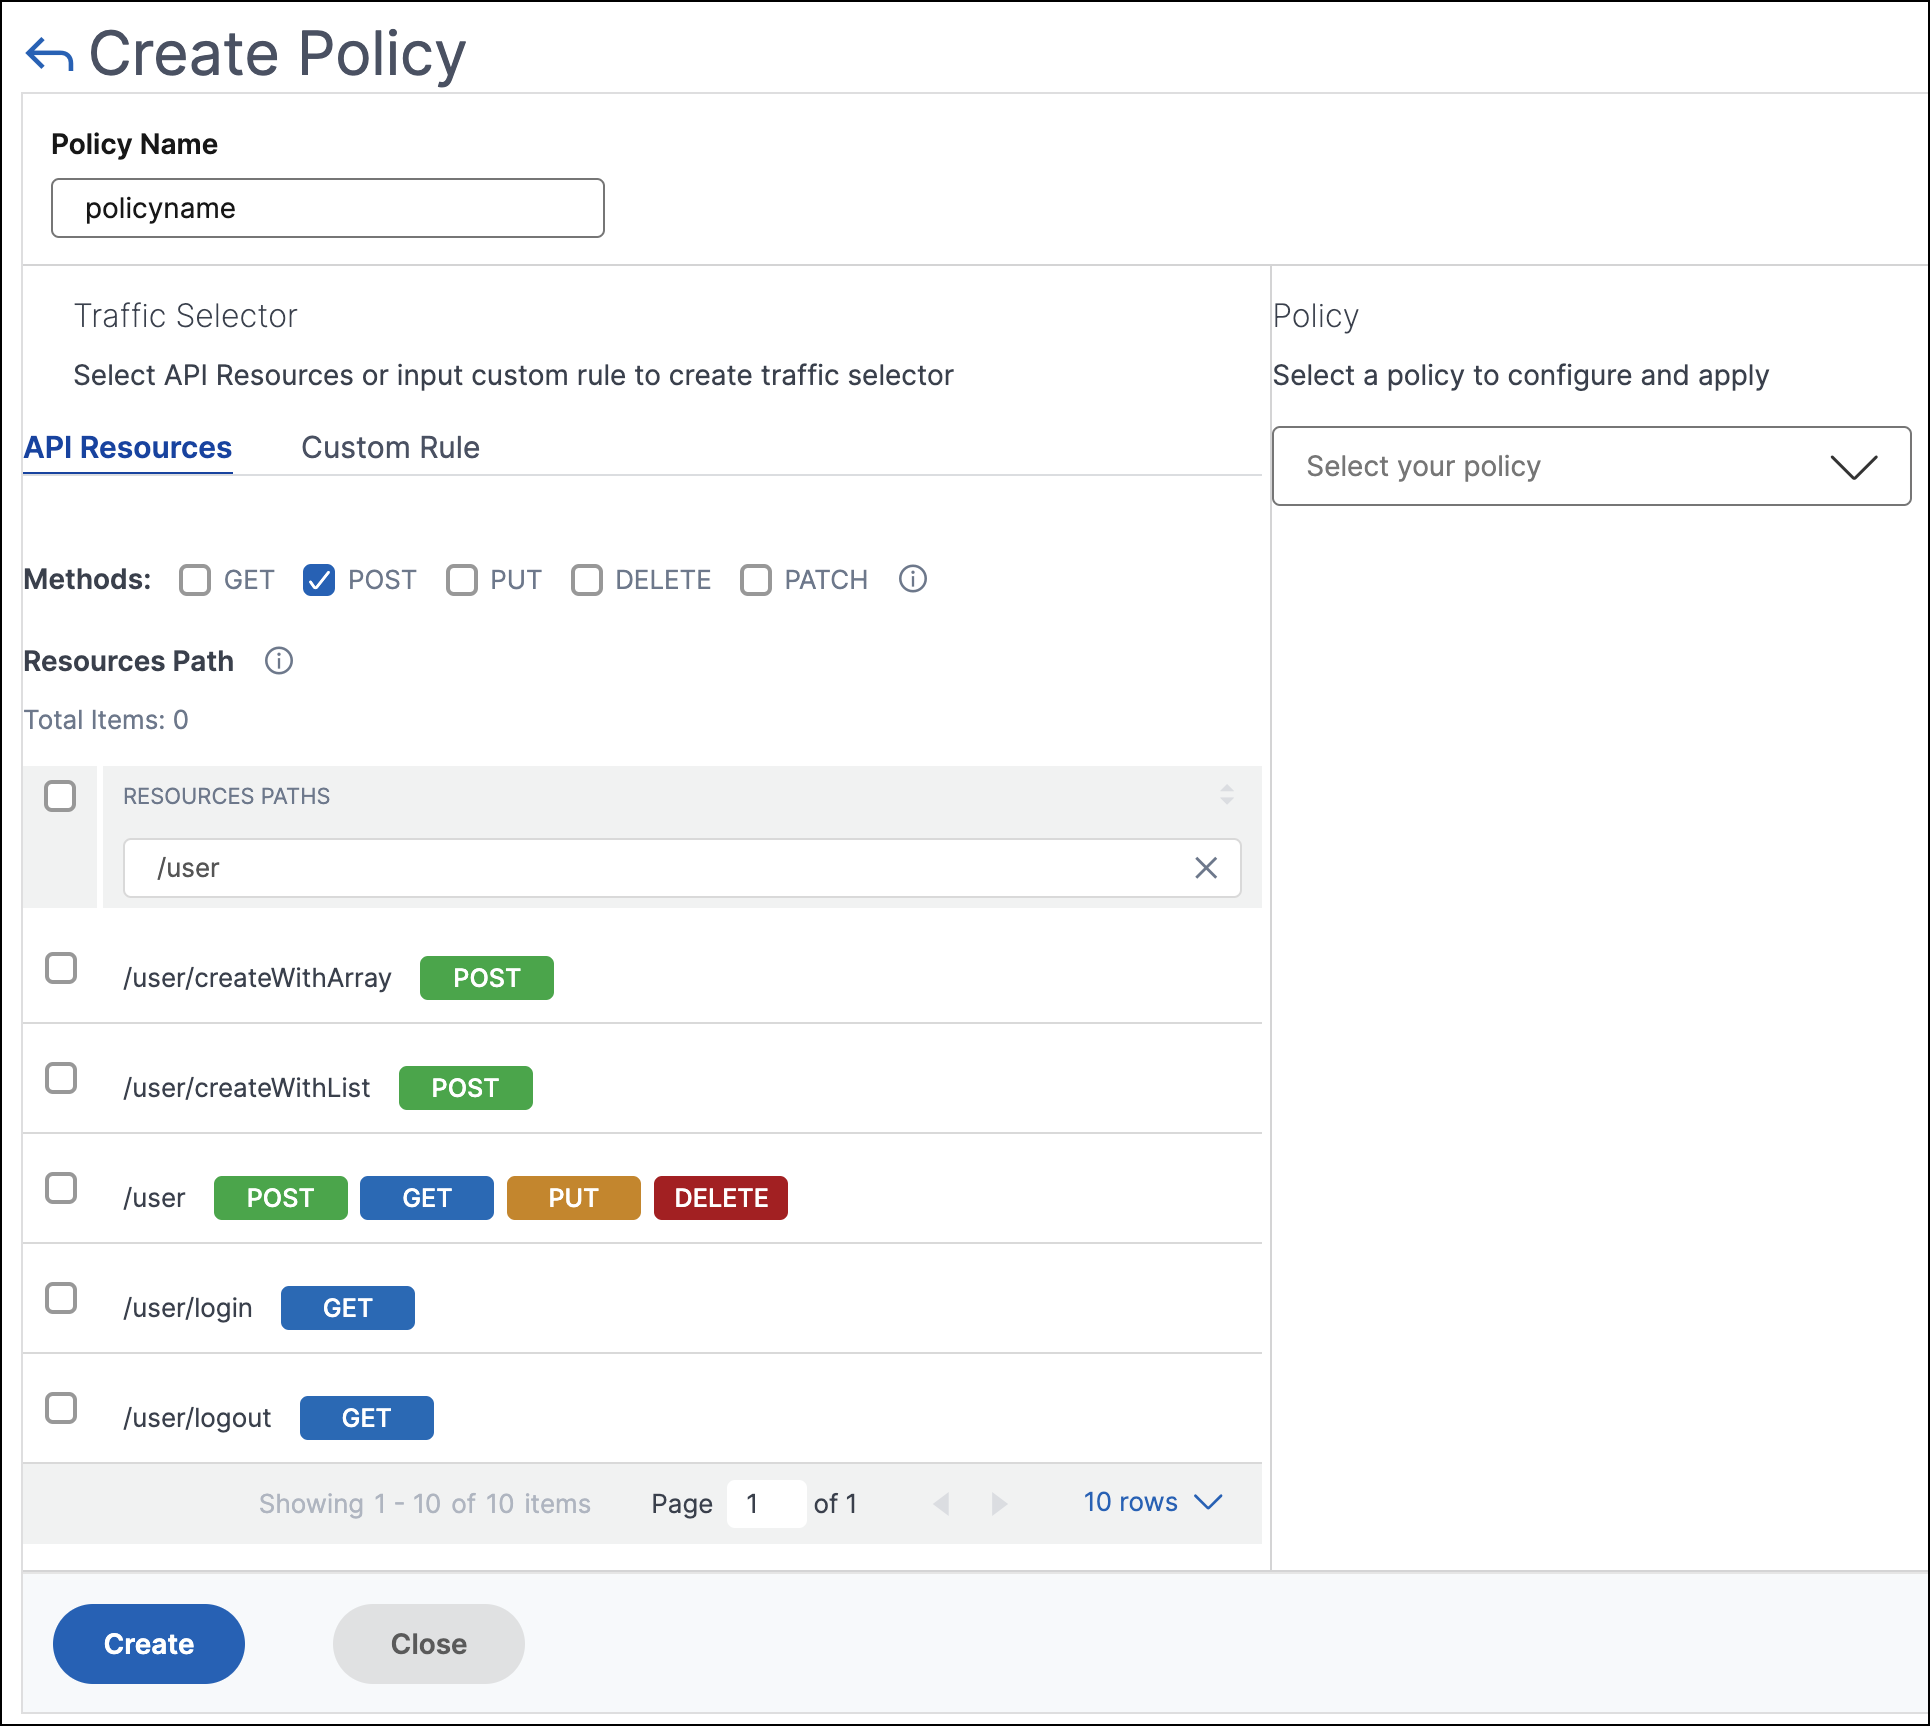
In this example, the API resources with
/userthat have thePOSTmethod are listed. -
Custom Rule – In this tab, you can specify custom path prefixes and multiple methods.
The configured policy applies to an incoming API request that matches the custom rule for API traffic selection.
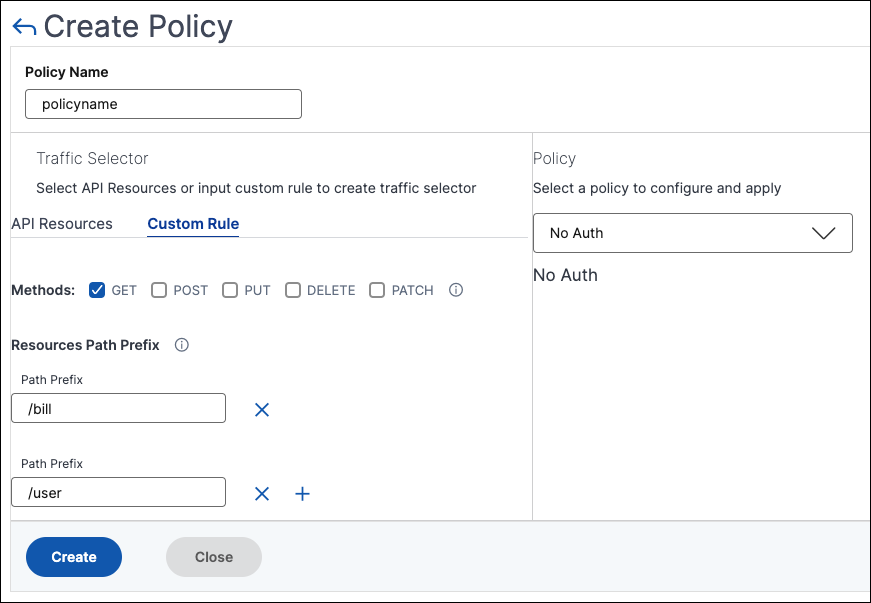
In this example, the No-Auth policy applies to the API resources that have the
/billprefix and theGETmethod.
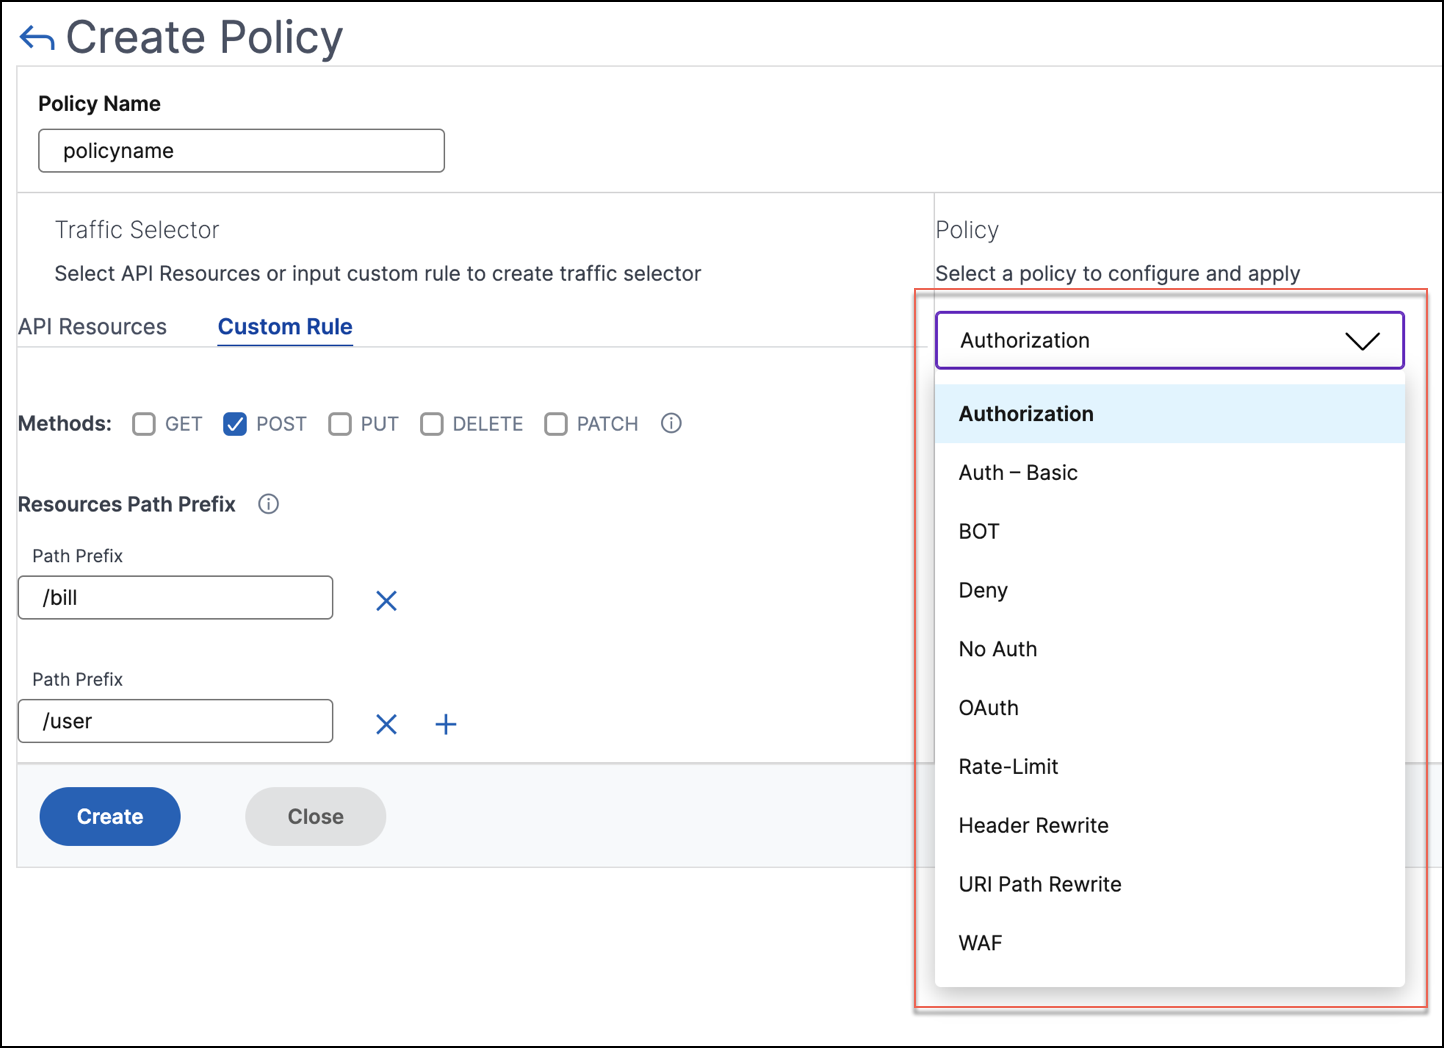
In Policy, select a policy from the list that you want to apply to the selected API resource and method. For more information about each policy, see Policy types.
-
-
Optional, you can move policy types to set a priority. The policy types with higher priority apply first.
-
Click Save to add a policy. If you want to apply the policy immediately, click Save & Apply.
Policy types
When you are configuring an API policy, you can select the following policies that you want to apply to the API resource and method:
Note:
To manage the API Security using APIs, see Use APIs to manage API Security.
Authentication and Authorization
API resources are hosted on an application or API server. When you want to enforce access restrictions on such API resources, you can use the authentication and authorization policies. These policies verify whether the incoming API request has a necessary permission to access the resource.
Use the following policies to define authentication and authorization for the selected API resources:
No-Auth
Use this policy to skip authentication on the selected traffic.
Auth-Basic
This policy specifies that local authentication to be used with the HTTP basic authentication scheme. To use local authentication, you must create user accounts on the NetScaler.
OAuth
OAuth requires an external identity provider to authenticate a client using oAuth2 and issue an access token. When the client provides this token as an access credential to an API gateway, the token is validated based on the configured values.
-
JWKS URI - The URL of an endpoint that has JWKs (JSON Web Key) for JWT (JSON Web Token) verification
-
Issuer - The identity (usually a URL) of the authentication server.
-
Audience - The identity of the service or application for which the token is applicable.
-
Claims to save - The access permissions are represented as a set of claims and expected values. Specify the claim values in the CSV format.
-
Introspect URI - An introspection endpoint URL of the authentication server. This URL is used to verify opaque access tokens. For more information about these tokens, see OAuth configuration for opaque access tokens.
After you specify Introspect URI, specify the Client Id and Client Secret to access the authentication server.
-
Allowed algorithms - This option allows you to restrict certain algorithms in the incoming tokens. By default, all the supported methods are allowed. However, you can check the required algorithms for the selected traffic.
On successful validation, API Security grants access to the client.
Important:
When you configure an OAuth or Auth-Basic policy for the selected API resources, configure the No Auth policy for the remaining API resources. This configuration explicitly indicates that you want to skip authentication for the remaining resources.
Authorization
This policy verifies the required permissions to access an API resource. The access permissions are represented as a set of claims and expected values. To configure this policy, select Add a new Claim and specify the following:
- Claim Name
- Claim Values
Important:
API Security requires both authentication and authorization policies for API traffic. Therefore, you must configure an authorization policy with an authentication policy. The authentication policy can be OAuth or
Auth-Basic.Even if you do not have any authorization checks, you must create an authorization policy with empty claims. Otherwise, the request is denied with a 403 error.
Rate limit
Specify the maximum load given to the selected API resource. With this policy, you can monitor the API traffic rate and take preventive actions. To configure this policy, specify the following:
-
HTTP Header Name - It is a traffic selector key that filters the traffic to identify the API requests. And, the Rate limit policy applies and monitors only to such API requests.
-
Header Values - These header values are separated by commas for the mentioned header name.
-
Threshold - The maximum number of requests that can be allowed in the specified interval. If you have specified Header Values, this threshold applies for each header value.
Example-1:
When you specify header values (
"key1","key2","key3") for the header namex-api-keyand you set the threshold to80, the set threshold applies for each header value.Example-2:
If you want to specify different thresholds for each header value, create separate rate limit policies using the same HTTP header name.
-
Policy-1: Specify header values (
"key1","key2") for the header namex-api-keyand you set the threshold to80. -
Policy-2: Specify header values (
"key3") for the header namex-api-keyand you set the threshold to30.
If you don’t specify a header value, the threshold applies for the specified HTTP header name.
-
-
Time slice - The interval specified in microseconds. During this interval, the requests are monitored against the configured limits. By default, it is set to 1000 microseconds (1 millisecond).
-
Limit type - The mode how you want to apply the rate limit policy. You can select Burst or Smooth limit type.
-
Action - Defines an action that you want to take on the traffic that breaches the threshold. You can specify one of the following actions:
- DROP: Drops the requests above the configured traffic limits.
- RESET: Resets the connection for the requests.
- REDIRECT: Redirects the traffic to the configured redirect_url.
-
RESPOND: Responds with the standard response (
429 Too many requests).
WAF
This policy prevents security breaches, data loss, and possible unauthorized modifications to websites that access sensitive business or customer information.
Before you configure a WAF policy, create a WAF profile in NetScaler Console using StyleBooks.
In WAF Profile Name, select or specify the WAF profile that you have created.
Bot
This policy identifies bad bots and protects your appliance from advanced security attacks.
Before you configure a BOT policy, create a BOT profile in NetScaler Console using StyleBooks.
In Bot Profile Name, specify the BOT profile that you have created.
Header Rewrite
This policy helps you modify the header of API requests and responses. If you want to replace the value in the HTTP header, specify the following:
-
HTTP Header Name: The filed name that you want to modify in the request header.
Example:
Host -
Header value: Optional, the value string that you want to modify in the specified header name.
Example:
sample.com -
Header new value: The new value to replace the specified header value.
If no Header value is specified, it replaces any received value with the specified value to the HTTP Header Name.
Example:
example.com
In this example, the header rewrite policy replaces sample.com to example.com in the Host field of an API request.
URI Path Rewrite
This policy helps you modify the URI path of API requests and responses. If you want to replace a segment in the URI path, add a rule to do one of the following:
-
Replace a path segment – When you select this action type, specify the following:
- Current path segment – The path segment that you want to replace.
- New path segment – New path segment that replaces only the current path segment.
For example, to change a locale in the URI path from English to Chinese, specify
/en-us/in Current Path Segment. And, specify/zh-zhin New Path Segment. It replaces only the path segment and retains the remaining URI path. -
Replace the full path – This action type completely replaces the URI path of API requests and responses with the specified path. If you specify
/example.htmlin New Path Segment, the URI path of an API request or response is changed to the specified path. -
Remove the path segment – This action removes the specified segment from the URI. For example, to remove English locale from the URI path, specify
/en-us/in Current Path Segment. -
Insert a path segment – This action inserts the specified segment in the URI path. To apply this rule, specify the position where you want to insert the segment. And, what segment you want to insert.
For example, when you want to insert a segment right after some text, do the following:
- Specify the position where you want to insert a new segment.
- In Current Path Segment, specify the text after which a new segment to be added.
- In New Path Segment, specify the segment that you want to add.
Deny
This policy helps you deny API requests from reaching your API resources.