Deploy an API instance
To deploy an API instance, you require an API proxy. An API proxy is a front-end virtual server where the API Security (NetScaler instance) receives the API traffic from API clients. The API clients can be browsers, mobile applications, and so on.
You can share an API proxy with different API deployments. In an organization where you have many API services, you can create a separate API proxy for each API service. Or, you can create and share an API proxy with API instances for different API services.
For example, the two API services app1 and app2 are deployed on the same API Security and using the same front-end virtual server. You want to provide the same virtual IP address and SSL certificate information to both API services. In this case, you can add an API proxy with the required information and share with separate deployments. So, API services on different deployments can receive requests using the shared API proxy.
As an administrator, do the following to deploy an API instance:
Add an API proxy
Follow the steps to add an API proxy:
-
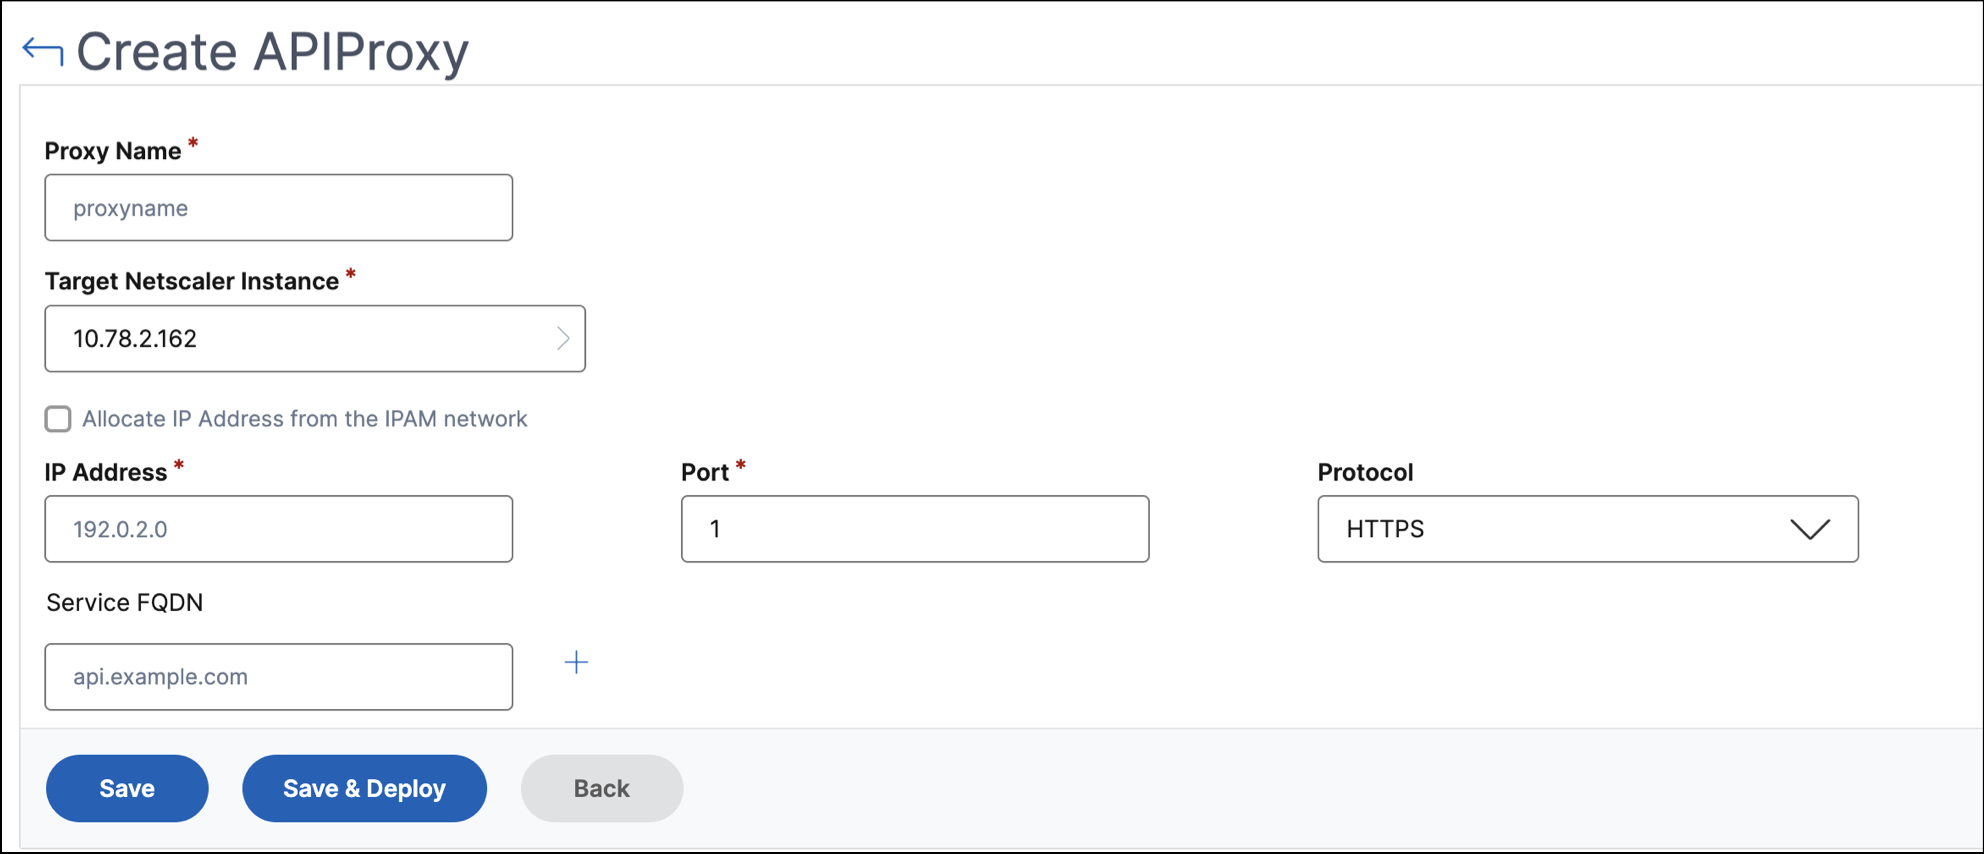
Go to Security > API Security > API Proxy > Add.
-
Specify the following:
-
Proxy Name – A name for an API proxy.
-
Target NetScaler Instance - Select an NetScaler instance that acts as an API gateway.
-
IP address – An IP address of the virtual server that is hosting API services.
-
Port – A port number of the virtual server that is hosting API services.
-
Protocol – Set a protocol depending on the type of traffic that you want to receive on the API proxy (HTTP or HTTPS).
-
TLS Security Profile – Select High or Medium from the list. If you select High, it maps to the A+ rating SSL profile on a NetScaler instance.
-
Certificate Store - Select the SSL certificate for the API Security. NetScaler agent certificate store helps you to store and manage your SSL certificates in one location.
In the NetScaler agent certificate store, you can store SSL certificates in NetScaler agent and reuse them during NetScaler configuration.
Note:
If your existing deployments use the SSL certificate or key that are not in the NetScaler agent certificate store, you must add the certificate and key to the store with the same name.
-
Service FQDN – A fully qualified domain name where your API services are hosted. For example:
api.example.com
Alternatively, you can select an IPAM network to allocate the IP address. To view the allocated IP address from the IPAM network, navigate to Settings > IPAM. For more information on IPAM, see Configure IPAM.
-
-
Click Save to save the deployment configuration.
If you want to deploy this API proxy on the API Security, click Save and Deploy.
After adding an API proxy, deploy an API instance.
Deploy an API instance using the API proxy
Follow the steps to deploy an API instance:
-
Navigate to Security > API Security > Deployments.
-
Click Add.
-
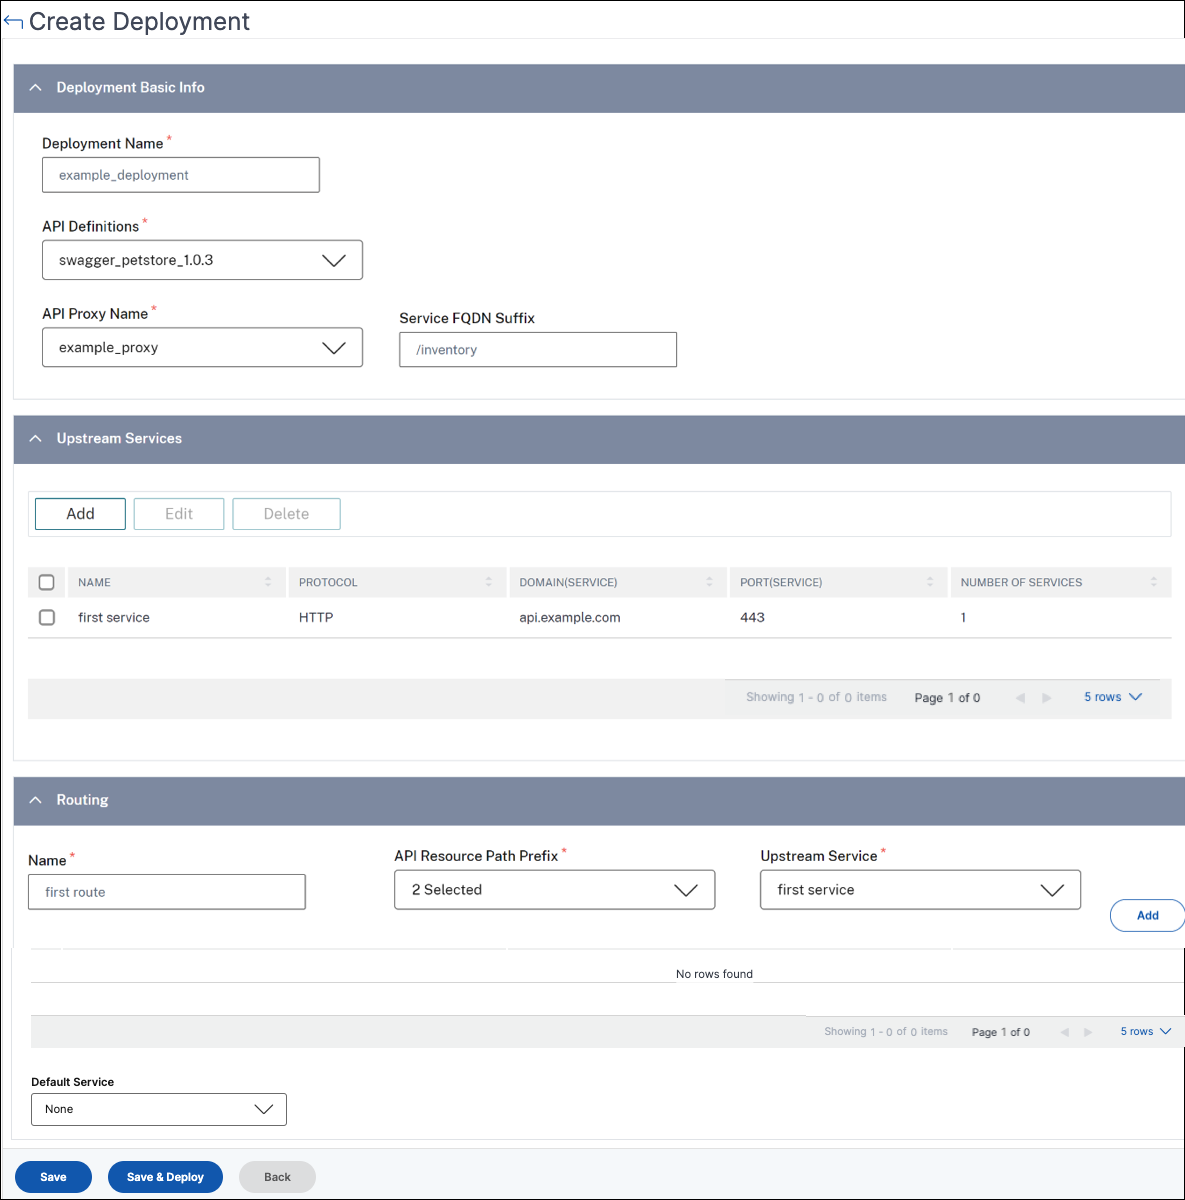
In Deployment Basic Info,
-
Specify the Deployment Name.
-
In API Definitions, select the required API definition.
-
Select the API Proxy that you want to use with this deployment.
-
-
In Upstream Services, click Add to add back-end (origin) API servers where you want to egress the API traffic. You can configure an upstream service with its domain name or IP address.
You can specify SNIP address and netmask details while deploying an API instance. The NetScaler instance uses the specified SNIP address to communicate with the upstream services (back end). The specified SNIP address becomes the source IP address for the egress traffic sent to upstream services. You can also use IPAM to configure SNIP address and netmask. If you don’t configure the SNIP address, the default SNIP address of the NetScaler instance becomes the source IP address for the upstream services.
Note:
By default, the SNIP address and netmask options are optional. However, if you specify one of these options, you must specify another option too.
-
Specify a name to an upstream service.
-
Specify the domain.
-
In Services, specify an IP address and port value. To add more IP addresses, click Add a new row.
-
Click Add.
-
-
In Routing, specify the following details to route incoming API traffic based on the resource path prefix:
-
Specify the route name.
-
Select an API Resource to receive an API request.
Note:
You can also specify the custom path or path prefix.
-
Select an Upstream Service from the list where you want to transfer the API traffic.
-
-
Click Save to save the deployment configuration.
If you want to deploy the configuration to the API Security, click Save and Deploy.
Enable the API analytics
The following are the prerequisites to enable analytics for a deployment:
-
Ensure that virtual servers are licensed
-
Ensure that analytics status is Disabled
-
Ensure that virtual servers are in UP status
To enable the API analytics for a deployment, do the following:
-
In Security > API Security > Deployments, select the deployment to which you want to enable the API analytics.
-
Click Enable Analytics.
-
In the Configure Analytics for deployment page, select the virtual server, and click Enable Analytics.
-
On the Enable Analytics window:
-
Select the insight type (Web Insight, Security Insight, Bot Insight)
-
Select Logstream or IPFIX as Transport Mode.
For more information about IPFIX and Logstream, see Logstream overview.
The Expression is true by default.
-
Click OK.
-
NetScaler Console enables analytics on the selected virtual servers.