Provision the Citrix® ADC VPX instance by using OpenStack
You can provision a Citrix ADC VPX instance in an Openstack environment either by using the Nova boot command (OpenStack CLI) or Horizon (OpenStack dashboard) .
Provisioning a VPX instance, optionally involves using data from the config drive. Config drive is a special configuration drive that attaches to the instance as a CD-ROM device when it boots. This configuration drive can be used to pass networking configuration such as management IP address, network mask, default gateway, and to inject customer scripts.
In a Citrix ADC appliance, the default authentication mechanism is password based. Now, SSH key-pair authentication mechanism is supported for Citrix ADC VPX instances on OpenStack environment.
The key-pair (public key and private key) needs to be generated before using Public Key Cryptography mechanism. You can use different mechanisms, such as Horizon, Puttygen.exe for Windows, and ssh-keygen for Linux environment, to generate the key pair. Refer to online documentation of respective mechanisms for more information about generating key pair.
Once a key pair is available, copy the private key to a secure location to which authorized persons will have access. In OpenStack, public key can be deployed on a VPX instance by using Horizon or Nova boot command. When a VPX instance is provisioned by using OpenStack, it first detects that the instance is booting in an OpenStack environment by reading a specific BIOS string. This string is “OpenStack Foundation” and for Red Hat Linux distributions it is stored in /etc/nova/release. This is a standard mechanism that is available in all OpenStack implementations based on KVM hypervisor platform. The drive should have a specific OpenStack label.
If the config drive is detected, the instance attempts to read the network configuration, custom scripts, and SSH key pair if provided.
Userdata file
The Citrix ADC VPX instance uses a customized OVF file, also known as userdata file, to inject network configuration, custom scripts. This file is provided as part of config drive. Here is an example of a customized OVF file.
<?xml version="1.0" encoding="UTF-8" standalone="no"?>
<Environment xmlns:oe="http://schemas.dmtf.org/ovf/environment/1"
xmlns:xsi="http://www.w3.org/2001/XMLSchema-instance"
oe:id=""
xmlns="http://schemas.dmtf.org/ovf/environment/1"
xmlns:cs="http://schemas.citrix.com/openstack">
<PlatformSection>
<Kind></Kind>
<Version>2016.1</Version>
<Vendor>VPX</Vendor>
<Locale>en</Locale>
</PlatformSection>
<PropertySection>
<Property oe:key="com.citrix.netscaler.ovf.version" oe:value="1.0"/>
<Property oe:key="com.citrix.netscaler.platform" oe:value="NSVPX"/>
<Property oe:key="com.citrix.netscaler.orch_env" oe:value="openstack-orch-env"/>
<Property oe:key="com.citrix.netscaler.mgmt.ip" oe:value="10.1.2.22"/>
<Property oe:key="com.citrix.netscaler.mgmt.netmask" oe:value="255.255.255.0"/>
<Property oe:key="com.citrix.netscaler.mgmt.gateway" oe:value="10.1.2.1"/>
</PropertySection>
 <cs:ScriptSection>
   <cs:Version>1.0</cs:Version>
     <ScriptSettingSection xmlns="http://schemas.citrix.com/openstack" xmlns:i="http://www.w3.org/2001/XMLSchema-instance">
         <Scripts>
           <Script>
                 <Type>shell</Type>
                 <Parameter>X Y</Parameter>
                <Parameter>Z</Parameter>
                <BootScript>before</BootScript>
                  <Text>
                        #!/bin/bash
                        echo "Hi, how are you" $1 $2 >> /var/sample.txt
                  </Text>
           </Script>
           <Script>
                 <Type>python</Type>
                 <BootScript>after</BootScript>
                  <Text>
                       #!/bin/python
 print("Hello");
                  </Text>
           </Script>
   <Script>
                 <Type>perl</Type>
                 <BootScript>before</BootScript>
                  <Text>
                       !/usr/bin/perl
 my $name = "VPX";
 print "Hello, World $name !\n" ;
                  </Text>
           </Script>
           <Script>
                <Type>nscli</Type>
                <BootScript>after</BootScript>
                <Text>
                 add vlan 33
 bind vlan 33 -ifnum 1/2
                </Text>
           </Script>
         </Scripts>
     </ScriptSettingSection>
 </cs:ScriptSection>
</Environment>
In the OVF file above “PropertySection” is used for NetScaler networking configuration while <cs:ScriptSection> is used to enclose all scripts. <Scripts></Scripts> tags are used to bundle all scripts together. Each script is defined in between <Script> </Script> tags. Each script tag has following fields/tags:
a) <Type>: Specifies value for script type. Possible values: Shell/Perl/Python/NSLCI (for NetScaler CLI scripts)
b) <Parameter>: Provides parameters to the script. Each script can have multiple <Parameter> tags.
c) <BootScript>: Specifies script execution point. Possible values for this tag: before/after. “before” specifies script will be executed before PE comes up. “after” specifies that the script will be executed after PE comes up.
d) <Text>: Pastes content of a script.
Note
Currently the VPX instance does not take care of sanitization of scripts. As an administrator, you should check the validity of the script.
Not all sections need to be present. Use an empty “PropertySection” to only define scripts to execute on first boot or an empty <cs:ScriptSection> to only define networking configuration.
After the required sections of the OVF file (userdata file) are populated, use that file to provision the VPX instance.
Network configuration
As part of network configuration, the VPX instance reads:
- Management IP address
- Network mask
- Default gateway
After the parameters are successfully read, they are populated in the NetScaler® configuration, to allow managing the instance remotely. If the parameters are not read successfully or the config drive is not available, the instance transitions to the default behavior, which is:
- The instance attempts to retrieve the IP address information from DHCP.
- If DHCP fails or times-out, the instance comes up with default network configuration (192.168.100.1/16).
Customer script
The VPX instance allows to execute a custom script during initial provisioning. The appliance supports script of type Shell, Perl, Python, and Citrix ADC CLI commands.
SSH key pair authentication
The VPX instance copies public key, available within the configuration drive as part of instance meta data, into its “authorized_keys” file. This allows the user to access the instance with private key.
Note:
When an SSH key is provided, the default credentials (nsroot/nsroot) no longer work. If password-based access is needed, log on with the respective SSH private key and manually set a password.
Before you begin
Before you provision a VPX instance on OpenStack environment, extract the .qcow2 file from the .tgz file and build
an OpenStack image from the qcow2 image. Follow these steps:
1. Extract the. qcow2 file from the .tqz file by typing the following command.
tar xvzf <TAR file>

tar xvzf <NSVPX-KVM-12.0-26.2_nc.tgz>
NSVPX-KVM.xml
NSVPX-KVM-12.0-26.2_nc.qcow2
2. Build an OpenStack image using the .qcoz2 file extracted in step 1 by typing the following command.
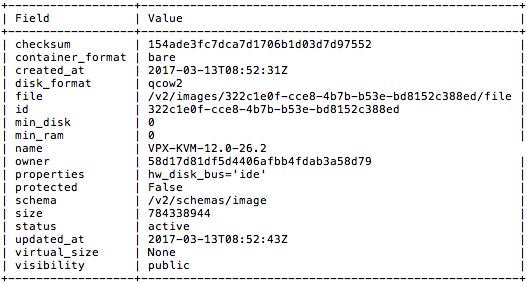
openstack image create --container-format bare --property hw_disk_bus=ide --disk-format qcow2 --file <path to qcow2 file> --public <name of the OpenStack image>

glance image-create --name="NS-VPX-12-0-26-2" --property hw_disk_bus=ide --ispublic=
true --container-format=bare --disk-format=qcow2< NSVPX-KVM-12.0-26.2_nc.qcow2
Figure 1: The following illustration provides a sample output for the glance image-create command.
Provisioning the VPX instance
You can provision a VPX instance in two ways by using one of the options:
- Horizon (OpenStack dashboard)
- Nova boot command (OpenStack CLI)
Provision a VPX instance by using the OpenStack dashboard
Follow these steps to provision the VPX instance by using Horizon:
- Log on to the OpenStack dashboard.
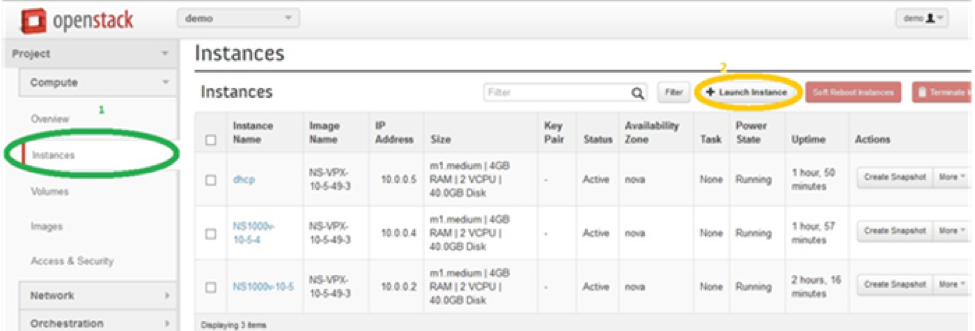
- In the Project panel on the left hand side of the dashboard, select Instances.
- In the Instances panel, click Launch Instance to open the Instance Launching wizard.
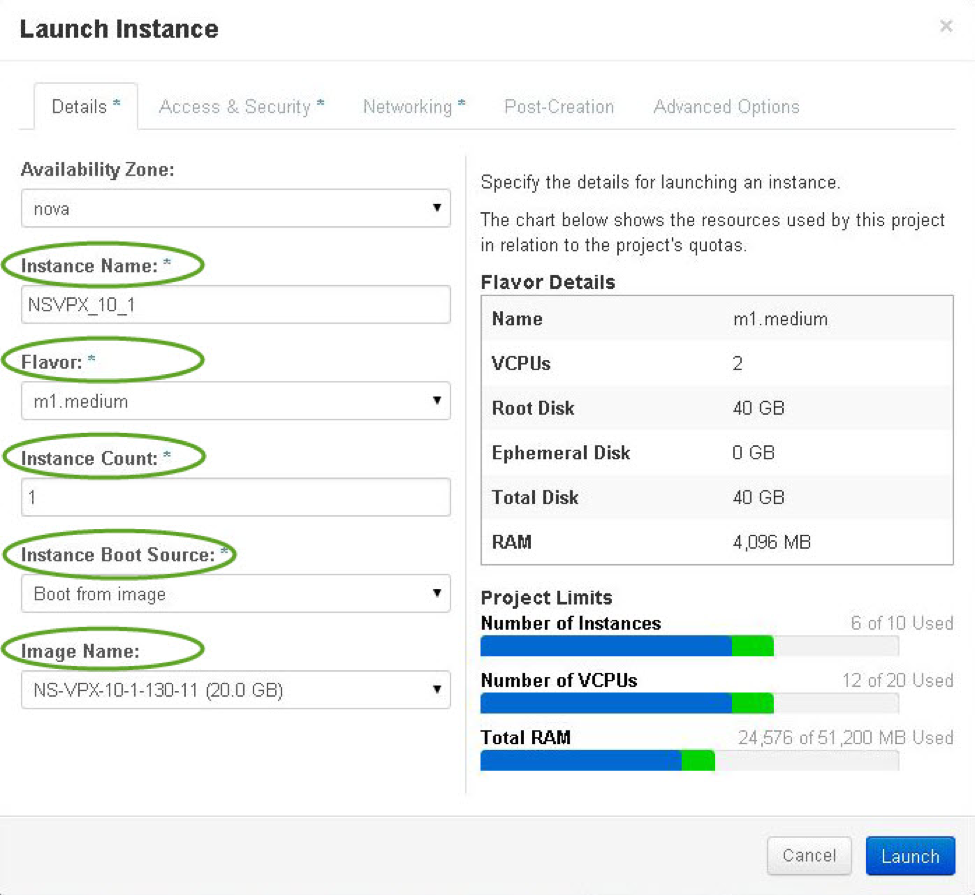
4. In the Launch Instance wizard, fill in the details, like:
- Instance Name
- Instance Flavor
- Instance Count
- Instance Boot Source
- Image Name
5. Deploy a new key pair or an existing key pair through Horizon by completing the following steps:
a) If you don’t have an existing key pair, create the key by using any existing mechanisms. If you’ve an existing key, skip this step.
b) Copy the content of public key.
c) Go to Horizon > Instances > Create New Instances.
d) Click Access & Security.
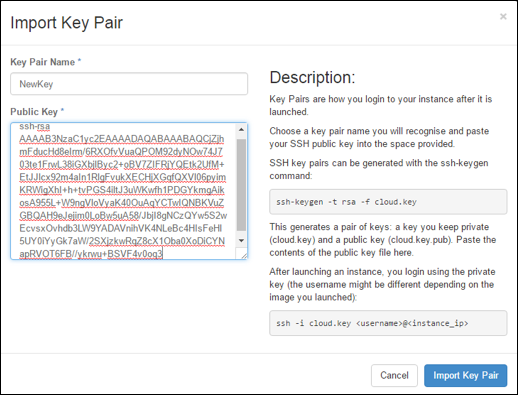
e) Click the + sign next to the Key Pair drop-down menu and provide values for shown parameters.
f) Paste public key content in Public key box, give a name to the key and click Import Key Pair.
6. Click the Post Creation tab in the wizard. In Customization Script, add the content of the userdata file. The userdata file contains the IP address, Netmask and Gateway details, and customer scripts of the VPX instance.
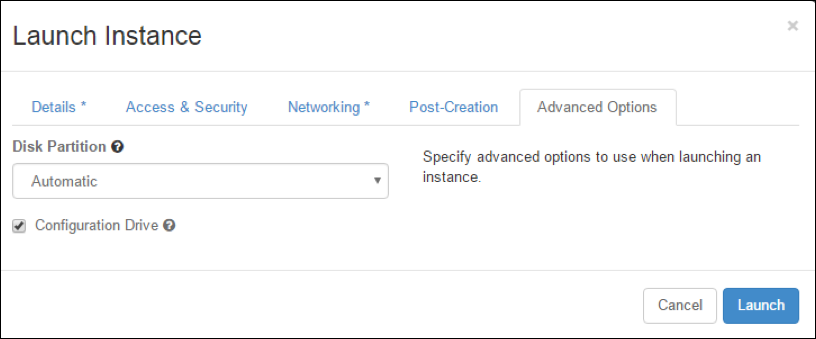
7. After a key pair is selected or imported, check config-drive option and click Launch.
Provision the VPX instance by using OpenStack CLI
Follow these steps to provision a VPX instance by using OpenStack CLI.
1. To create an image from qcow2, type the following command:
openstack image create --container-format bare --property hw_disk_bus=ide --diskformat qcow2 --file NSVPX-OpenStack.qcow2 --public VPX-ToT-Image
2. To select an image for creating an instance, type the following command:
openstack image list | more
3. To create an instance of a particular flavor, type the following command to choose a flavor ID/Name of from a list:
openstack flavor list
4. To attach a NIC to a particular network, type the following command to choose a network ID from a network list:
openstack network list
5. To create an instance, type the following command:
openstack server create --flavor FLAVOR_ID --image IMAGE_ID --key-name KEY_NAME
--user-data USER_DATA_FILE_PATH --config-drive True --nic net-id=net-uuid
INSTANCE_NAME
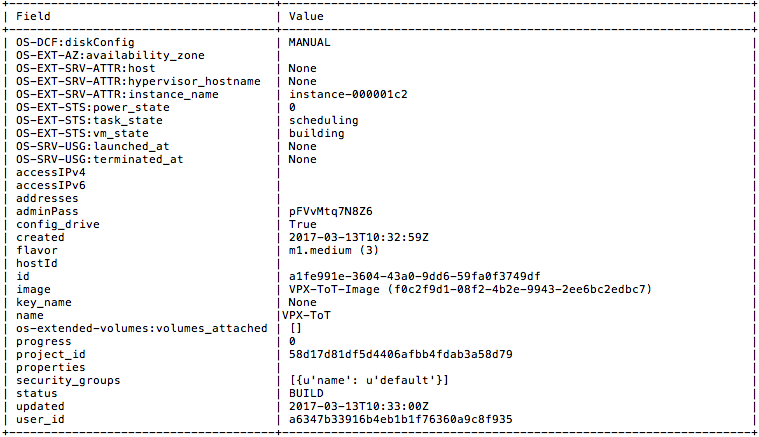
openstack server create --image VPX-ToT-Image --flavor m1.medium --user-data
ovf.xml --config-drive True --nic net-id=2734911b-ee2b-48d0-a1b6-3efd44b761b9
VPX-ToT
Figure 2: The following illustration provides a sample output.
