Configure Microsoft Entra ID as SAML IdP and NetScaler as SAML SP
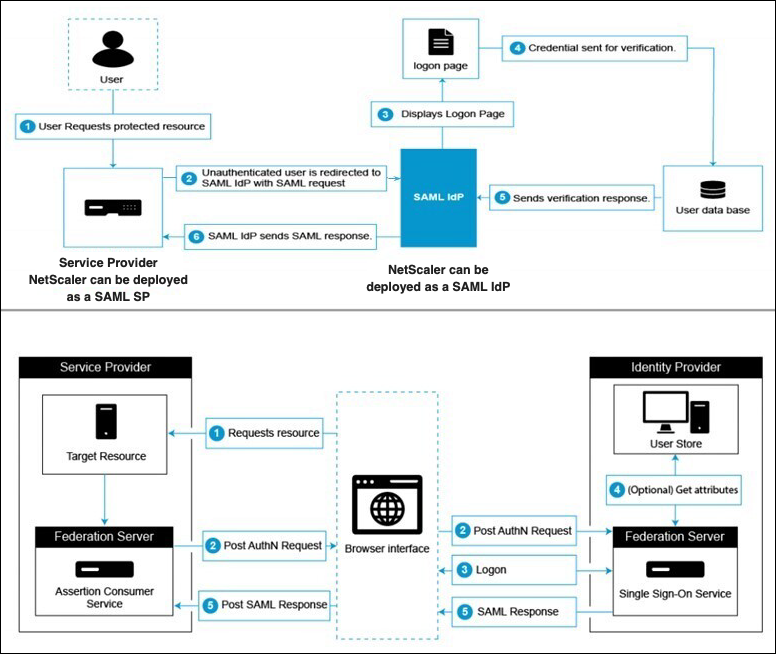
The SAML service provider (SAML SP) is a SAML entity that is deployed by the service provider. When a user tries to access a protected application, the SP evaluates the client request. If the client is unauthenticated (does not have a valid NSC_TMAA or NSC_TMAS cookie), the SP redirects the request to the SAML identity provider (IdP). The SP also validates SAML assertions that are received from the IdP.
The SAML identity provider (SAML IdP) is a SAML entity that is deployed on the customer network. The IdP receives requests from the SAML SP and redirects users to a logon page, where they must enter their credentials. The IdP authenticates these credentials with the user directory (external authentication server, such as LDAP) and then generates a SAML assertion that is sent to the SP. The SP validates the token, and the user is then granted access to the requested protected application.
The following diagram depicts the SAML authentication mechanism.

Microsoft Entra ID side configurations
Configure single sign-on settings:
-
On the Azure portal, click Azure Active Directory.
-
Under the Manage section in the navigation pane, click Enterprise Applications. A random sample of the applications in your Microsoft Entra ID (formerly Azure AD) tenant appears.
-
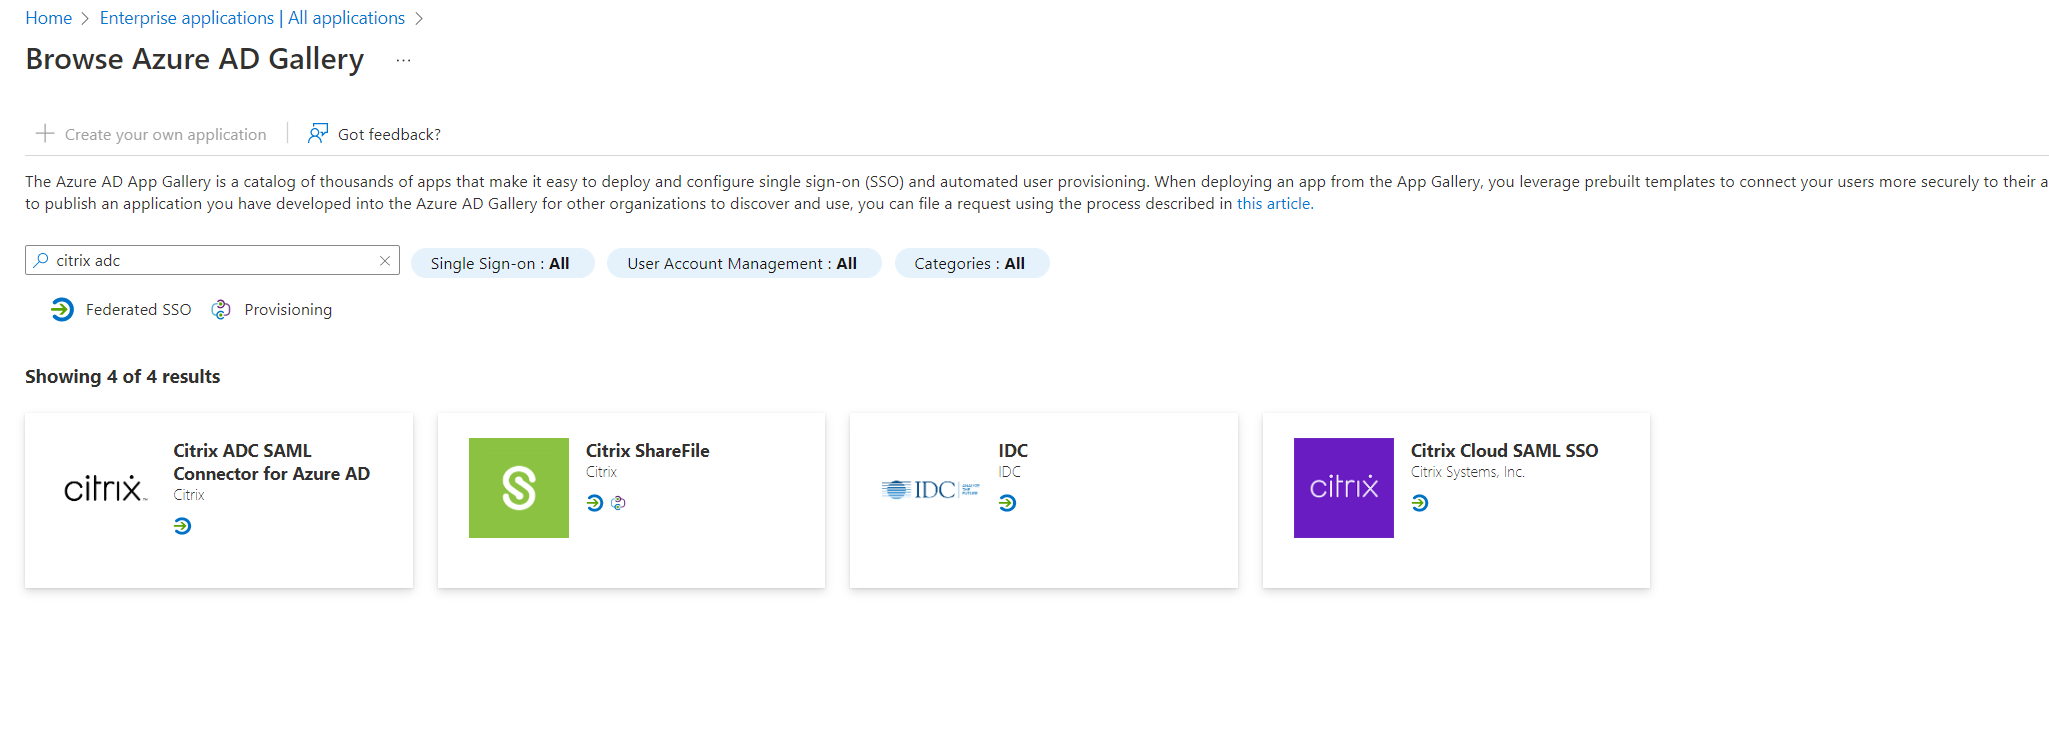
In the search bar, enter NetScaler SAML Connector for Azure AD.

-
Under the Manage section, select Single sign-on.
-
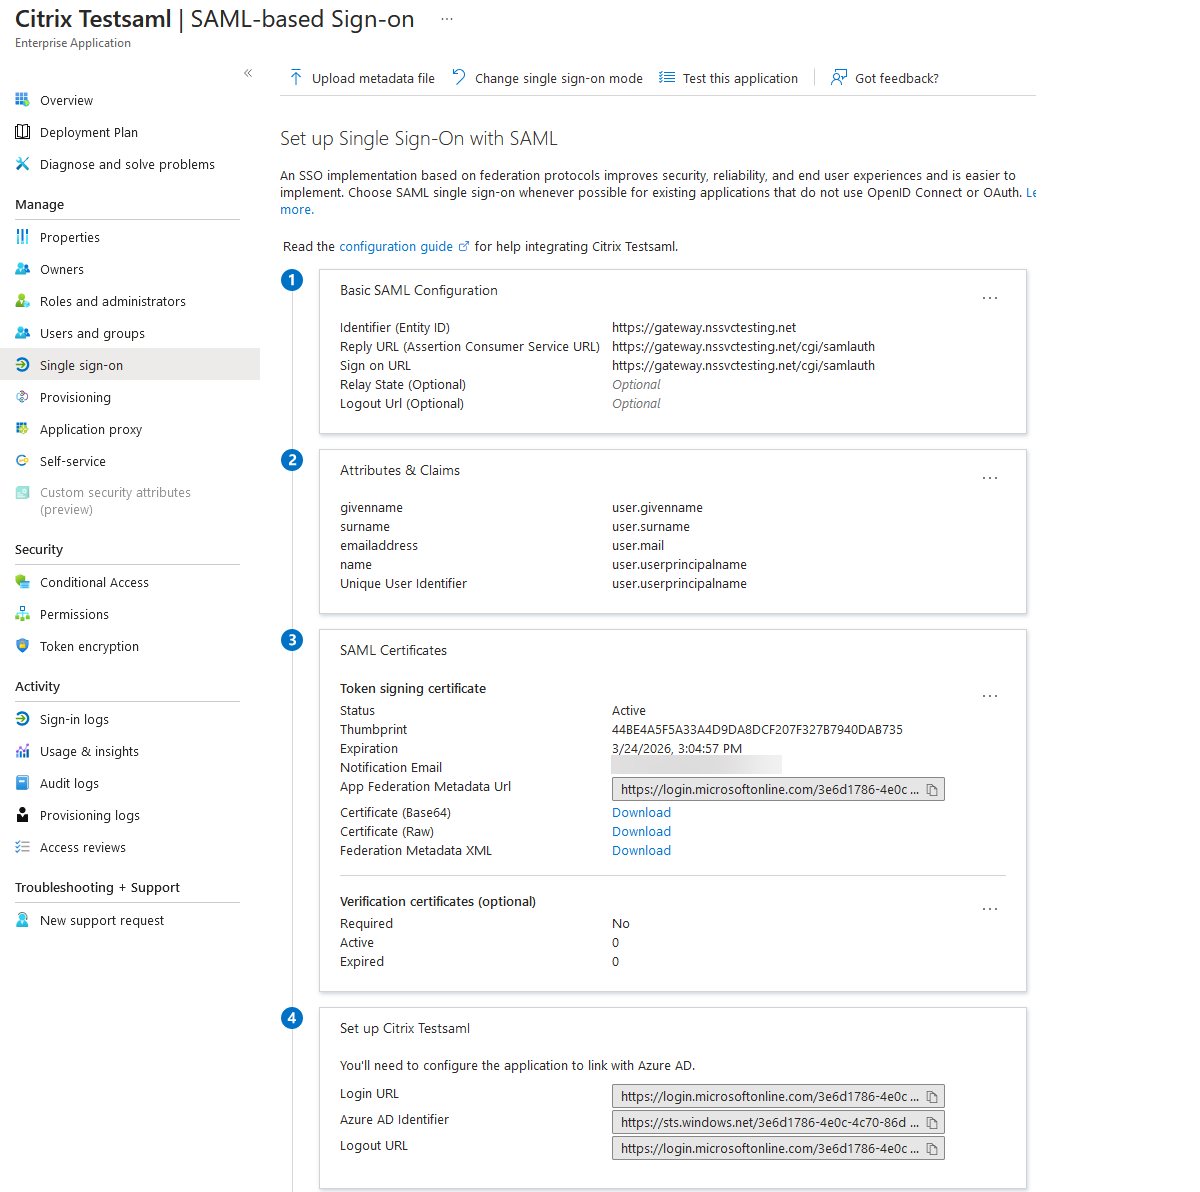
Select SAML to configure the single sign-on. The Set up Single Sign-On with SAML - Preview page appears. Here, Azure is acting as a SAML IdP.
-
Configure basic SAML options:
Identifier (Entity ID) - Required for some apps. Uniquely identifies the application for which the single sign-on is being configured. Microsoft Entra ID sends the identifier to the application as the audience parameter of the SAML token. The application is expected to validate it. This value also appears as the Entity ID in any SAML metadata provided by the application.
Reply URL - Mandatory. Specifies where the application expects to receive the SAML token. The reply URL is also referred as the Assertion Consumer Service (ACS) URL. Specify the reply URL in the format
http(s)://<SP_URL>/cgi/samlauth.Sign-on URL - When a user opens this URL, the service provider redirects to Microsoft Entra ID to authenticate and sign on the user.
Relay State - Specifies to the application where to redirect the user after the authentication is complete.
-
Download the certificate (Base64) from the SAML Certificates section. The certificate is used as samlidPCertName while configuring NetScaler as SAML SP.

-
Once the Microsoft Entra ID side configuration is completed, add users and user groups that are permitted to access the application. Navigate to the Users and groups tab and click +Add user/group.

NetScaler side configurations
-
Create a SAML action.
-
Navigate to NetScaler® Gateway > Policies > Authentication > SAML.
-
On the Policies tab, click Add.
-
In the Name field, specify a policy name.
-
Click the Add button next to Server, enter values for the following parameters, and click Create.
Parameter description:
The value for Redirect URL and IDP Certificate Name parameters must be taken from the Azure side configurations.
-
Name: Name of the server.
-
Export SAML Metadata: Click this link if you want to export the metadata of the SAML profile to a NetScaler Gateway VPN virtual server.
-
Import Metadata: This option imports the SAML metadata. This option is enabled by default.
-
If the Import Metadata option is disabled, enter the values for the following parameters:
-
Redirect URL: Enter the login URL used previously in the Microsoft Entra ID “Setup NetScaler” section. For example,
https://login.microsoftonline.com/3e6d1786-4e0c-4c70-86d2-ae7811f97f79/saml2. -
Single Logout URL: URL on IdP to which logoutRequest is sent on NetScaler session cleanup. For example,
https://login.microsoftonline.com/3e6d1786-4e0c-4c70-86d2-ae7811f97f79/saml2. -
SAML Binding: A mechanism that is used to transport SAML requestor and responder messages between the SP and IdP. When NetScaler acts as an SP, it supports POST, REDIRECT, and ARTIFACT bindings. The default binding method is POST.
-
Logout Binding: Specifies the transport mechanism of SAML logout messages. The default binding mechanism is POST.
-
IDP Certificate Name: IdPCert Certificate (Base64) present in the SAML Certificates section.
 add ssl certkey <IDP-CERT-NAME> -cert <Name-of-the-IdP-certificate-downloaded-above>
 <!--NeedCopy-->
-
-
-
User Field: The “userprincipalName” taken from the “User Attributes and Claims” section of Azure IdP.
-
Signing Certificate Name: Not needed for Microsoft Entra ID. Select the SAML SP certificate (with private key) that NetScaler uses to sign authentication requests to the IdP. The same certificate (without private key) must be imported to the IdP, so that the IdP can verify the authentication request signature. This field is not needed for most IdPs.
-
Issuer Name: Entity ID or the identifier.
https://gateway.nssvctesting.netin this case. In a load balancing deployment scenario, you must use the FQDN of the load balancing virtual server. -
Reject Unsigned Assertion: Option that you can specify if you require the assertions from the IdP to be signed. The default option is ON.
-
Audience: Audience for which the assertion sent by IdP is applicable. This parameter is typically an entity name or URL that represents the service provider.
-
Signature Algorithm: Algorithm to be used to sign or verify SAML transactions. The default value is RSA-SHA256.
-
Digest Method: Algorithm to be used to compute or verify digest for SAML transactions. The default value is SHA256.
-
Default Authentication Group: The default group that is chosen when the authentication succeeds in addition to the extracted groups.
-
Group Name Field: Name of the tag in an assertion that contains user groups.
-
Skew Time (mins)” This option specifies the clock skew in minutes that the NetScaler service provider allows on an incoming assertion. For example, if you set the skew time to 10 minutes at 16:00, the SAML assertion is valid from 15:50 to 16:10 - 20 minutes in total. The default skew time is 5 minutes.
-
Two Factor: This parameter enables the second factor after SAML. Default value: OFF.
-
Requested Authentication Context: This parameter specifies the authentication context requirements of authentication statements returned in the response. Default value: Exact.
-
Authentication Class Types: This parameter specifies the authentication class types that are requested from IdP. The default value is none.
-
Send Thumbprint: This parameter is used to send thumbprint instead of x509 certificate in SAML request. This option is disabled by default.
-
Enforce Username: This parameter is used to choose whether the user name that is extracted from the SAML assertion can be edited in the login page while doing the second factor. This option is enabled by default.
-
Force Authentication: This parameter forces authentication at the IdP that receives NetScaler’s request. This option is disabled by default
-
Store SAML Response: This parameter is used to store the entire SAML response through the life of the user session. This option is disabled by default.
-
-
-
Create a corresponding SAML policy for the SAML action.
-
Navigate to Security > AAA - Application Traffic > Policies > Authentication > Advanced Policies > Policy and click Add.
-
On the Create Authentication Policy page, provide the following details:
-
Name: Specify a name for the SAML policy.
-
Action Type: Select SAML as the authentication action type.
-
Action: Select the SAML server profile to bind the SAML policy with.
-
Expression: Displays the name of the rule or expression that the SAML policy uses to determine if the user must authenticate with the SAML server. On the text box, set the value “rule = true” for the SAML policy to take effect and the corresponding SAML action to be run.
-
-
-
Bind the SAML policy to the VPN virtual server and link the VPN virtual server to the authentication virtual server through an authentication profile. For details on the binding procedure, see Bind the authentication policy.
Notes:
Microsoft Entra ID does not expect the Subject ID field in the SAML request.
For NetScaler to not send the Subject ID field, type the following command on the NetScaler CLI.
nsapimgr_wr.sh -ys call="ns_saml_dont_send_subject"This command is only applicable in nFactor authentication workflows.Add
nsapimgr_wr.sh -ys call="ns_saml_dont_send_subject"command in the /nsconfig/rc.netscaler file for persistency and also to take effect upon rebooting.