-
Getting Started with NetScaler
-
Deploy a NetScaler VPX instance
-
Optimize NetScaler VPX performance on VMware ESX, Linux KVM, and Citrix Hypervisors
-
Apply NetScaler VPX configurations at the first boot of the NetScaler appliance in cloud
-
Configure simultaneous multithreading for NetScaler VPX on public clouds
-
Install a NetScaler VPX instance on Microsoft Hyper-V servers
-
Install a NetScaler VPX instance on Linux-KVM platform
-
Prerequisites for installing NetScaler VPX virtual appliances on Linux-KVM platform
-
Provisioning the NetScaler virtual appliance by using OpenStack
-
Provisioning the NetScaler virtual appliance by using the Virtual Machine Manager
-
Configuring NetScaler virtual appliances to use SR-IOV network interface
-
Configuring NetScaler virtual appliances to use PCI Passthrough network interface
-
Provisioning the NetScaler virtual appliance by using the virsh Program
-
Provisioning the NetScaler virtual appliance with SR-IOV on OpenStack
-
Configuring a NetScaler VPX instance on KVM to use OVS DPDK-Based host interfaces
-
-
Deploy a NetScaler VPX instance on AWS
-
Deploy a VPX high-availability pair with elastic IP addresses across different AWS zones
-
Deploy a VPX high-availability pair with private IP addresses across different AWS zones
-
Protect AWS API Gateway using the NetScaler Web Application Firewall
-
Configure a NetScaler VPX instance to use SR-IOV network interface
-
Configure a NetScaler VPX instance to use Enhanced Networking with AWS ENA
-
Deploy a NetScaler VPX instance on Microsoft Azure
-
Network architecture for NetScaler VPX instances on Microsoft Azure
-
Configure multiple IP addresses for a NetScaler VPX standalone instance
-
Configure a high-availability setup with multiple IP addresses and NICs
-
Configure a high-availability setup with multiple IP addresses and NICs by using PowerShell commands
-
Deploy a NetScaler high-availability pair on Azure with ALB in the floating IP-disabled mode
-
Configure a NetScaler VPX instance to use Azure accelerated networking
-
Configure HA-INC nodes by using the NetScaler high availability template with Azure ILB
-
Configure a high-availability setup with Azure external and internal load balancers simultaneously
-
Configure a NetScaler VPX standalone instance on Azure VMware solution
-
Configure a NetScaler VPX high availability setup on Azure VMware solution
-
Deploy NetScaler GSLB on Azure
-
Configure address pools (IIP) for a NetScaler Gateway appliance
-
Deploy a NetScaler VPX instance on Google Cloud Platform
-
Deploy a VPX high-availability pair on Google Cloud Platform
-
Deploy a VPX high-availability pair with external static IP address on Google Cloud Platform
-
Deploy a single NIC VPX high-availability pair with private IP address on Google Cloud Platform
-
Deploy a VPX high-availability pair with private IP addresses on Google Cloud Platform
-
Install a NetScaler VPX instance on Google Cloud VMware Engine
-
-
Solutions for Telecom Service Providers
-
Load Balance Control-Plane Traffic that is based on Diameter, SIP, and SMPP Protocols
-
Provide Subscriber Load Distribution Using GSLB Across Core-Networks of a Telecom Service Provider
-
Authentication, authorization, and auditing application traffic
-
Basic components of authentication, authorization, and auditing configuration
-
Web Application Firewall protection for VPN virtual servers and authentication virtual servers
-
On-premises NetScaler Gateway as an identity provider to Citrix Cloud
-
Authentication, authorization, and auditing configuration for commonly used protocols
-
Troubleshoot authentication and authorization related issues
-
-
-
-
-
-
Persistence and persistent connections
-
Advanced load balancing settings
-
Gradually stepping up the load on a new service with virtual server–level slow start
-
Protect applications on protected servers against traffic surges
-
Retrieve location details from user IP address using geolocation database
-
Use source IP address of the client when connecting to the server
-
Use client source IP address for backend communication in a v4-v6 load balancing configuration
-
Set a limit on number of requests per connection to the server
-
Configure automatic state transition based on percentage health of bound services
-
-
Use case 2: Configure rule based persistence based on a name-value pair in a TCP byte stream
-
Use case 3: Configure load balancing in direct server return mode
-
Use case 6: Configure load balancing in DSR mode for IPv6 networks by using the TOS field
-
Use case 7: Configure load balancing in DSR mode by using IP Over IP
-
Use case 10: Load balancing of intrusion detection system servers
-
Use case 11: Isolating network traffic using listen policies
-
Use case 12: Configure Citrix Virtual Desktops for load balancing
-
Use case 13: Configure Citrix Virtual Apps and Desktops for load balancing
-
Use case 14: ShareFile wizard for load balancing Citrix ShareFile
-
Use case 15: Configure layer 4 load balancing on the NetScaler appliance
-
-
-
-
Authentication and authorization for System Users
-
-
Configuring a CloudBridge Connector Tunnel between two Datacenters
-
Configuring CloudBridge Connector between Datacenter and AWS Cloud
-
Configuring a CloudBridge Connector Tunnel Between a Datacenter and Azure Cloud
-
Configuring CloudBridge Connector Tunnel between Datacenter and SoftLayer Enterprise Cloud
-
Configuring a CloudBridge Connector Tunnel Between a NetScaler Appliance and Cisco IOS Device
-
CloudBridge Connector Tunnel Diagnostics and Troubleshooting
This content has been machine translated dynamically.
Dieser Inhalt ist eine maschinelle Übersetzung, die dynamisch erstellt wurde. (Haftungsausschluss)
Cet article a été traduit automatiquement de manière dynamique. (Clause de non responsabilité)
Este artículo lo ha traducido una máquina de forma dinámica. (Aviso legal)
此内容已经过机器动态翻译。 放弃
このコンテンツは動的に機械翻訳されています。免責事項
이 콘텐츠는 동적으로 기계 번역되었습니다. 책임 부인
Este texto foi traduzido automaticamente. (Aviso legal)
Questo contenuto è stato tradotto dinamicamente con traduzione automatica.(Esclusione di responsabilità))
This article has been machine translated.
Dieser Artikel wurde maschinell übersetzt. (Haftungsausschluss)
Ce article a été traduit automatiquement. (Clause de non responsabilité)
Este artículo ha sido traducido automáticamente. (Aviso legal)
この記事は機械翻訳されています.免責事項
이 기사는 기계 번역되었습니다.책임 부인
Este artigo foi traduzido automaticamente.(Aviso legal)
这篇文章已经过机器翻译.放弃
Questo articolo è stato tradotto automaticamente.(Esclusione di responsabilità))
Translation failed!
Deploy NetScaler GSLB on Azure
With the increasing demand, businesses running an on-prem data center serving regional customers want to scale and deploy across globally using Azure cloud. With NetScaler on the network administrator’s side, you can use the GSLB StyleBook to configure applications both on-prem and in the cloud. You can transfer the same configuration to the cloud with NetScaler ADM. You can reach either on-prem or cloud resources depending on proximity with GSLB. This allows you have seamless experience no matter where the you are located in the world.
DBS overview
NetScaler GSLB supports using Domain-Based Services (DBS) for Cloud load balancers. This allows for the auto-discovery of dynamic cloud services using a cloud load balancer solution. This configuration allows the NetScaler to implement GSLB DBS in an Active-Active environment. DBS allows the scaling of back end resources in Microsoft Azure environments from DNS discovery. This section covers integration between NetScalers in the Azure Autoscale environment.
Domain name-based services using Azure load balancer (ALB)
GLSB DBS utilizes the FQDN of the user ALB to dynamically update the GSLB service groups to include the back-end servers that are being created and deleted within Azure. To configure this feature, the user points the Citrix ADC to their ALB to dynamically route to different servers in Azure. They can do this without having to manually update the Citrix ADC every time an instance is created and deleted within Azure. The Citrix ADC DBS feature for GSLB service groups uses DNS-aware service discovery to determine the member service resources of the DBS namespace identified in the autoscale group.
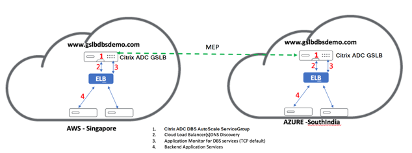
The following image depicts the NetScaler GSLB DBS autoscale components with cloud load balancers:
Azure GSLB prerequisites
The prerequisites for the NetScaler GSLB service groups include a functioning Microsoft Azure environment with the knowledge and ability to configure security groups, Linux Web Servers, NetScaler appliances within AWS, Elastic IPs, and Elastic load balancers (ELB).
-
GSLB DBS Service integration requires NetScaler version 12.0.57 for Microsoft Azure load balancer instances.
-
GSLB service group entity: NetScaler version 12.0.57.
-
GSLB service group is introduced which supports autoscale using DBS dynamic discovery.
-
DBS Feature Components (domain-based service) must be bound to the GSLB service group.
Example:
```
> add server sydney_server LB-Sydney-xxxxxxxxxx.ap-southeast-2.elb.amazonaws.com
> add gslb serviceGroup sydney_sg HTTP -autoscale DNS -siteName sydney
> bind gslb serviceGroup sydney_sg sydney_server 80
<!--NeedCopy--> ```
Configure Azure components
-
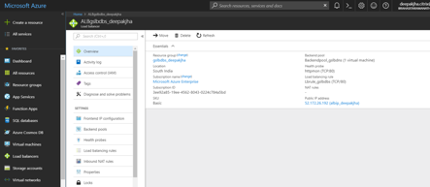
Log in to the user Azure Portal and create a new virtual machine from a NetScaler template.
-
Create an Azure load balancer.
-
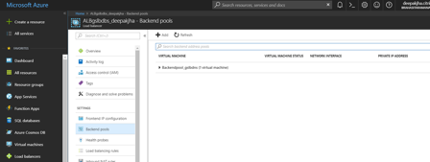
Add the created NetScaler back-end pools.
-
Create a health probe for port 80.
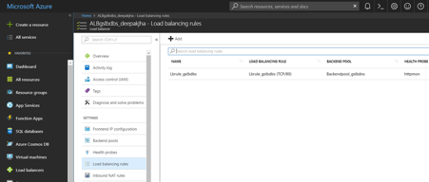
Create a load balancing rule utilizing the front-end IP created from the load balancer.
-
Protocol: TCP
-
Back-end Port: 80
-
Back-end pool: NetScaler created in step 1
-
Health Probe: Created in step 4
-
Session Persistence: None
-
Configure NetScaler GSLB domain-based service
The following configurations summarize what is required to enable domain-based services for autoscaling ADCs in a GSLB enabled environment.
Traffic management configurations
Note:
It is required to configure the NetScaler with either a nameserver or a DNS virtual server through which the ELB /ALB Domains are resolved for the DBS Service Groups. For more information on name servers or DNS virtual servers, see: DNS nameServer
-
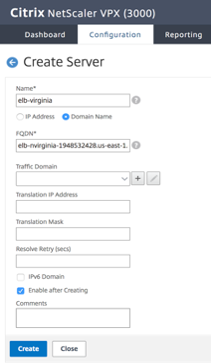
Navigate to Traffic Management > Load Balancing > Servers.
-
Click Add to create a server, provide a name and FQDN corresponding to the A record (domain name) in Azure for the ALB.
-
Repeat step 2 to add the second ALB from the second resource in Azure.
GSLB configurations
-
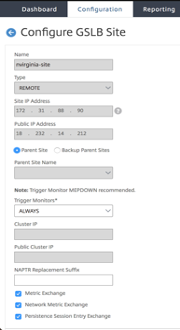
Click the Add button to configure a GSLB site.
-
Specify the details for configuring the GSLB site
Name the site. Type is configured as remote or local based on which NetScaler you are configuring the site on. The site IP address is the IP address for the GSLB site. The GSLB site uses this IP address to communicate with the other GSLB sites. The public IP address is required when using a cloud service where a particular IP address is hosted on an external firewall or NAT device. The site should be configured as a parent site. Ensure that the Trigger Monitors are set to ALWAYS. Also, be sure to check the three boxes at the bottom for Metric Exchange, Network Metric Exchange, and Persistence Session Entry Exchange.
We recommend you set the Trigger monitor to MEPDOWN. For more information, see Configure a GSLB Service Group.
-
Click Create.
-
Navigate to Traffic Management > GSLB > Service Groups.
-
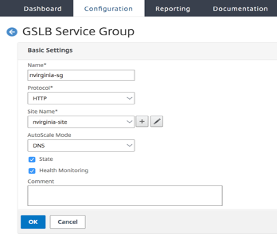
Click Add to add a service group.
-
Specify the details to configure the service group
Name the Service Group, use the HTTP protocol. Under Site Name choose the respective site that you created. Be sure to configure autoscale Mode as DNS and check off the boxes for State and Health Monitoring. Click OK to create the Service Group.
-
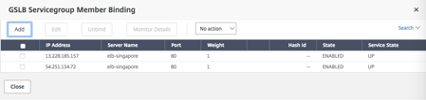
Click Service Group Members and select Server Based. Select the respective ELB that was configured in the start of the run guide. Configure the traffic to go over port 80. Click Create.
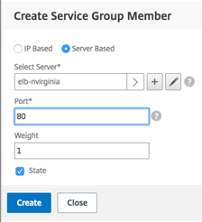
The service group member binding should populate with 2 instances that it is receiving from the ELB.
-
Repeat steps 5 & 6 to configure the service group for the second resource location in Azure. (This can be done from the same NetScaler GUI).
-
To set up a GSLB virtual server. Navigate to Traffic Management > GSLB > Virtual Servers.
- Click Add to create the virtual server.
-
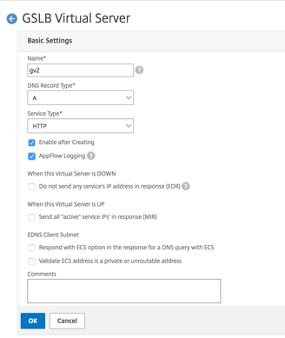
Specify the details to configure the GSLB virtual server.
Name the server, DNS Record Type is set as A, Service Type is set as HTTP, and check the boxes for Enable after Creating and AppFlow Logging. Click OK to create the GSLB Virtual Server.
-
Once the GSLB virtual server is created, click No GSLB Virtual Server ServiceGroup Binding.
-
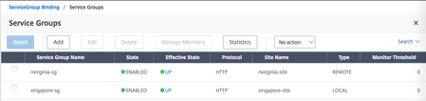
Under ServiceGroup Binding use Select Service Group Name to select and add the service groups that were created in the previous steps.
-
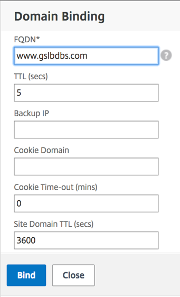
Configure the GSLB virtual server domain binding by clicking No GSLB Virtual Server Domain Binding. Configure the FQDN and bind. Retain default setting for other parameters.
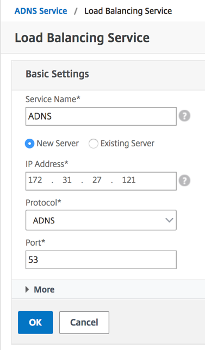
- Configure the ADNS Service by clicking No Service.
-
Specify the details to configure load balancing service.
Add a Service Name, click New Server, and enter the IP Address of the ADNS server. If the user ADNS is already configured, users can select Existing Server and then choose the user ADNS from the drop-down menu. Make sure that the protocol is ADNS and the traffic is configured to flow over port 53.
-
Configure the Method as Least Connection and the Backup Method as Round Robin.
-
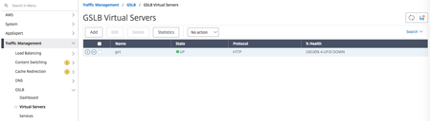
Click Done and verify that the user GSLB virtual server is shown as Up.
Other resources
NetScaler Global Load Balancing for Hybrid and Multi-Cloud Deployments
Share
Share
This Preview product documentation is Cloud Software Group Confidential.
You agree to hold this documentation confidential pursuant to the terms of your Cloud Software Group Beta/Tech Preview Agreement.
The development, release and timing of any features or functionality described in the Preview documentation remains at our sole discretion and are subject to change without notice or consultation.
The documentation is for informational purposes only and is not a commitment, promise or legal obligation to deliver any material, code or functionality and should not be relied upon in making Cloud Software Group product purchase decisions.
If you do not agree, select I DO NOT AGREE to exit.