Deploy a NetScaler VPX instance on the Google Cloud Platform
You can deploy a NetScaler VPX instance on the Google Cloud Platform (GCP). A VPX instance in GCP enables you to take advantage of GCP cloud computing capabilities and use Citrix load balancing and traffic management features for your business needs. You can deploy VPX instances in GCP as standalone instances. Both single NIC and multi NIC configurations are supported.
Supported GCP machine type families
| Machine type family | Minimum machine type |
|---|---|
| General Purpose Machines | e2-medium, e2-standard-2, e2-highmem-2, n1-standard-2, n1-highmem-2, n2-standard-2, n2-highmem-2, n2d-standard-2, n2d-highmem-2, c3-standard-4, n4-standard-2 |
| Compute-Optimized Machines | c2-standard-4, c2d-standard-2, c2d-highmem-2 |
Note:
N4 and C3 instance types are supported from NetScaler release 14.1-56.x onwards.
Supported features
All Premium, Advanced, and Standard features are supported on the GCP based on the license or version type used.
Limitation
- IPv6 isn’t supported.
Hardware requirements
VPX instance in GCP must have a minimum of 2 vCPUs and 4 GB RAM.
Points to note
Consider the following GCP-specific points before you begin your deployment.
- After creating the instance, you can’t add or remove any network interfaces.
- For a multi-NIC deployment, create separate VPC networks for each NIC. One NIC can be associated with only one network.
- For a single-NIC instance, the GCP console creates a network by default.
- A minimum of 4 vCPUs is required for an instance with more than two network interfaces.
- If IP forwarding is required, you must enable IP forwarding while creating the instance and configuring the NIC.
Scenario: Deploy a multi-NIC, multi-IP standalone NetScaler VPX instance
This scenario illustrates how to deploy a NetScaler VPX standalone instance in GCP. In this scenario, you create a standalone VPX instance with many NICs. The instance communicates with back-end servers (the server farm).
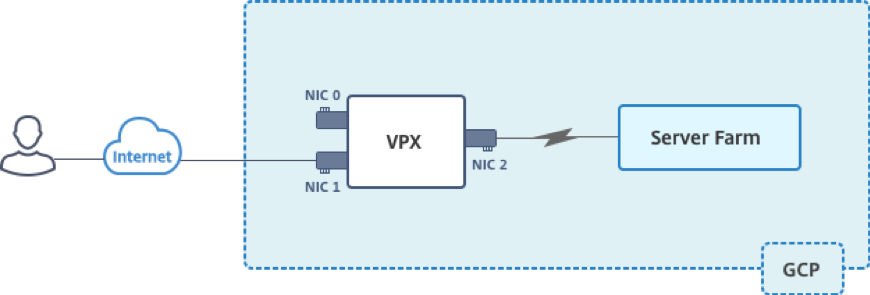
Create three NICs to serve the following purposes.
| NIC | Purpose | Associated with VPC network |
|---|---|---|
| NIC 0 | Serves management traffic (NetScaler IP) | Management network |
| NIC 1 | Serves client-side traffic (VIP) | Client network |
| NIC 2 | Communicates with back-end servers (SNIP) | Back-end server network |
Set up the required communication routes between the following:
- NetScaler VPX instance and the back-end servers.
- NetScaler VPX instance and the external hosts on the public internet.
Summary of deployment steps
- Create three VPC networks for three different NICs.
- Create firewall rules for ports 22, 80, and 443.
- Create an instance with three NICs.
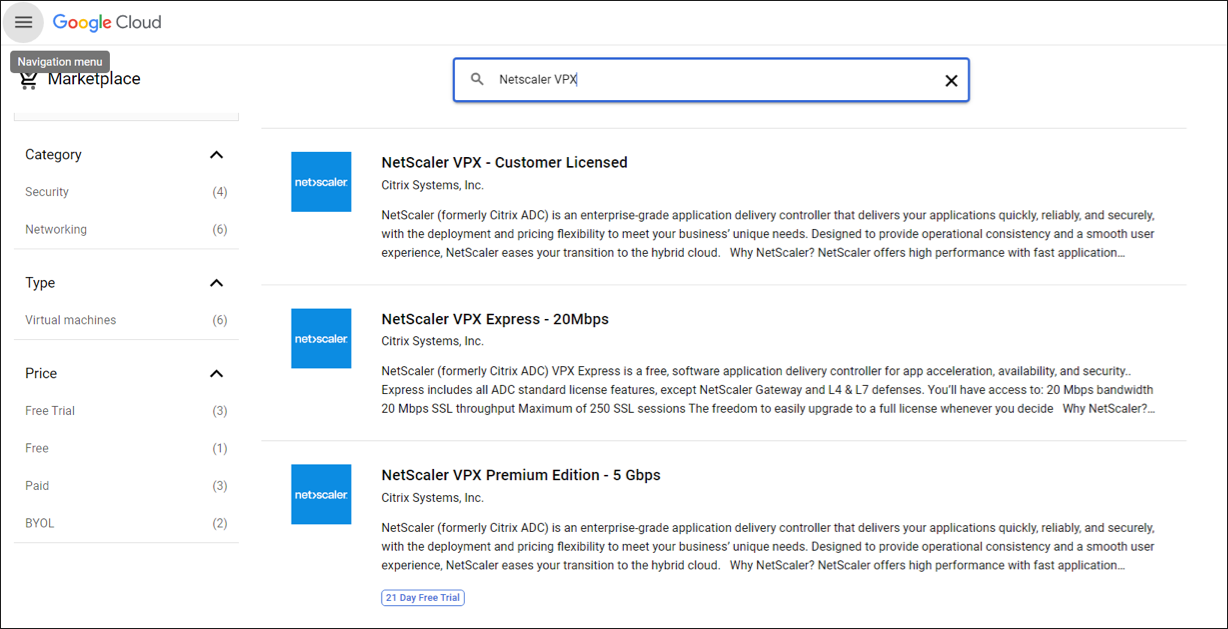
Select the NetScaler VPX instance from the GCP marketplace.
Note:
Create an instance in the same region where you’ve created the VPC networks.
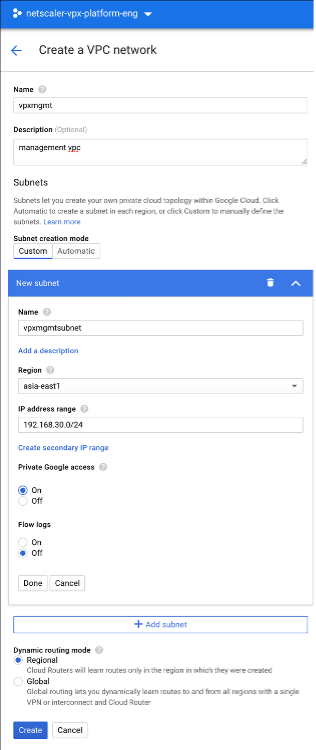
Step 1. Create VPC networks.
Create three VPC networks that are associated with the management NIC, the client NIC, and the server NIC. To create a VPC network, log on to Google console > Networking > VPC network > Create VPC Network. Complete the required fields, as shown in the screen capture, and click Create.
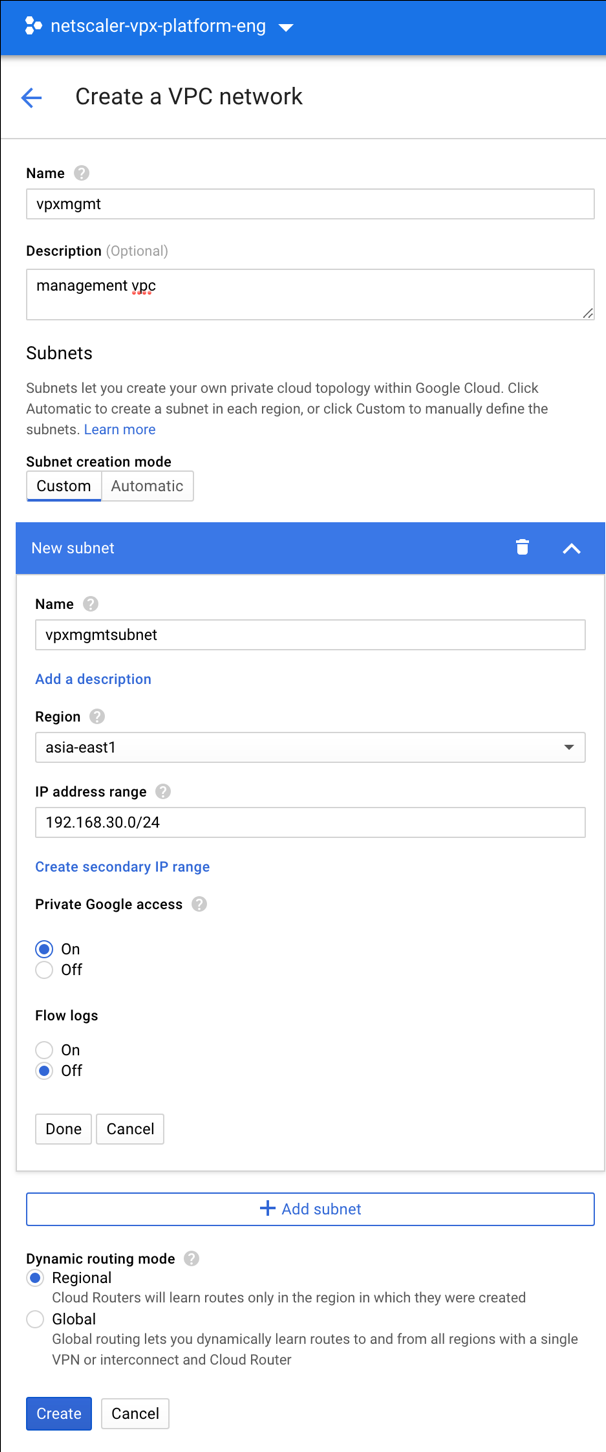
Similarly, create VPC networks for client and server-side NICs.
Note:
All three VPC networks must be in the same region, which is asia-east1 in this scenario.
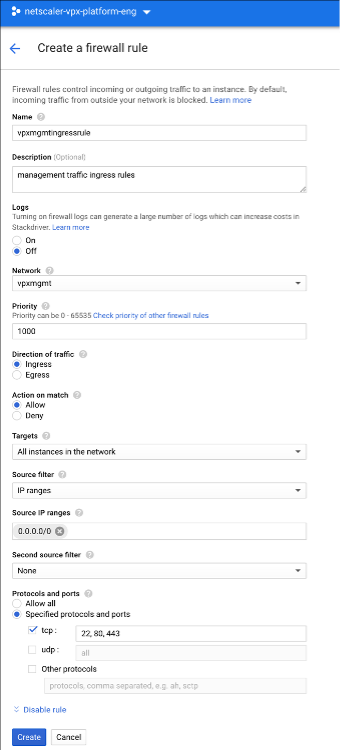
Step 2. Create firewall rules for ports 22, 80, and 443.
Create rules for SSH (port 22), HTTP (port 80), and HTTPS (port 443) for each VPC networks. For more information about firewall rules, see Firewall Rules Overview.

Step 3. Create the VPX instance.
- Log on to the GCP console.
- Navigate to the GCP Marketplace.
-
Select a subscription based on your requirements.
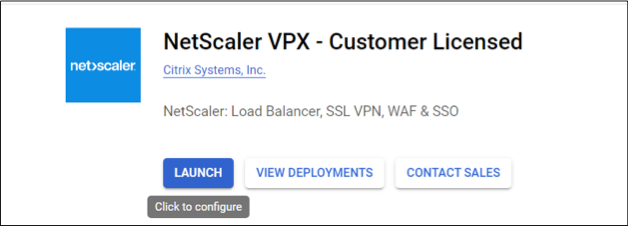
-
Click Launch on the selected subscription.
-
Complete the deployment form and click Deploy.
Note:
Use the VPC Networks created in Step 1.
-
The deployed instance appears under Compute Engine > VM instances.
Use the GCP SSH or the serial console to configure and manage the VPX instance.
Scenario: Deploy a single-NIC, standalone VPX instance
This scenario illustrates how to deploy a NetScaler VPX standalone instance with a single NIC in GCP. The alias IP addresses are used to achieve this deployment.
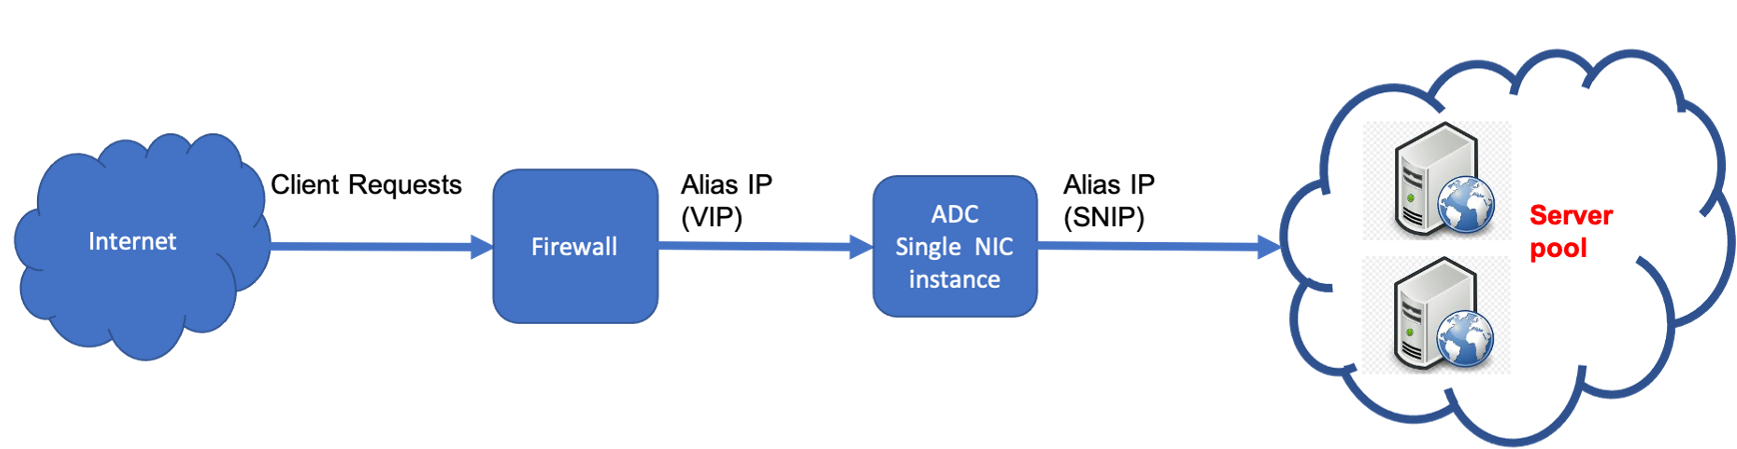
Create a single NIC (NIC0) to serve the following purposes:
- Handle management traffic (NetScaler IP) in the management network.
- Handle client-side traffic (VIP) in the client network.
- Communicate with back-end servers (SNIP) in the back-end server network.
Set up the required communication routes between the following:
- Instance and the back-end servers.
- Instance and the external hosts on the public internet.
Summary of deployment steps
- Create a VPC network for NIC0.
- Create firewall rules for ports 22, 80, and 443.
- Create an instance with a single NIC.
- Add Alias IP addresses to VPX.
- Add VIP and SNIP on VPX.
- Add a load balancing virtual server.
- Add a service or service group on the instance.
- Bind the service or service group to the load balancing virtual server on the instance.
Note:
Create an instance in the same region where you’ve created the VPC networks.
Step 1. Create one VPC network.
Create one VPC network to associate with NIC0.
To create a VPC network, do these steps:
- Log on to GCP console > Networking > VPC network > Create VPC Network
- Complete the required fields, and click Create.
Step 2. Create firewall rules for ports 22, 80, and 443.
Create rules for SSH (port 22), HTTP (port 80), and HTTPS (port 443) for the VPC network. For more information about firewall rules, see Firewall Rules Overview.
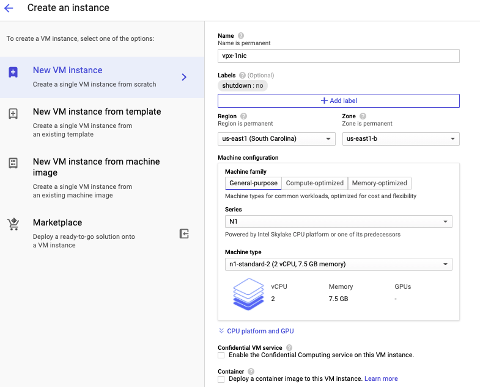
Step 3. Create an instance with single NIC.
To create an instance with a single NIC, do these steps:
- Log on to the GCP console.
- Under Compute, hover over Compute Engine, and select Images.
-
Select the image, and click Create Instance.

-
Select an instance type with two vCPUs (minimum requirement for ADC).
- Click the Networking tab from the Management, security, disks, networking window.
- Under Network interfaces, click the Edit icon to edit the default NIC.
- In the Network interfaces window, under Network, select the VPC network that you created.
- You can create a static external IP address. Under the External IP addresses, click Create IP address.
- In the Reserve a static address window, add a name and description and click Reserve.
- Click Create to create the VPX instance. The new instance appears under VM instances.
Step 4. Add alias IP addresses to the VPX instance.
Assign two alias IP addresses to the VPX instance to use as VIP and SNIP addresses.
Note:
Do not use the primary internal IP address of the VPX instance to configure the VIP or SNIP.
To create an alias IP address, perform these steps:
- Navigate to the VM instance and click Edit.
- In the Network interface window, edit the NIC0 interface.
-
In the Alias IP range field, enter the alias IP addresses.
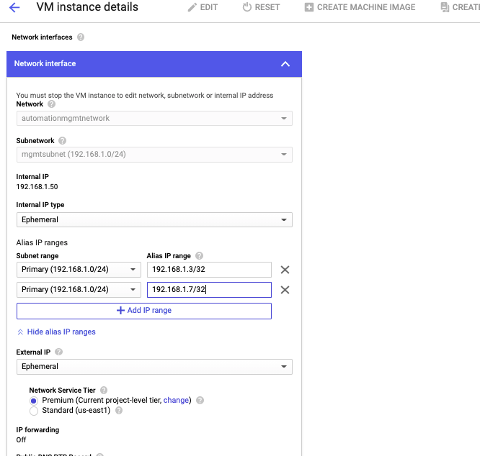
- Click Done, and then Save.
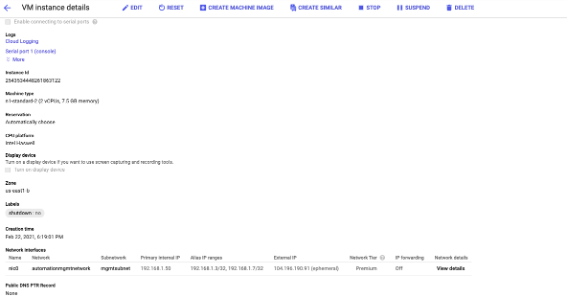
-
Verify the alias IP addresses in the VM instance details page.
Step 5. Add VIP and SNIP on the VPX instance.
On the VPX instance, add a client alias IP address and a server alias IP address.
-
On the NetScaler GUI, navigate to System > Network > IPs > IPv4s, and click Add.
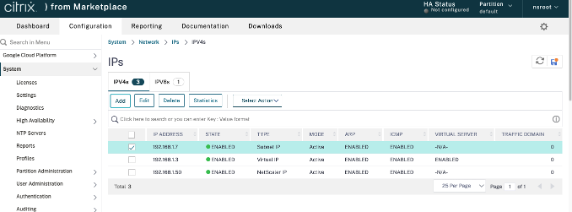
-
To create a client alias IP (VIP) address:
- Enter the client-alias IP address and netmask configured for the VPC subnet in the VM instance.
- In the IP Type field, select Virtual IP from the drop-down menu.
- Click Create.
-
To create a server alias IP (SNIP) address:
- Enter the server-alias IP address and netmask configured for the VPC subnet in the VM instance.
- In the IP Type field, select Subnet IP from the drop-down menu.
- Click Create.
Step 6. Add load balancing virtual server.
- On the NetScaler GUI, navigate to Configuration > Traffic Management > Load Balancing > Virtual Servers, and click Add.
- Add the required values for Name, Protocol, IP Address Type (IP Address), IP Address (client alias IP), and Port.
- Click OK to create the load balancing virtual server.

Step 7. Add a service or service group on the VPX instance.
- From the NetScaler GUI, navigate to Configuration > Traffic Management > Load Balancing > Services, and click Add.
- Add the required values for Service Name, IP Address, Protocol, and Port, and click OK.
Step 8. Bind the service/service group to the Load Balancing Virtual Server on the instance.
- From the GUI, navigate to Configuration > Traffic Management > Load Balancing > Virtual Servers.
- Select the load balancing virtual server configured in Step 6, and click Edit.
- In the Service and Service Groups window, click No Load Balancing Virtual Server Service Binding.
- Select the service configured in Step 7, and click Bind.
Points to note after you’ve deployed the VPX instance on GCP
-
Log on to the VPX with user name
nsrootand instance ID as password. At the prompt, change the password and save the configuration. -
For collecting a technical support bundle, run the command
shell /netscaler/showtech_cloud.plinstead of the customaryshow techsupport. -
After deleting a NetScaler VM from the GCP console, delete the associated NetScaler internal target instance also. To do so, go to the gcloud CLI and type the following command:
 gcloud compute -q  target-instances delete <instance-name>-adcinternal --zone <zone>
 <!--NeedCopy-->
Note:
<instance-name>-adcinternalis the name of the target instance that must be deleted.
NetScaler VPX licensing
A NetScaler VPX instance on GCP requires a valid license. The licensing option available for NetScaler VPX instances running on GCP is as follows:
Bring your own license (BYOL): To use the BYOL option, follow these steps:
- Use the licensing portal on the NetScaler® website to generate a valid license.
-
Upload the generated license to the instance.
- NetScaler VPX Check-in and Check-out license: This licensing model allows you to check out a license from a pool of available licenses and check it back in when no longer needed. For more information and detailed instructions, see NetScaler VPX Check-in and Check-out License.
Note:
Subscription-based licensing is no longer supported for NetScaler VPX instances on GCP.
Supported NetScaler VPX offerings on GCP
The following table lists the supported NetScaler VPX offerings on GCP.
| Supported VPX offerings |
|---|
| NetScaler VPX - Customer Licensed |
| NetScaler VPX FIPS - Customer Licensed |
GDM templates to deploy a NetScaler VPX instance
You can use a NetScaler VPX Google Deployment Manager (GDM) template to deploy a VPX instance on GCP. For details, see NetScaler GDM Templates.
Resources
Related information
In this article
- Supported GCP machine type families
- Supported features
- Limitation
- Hardware requirements
- Points to note
- Scenario: Deploy a multi-NIC, multi-IP standalone NetScaler VPX instance
- Scenario: Deploy a single-NIC, standalone VPX instance
- Points to note after you’ve deployed the VPX instance on GCP
- NetScaler VPX licensing
- Supported NetScaler VPX offerings on GCP
- GDM templates to deploy a NetScaler VPX instance