Configure a NetScaler VPX standalone instance on Azure VMware solution
You can configure a NetScaler VPX standalone instance on Azure VMware solution (AVS) for internet facing applications.
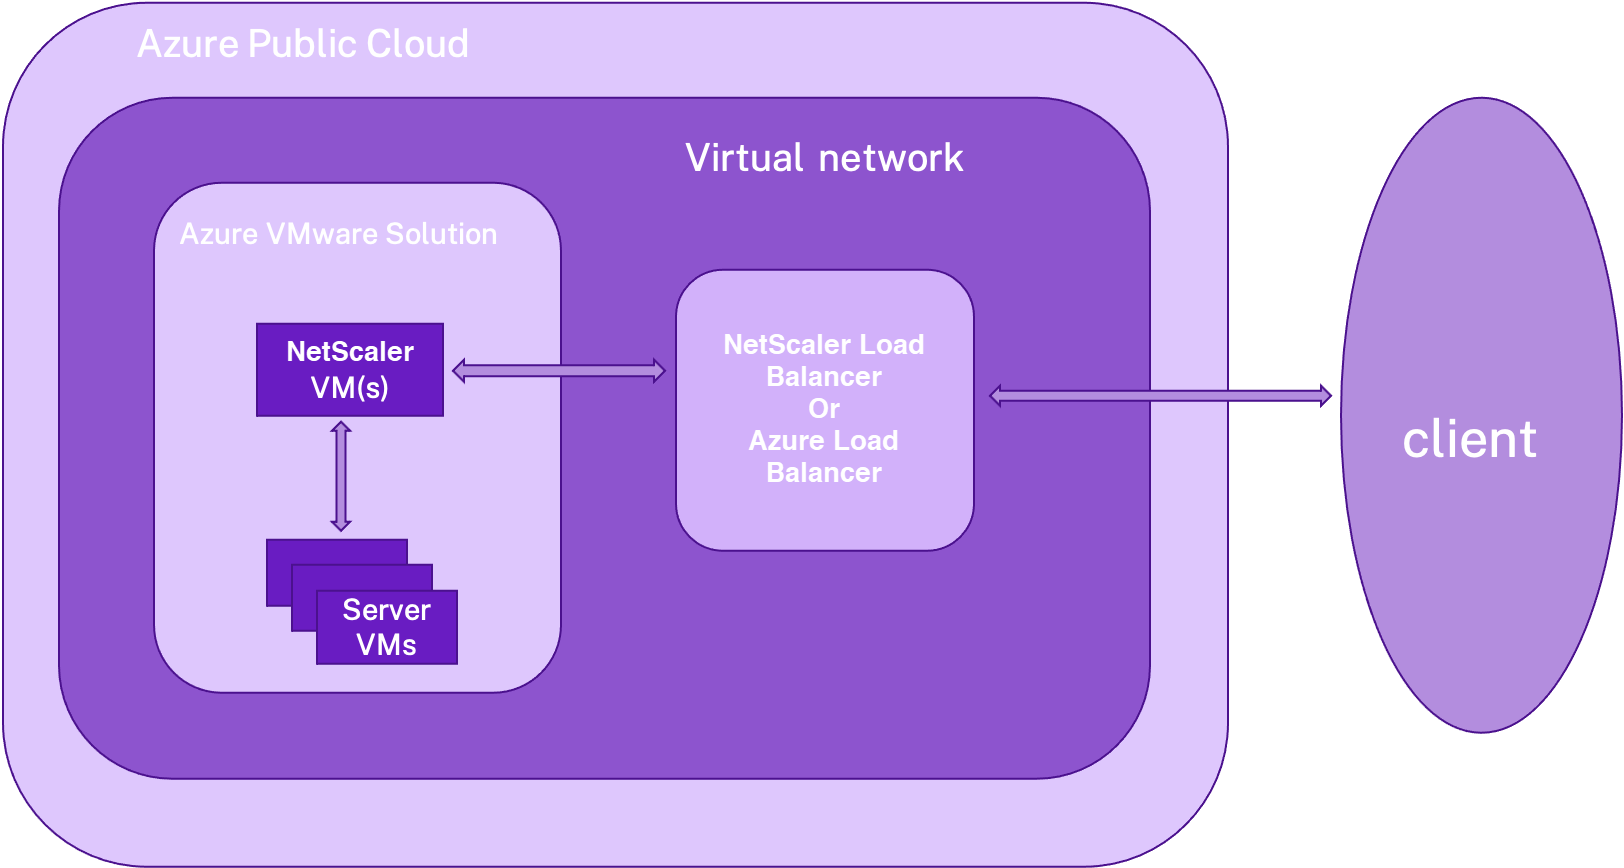
The following diagram shows the NetScaler VPX standalone instance on Azure VMware Solution. A client can access the AVS service by connecting to the virtual IP (VIP) address of NetScaler inside the AVS. You can achieve this by provisioning a NetScaler load balancer or the Azure load balancer instance outside AVS but in the same Azure virtual network. Configure the load balancer to access the VIP of the NetScaler VPX instance within AVS service.

Prerequisites
Before you begin installing a virtual appliance, read the following Azure prerequisites:
- For more information on Azure VMware solution and its prerequisites, see Azure VMware Solution documentation.
- For more information on deploying Azure VMware solution, see Deploy an Azure VMware Solution private cloud.
- For more information on creating a Windows Jump box VM to access and manage Azure VMware Solution, see Access an Azure VMware Solution private cloud.
- In Windows Jump box VM, download the NetScaler VPX appliance setup files.
- Create appropriate NSX-T network segments on VMware SDDC to which the virtual machines connect. For more information, see Add a network segment in Azure VMware Solution
- For more information on how to install a NetScaler VPX instance on VMware cloud, see Install a NetScaler VPX instance on VMware cloud.
Configure a NetScaler VPX standalone instance on AVS using the NetScaler load balancer
Follow these steps to configure the NetScaler VPX standalone instance on AVS for internet facing applications using the NetScaler load balancer.
-
Deploy a NetScaler VPX instance on the Azure cloud. For more information, see Configure a NetScaler VPX standalone instance.
Note:
Ensure that it is deployed on the same virtual network as the Azure VMware Cloud.
-
Configure the NetScaler VPX instance to access the VIP address of NetScaler VPX deployed on AVS.
-
Add a load balancing virtual server.
add lb vserver <name> <serviceType> [<vip>] [<port>]
<!--NeedCopy-->
Example:
add lb vserver lb1 HTTPS 172.31.0.6 443 <!--NeedCopy--> -
Add a service that connects to the VIP of NetScaler VPX deployed on AVS.
add service <name> <ip> <serviceType> <port>
<!--NeedCopy-->
Example:
add service webserver1 192.168.4.10 HTTP 80 <!--NeedCopy--> -
Bind a service to the load balancing virtual server.
bind lb vserver <name> <serviceName>
<!--NeedCopy-->
Example:
bind lb vserver lb1 webserver1
<!--NeedCopy-->
-
Configure NetScaler VPX standalone instance on AVS using the Azure load balancer
Follow these steps to configure the NetScaler VPX standalone instance on AVS for internet facing applications using the Azure load balancer.
-
Configure an Azure Load Balancer instance on Azure cloud. For more information, see Azure documentation on creating load balancer.
-
Add the VIP address of the NetScaler VPX instance that is deployed on AVS to the back-end pool.
The following Azure command adds one back-end IP address into the load balance back-end address pool.
az network lb address-pool address add
                                    --resource-group <Azure VMC Resource Group>
                                    --lb-name <LB Name>
                                    --pool-name <Backend pool name>
                                    --vnet <Azure VMC Vnet>
                                    --name <IP Address name>
                                    --ip-address <VIP of ADC in VMC>
<!--NeedCopy-->
Note:
Ensure that the Azure load balancer is deployed in the same virtual network as the Azure VMware cloud.