Deploy a NetScaler VPX HA pair in Azure using the secondary IP configurations
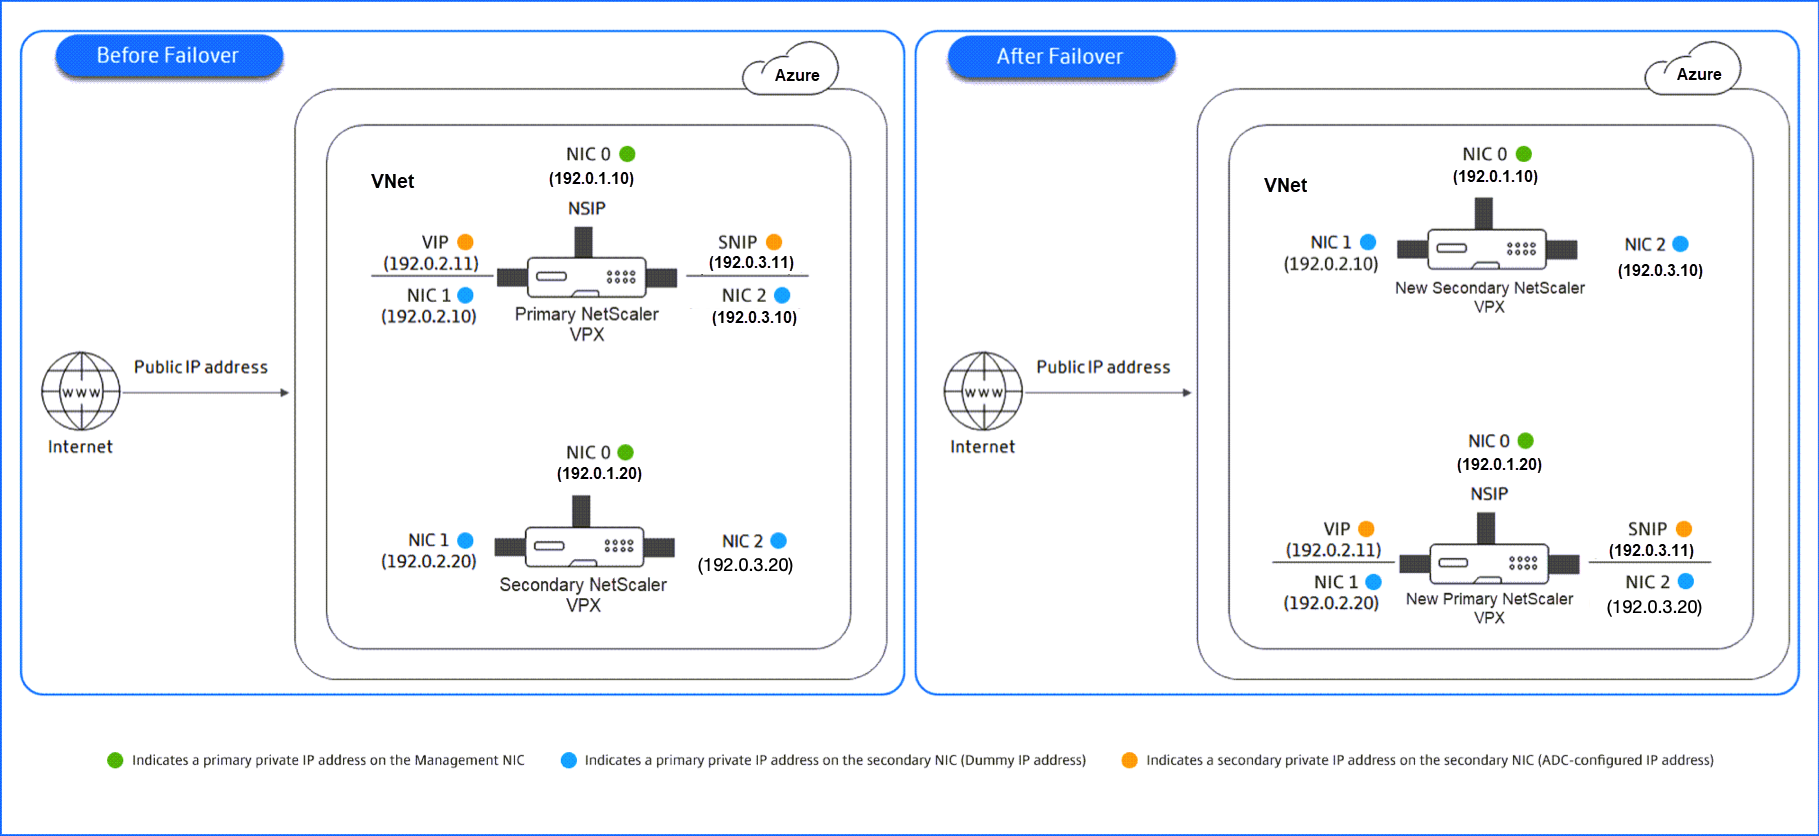
You can deploy a NetScaler VPX high availability pair in Azure with both NetScaler VPX instances on the same virtual network (VNet), using the secondary IP configurations of the network interfaces (NICs). This HA deployment eliminates the need for the Azure Load Balancer (ALB). During failover, the secondary private IP addresses assigned to the client-side and server-side NICs of the primary node are migrated to the secondary node. All the public IP addresses associated with these secondary private IP addresses are also moved accordingly.
Important:
Before starting the deployment, ensure that your Azure environment meets the prerequisites to avoid any issues during the setup.
The following are some of the benefits of using secondary IP configurations:
- Simplified failover: Secondary IP addresses enable automatic migration of virtual IP addresses (VIPs) and subnet IP addresses (SNIPs) between HA nodes, ensuring seamless failover without the need for external load balancing.
- Scalability: Multiple IP addresses can be assigned to a single NIC, allowing flexible traffic routing and scaling of services within the same VM.
- Resilience: The ability to move secondary private IP addresses between nodes enhances network availability and provides quick recovery during node failure.
- Cost efficiency: By eliminating the need for an ALB, you reduce infrastructure costs while maintaining high availability and traffic management within the same subnet.
The following illustration depicts an HA failover scenario by migrating secondary private IP addresses.
Prerequisites to deploy a NetScaler VPX™ HA pair using Azure secondary IP configurations
-
Use NetScaler version 14.1–34.42 or later.
-
Ensure that your subscription has the new Azure control plane enabled.
Note:
If the new Azure control plane is not enabled for your subscription, high-availability deployments might experience a longer failover duration. In such cases, contact Azure support for assistance in enabling the new control plane.
How to deploy a NetScaler VPX HA pair using Azure secondary IP configurations
To deploy a NetScaler VPX HA pair using the secondary IP configurations in Azure, follow these steps:
- Deploy two NetScaler VPX instances in Azure, each with three network interfaces in the same resource group and VNet.
- Assign a managed identity to both the NetScaler VPX instances.
- Assign Azure secondary IP configurations to the client and server network interfaces of the primary node.
- Configure the VIP and SNIP on the primary node using the Azure private IP address from the secondary IP configuration.
- Configure the primary private IP addresses of the server network interfaces on both the primary and secondary NetScaler instances to be the VIP, on the primary node.
- Configure HA on both the nodes.
Step 1. Deploy two NetScaler VPX instances (primary and secondary nodes) in the same resource group and VNet. Ensure that each NetScaler VPX instance has three NICs: Ethernet 0, Ethernet 1, and Ethernet 2.
For detailed steps, see Deploy two VPX instances on Azure.
Step 2. Apply either a system-assigned or a user-assigned managed identity to both the NetScaler VPX instances.
Note:
The Azure service principal is not supported for this feature.
For details, see Managed identities for Azure resources.
For instructions on configuring a managed identity on NetScaler VPX, see Configure a managed identity on a virtual machine.
Step 3. Add one of the following Azure role assignments to the managed identity associated with the NetScaler VPX instances.
- Reader and Network Contributor: Grants read-only access to Azure resources and the permissions required to manage networking resources.
- Contributor: Provides full access to Azure resources.
Step 4. On the primary node, assign private IP addresses to Ethernet 1 (client IP or VIP) and Ethernet 2 (back-end server IP or SNIP).
The Azure portal automatically assigns primary private IP addresses to the configured NICs. To assign more private IP addresses for the VIP and SNIP network interfaces, use secondary IP configurations.
To assign a secondary IP configuration to a network interface in Azure, follow these steps:
- Log in to the Azure Portal and navigate to Virtual Machines.
- Select the virtual machine associated with the network interface.
- In the virtual machine settings, go to Network settings and select the NIC to which you want to add a secondary private IP address.
- In the Network Interface settings, click the IP configurations tab.
-
Click Add to assign an IP configuration of type Secondary.
- If you choose a static allocation method, enter a specific IPv4 address within the subnet range for the instance.
- If you choose a dynamic allocation method, Azure automatically assigns an IP address.
- Click Add or Save to apply the changes.
Step 5. Configure VIP and SNIP on the primary node using the private IP addresses from the secondary IP configuration.
-
Access the primary node using SSH. Open an SSH client and run the following command:
ssh -i <location of your private key> nsroot@<public DNS of the instance> <!--NeedCopy--> -
Configure the VIP and SNIP addresses.
For configuring the VIP address, run the following command:
add ns ip <IPAddress> <netmask> -type VIP
<!--NeedCopy-->
Example:
add ns ip 192.0.2.11 255.255.255.0 -type VIP
<!--NeedCopy-->
For configuring the SNIP address, run the following command:
add ns ip <IPAddress> <netmask> -type SNIP
<!--NeedCopy-->
Example:
add ns ip 192.0.3.11 255.255.255.0 -type SNIP <!--NeedCopy--> -
Save the configuration by running the
save configcommand. -
Verify the configured IP addresses using the following command:
show ns ip
<!--NeedCopy-->
Step 6. Configure the primary private IP addresses of the server network interfaces on both the primary and secondary NetScaler instances to be the VIP, on the primary node.
-
Access the primary node using SSH. Open an SSH client and run the following command:
ssh -i <location of your private key> nsroot@<public DNS of the instance>
<!--NeedCopy-->
Example:
ssh -i ~/.ssh/mykey.pem nsroot@primary-instance.eastus.cloudapp.azure.com <!--NeedCopy--> -
On the primary node, configure the primary private IP address of Ethernet 2 (back-end server NIC) of both the primary and secondary NetScaler instances to be the VIP:
add ns ip <private IPaddress of primary instance> <netmask> -type VIP

add ns ip <private IPaddress of secondary instance> <netmask> -type VIP
<!--NeedCopy-->
Example:
add ns ip 192.0.3.10 255.255.255.0 -type VIP

add ns ip 192.0.3.20 255.255.255.0 -type VIP
<!--NeedCopy-->
Step 7. Configure HA on both nodes.
-
On the primary node, open a Shell client and run the following command:
add ha node <peer node id> <private IP address of the management NIC of the secondary node>
<!--NeedCopy-->
Example:
add ha node 1 192.0.1.20 <!--NeedCopy--> -
On the secondary node, run the following command:
add ha node <peer node id> <private IP address of the management NIC of the primary node>
<!--NeedCopy-->
Example:
add ha node 1 192.0.1.10 <!--NeedCopy--> -
Save the configuration by running the
save configcommand. -
Verify the configured HA nodes by running the
show ha nodecommand.During failover, the secondary IP configurations for the VIP and SNIP network interfaces are moved from the previous primary node to the new primary node.
Deploy a NetScaler VPX HA pair in Azure using solution templates
The Azure solution templates automate NetScaler VPX High Availability (HA) deployment, reducing deployment time and eliminating manual configuration on both Azure and NetScaler. Customers can deploy a production-ready HA solution with minimal effort using these solution templates.
This solution deploys two NetScaler VPX instances across different Availability Zones or Availability Sets for high availability and fault tolerance.
For more information about solution templates, see Microsoft documentation.
Key features of the NetScaler VPX Azure solution deployment
-
High availability: Deploys two NetScaler VPX instances across separate Azure Availability Zones with automated HA configuration and peer node discovery.
-
Networking:
- Three-NIC deployment: Utilizes dedicated Management, Client, and Server subnets for network segmentation.
- Virtual network support: Works with both new and existing virtual networks.
- Public IP address configuration: Allows configurable public IP addresses for both management and client traffic.
- Accelerated networking: Option to enable or disable accelerated networking.
-
Security and compliance:
- Network security groups (NSGs): Includes customizable inbound rules for enhanced security.
- RBAC integration: Automatic role assignments through system-assigned managed identity.
Prerequisites
Before you begin, ensure that you have the following:
- An active Azure subscription with administrative permissions.
- An Azure region with Availability Zone support.
- NetScaler license files (Bring Your Own License).
Marketplace offer information (Bring Your Own License - BYOL)
When deploying NetScaler VPX on Azure using the solution template, use the Bring Your Own License (BYOL) model.
- Offer ID: netscalervpx-141
- SKU/Plan ID: netscalerbyol
- Publisher: Citrix
Deploying NetScaler VPX HA pair in Azure using solution templates
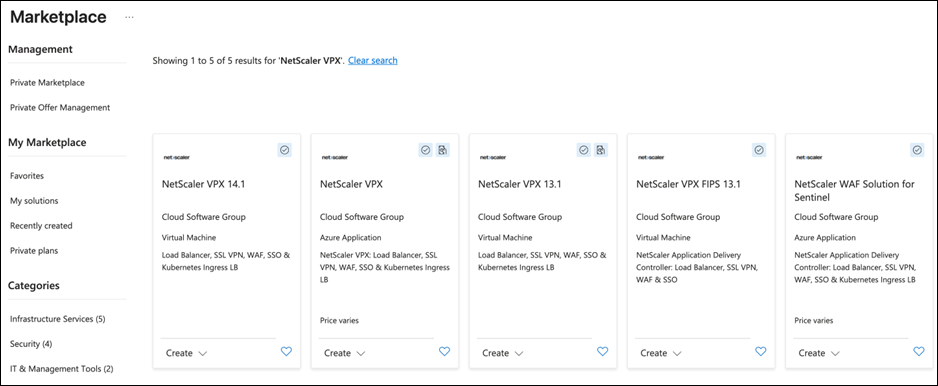
This section describes how to deploy NetScaler VPX using the Azure Marketplace portal.
Step 1. Deploy from Azure Marketplace.
- Sign in to the Azure portal.
-
Search for NetScaler VPX in Azure Marketplace to find the deployment options.
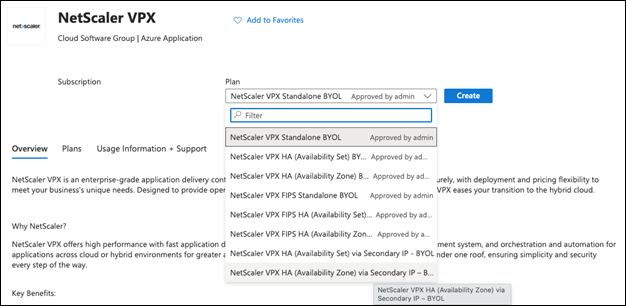
Step 2. Select a deployment plan.
Choose one of the following plans based on your availability requirements:
- NetScaler VPX HA (Availability Zone) via Secondary IP - BYOL
- NetScaler VPX HA (Availability Set) via Secondary IP - BYOL
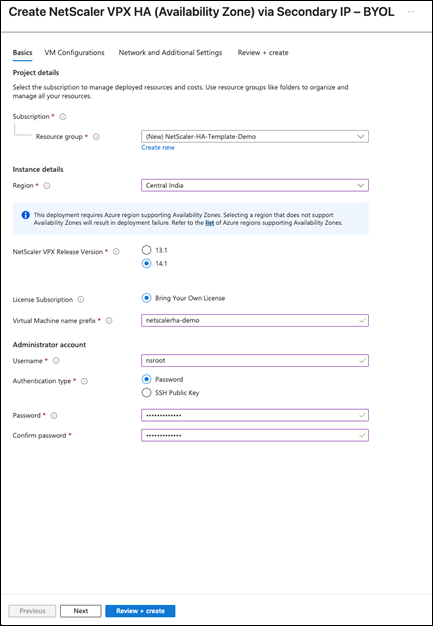
Step 3. Configure basic settings and administrator credentials.
- Subscription - Select your Azure subscription.
- Resource group - Create a new resource group or select an existing one.
- Region - Select an Azure region that supports Availability Zones or Availability Sets.
- VM name prefix - Enter a prefix for the NetScaler VPX virtual machine instances.
- Release version - Specify the desired NetScaler VPX version (for example, 14.1).
- Administrator username - Enter an administrator user name.
- Authentication type - Select Password or SSH public key.
- Credentials - Enter your password or SSH key based on the authentication type that you selected.
Step 4. Configure virtual machine settings.
- VM size - Select a size that meets your performance requirements.
- OS disk type - Select a storage disk type (for example, Standard_LRS or Premium_LRS).
- Publish monitoring metrics - Enable this option to send NetScaler ADC performance metrics to Azure Monitor.
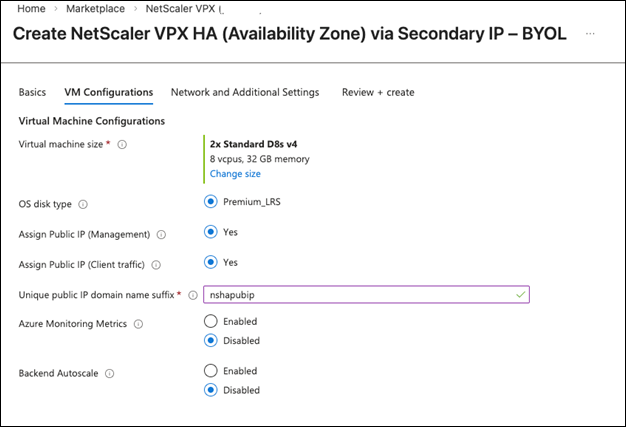
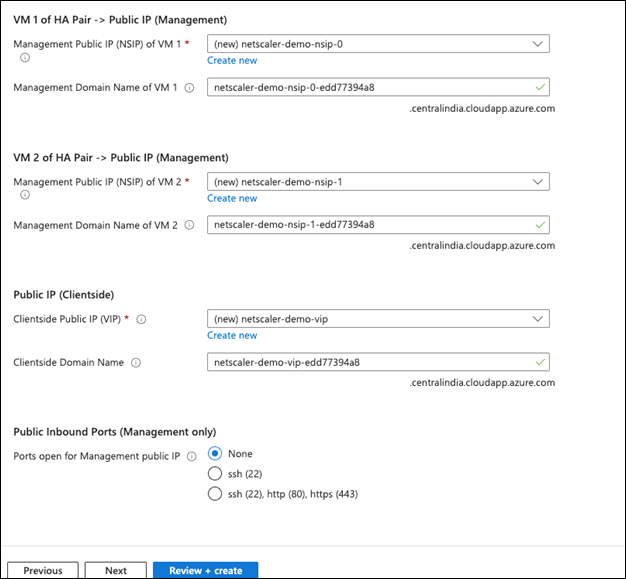
Step 5. Configure network settings.
- Virtual network - Create a new virtual network or select an existing one.
- Address space - Specify the CIDR block for a new virtual network.
- Subnets - Configure Management, Client, and Server subnets.
- Accelerated networking - Enable for improved network performance on key interfaces.
- Management public IP addresses - Assign public IP addresses to VM 1 and VM 2 (recommended).
- Client public IP address - Optionally assign a public IP address for client access.
- DNS labels - Add unique DNS labels if DNS resolution is required.
- Public inbound ports - Allow required ports (for example, SSH-22, HTTP-80, HTTPS-443).

Step 6. Review and complete deployment.
- Review all the chosen configuration parameters to ensure that they meet your requirements.
- Accept the terms and conditions.
- Select Create to begin deployment.
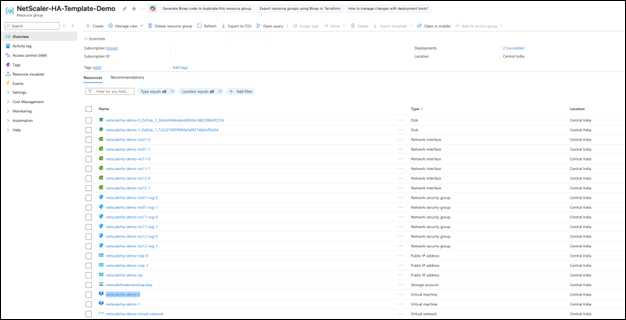
Step 7. Verify your deployment.
After deployment completes, verify that your NetScaler HA pair is configured correctly and operating as expected.
-
Verify HA node status.
-
Connect to one of the NetScaler instances using SSH.
-
Run the
show ha nodecommand to check the HA node status. -
Verify the following:
- Both nodes appear in the output
- Synchronization (Sync) status is healthy
- INC mode (Independent Network Configuration) is configured correctly

-
-
Validate IP address configuration.
Run the
show ns ipcommand on the NetScaler instance. Check the output to verify that all Virtual IP addresses (VIPs) and Subnet IP addresses (SNIPs) are present and configured correctly.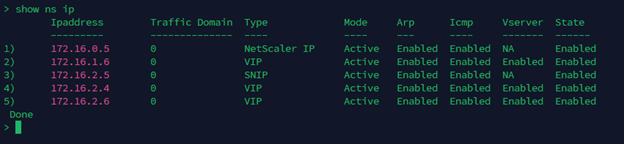
-
Perform a high availability failover test.
We recommend you to perform a manual failover test to verify the resilience of your HA setup.
- Run the
force ha failover –forcecommand to initiate the failover. -
Verify the following:
- The failover completes successfully
- All secondary IP configurations transfer to the new primary node
- Run the