Add back-end Azure Autoscaling service
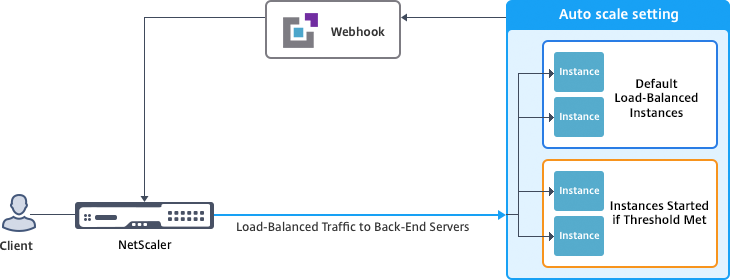
Efficient hosting of applications in a cloud involves easy and cost-effective management of resources depending on the application demand. To meet increasing demand, you have to scale up network resources. Whether demand subsides, you must scale down to avoid the unnecessary cost of idle resources. To minimize the cost of running the application, you have to constantly monitor traffic, memory and CPU use, and so on. However, monitoring traffic manually is cumbersome. For the application environment to scale up or down dynamically, you must automate the processes of monitoring traffic and scaling resources up and down whenever necessary.
You can use Autoscale™ with Azure virtual machine scale sets (VMSS) for VPX multi-IP standalone and high availability deployment on Azure.
Integrated with the Azure VMSS and Autoscale feature, the NetScaler VPX instance provides the following advantages:
- Load balance and management: Auto configures servers to scale up and scale down, depending on demand. The NetScaler VPX instance auto detects the VMSS Autoscale setting in the same virtual network where the VPX instance is deployed, or the peered virtual networks that are in the same Azure subscription. You can select the VMSS Autoscale setting to balance the load. This is done by auto configuring NetScaler virtual IP address and subnet IP address on the VPX instance.
- High availability: Detects Autoscale groups and load balances servers.
- Better network availability: The VPX instance supports back-end servers on different virtual networks (VNets).
For more information, see the following Azure topic
- Virtual Machine Scale Sets Documentation
- Overview of Autoscale in Microsoft Azure Virtual Machines, Cloud Services, and Web Apps
Before you begin
-
Read Azure-related usage guidelines. For more information, see Deploy a NetScaler VPX instance on Microsoft Azure.
-
Create one or more NetScaler VPX instances with three network interfaces on Azure according to your requirement (standalone or high availability deployment).
-
Open the TCP 9001 port on the network security group of the 0/1 interface of the VPX instance. The VPX instance uses this port to receive the scale-out and scale-in notification.
- Create an Azure VMSS in the same virtual network, where the NetScaler VPX instance is deployed. If the VMSS and NetScaler VPX instance are deployed in different Azure virtual networks, the following conditions have to be met:
- Both the virtual networks must be in the same Azure subscription.
- The two virtual networks must be connected using the virtual network peering feature of Azure.
If you don’t have an existing VMSS configuration, complete the following tasks:
a) Create a VMSS
b) Enable Autoscale on VMSS
c) Create scale-in and scale-out policies in the VMSS Autoscale setting
For more information, see Overview of Autoscale with Azure virtual machine scale sets.
-
NetScaler VPX supports VMSS with Uniform orchestration only. VMSS with Flexible orchestration is not supported. For more information, see Orchestration modes for Virtual Machine Scale Sets in Azure.
-
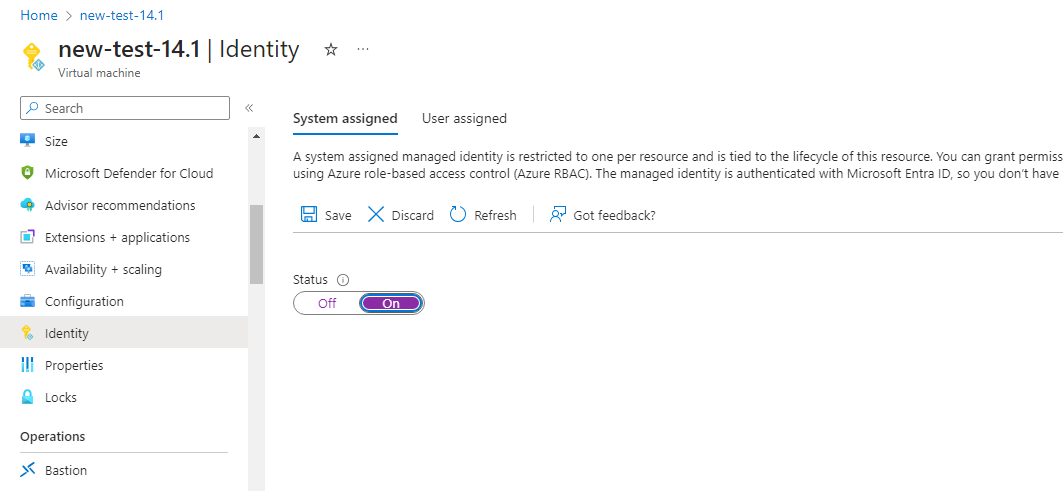
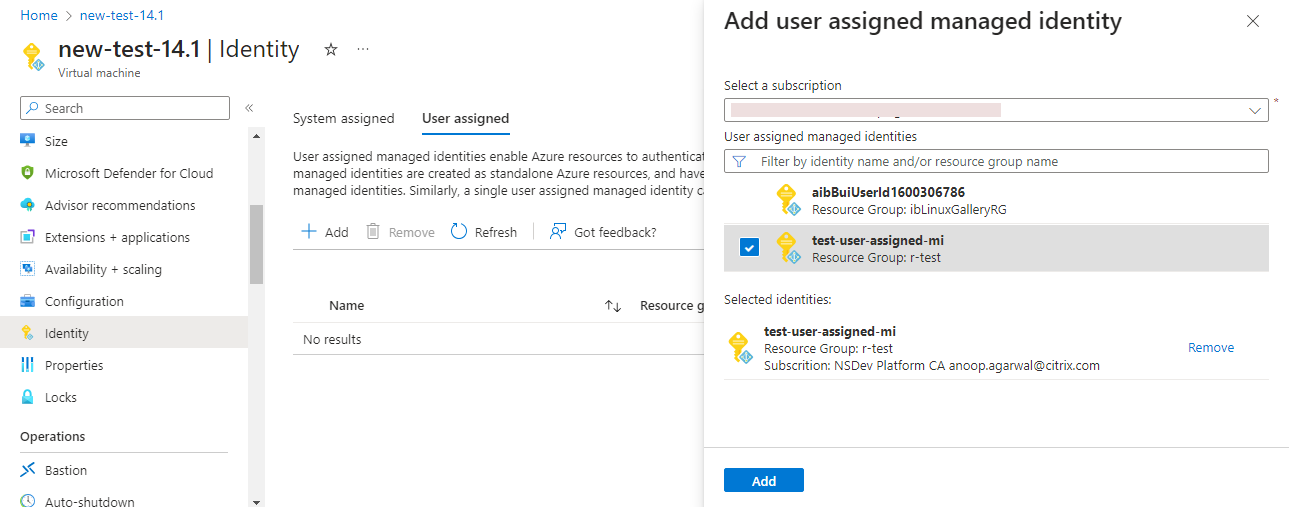
Starting from NetScaler release 14.1-12.x, NetScaler VPX supports managed identity in the Azure cloud. Managed identities link a Service Principal to an Azure resource like a virtual machine. With managed identity, you don’t need to manage the cloud credentials (Application ID, Application secret, and Tenant ID) thus avoiding security risks. Currently, NetScaler VPX supports only the system-assigned and a single-user assigned managed identity. Multiple-user assigned managed identity is not supported.
For NetScaler releases prior to 14.1-12.x, you must manually manage the cloud credentials in NetScaler VPX through Azure Active Directory (AAD). Assign a contributor role to the newly created AAD application. The cloud credentials must be recreated periodically after it expires. For more information, see Create an Azure Active Directory application and service principal.
When you configure managed identity on the Azure console and cloud credentials in NetScaler®, managed identity takes precedence over cloud credentials.
Configure a managed identity on a virtual machine
- Sign in to the Azure portal.
- Navigate to your virtual machine and select Identity.
- Choose either System assigned or User assigned based on your requirements.
-
Under Status, select On and then click Save.
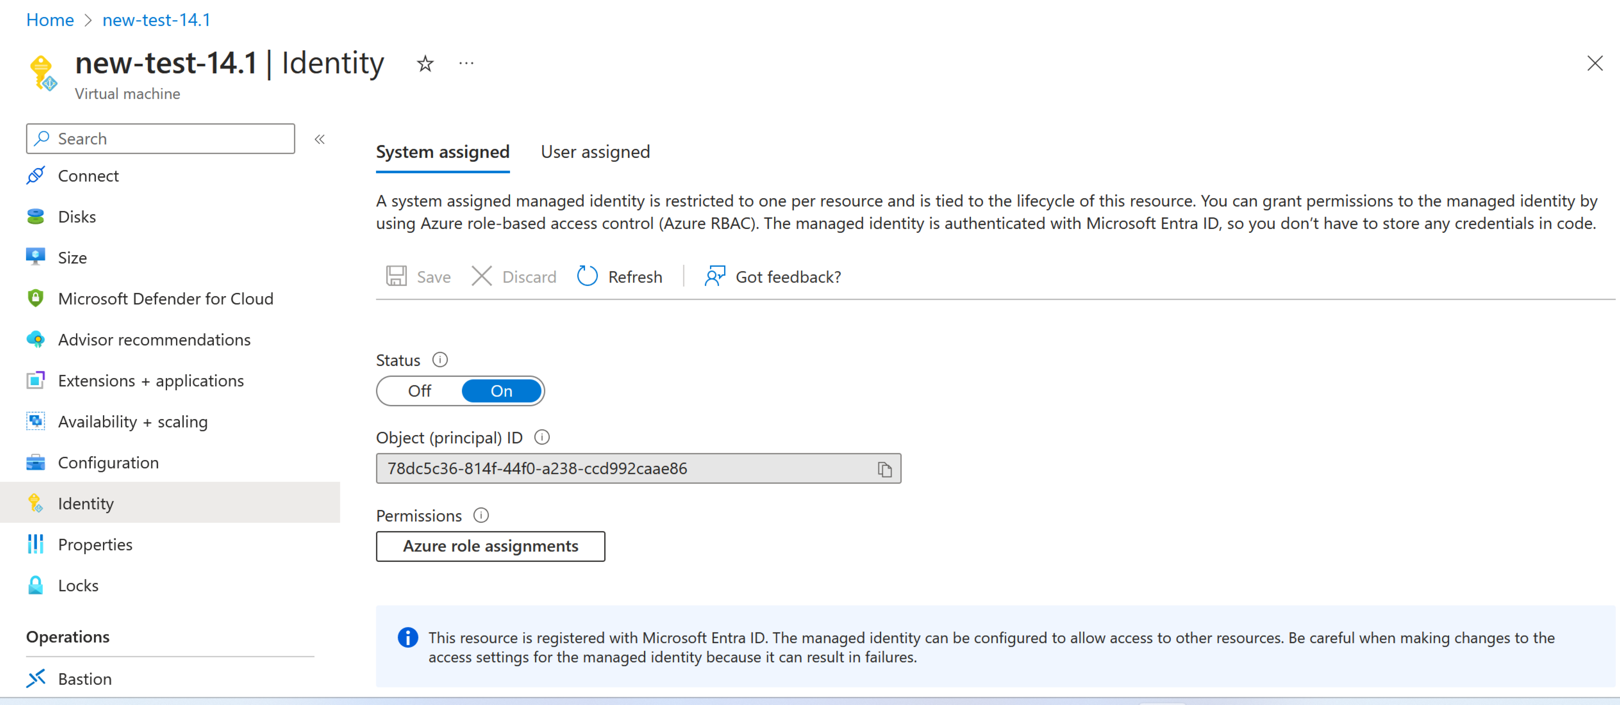
Once the status is saved, you see that a service principal object is created and assigned to the VM.
-
Click Azure role assignments.
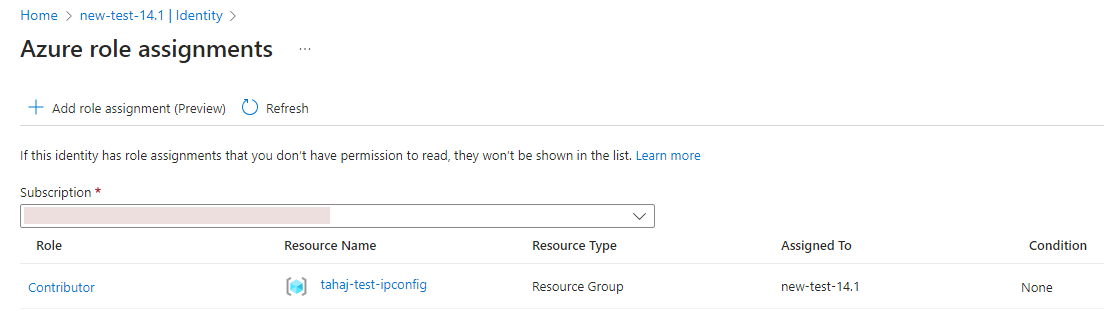
- In the Add role assignment window, select a scope. You can select from the following options:
-
Subscription
If the VMSS and VM are in different resource groups, use Subscription as the scope.
-
Resource group
If the VMSS is in the same resource group as your VM, use Resource group as the scope.
- Key Vault
- Storage
- SQL
Based on your scope selection, fill in the details for other fields. Assign a Contributor role and Save the configuration.

The Azure role assignments page displays the managed identity that you created.
-
-
To create a user assigned managed identity, select a subscription, choose a user assigned managed identity, and click Add.
Add VMSS to a NetScaler VPX instance
Complete the following steps to add the Autoscale setting to the VPX instance:
-
Log on to the VPX instance.
-
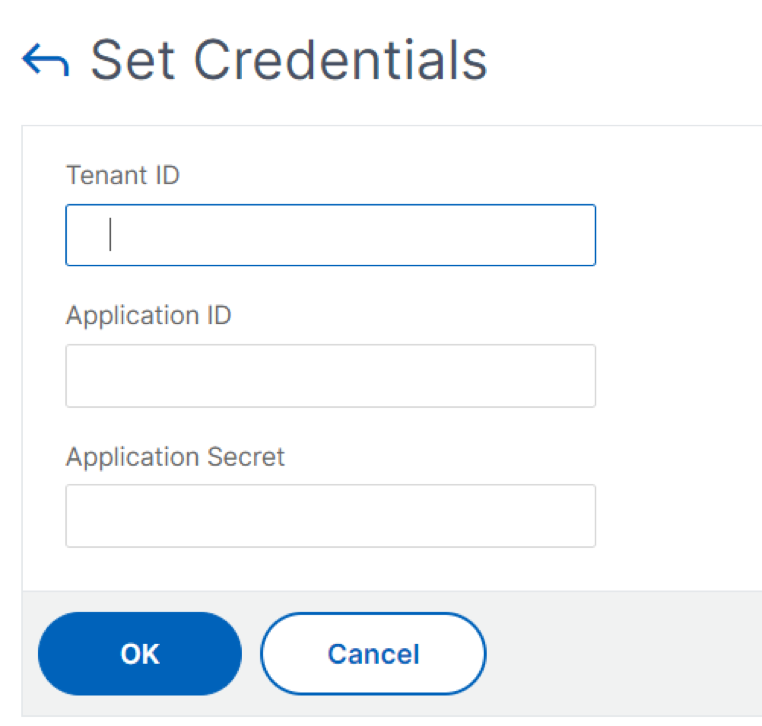
Navigate to Configuration > Azure > Set Credentials. Add the required Azure credentials for the Autoscale feature to work.
Note:
If you are using Azure managed identity, it is not required to set credentials.
-
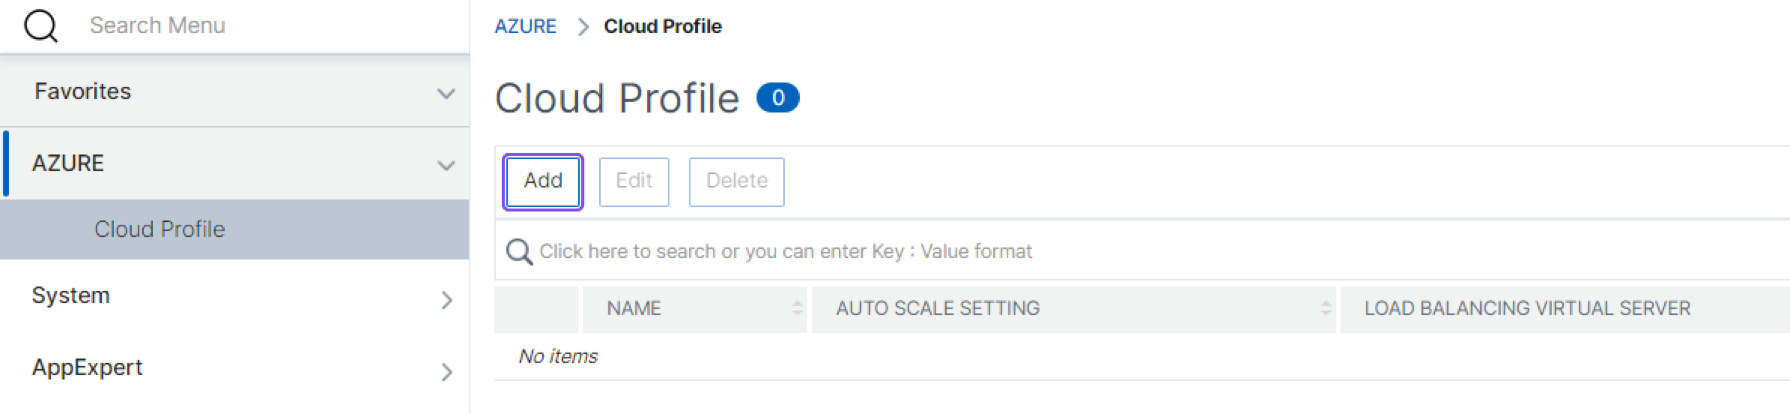
Go to System > Azure > Cloud Profile and click Add to create a cloud profile.
The Create Cloud Profile configuration page appears.
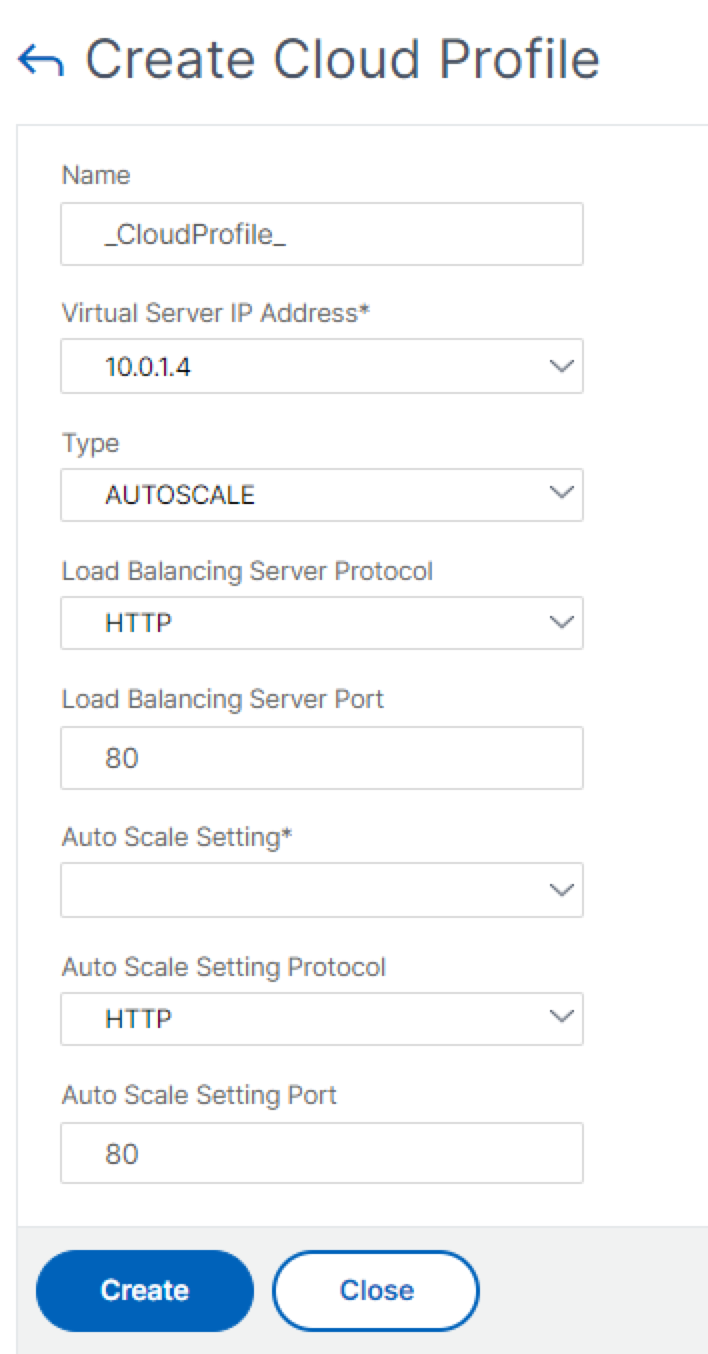
Cloud profile creates a NetScaler load balancing virtual server and a service group with members (servers) as the servers of the Auto Scaling Group. Your back-end servers must be reachable through the SNIP configured on the VPX instance.
Points to keep in mind while creating a cloud profile
- The virtual server IP address is auto-populated from the free IP address available to the VPX instance. For more information, see Assign multiple IP addresses to virtual machines using the Azure portal.
- The Autoscale setting is prepopulated from the VMSS instance that is connected to the NetScaler VPX instance either in the same virtual network or peered virtual networks. For more information, see Overview of Autoscale with Azure virtual machine scale sets.
- While selecting the Auto Scale Setting Protocol and Auto Scale Setting Port, ensure that your servers listen on the protocols and ports, and you bind the correct monitor in the service group. By default, the TCP monitor is used.
- For SSL Protocol type autoscaling, after you create the cloud profile, the load balance virtual server or service group is down because of a missing certificate. You can bind the certificate to the virtual server or service group manually.
Note:
From NetScaler release 13.1-42.x onwards, you can create different cloud profiles for different services (using different ports) with the same VMSS in Azure. Thus, the NetScaler VPX instance supports multiple services with the same Autoscaling group in the public cloud.
To view autoscale-related information in the Azure portal, go to Virtual machine scale sets, and select virtual machine scale set > Scaling.
Migrate from unmanaged disks to managed disks in Azure
If your NetScaler VPX instance or VMSS is deployed with unmanaged disks, migration to managed disks is required to align with Azure cloud changes. See the following Azure documentation for the migration guide and related FAQs:
References
For information on autoscaling of NetScaler VPX in Microsoft Azure using NetScaler Application Delivery and Management, see Azure Autoscale using NetScaler ADM.