Deploy NetScaler GSLB on Azure
With the increasing demand, businesses running an on-prem data center serving regional customers want to scale and deploy across globally using Azure cloud. With NetScaler on the network administrator’s side, you can use the GSLB StyleBook to configure applications both on-prem and in the cloud. You can transfer the same configuration to the cloud with NetScaler ADM. You can reach either on-prem or cloud resources depending on proximity with GSLB. This allows you to have a seamless experience no matter where you are in the world.
DBS overview
NetScaler GSLB supports using Domain-Based Services (DBS) for Cloud load balancers. This allows for the auto-discovery of dynamic cloud services using a cloud load balancer solution. This configuration allows the NetScaler to implement GSLB DBS in an Active-Active environment. DBS allows the scaling of back end resources in Microsoft Azure environments from DNS discovery. This section covers integration between NetScalers in the Azure Autoscale environment.
Domain name-based services using Azure load balancer (ALB)
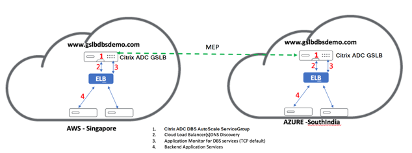
GSLB DBS uses the FQDN of the user ALB to dynamically update the GSLB service groups to include the back-end servers that are being created and deleted within Azure. To configure this feature, the user points the Citrix® ADC to their ALB to dynamically route to different servers in Azure. They can do this without having to manually update the Citrix ADC every time an instance is created and deleted within Azure. The Citrix ADC DBS feature for GSLB service groups uses DNS-aware service discovery to determine the member service resources of the DBS namespace identified in the Autoscale™ group.
The following image depicts the NetScaler GSLB DBS Autoscale components with cloud load balancers:
Azure GSLB prerequisites
The prerequisites for the NetScaler GSLB service groups include a functioning Microsoft Azure environment, along with the knowledge and ability to configure Linux Web Servers, NetScaler appliances within Azure, public IP addresses, and Azure load balancers (ALB).
-
GSLB DBS Service integration requires NetScaler version 12.0.57 for Microsoft Azure load balancer instances.
-
GSLB service group entity: NetScaler version 12.0.57.
-
GSLB service group is introduced which supports autoscale using DBS dynamic discovery.
-
DBS Feature Components (domain-based service) must be bound to the GSLB service group.
Example:
add server sydney_server LB-Sydney-xxxxxxxxxx.australiaeast.cloudapp.azure.com
add gslb serviceGroup sydney_sg HTTP -autoscale DNS -siteName sydney
bind gslb serviceGroup sydney_sg sydney_server 80
<!--NeedCopy-->
Configure Azure components
-
Log in to the user Azure Portal and create a new virtual machine from a NetScaler template.
-
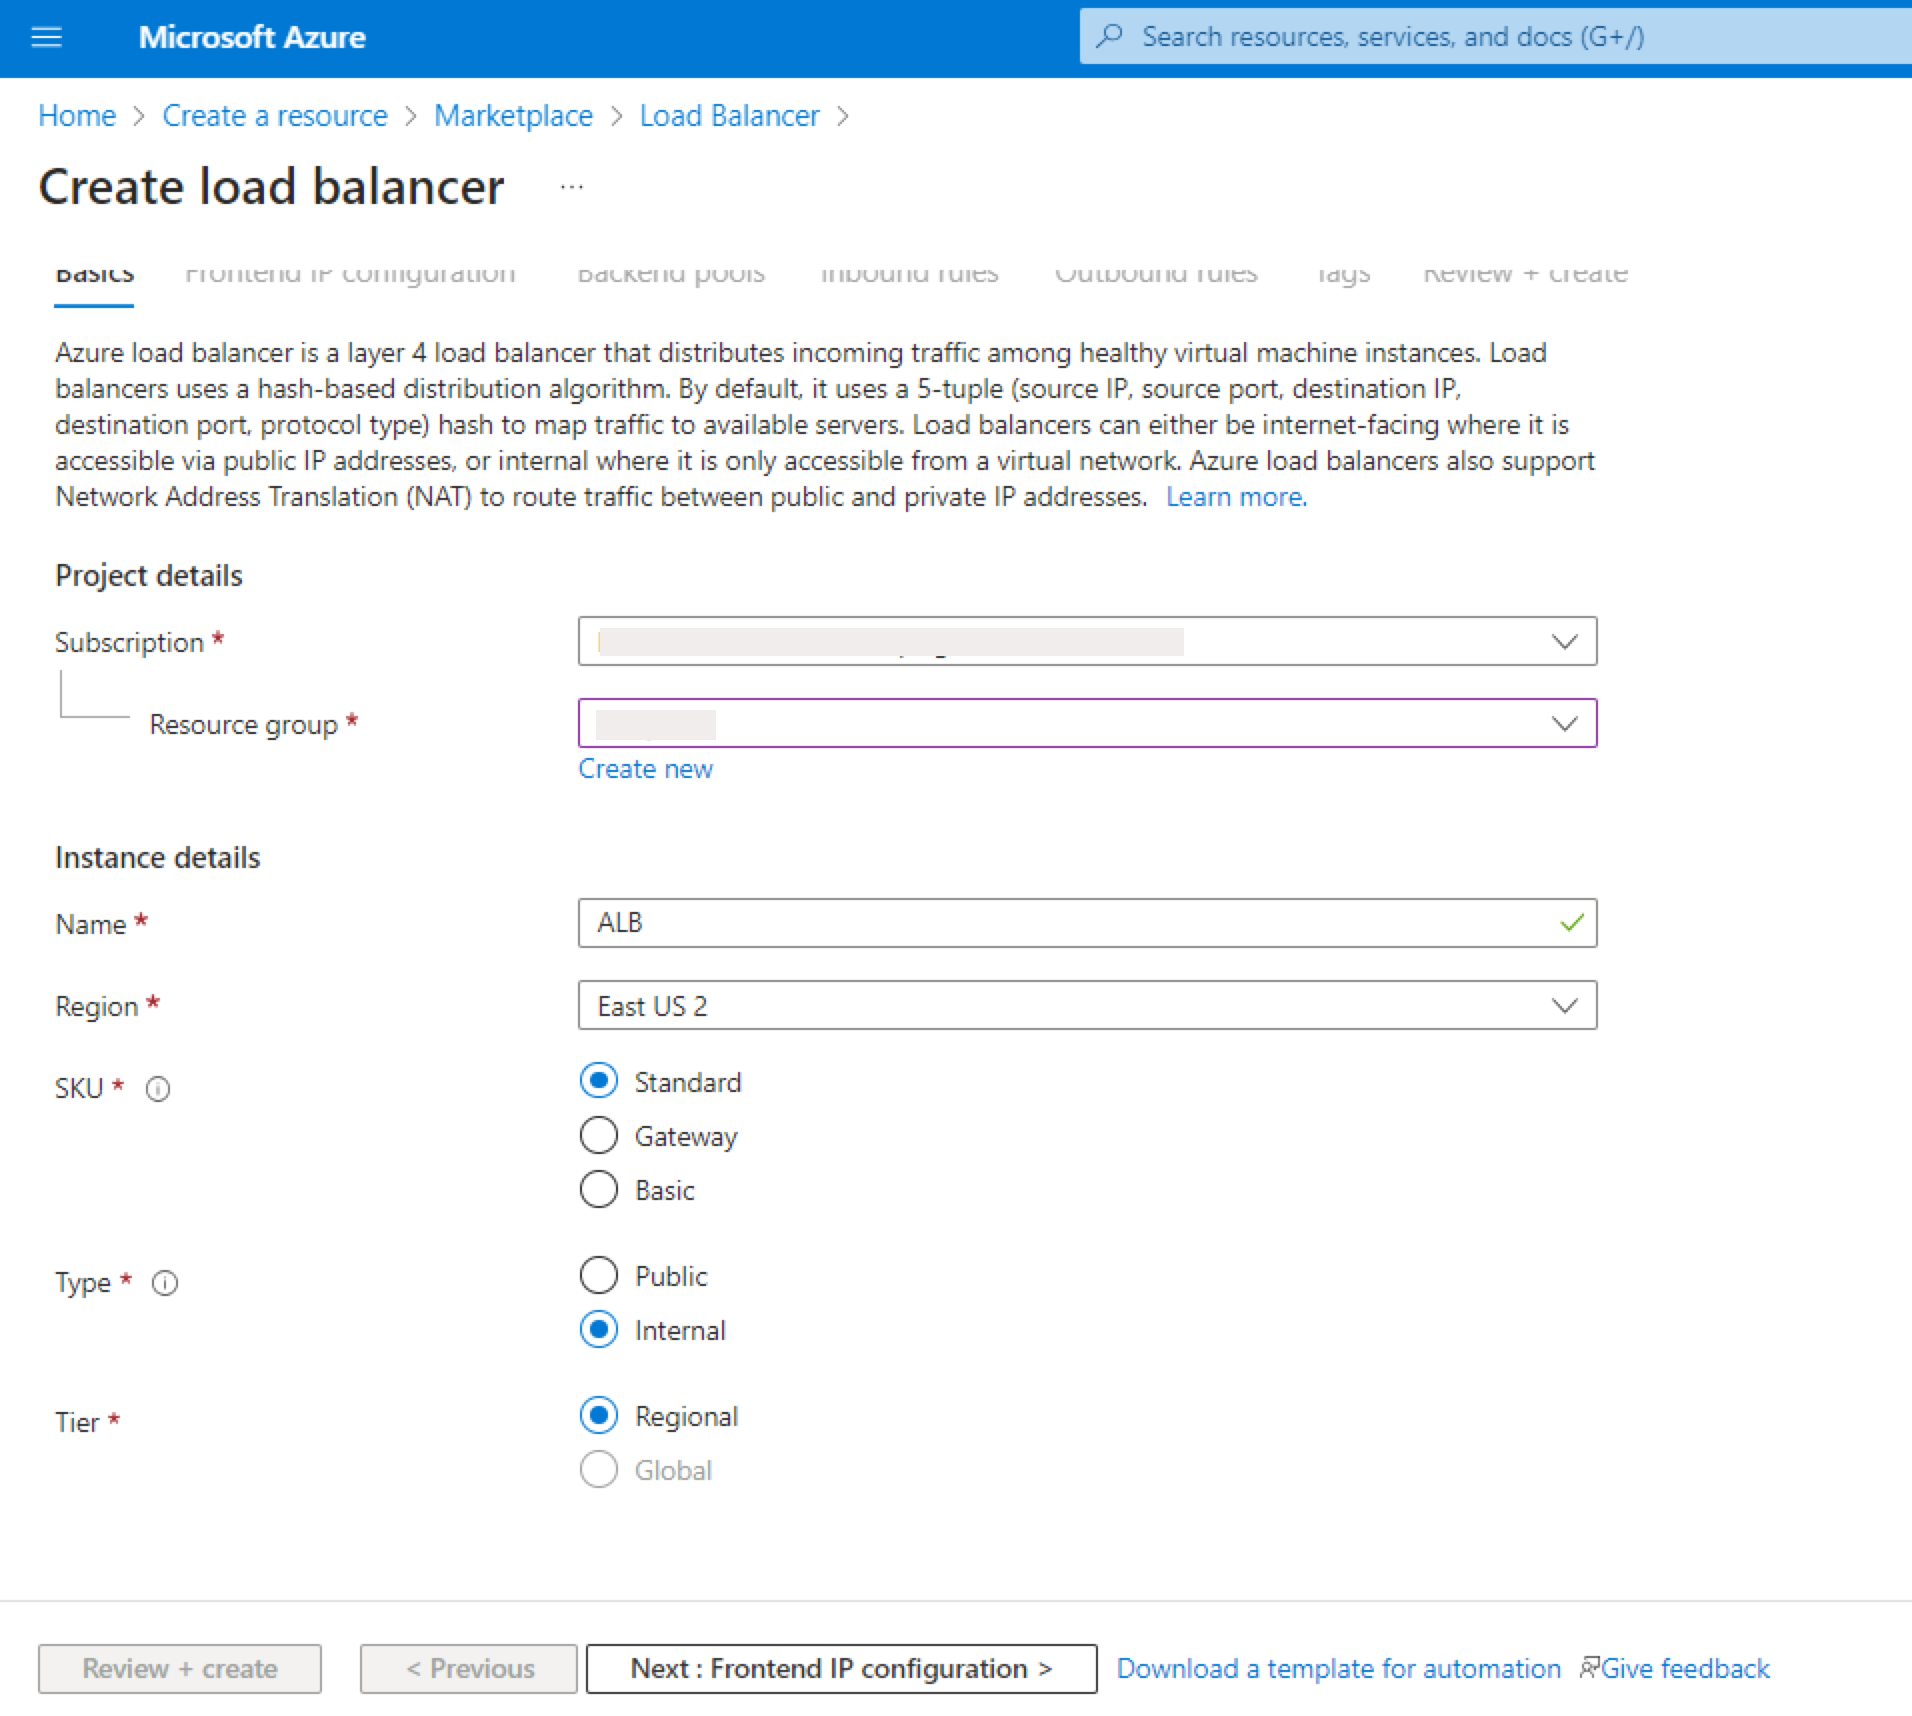
Create an Azure load balancer.
-
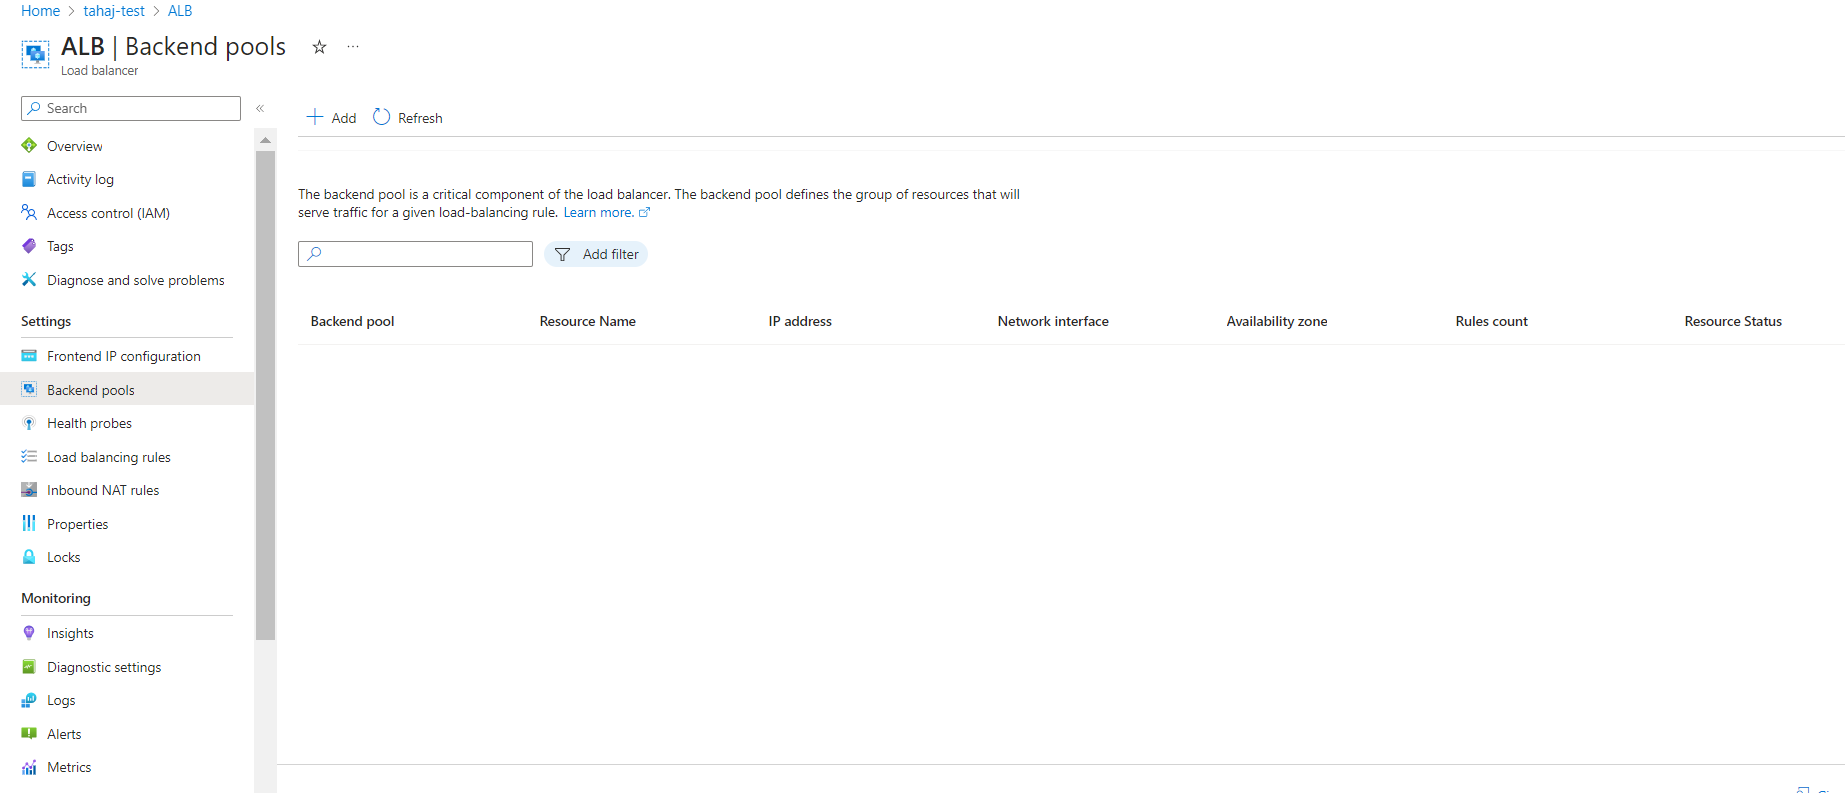
Add the created NetScaler back-end pools.
-
Create a health probe for port 80.
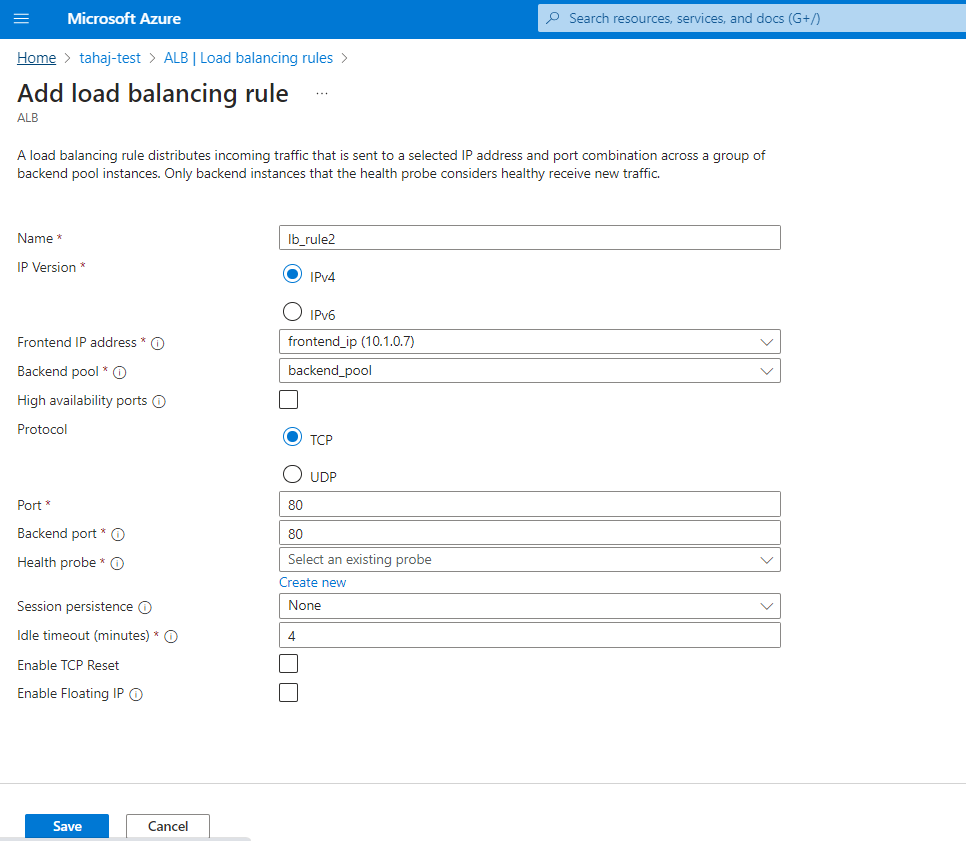
Create a load balancing rule using the front-end IP created from the load balancer.
-
Protocol: TCP
-
Back-end Port: 80
-
Back-end pool: NetScaler created in step 1
-
Health Probe: Created in step 4
-
Session Persistence: None
-
Configure NetScaler GSLB domain-based service
The following configurations summarize what is required to enable domain-based services for autoscaling ADCs in a GSLB enabled environment.
Traffic management configurations
Note:
It is required to configure the NetScaler with either a nameserver or a DNS virtual server through which the ALB domains are resolved for the DBS service groups. For more information on name servers or DNS virtual servers, see DNS nameServer.
-
Navigate to Traffic Management > Load Balancing > Servers.
-
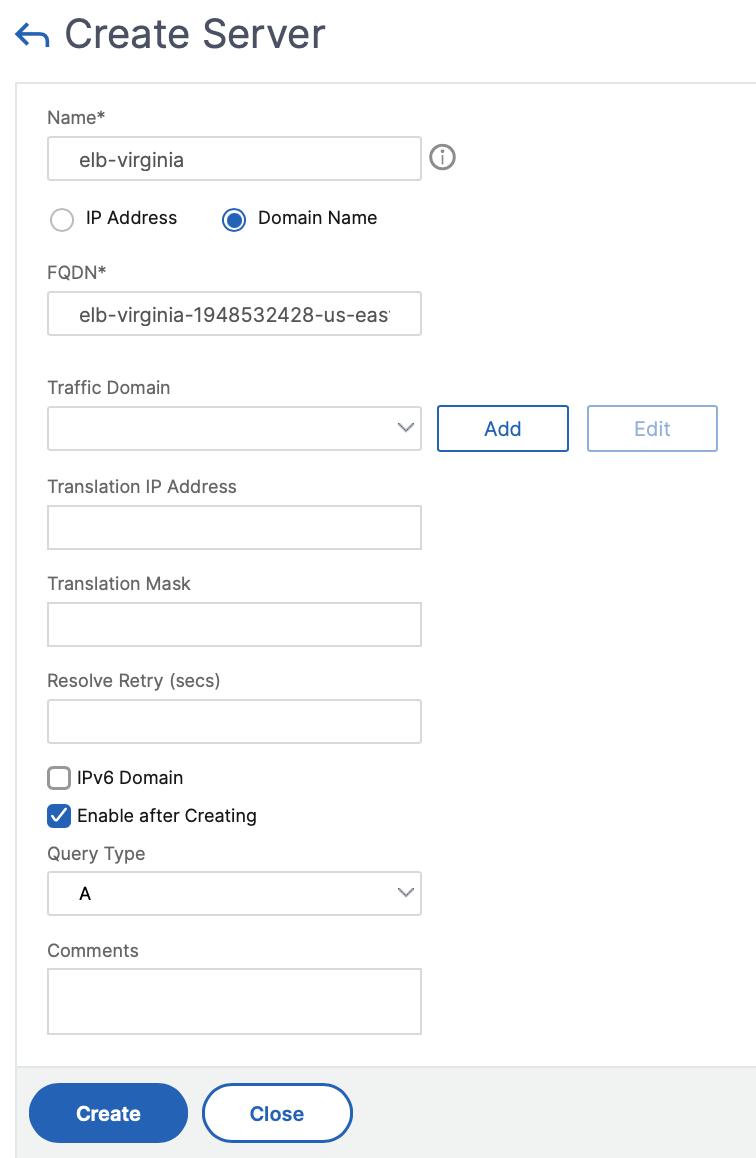
Click Add to create a server, provide a name and FQDN corresponding to the A record (domain name) in Azure for the ALB.
-
Repeat step 2 to add the second ALB from the second resource in Azure.
GSLB configurations
-
Click Add to configure a GSLB site.
-
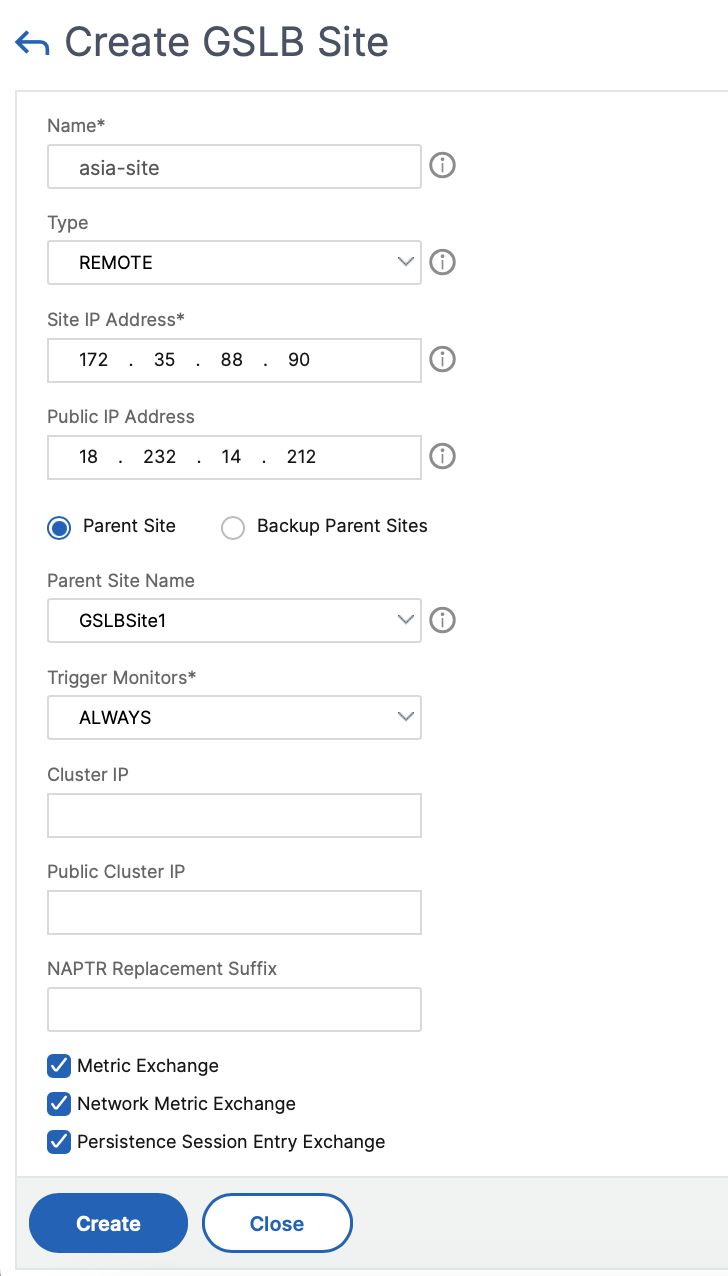
Specify the details for configuring the GSLB site
Name the site. Type is configured as remote or local based on which NetScaler you are configuring the site on. The site IP address is the IP address for the GSLB site. The GSLB site uses this IP address to communicate with the other GSLB sites. The public IP address is required when using a cloud service where a particular IP address is hosted on an external firewall or NAT device. Configure the site as a parent site and ensure that the Trigger Monitors are set to ALWAYS. Also, be sure to check the three boxes at the bottom for Metric Exchange, Network Metric Exchange, and Persistence Session Entry Exchange.
We recommend you set the Trigger monitor to MEPDOWN. For more information, see Configure a GSLB Service Group.
-
Click Create.
-
Navigate to Traffic Management > GSLB > Service Groups.
-
Click Add to add a service group.
-
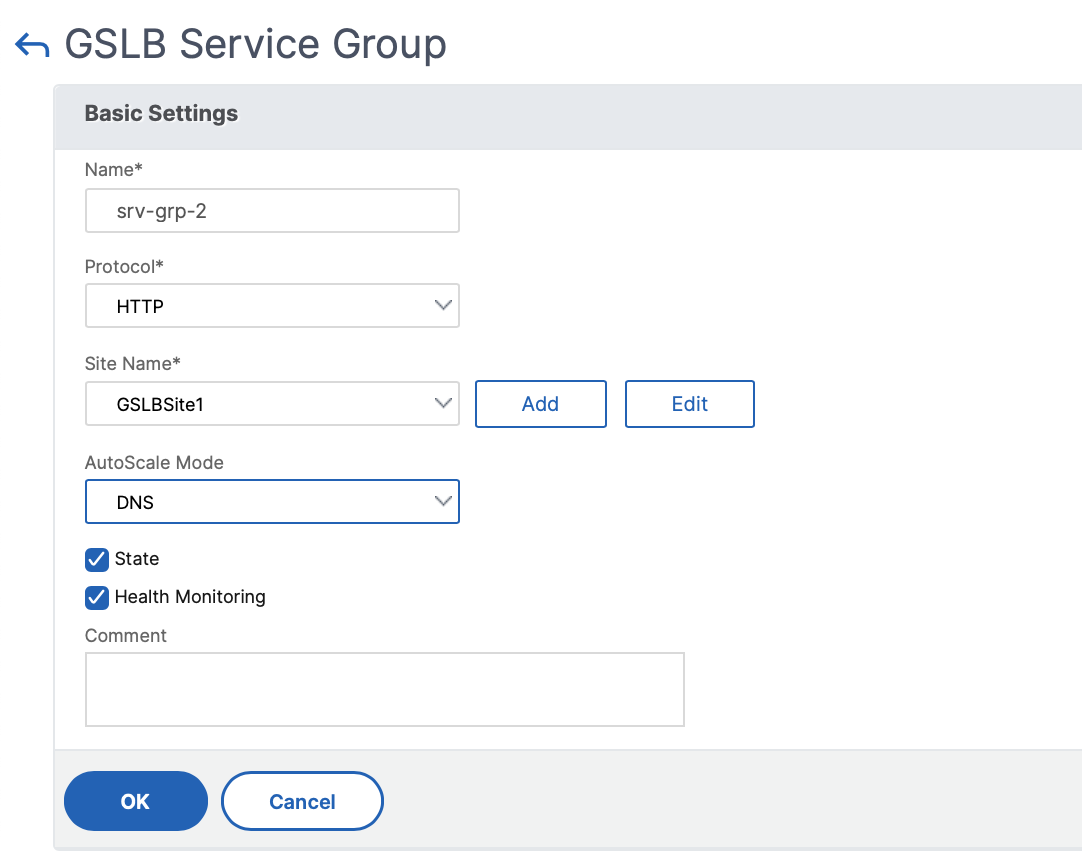
Specify the details to configure the service group
Name the Service Group, use the HTTP protocol. Under Site Name choose the respective site that you created. Be sure to configure autoscale Mode as DNS and check off the boxes for State and Health Monitoring. Click OK to create the Service Group.
-
Click Service Group Members and select Server Based. Select the respective ALB that was configured in the start of the run guide. Configure the traffic to go over port 80. Click Create.
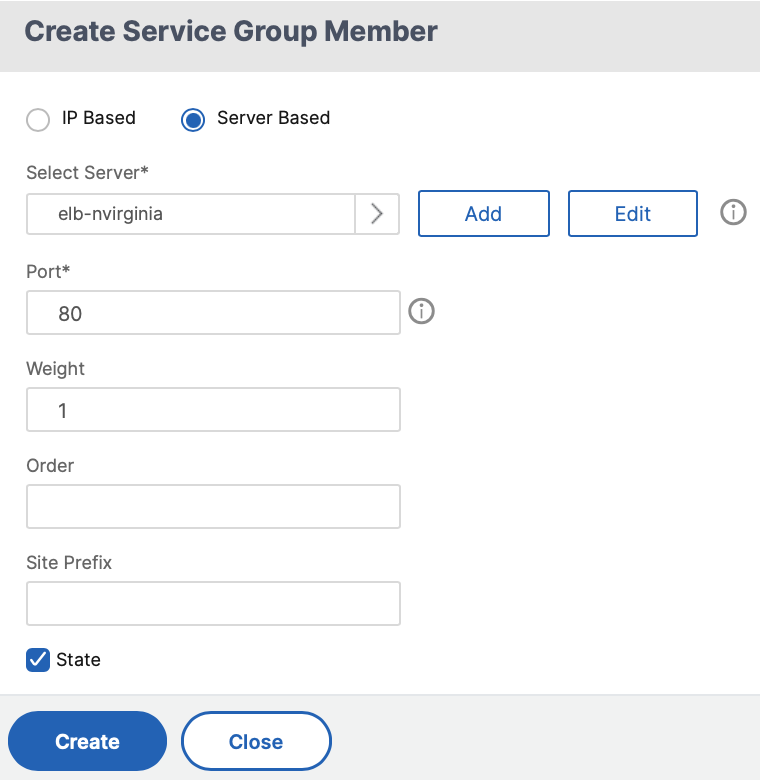
The service group member binding populates with 2 instances that it receives from the ALB.

-
Repeat steps 5 and 6 to configure the service group for the second resource location in Azure. (This can be done from the same NetScaler GUI).
-
To set up a GSLB virtual server. Navigate to Traffic Management > GSLB > Virtual Servers.
- Click Add to create the virtual server.
-
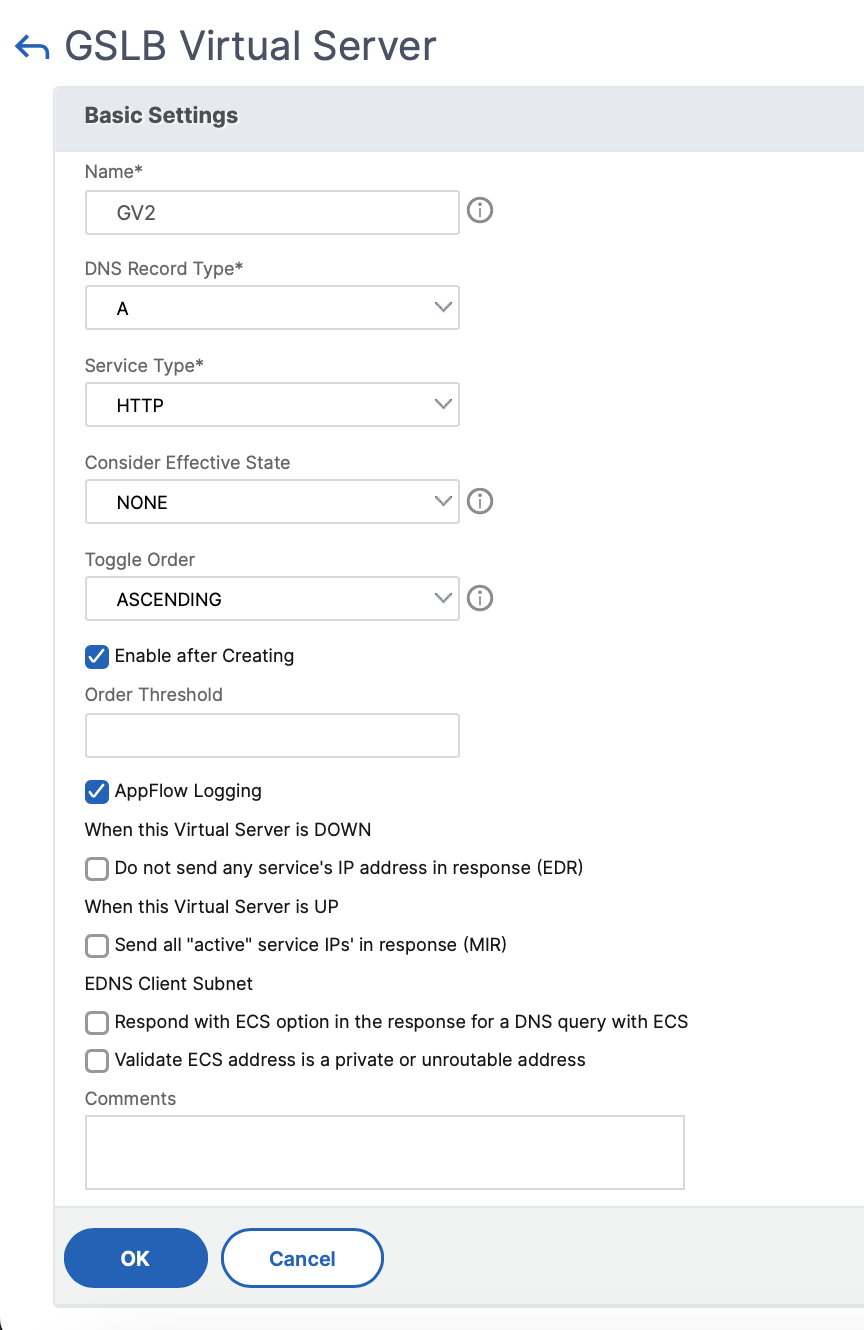
Specify the details to configure the GSLB virtual server.
Name the server, DNS Record Type is set as A, Service Type is set as HTTP, and check the boxes for Enable after Creating and AppFlow® Logging. Click OK to create the GSLB Virtual Server.
-
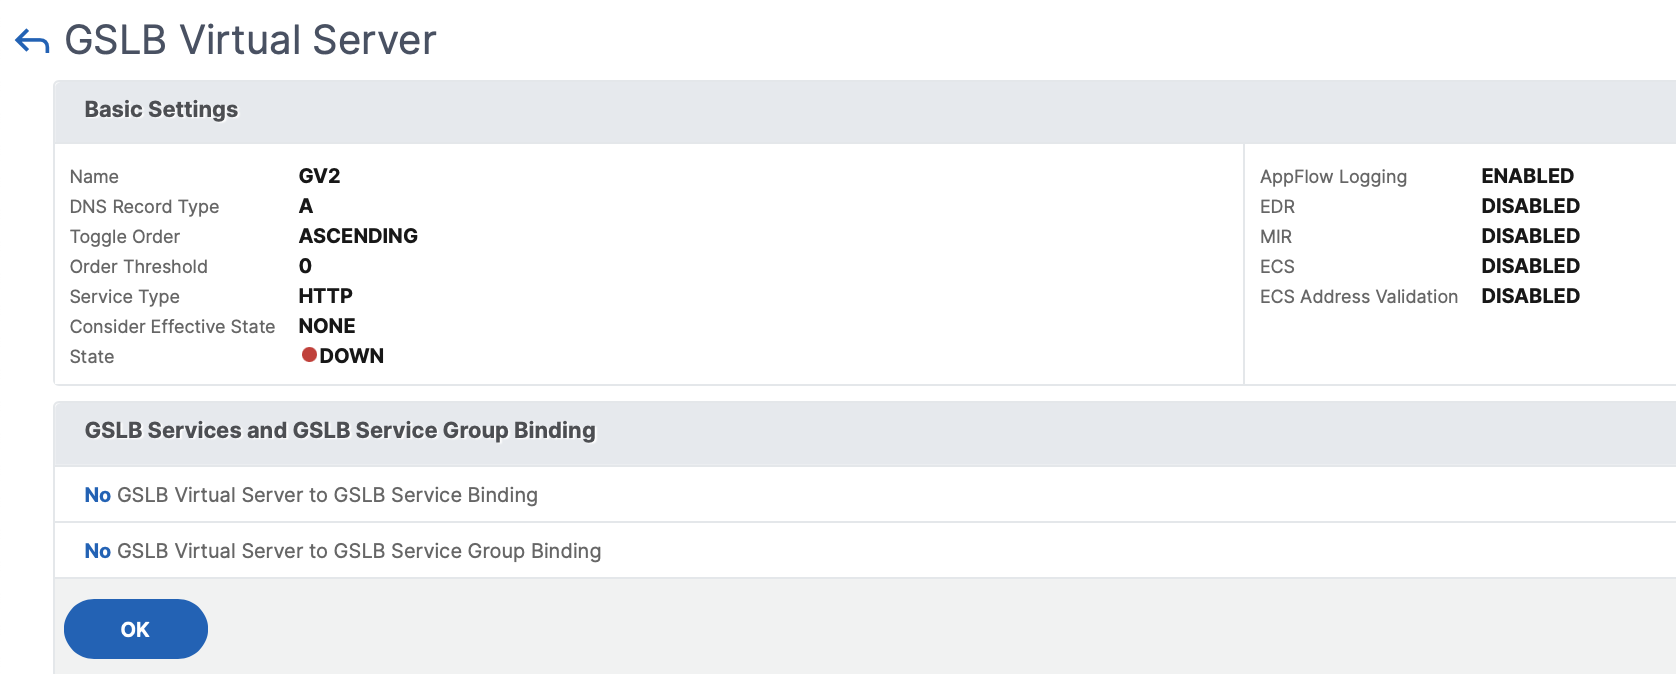
Once the GSLB virtual server is created, click No GSLB Virtual Server ServiceGroup Binding.
-
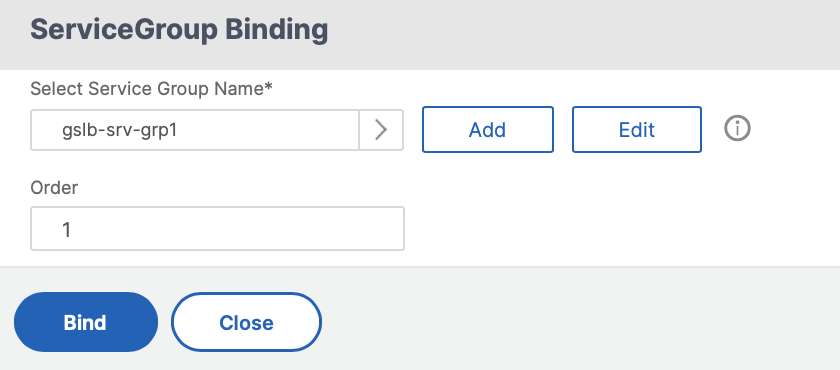
Under ServiceGroup Binding use Select Service Group Name to select and add the service groups that were created in the previous steps.
-
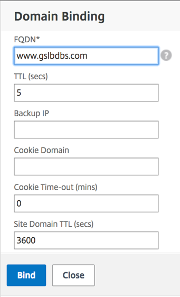
Configure the GSLB virtual server domain binding by clicking No GSLB Virtual Server Domain Binding. Configure the FQDN and bind. Retain the default setting for other parameters.
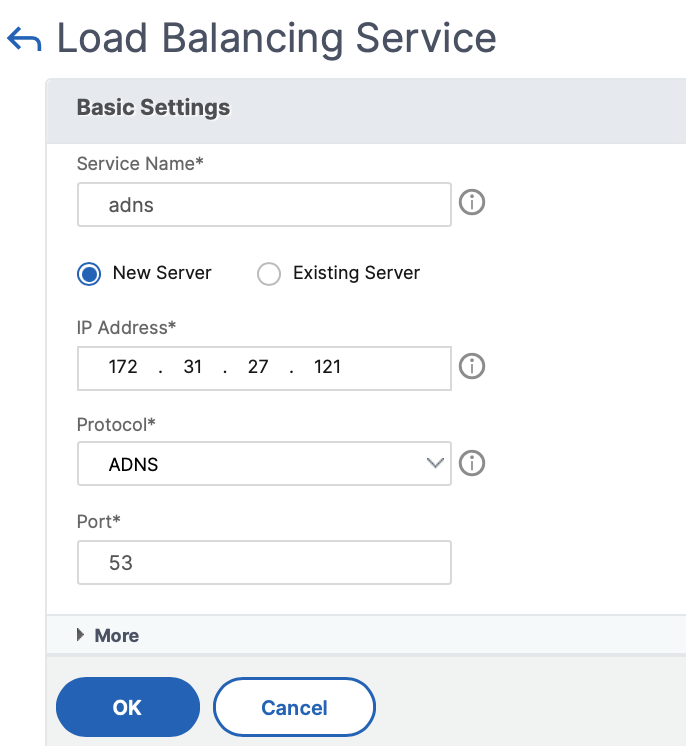
- Configure the ADNS Service by clicking No Service.
-
Specify the details to configure load balancing service.
Add a Service Name, click New Server, and enter the IP Address of the ADNS server. If the user ADNS is already configured, users can select Existing Server and then choose the user ADNS from the drop-down menu. Make sure that the protocol is ADNS and the traffic is configured to flow over port 53.
-
Configure the Method as Least Connection and the Backup Method as Round Robin.
-
Click Done and verify that the user GSLB virtual server is shown as Up.

Other resources
NetScaler Global Load Balancing for Hybrid and Multi-Cloud Deployments