Secure peering
When an appliance has secure peering enabled, connections with a partner for which it does not have a secure peer relationship are not encrypted or compressed, though TCP flow-control acceleration is still available. Compression is disabled to ensure that data stored in compression history from secured partners cannot be shared with unsecured partners.
When the appliance at one end of a connection detects that the other appliance has secure peering enabled, it attempts to open an SSL signaling tunnel. If the two appliances successfully authenticate each other over this tunnel, they have a secure peering relationship. All accelerated connections between the two appliances are encrypted, and compression is enabled.
Note
An appliance with secure peering enabled does not compress connections to unsecured partners, using the same appliance successfully with a mix of secured and unsecured partners is difficult. Keep this point in mind when designing your accelerated network.
A keystore password is required to access the security parameters. This keystore password is different from the administrator’s password, to allow security administration to be separated from other tasks. If the keystore password is reset, all existing encrypted data and private keys are lost.
To protect data even if the appliance is stolen, the keystore password must be reentered every time the appliance is restarted. Until this is done, secure peering and compression are disabled.
Generate security keys and certificates
Citrix SD-WAN WANOP products are shipped without the required keys and certificates for the SSL signaling tunnel. You must generate them yourself. You can generate keys and certificates through your normal process for generating credentials, or with the “openssl” package from http://www.openssl.org.
For testing purposes, you can generate and use a self-signed X509 certificate based on a private key (which you also generate). In production, use certificates that refer to a trusted certifying authority. The following example calls openssl from the command line on a PC to generate a private key ( my.key) and self-signed certificate ( my.crt):
pre codeblock
# Generate a 2048-bit private key
openssl genrsa -out my.key 2048
# Now create a Certificate Signing Request
openssl req -new -key my.key -out my.csr
# Finally, create a self-signed certificate with a 365-day expiration
openssl x509 -req -days 365 -in my.csr -signkey my.key -out my.crt
<!--NeedCopy-->
For production use, consult your organization’s security policies.
Configure secure peering
There are two ways to establish secure peering:
-
Using credentials generated by the appliances.
-
Using credentials you provide yourself.
Because an appliance with secure peering enabled will only compress connections with partner appliances with which it has a secure peering relationship, this procedure should be applied at the same time to all your appliances.
To prepare the appliances for secure peering:
Perform the following procedure on each appliance in your network.
-
Install a crypto license on the appliance. Without a crypto license, secure acceleration is not available.
-
If you have not done so already, acquire crypto licenses from Citrix.
-
If you are using a network license server, go to the Configuration > Appliance Settings > Licensing . On the Add License section click edit, and select the Remote license server and set Crypto License On.
-
If you are using local licensing, go to Configuration > Appliance Settings > Licensing . In the Add License page, click the Local license server option, and click Add to upload a local crypto license.
-
Verify successful license installation on the Configuration > Appliance Settings > Licensing page. Under Licensing Information, a crypto license should be shown as active and with an expiration date in the future.
-
-
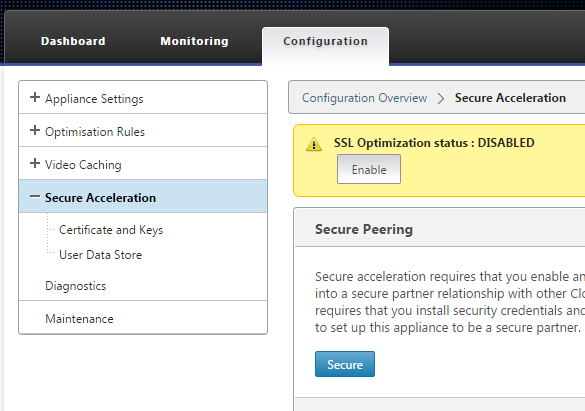
Go to the Configuration > Secure Acceleration page. If the page has a button labeled Secure, click it.
-
If you are taken to a Keystore Settings screen automatically, do the following:
-
Enter a keystore password twice and click Save.
-
When the screen updates to show the Secure Peering Certificates and Keys section, click Enable Secure Peering and CA Certificate, then click Save.
-
Skip to Step 6.
-
-
If you were not taken to the Keystore Settings screen automatically, click the pencil icon under Secure Peering, then click the pencil icon under Keystore Settings. Open on the Keystore Status pulldown menu, and enter a keystore password twice. Click Save.
-
Enable secure peering by going to the Configuration > Secure Acceleration page and clicking the Enable button. Ignore any warnings at this stage. This setting enables secure peering when the required additional configuration is complete.
-
Enable encryption of compression history by going to Configuration > Secure Acceleration User Data Store and clicking the pencil icon. Click Enable Disk Encryption, then click Save. User data store encryption prevents unauthorized reading of the disk based compression history, in case the appliance is stolen or returned to the factory. The security of disk data encryption relies on the keystore password. This feature uses AES-256 encryption. (Disk data encryption does not encrypt the entire disk, just the compression history.)
-
If you are using appliance-generated credentials, skip to the next step. If you are using your own credentials, do the following:
-
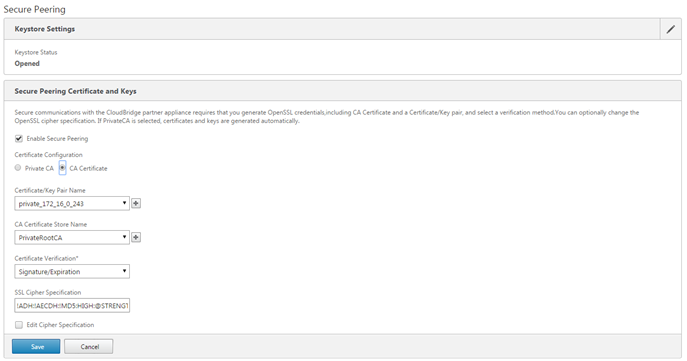
Go to Configuration > Secure Acceleration and click the pencil icon under Secure Peering, then click the pencil icon under Secure Peering Certificates and Keys. Click Enable Secure Peering and Certificate Configuration > CA Certificate. The credential specification fields appear.
-
Under Certificate/Key Pair Name, click the + icon and upload or paste the cert/key pair for this appliance. If required by the credentials, also enter the key password or file password. Click Create.
-
Under CA Certificate Store Name, click the + icon and upload or paste the CA certificate for this appliance.
-
Keep the default values for the Certificate Verification and SSL Cipher Specification fields unless your organization requires otherwise.
-
Click Save.
-
-
Repeat for the rest of your appliances.
-
If you are using credentials that you provided yourself, secure peering configuration is complete.
-
If you are using appliance-generated credentials, perform the following procedure.
To use secure peering with appliance-generated credentials:
-
Use the “Prepare the appliances for securing peering” procedure, above, to prepare your appliances for this procedure.
-
On one datacenter appliance, go to Configuration > Secure Acceleration and click the Enable button, if present, to enable secure peering.
-
Click the pencil icon under Secure Peering. The keystore should be open. If it isn’t, open it now.
-
Click the pencil icon under Secure Peering Certificate and Keys. Click the Enable Secure Peering and Private CA options, then click Save. This will generate a local self-signed CA certificate and a local certificate-key pair.
-
Click + under Connected Peers. Enter the IP address, administrator’s user name, and administrator’s password for one of your remote appliances and click Connect. This issues a CA certificate and certificate-key pair for the remote appliance, and copies it to the remote appliance.
Note
For SD-WAN WANOP appliances, the IP address could be the IP address of any of the interface where web access is enabled. For SD-WAN PE appliances, the IP address is the management IP address.
-
Repeat this process for your other remote appliances.
-
On the datacenter appliance, verify connectivity by going to Monitoring > Partners and Plug-ins > Secure Partners. For each remote appliance, the content of the Secure field should be True, and the Connection Status should be Connected Available.