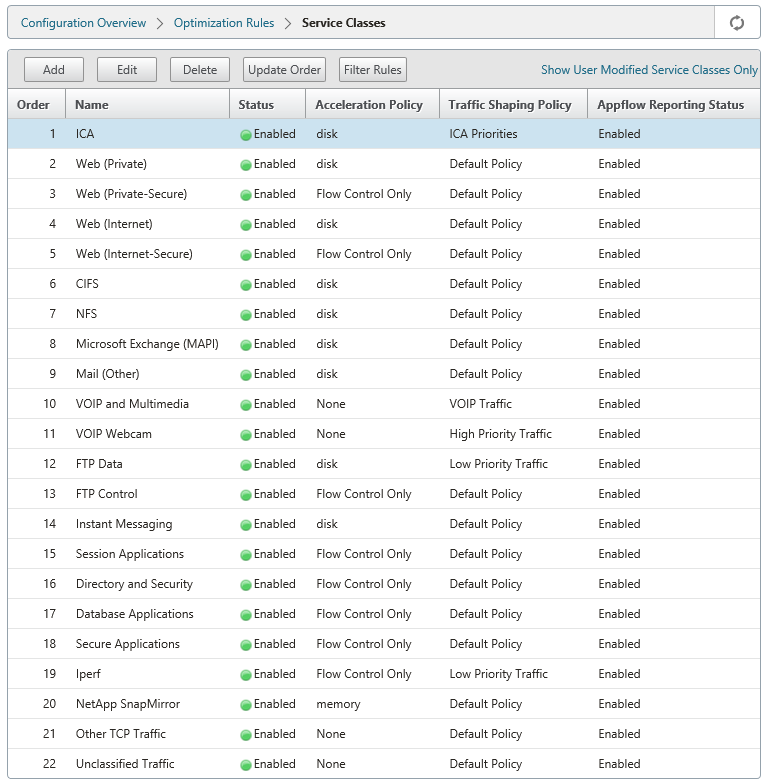
Service classes
Service classes are assigned traffic-shaping policies and acceleration policies to be used for all connections that match the service-class definition. Service classes can be based on the following parameters:
-
Applications
-
IP or VLAN addresses
-
DSCP bits
-
SSL profiles
The default service-class definitions are recommended as a starting point. Modify them if they prove inadequate for your links.
The service classes are defined in an ordered list. The first definition that matches the traffic being processed becomes the service class for the traffic.
Differences between acceleration decisions and traffic shaping policies
To make an acceleration decision, the Citrix SD-WAN WANOP appliance examines the initial SYN packet of each TCP connection to determine whether the connection is a candidate for acceleration. The SYN packet contains no payload, only headers, so the acceleration decision must be based on the contents of the SYN packet’s headers, such as the destination port or destination IP address of the connection. Acceleration, once applied, lasts for the duration of the connection.
Unlike acceleration decisions, traffic-shaping policies can be based on the contents of the connection’s data stream. Depending on how long it takes for the application classifier to receive enough data for a final classification, a connection might be reclassified during its lifetime.
For example, the first packet in an HTTP connection to http://www.example.com is an SYN packet that contains a header but no payload. The header has an IP destination port of 80, which matches the HTTP: Internet service class definition, so the acceleration engine bases its acceleration decision, in this case, none (no acceleration) on that service class.
The traffic shaper uses the traffic-shaping policy from the HTTP: Internet service-class, but this decision is temporary. The first payload packet contains the string GET http://www.example.com, which matches the example application definition in the application classifier. The service class that includes the example application is selected by the traffic shaper, instead the service class that includes HTTP: Internet, and the traffic shaper uses the service-class policy named in that service-class definition.
Note
Regardless of the service class policy, the reporting feature tracks the usage of the example application.
Important
All traffic is associated with an application and a service class, and all service classes have a traffic shaping policy, but only TCP connections have an acceleration policy other than none.
Configure service class definitions
Because service-class definitions are an ordered list, a definition that is an exception to a general case must precede the more general definition on the service-class page. The first definition whose rule matches the traffic is the one that is applied. For example:
-
Service classes based on URLs must precede the HTTP service classes in the service-class list, because any URL-based rule also matches the HTTP service class. Therefore, putting the HTTP service class first would prevent the URL-based rules or published application-based rules from ever being used.
-
Similarly, service classes based on ICA (Virtual Apps/Virtual Desktops) published applications must precede the Citrix service class.
Because all URL-based rules match the HTTP service class, putting the HTTP service class above them would result in the URL-based rules or published application-based rules never being used.
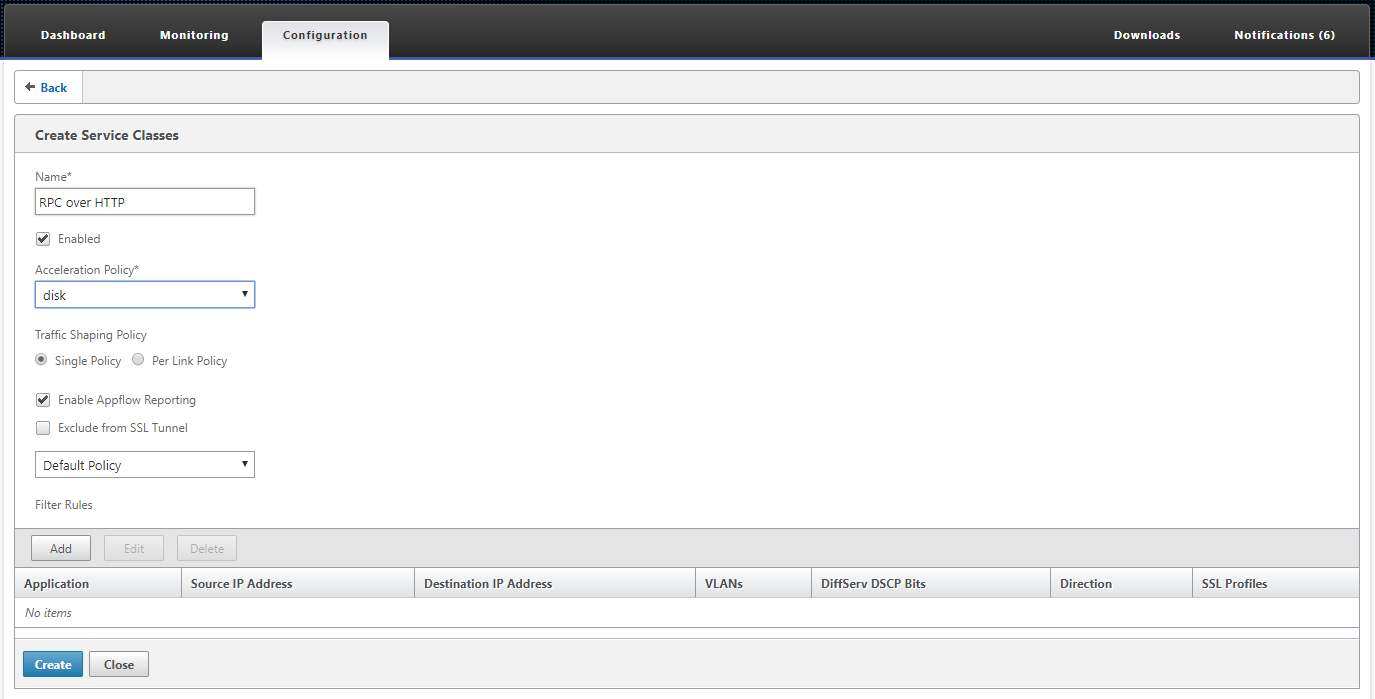
To create an RPC over HTTP service class and bind the SSL profile to it:
-
Navigate to Configuration> Optimization Rules > Service Classes and click Add.
-
In the Name field, enter a name for the service class.
-
Make sure that the Enabled option is selected.
-
From the Acceleration Policy list, select an acceleration policy. Memory and Disk specify where to store the traffic history used for compression. Disk is usually the best choice, because the appliance automatically selects disk or memory, depending on which is more appropriate for the traffic. Memory specifies memory only. Select Flow Control Only to disable compression but enable flow-control acceleration. Select this for services that are always encrypted, and for the FTP control channel. None is used only for uncompressible encrypted traffic and real-time video.
-
Select Enable AppFlow Reporting to enable AppFlow reporting for this Service Class. Information from this service class is included in any AppFlow reports. AppFlow is an industry standard for unlocking application transactional data processed by the network infrastructure. The WAN Optimization AppFlow interface works with any AppFlow collector to generate reports. The collector receives detailed information from the appliance, using the AppFlow open standard.
-
Select Exclude from the SSL Tunnel to exclude traffic associated with the Service Class from SSL Tunneling.
-
In the traffic shaping policy list, make sure that Default Policy option is selected. Traffic shaping policies have a weighted priority and other attributes that determine how matching traffic will be treated, relative to other traffic. Most service classes are set to Default Policy, but higher-priority traffic can be assigned a higher-priority traffic-shaping policy, and lower-priority traffic can be assigned a lower-priority policy.
-
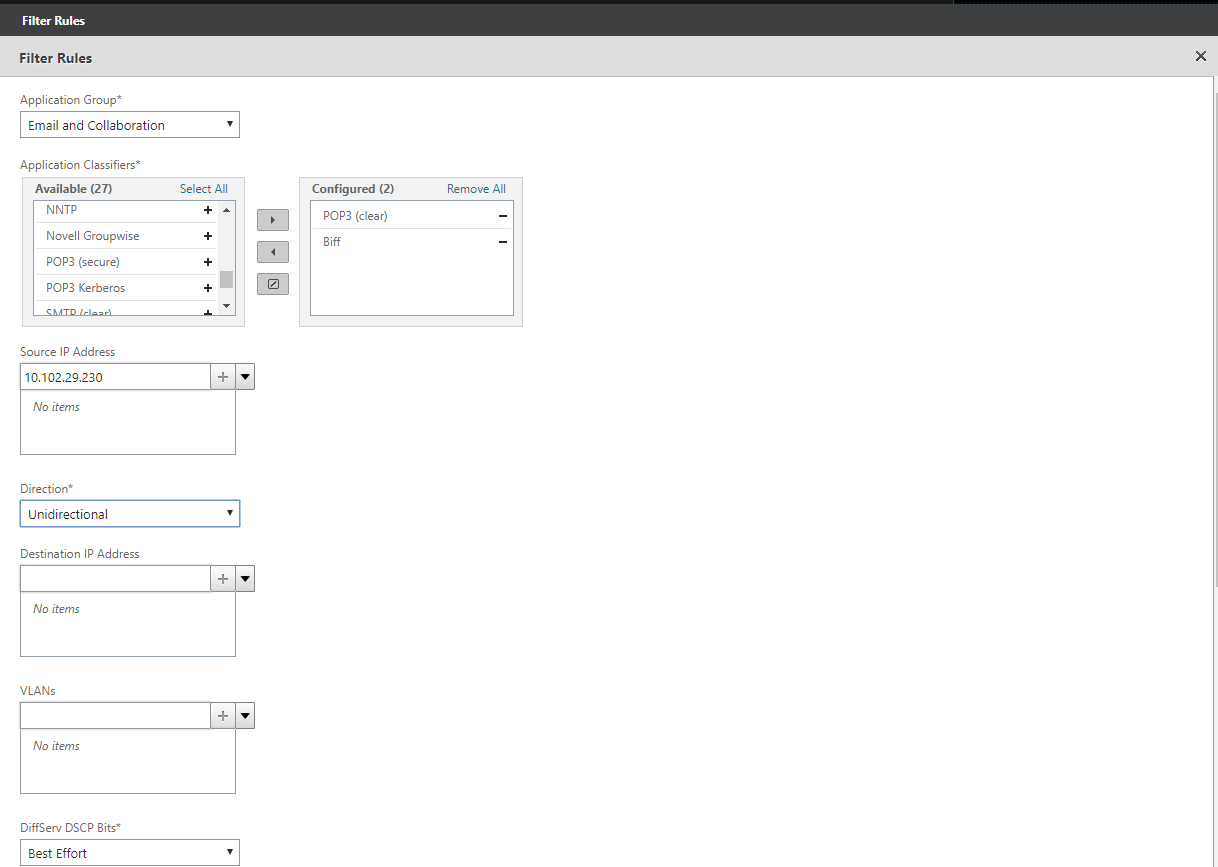
In the Filter Rules section, click Add to create filter rule that has Any as the default value for all parameters. If a rule is evaluated as TRUE for a given connection, the connection is assigned to that service class. Filter rules for most service classes consist solely of a list of applications, but rules can also include IP addresses, VLAN tags, DSCP values, and SSL profile names. All the fields in a rule default to Any (a wildcard). Fields within a rule are ANDed together.
-
Click Add to add filter rules.
-
From the Application Group list, select Email and Collaboration.
-
From the Available list, select the required applications.
-
Move the selected applications to the Configured list.
-
In the Source IP Addresses field, add the client IP addresses.
-
From the Direction list, select the direction of the traffic.
-
From the SSL Profiles list, select the SSL profile you have created
-
Click Create.
Note
-
You must configure and bind an SSL profile to the service class only on the datacenter-side appliance.
-
Only the service classes that have their filter rules direction set to unidirectional can be associated with SSL profiles.
-