Konvertieren einer NetScaler MPX 26000-50S Appliance in eine NetScaler SDX 26000-50S Appliance
Sie können eine NetScaler MPX Appliance in eine NetScaler SDX Appliance konvertieren, indem Sie die Software über ein neues Solid-State-Laufwerk (SSD) aktualisieren. NetScaler liefert ein Feldkonvertierungskit zur Migration einer NetScaler MPX Appliance zu einer SDX Appliance.
Die Konvertierung erfordert alle acht SSDs.
Hinweis:
Citrix empfiehlt, den Lights-Out-Management (LOM)-Port der Appliance zu konfigurieren, bevor Sie den Konvertierungsprozess starten. Weitere Informationen zum LOM-Port der ADC-Appliance finden Sie unter Lights-Out-Management-Port der NetScaler SDX Appliance.
Um eine MPX Appliance in eine SDX Appliance zu konvertieren, müssen Sie über ein Konsolenkabel, das an einen Computer oder ein Terminal angeschlossen ist, auf die Appliance zugreifen. Bevor Sie das Konsolenkabel anschließen, konfigurieren Sie den Computer oder das Terminal so, dass es die folgende Konfiguration unterstützt:
- VT100-Terminalemulation
- 9600 Baud
- 8 Datenbits
- 1 Stoppbit
- Parität und Flusskontrolle auf KEINE gesetzt
Verbinden Sie ein Ende des Konsolenkabels mit dem seriellen RS232-Port der Appliance und das andere Ende mit dem Computer oder Terminal.
Hinweis:
Um ein Kabel mit einem RJ-45-Konverter zu verwenden, stecken Sie den optionalen Konverter in den Konsolenport und schließen Sie das Kabel daran an.
Vergewissern Sie sich bei angeschlossenem Kabel, dass die Komponenten der MPX Appliance ordnungsgemäß funktionieren. Sie können dann mit der Konvertierung beginnen. Der Konvertierungsprozess modifiziert das BIOS, installiert ein Citrix Hypervisor- und ein Service Virtual Machine-Image und kopiert das NetScaler VPX-Image auf das Solid State Drive.
Der Konvertierungsprozess richtet auch einen redundanten Verbund unabhängiger Festplatten (RAID)-Controller für den lokalen Speicher und den NetScaler VPX-Speicher ein. SSD-Steckplätze Nr. 1 und Nr. 2 werden für den lokalen Speicher verwendet, und die SSD-Steckplätze Nr. 3, Nr. 4, Nr. 5, Nr. 6, Nr. 7 und Nr. 8 werden für den NetScaler VPX-Speicher verwendet.
Nach dem Konvertierungsprozess ändern Sie die Konfiguration des Geräts und wenden eine neue Lizenz an. Anschließend können Sie die VPX-Instanzen über den Management Service auf dem nun als NetScaler SDX-Appliance fungierenden Gerät bereitstellen.
Überprüfen Sie den ordnungsgemäßen Betrieb der Komponenten der MPX-Appliance
- Greifen Sie auf den Konsolenport zu und geben Sie die Administratoranmeldeinformationen ein.
-
Führen Sie den folgenden Befehl über die Befehlszeilenschnittstelle des Geräts aus, um die Seriennummer anzuzeigen:
show hardware. Möglicherweise benötigen Sie die Seriennummer, um sich nach der Konvertierung am Gerät anzumelden.Beispiel
> show hardware
Platform: NSMPX-26000-50S 28*CPU+256GB+4*MLX(50)+16*F2X+2*E1K+4*4-CHIP CO 520310
Manufactured on: 9/15/2020
CPU: 2400MHZ
Host Id: 1862303878
Serial no: 83WRVD62EM
Encoded serial no: 83WRVD62EM
Netscaler UUID: 258f9971-f7db-11ea-b021-00e0ed9041b6
BMC Revision: 5.03
Done
<!--NeedCopy-->
Die Seriennummer kann hilfreich sein, wenn Sie den technischen Support von Citrix® kontaktieren möchten.
-
Führen Sie den folgenden Befehl aus, um den Status der aktiven Schnittstellen anzuzeigen:
show interfaceBeispiel
> show interface 1) Interface 0/1 (Gig Ethernet 10/100/1000 MBits) #8 flags=0xc020 <ENABLED, UP, UP, autoneg, HAMON, HEARTBEAT, 802.1q> MTU=1500, native vlan=1, MAC=0c:c4:7a:56:64:7e, uptime 120h29m33s Requested: media AUTO, speed AUTO, duplex AUTO, fctl OFF, throughput 0 Actual: media UTP, speed 1000, duplex FULL, fctl OFF, throughput 1000 LLDP Mode: NONE, LR Priority: 1024 RX: Pkts(1614945) Bytes(104805024) Errs(0) Drops(1601312) Stalls(0) TX: Pkts(9166) Bytes(2556380) Errs(0) Drops(0) Stalls(0) NIC: InDisc(0) OutDisc(0) Fctls(0) Stalls(0) Hangs(0) Muted(0) Bandwidth thresholds are not set. 2) Interface 0/2 (Gig Ethernet 10/100/1000 MBits) #9 flags=0x4000 <ENABLED, DOWN, down, autoneg, HAMON, HEARTBEAT, 802.1q> MTU=1500, native vlan=1, MAC=0c:c4:7a:56:64:7f, downtime 120h29m53s Requested: media AUTO, speed AUTO, duplex AUTO, fctl OFF, throughput 0 LLDP Mode: NONE, LR Priority: 1024 RX: Pkts(0) Bytes(0) Errs(0) Drops(0) Stalls(0) TX: Pkts(0) Bytes(0) Errs(0) Drops(0) Stalls(0) NIC: InDisc(0) OutDisc(0) Fctls(0) Stalls(0) Hangs(0) Muted(0) Bandwidth thresholds are not set. 3) Interface 25/1 (25G Ethernet, unknown device) #10 flags=0x4000 <ENABLED, DOWN, down, autoneg, HAMON, HEARTBEAT, 802.1q> MTU=1500, native vlan=1, MAC=00:e0:ed:90:41:bc, downtime 120h29m53s Requested: media AUTO, speed AUTO, duplex AUTO, fctl OFF, throughput 0 LLDP Mode: NONE, LR Priority: 1024 RX: Pkts(0) Bytes(0) Errs(0) Drops(0) Stalls(0) TX: Pkts(0) Bytes(0) Errs(0) Drops(0) Stalls(0) NIC: InDisc(0) OutDisc(0) Fctls(0) Stalls(0) Hangs(0) Muted(0) Bandwidth thresholds are not set. Rx Ring: Configured size=2048, Actual size=512, Type: Elastic 4) Interface 25/2 (25G Ethernet, unknown device) #11 flags=0x4000 <ENABLED, DOWN, down, autoneg, HAMON, HEARTBEAT, 802.1q> MTU=1500, native vlan=1, MAC=00:e0:ed:90:41:bd, downtime 120h29m53s Requested: media AUTO, speed AUTO, duplex AUTO, fctl OFF, throughput 0 LLDP Mode: NONE, LR Priority: 1024 RX: Pkts(0) Bytes(0) Errs(0) Drops(0) Stalls(0) TX: Pkts(0) Bytes(0) Errs(0) Drops(0) Stalls(0) NIC: InDisc(0) OutDisc(0) Fctls(0) Stalls(0) Hangs(0) Muted(0) Bandwidth thresholds are not set. Rx Ring: Configured size=2048, Actual size=512, Type: Elastic 5) Interface 25/3 (25G Ethernet, unknown device) #12 flags=0x4000 <ENABLED, DOWN, down, autoneg, HAMON, HEARTBEAT, 802.1q> MTU=1500, native vlan=1, MAC=00:e0:ed:90:41:be, downtime 120h29m53s Requested: media AUTO, speed AUTO, duplex AUTO, fctl OFF, throughput 0 LLDP Mode: NONE, LR Priority: 1024 RX: Pkts(0) Bytes(0) Errs(0) Drops(0) Stalls(0) TX: Pkts(0) Bytes(0) Errs(0) Drops(0) Stalls(0) NIC: InDisc(0) OutDisc(0) Fctls(0) Stalls(0) Hangs(0) Muted(0) Bandwidth thresholds are not set. Rx Ring: Configured size=2048, Actual size=512, Type: Elastic 6) Interface 25/4 (25G Ethernet, unknown device) #13 flags=0x4000 <ENABLED, DOWN, down, autoneg, HAMON, HEARTBEAT, 802.1q> MTU=1500, native vlan=1, MAC=00:e0:ed:90:41:bf, downtime 120h29m53s Requested: media AUTO, speed AUTO, duplex AUTO, fctl OFF, throughput 0 LLDP Mode: NONE, LR Priority: 1024 RX: Pkts(0) Bytes(0) Errs(0) Drops(0) Stalls(0) TX: Pkts(0) Bytes(0) Errs(0) Drops(0) Stalls(0) NIC: InDisc(0) OutDisc(0) Fctls(0) Stalls(0) Hangs(0) Muted(0) Bandwidth thresholds are not set. Rx Ring: Configured size=2048, Actual size=512, Type: Elastic 7) Interface 25/5 (25G Ethernet, unknown device) #14 flags=0x4000 <ENABLED, DOWN, down, autoneg, HAMON, HEARTBEAT, 802.1q> MTU=1500, native vlan=1, MAC=00:e0:ed:90:41:f2, downtime 120h29m53s Requested: media AUTO, speed AUTO, duplex AUTO, fctl OFF, throughput 0 LLDP Mode: NONE, LR Priority: 1024 RX: Pkts(0) Bytes(0) Errs(0) Drops(0) Stalls(0) TX: Pkts(0) Bytes(0) Errs(0) Drops(0) Stalls(0) NIC: InDisc(0) OutDisc(0) Fctls(0) Stalls(0) Hangs(0) Muted(0) Bandwidth thresholds are not set. Rx Ring: Configured size=2048, Actual size=512, Type: Elastic 8) Interface 25/6 (25G Ethernet, unknown device) #15 flags=0x4000 <ENABLED, DOWN, down, autoneg, HAMON, HEARTBEAT, 802.1q> MTU=1500, native vlan=1, MAC=00:e0:ed:90:41:f3, downtime 120h29m53s Requested: media AUTO, speed AUTO, duplex AUTO, fctl OFF, throughput 0 LLDP Mode: NONE, LR Priority: 1024 RX: Pkts(0) Bytes(0) Errs(0) Drops(0) Stalls(0) TX: Pkts(0) Bytes(0) Errs(0) Drops(0) Stalls(0) NIC: InDisc(0) OutDisc(0) Fctls(0) Stalls(0) Hangs(0) Muted(0) Bandwidth thresholds are not set. Rx Ring: Configured size=2048, Actual size=512, Type: Elastic 9) Interface 25/7 (25G Ethernet, unknown device) #16 flags=0x4000 <ENABLED, DOWN, down, autoneg, HAMON, HEARTBEAT, 802.1q> MTU=1500, native vlan=1, MAC=00:e0:ed:90:41:f4, downtime 120h29m53s Requested: media AUTO, speed AUTO, duplex AUTO, fctl OFF, throughput 0 LLDP Mode: NONE, LR Priority: 1024 RX: Pkts(0) Bytes(0) Errs(0) Drops(0) Stalls(0) TX: Pkts(0) Bytes(0) Errs(0) Drops(0) Stalls(0) NIC: InDisc(0) OutDisc(0) Fctls(0) Stalls(0) Hangs(0) Muted(0) Bandwidth thresholds are not set. Rx Ring: Configured size=2048, Actual size=512, Type: Elastic 10) Interface 25/8 (25G Ethernet, unknown device) #17 flags=0x4000 <ENABLED, DOWN, down, autoneg, HAMON, HEARTBEAT, 802.1q> MTU=1500, native vlan=1, MAC=00:e0:ed:90:41:f5, downtime 120h30m00s Requested: media AUTO, speed AUTO, duplex AUTO, fctl OFF, throughput 0 LLDP Mode: NONE, LR Priority: 1024 RX: Pkts(0) Bytes(0) Errs(0) Drops(0) Stalls(0) TX: Pkts(0) Bytes(0) Errs(0) Drops(0) Stalls(0) NIC: InDisc(0) OutDisc(0) Fctls(0) Stalls(0) Hangs(0) Muted(0) Bandwidth thresholds are not set. Rx Ring: Configured size=2048, Actual size=512, Type: Elastic 11) Interface 25/9 (25G Ethernet, unknown device) #2 flags=0x4000 <ENABLED, DOWN, down, autoneg, HAMON, HEARTBEAT, 802.1q> MTU=1500, native vlan=1, MAC=00:e0:ed:90:41:b4, downtime 120h30m00s Requested: media AUTO, speed AUTO, duplex AUTO, fctl OFF, throughput 0 LLDP Mode: NONE, LR Priority: 1024 RX: Pkts(0) Bytes(0) Errs(0) Drops(0) Stalls(0) TX: Pkts(0) Bytes(0) Errs(0) Drops(0) Stalls(0) NIC: InDisc(0) OutDisc(0) Fctls(0) Stalls(0) Hangs(0) Muted(0) Bandwidth thresholds are not set. Rx Ring: Configured size=2048, Actual size=512, Type: Elastic 12) Interface 25/10 (25G Ethernet, unknown device) #3 flags=0x4000 <ENABLED, DOWN, down, autoneg, HAMON, HEARTBEAT, 802.1q> MTU=1500, native vlan=1, MAC=00:e0:ed:90:41:b5, downtime 120h30m00s Requested: media AUTO, speed AUTO, duplex AUTO, fctl OFF, throughput 0 LLDP Mode: NONE, LR Priority: 1024 RX: Pkts(0) Bytes(0) Errs(0) Drops(0) Stalls(0) TX: Pkts(0) Bytes(0) Errs(0) Drops(0) Stalls(0) NIC: InDisc(0) OutDisc(0) Fctls(0) Stalls(0) Hangs(0) Muted(0) Bandwidth thresholds are not set. Rx Ring: Configured size=2048, Actual size=512, Type: Elastic 13) Interface 25/11 (25G Ethernet, unknown device) #0 flags=0x4000 <ENABLED, DOWN, down, autoneg, HAMON, HEARTBEAT, 802.1q> MTU=1500, native vlan=1, MAC=00:e0:ed:90:41:b6, downtime 120h30m00s Requested: media AUTO, speed AUTO, duplex AUTO, fctl OFF, throughput 0 LLDP Mode: NONE, LR Priority: 1024 RX: Pkts(0) Bytes(0) Errs(0) Drops(0) Stalls(0) TX: Pkts(0) Bytes(0) Errs(0) Drops(0) Stalls(0) NIC: InDisc(0) OutDisc(0) Fctls(0) Stalls(0) Hangs(0) Muted(0) Bandwidth thresholds are not set. Rx Ring: Configured size=2048, Actual size=512, Type: Elastic 14) Interface 25/12 (25G Ethernet, unknown device) #1 flags=0x4000 <ENABLED, DOWN, down, autoneg, HAMON, HEARTBEAT, 802.1q> MTU=1500, native vlan=1, MAC=00:e0:ed:90:41:b7, downtime 120h30m00s Requested: media AUTO, speed AUTO, duplex AUTO, fctl OFF, throughput 0 LLDP Mode: NONE, LR Priority: 1024 RX: Pkts(0) Bytes(0) Errs(0) Drops(0) Stalls(0) TX: Pkts(0) Bytes(0) Errs(0) Drops(0) Stalls(0) NIC: InDisc(0) OutDisc(0) Fctls(0) Stalls(0) Hangs(0) Muted(0) Bandwidth thresholds are not set. Rx Ring: Configured size=2048, Actual size=512, Type: Elastic 15) Interface 25/13 (25G Ethernet, unknown device) #6 flags=0x4000 <ENABLED, DOWN, down, autoneg, HAMON, HEARTBEAT, 802.1q> MTU=1500, native vlan=1, MAC=00:e0:ed:90:41:ee, downtime 120h30m00s Requested: media AUTO, speed AUTO, duplex AUTO, fctl OFF, throughput 0 LLDP Mode: NONE, LR Priority: 1024 RX: Pkts(0) Bytes(0) Errs(0) Drops(0) Stalls(0) TX: Pkts(0) Bytes(0) Errs(0) Drops(0) Stalls(0) NIC: InDisc(0) OutDisc(0) Fctls(0) Stalls(0) Hangs(0) Muted(0) Bandwidth thresholds are not set. Rx Ring: Configured size=2048, Actual size=512, Type: Elastic 16) Interface 25/14 (25G Ethernet, unknown device) #7 flags=0x4000 <ENABLED, DOWN, down, autoneg, HAMON, HEARTBEAT, 802.1q> MTU=1500, native vlan=1, MAC=00:e0:ed:90:41:ef, downtime 120h30m00s Requested: media AUTO, speed AUTO, duplex AUTO, fctl OFF, throughput 0 LLDP Mode: NONE, LR Priority: 1024 RX: Pkts(0) Bytes(0) Errs(0) Drops(0) Stalls(0) TX: Pkts(0) Bytes(0) Errs(0) Drops(0) Stalls(0) NIC: InDisc(0) OutDisc(0) Fctls(0) Stalls(0) Hangs(0) Muted(0) Bandwidth thresholds are not set. Rx Ring: Configured size=2048, Actual size=512, Type: Elastic 17) Interface 25/15 (25G Ethernet, unknown device) #4 flags=0x4000 <ENABLED, DOWN, down, autoneg, HAMON, HEARTBEAT, 802.1q> MTU=1500, native vlan=1, MAC=00:e0:ed:90:41:f0, downtime 120h30m00s Requested: media AUTO, speed AUTO, duplex AUTO, fctl OFF, throughput 0 LLDP Mode: NONE, LR Priority: 1024 RX: Pkts(0) Bytes(0) Errs(0) Drops(0) Stalls(0) TX: Pkts(0) Bytes(0) Errs(0) Drops(0) Stalls(0) NIC: InDisc(0) OutDisc(0) Fctls(0) Stalls(0) Hangs(0) Muted(0) Bandwidth thresholds are not set. Rx Ring: Configured size=2048, Actual size=512, Type: Elastic 18) Interface 25/16 (25G Ethernet, unknown device) #5 flags=0x4000 <ENABLED, DOWN, down, autoneg, HAMON, HEARTBEAT, 802.1q> MTU=1500, native vlan=1, MAC=00:e0:ed:90:41:f1, downtime 120h30m00s Requested: media AUTO, speed AUTO, duplex AUTO, fctl OFF, throughput 0 LLDP Mode: NONE, LR Priority: 1024 RX: Pkts(0) Bytes(0) Errs(0) Drops(0) Stalls(0) TX: Pkts(0) Bytes(0) Errs(0) Drops(0) Stalls(0) NIC: InDisc(0) OutDisc(0) Fctls(0) Stalls(0) Hangs(0) Muted(0) Bandwidth thresholds are not set. Rx Ring: Configured size=2048, Actual size=512, Type: Elastic 19) Interface 50/1 (mce Ethernet, unknown device) #20 flags=0xc020 <ENABLED, UP, UP, autoneg, HAMON, HEARTBEAT, 802.1q> MTU=9216, native vlan=1, MAC=24:8a:07:a4:91:0c, uptime 99h59m54s Requested: media AUTO, speed AUTO, duplex AUTO, fctl OFF, throughput 0 Actual: media UTP, speed 50000, duplex FULL, fctl OFF, throughput 50000 LLDP Mode: NONE, LR Priority: 1024 RX: Pkts(215681) Bytes(11431096) Errs(0) Drops(215680) Stalls(0) TX: Pkts(131) Bytes(5516) Errs(0) Drops(0) Stalls(0) NIC: InDisc(0) OutDisc(0) Fctls(0) Stalls(0) Hangs(0) Muted(0) Bandwidth thresholds are not set. 20) Interface 50/2 (mce Ethernet, unknown device) #21 flags=0xc020 <ENABLED, UP, UP, autoneg, HAMON, HEARTBEAT, 802.1q> MTU=1500, native vlan=1, MAC=24:8a:07:a4:91:0d, uptime 100h00m22s Requested: media AUTO, speed AUTO, duplex AUTO, fctl OFF, throughput 0 Actual: media UTP, speed 50000, duplex FULL, fctl OFF, throughput 50000 LLDP Mode: NONE, LR Priority: 1024 RX: Pkts(313720) Bytes(17365302) Errs(0) Drops(312232) Stalls(0) TX: Pkts(114) Bytes(4788) Errs(0) Drops(0) Stalls(0) NIC: InDisc(0) OutDisc(0) Fctls(0) Stalls(0) Hangs(0) Muted(0) Bandwidth thresholds are not set. 21) Interface 50/3 (100G Ethernet) #18 flags=0x4000 <ENABLED, DOWN, down, autoneg, HAMON, HEARTBEAT, 802.1q> MTU=1500, native vlan=1, MAC=24:8a:07:a4:91:00, downtime 120h30m07s Requested: media AUTO, speed AUTO, duplex AUTO, fctl OFF, throughput 0 LLDP Mode: NONE, LR Priority: 1024 RX: Pkts(0) Bytes(0) Errs(0) Drops(0) Stalls(0) TX: Pkts(0) Bytes(0) Errs(0) Drops(0) Stalls(0) NIC: InDisc(0) OutDisc(0) Fctls(0) Stalls(0) Hangs(0) Muted(0) Bandwidth thresholds are not set. 22) Interface 50/4 (100G Ethernet) #19 flags=0x4000 <ENABLED, DOWN, down, autoneg, HAMON, HEARTBEAT, 802.1q> MTU=1500, native vlan=1, MAC=24:8a:07:a4:91:01, downtime 120h30m07s Requested: media AUTO, speed AUTO, duplex AUTO, fctl OFF, throughput 0 LLDP Mode: NONE, LR Priority: 1024 RX: Pkts(0) Bytes(0) Errs(0) Drops(0) Stalls(0) TX: Pkts(0) Bytes(0) Errs(0) Drops(0) Stalls(0) NIC: InDisc(0) OutDisc(0) Fctls(0) Stalls(0) Hangs(0) Muted(0) Bandwidth thresholds are not set. 23) Interface LO/1 (Netscaler Loopback interface) #22 flags=0x20008020 <ENABLED, UP, UP> MTU=9216, native vlan=1, MAC=0c:c4:7a:56:64:7e, uptime 120h30m01s LLDP Mode: NONE, LR Priority: 1024 RX: Pkts(611167959) Bytes(89143315781) Errs(0) Drops(0) Stalls(0) TX: Pkts(1207140213) Bytes(120806672260) Errs(0) Drops(0) Stalls(0) Bandwidth thresholds are not set. Done > <!--NeedCopy--> -
Überprüfen Sie in der Ausgabe des Befehls
show interface, dass alle Schnittstellen aktiviert sind und der Status jeder Schnittstelle als UP/UP angezeigt wird.Hinweise:
-
Der Schnittstellenstatus wird nur dann als UP/UP angezeigt, wenn die Kabel an die Schnittstellen angeschlossen sind.
-
Wenn Sie nicht für jeden Port einen SFP+-Transceiver haben, überprüfen Sie die Schnittstellen schrittweise. Nachdem Sie den ersten Satz von Schnittstellen überprüft haben, ziehen Sie die SFP+-Transceiver ab und stecken Sie sie in den nächsten Satz von Ports.
-
-
Führen Sie den folgenden Befehl für jede der Schnittstellen aus, die sich nicht im UP/UP-Zustand befinden:
enable interface 50/xDabei ist x die neue Schnittstellennummer.> enable interface 50/1 Done > enable interface 50/2 Done > enable interface 50/3 Done > enable interface 50/4 Done <!--NeedCopy--> -
Führen Sie den folgenden Befehl aus, um zu überprüfen, ob der Status der Netzteile normal ist:
stat system –detail
Beispiel
> stat system -detail

Citrix ADC Executive View

System Information:
Up since    Wed Jan 20 21:35:18 2021
Up since(Local) Wed Jan 20 21:35:18 2021
Memory usage (MB)               5802
InUse Memory (%)                2.52
Number of CPUs                    15

System Health Statistics (Standard):
CPU 0 Core Voltage (Volts)                  1.80
CPU 1 Core Voltage (Volts)                  1.80
Main 3.3 V Supply Voltage                   3.35
Standby 3.3 V Supply Voltage                    3.25
+5.0 V Supply Voltage                           5.03
+12.0 V Supply Voltage                         12.13
Battery Voltage (Volts)                         2.98
Intel CPU Vtt Power(Volts)                      0.00
5V Standby Voltage(Volts)                   4.97
Voltage Sensor2(Volts)                      0.00
CPU Fan 0 Speed (RPM)                       3100
CPU Fan 1 Speed (RPM)                       3100
System Fan Speed (RPM)                      3100
System Fan 1 Speed (RPM)                    3100
System Fan 2 Speed (RPM)                    3100
CPU 0 Temperature (Celsius)                       47
CPU 1 Temperature (Celsius)                       51
Internal Temperature (Celsius)                    35
Power supply 1 status                         NORMAL
Power supply 2 status                         NORMAL
Power supply 3 status              NOT SUPPORTED
Power supply 4 status              NOT SUPPORTED

System Disk Statistics:
/flash Size (MB)                               23801
/flash Used (MB)                                 787
/flash Available (MB)                          21110
/flash Used (%)                                    3
/var Size (MB)                                341167
/var Used (MB)                                112391
/var Available (MB)                           201482
/var Used (%)                                     35

System Health Statistics(Auxiliary):
Voltage 0 (Volts)                           1.20
Voltage 1 (Volts)                           1.20
Voltage 2 (Volts)                           1.21
Voltage 3 (Volts)                           1.20
Voltage 4 (Volts)                           1.54
Voltage 5 (Volts)                           0.00
Voltage 6 (Volts)                           0.00
Voltage 7 (Volts)                           0.00
Fan 0 Speed (RPM)                           3200
Fan 1 Speed (RPM)                              0
Fan 2 Speed (RPM)                              0
Fan 3 Speed (RPM)                              0
Temperature 0 (Celsius)                       27
Temperature 1 (Celsius)                       38
Temperature 2 (Celsius)                        0
Temperature 3 (Celsius)                        0
 Done
>
<!--NeedCopy-->
-
Führen Sie den folgenden Befehl aus, um ein Tar-Archiv mit Systemkonfigurationsdaten und Statistiken zu erstellen:
show techsupportBeispiel
> show techsupport

showtechsupport data collector tool - $Revision$!
NetScaler version 13.0
The NS IP of this box is 10.217.206.43
This is not HA configuration
Copying selected configuration files ....
Running shell commands ....
Running CLI show commands ....
Collecting ns running configuration....
Collecting running gslb configuration....
Running CLI stat commands ....
Running vtysh commands ....
Copying newnslog files ....
Copying core files from /var/core ....
Copying core files from /var/crash ....
Copying GSLB location database files ....
Copying GSLB auto sync log files ....
Copying Safenet Gateway log files ....
Copying messages, ns.log, dmesg and other log files ....
Creating archive ....
/var/tmp/support/support.tgz  ---- points to ---> /var/tmp/support/collector_P_10.217.206.43_5Dec2020_05_32.tar.gz

showtechsupport script took 1 minute(s) and 17 second(s) to execute.
Done
<!--NeedCopy-->
Hinweis
Die Ausgabe des Befehls ist in der Datei
/var/tmp/support/collector_<IP_address>_P_<date>.tar.gzverfügbar. Kopieren Sie diese Datei zur späteren Bezugnahme auf einen anderen Computer. Die Ausgabe des Befehls kann hilfreich sein, wenn Sie den technischen Support von Citrix kontaktieren möchten. -
Wechseln Sie in der Befehlszeilenschnittstelle zur Shell-Eingabeaufforderung. Geben Sie ein:
shellBeispiel
> shell Copyright (c) 1992-2013 The FreeBSD Project. Copyright (c) 1979, 1980, 1983, 1986, 1988, 1989, 1991, 1992, 1993, 1994 The Regents of the University of California. All rights reserved. root@ns# <!--NeedCopy--> -
Führen Sie den folgenden Befehl aus, um den Speicher Ihrer Appliance zu überprüfen:
root@ns# grep "memory" /var/nslog/dmesg.bootBeispiel
root@ns# grep "memory" /var/nslog/dmesg.boot real memory = 274877906944 (262144 MB) avail memory = 264024535040 (251793 MB) root@ns# <!--NeedCopy--> -
Führen Sie den folgenden Befehl aus, um die Anzahl der CPU-Kerne Ihrer Appliance zu überprüfen:
root@ns# grep "cpu" /var/nslog/dmesg.bootBeispiel
root@ns# grep "cpu" /var/nslog/dmesg.boot cpu0 (BSP): APIC ID: 0 cpu1 (AP): APIC ID: 2 cpu2 (AP): APIC ID: 4 cpu3 (AP): APIC ID: 6 cpu4 (AP): APIC ID: 8 cpu5 (AP): APIC ID: 10 cpu6 (AP): APIC ID: 12 cpu7 (AP): APIC ID: 16 cpu8 (AP): APIC ID: 18 cpu9 (AP): APIC ID: 20 cpu10 (AP): APIC ID: 22 cpu11 (AP): APIC ID: 24 cpu12 (AP): APIC ID: 26 cpu13 (AP): APIC ID: 28 cpu14 (AP): APIC ID: 32 cpu15 (AP): APIC ID: 34 cpu16 (AP): APIC ID: 36 cpu17 (AP): APIC ID: 38 cpu18 (AP): APIC ID: 40 cpu19 (AP): APIC ID: 42 cpu20 (AP): APIC ID: 44 cpu21 (AP): APIC ID: 48 cpu22 (AP): APIC ID: 50 cpu23 (AP): APIC ID: 52 cpu24 (AP): APIC ID: 54 cpu25 (AP): APIC ID: 56 cpu26 (AP): APIC ID: 58 cpu27 (AP): APIC ID: 60 cpu0: <ACPI CPU> on acpi0 cpu1: <ACPI CPU> on acpi0 cpu2: <ACPI CPU> on acpi0 cpu3: <ACPI CPU> on acpi0 cpu4: <ACPI CPU> on acpi0 cpu5: <ACPI CPU> on acpi0 cpu6: <ACPI CPU> on acpi0 cpu7: <ACPI CPU> on acpi0 cpu8: <ACPI CPU> on acpi0 cpu9: <ACPI CPU> on acpi0 cpu10: <ACPI CPU> on acpi0 cpu11: <ACPI CPU> on acpi0 cpu12: <ACPI CPU> on acpi0 cpu13: <ACPI CPU> on acpi0 cpu14: <ACPI CPU> on acpi0 cpu15: <ACPI CPU> on acpi0 cpu16: <ACPI CPU> on acpi0 cpu17: <ACPI CPU> on acpi0 cpu18: <ACPI CPU> on acpi0 cpu19: <ACPI CPU> on acpi0 cpu20: <ACPI CPU> on acpi0 cpu21: <ACPI CPU> on acpi0 cpu22: <ACPI CPU> on acpi0 cpu23: <ACPI CPU> on acpi0 cpu24: <ACPI CPU> on acpi0 cpu25: <ACPI CPU> on acpi0 cpu26: <ACPI CPU> on acpi0 cpu27: <ACPI CPU> on acpi0 est0: <Enhanced SpeedStep Frequency Control> on cpu0 p4tcc0: <CPU Frequency Thermal Control> on cpu0 est1: <Enhanced SpeedStep Frequency Control> on cpu1 p4tcc1: <CPU Frequency Thermal Control> on cpu1 est2: <Enhanced SpeedStep Frequency Control> on cpu2 p4tcc2: <CPU Frequency Thermal Control> on cpu2 est3: <Enhanced SpeedStep Frequency Control> on cpu3 p4tcc3: <CPU Frequency Thermal Control> on cpu3 est4: <Enhanced SpeedStep Frequency Control> on cpu4 p4tcc4: <CPU Frequency Thermal Control> on cpu4 est5: <Enhanced SpeedStep Frequency Control> on cpu5 p4tcc5: <CPU Frequency Thermal Control> on cpu5 est6: <Enhanced SpeedStep Frequency Control> on cpu6 p4tcc6: <CPU Frequency Thermal Control> on cpu6 est7: <Enhanced SpeedStep Frequency Control> on cpu7 p4tcc7: <CPU Frequency Thermal Control> on cpu7 est8: <Enhanced SpeedStep Frequency Control> on cpu8 p4tcc8: <CPU Frequency Thermal Control> on cpu8 est9: <Enhanced SpeedStep Frequency Control> on cpu9 p4tcc9: <CPU Frequency Thermal Control> on cpu9 est10: <Enhanced SpeedStep Frequency Control> on cpu10 p4tcc10: <CPU Frequency Thermal Control> on cpu10 est11: <Enhanced SpeedStep Frequency Control> on cpu11 p4tcc11: <CPU Frequency Thermal Control> on cpu11 est12: <Enhanced SpeedStep Frequency Control> on cpu12 p4tcc12: <CPU Frequency Thermal Control> on cpu12 est13: <Enhanced SpeedStep Frequency Control> on cpu13 p4tcc13: <CPU Frequency Thermal Control> on cpu13 est14: <Enhanced SpeedStep Frequency Control> on cpu14 p4tcc14: <CPU Frequency Thermal Control> on cpu14 est15: <Enhanced SpeedStep Frequency Control> on cpu15 p4tcc15: <CPU Frequency Thermal Control> on cpu15 est16: <Enhanced SpeedStep Frequency Control> on cpu16 p4tcc16: <CPU Frequency Thermal Control> on cpu16 est17: <Enhanced SpeedStep Frequency Control> on cpu17 p4tcc17: <CPU Frequency Thermal Control> on cpu17 est18: <Enhanced SpeedStep Frequency Control> on cpu18 p4tcc18: <CPU Frequency Thermal Control> on cpu18 est19: <Enhanced SpeedStep Frequency Control> on cpu19 p4tcc19: <CPU Frequency Thermal Control> on cpu19 est20: <Enhanced SpeedStep Frequency Control> on cpu20 p4tcc20: <CPU Frequency Thermal Control> on cpu20 est21: <Enhanced SpeedStep Frequency Control> on cpu21 p4tcc21: <CPU Frequency Thermal Control> on cpu21 est22: <Enhanced SpeedStep Frequency Control> on cpu22 p4tcc22: <CPU Frequency Thermal Control> on cpu22 est23: <Enhanced SpeedStep Frequency Control> on cpu23 p4tcc23: <CPU Frequency Thermal Control> on cpu23 est24: <Enhanced SpeedStep Frequency Control> on cpu24 p4tcc24: <CPU Frequency Thermal Control> on cpu24 est25: <Enhanced SpeedStep Frequency Control> on cpu25 p4tcc25: <CPU Frequency Thermal Control> on cpu25 est26: <Enhanced SpeedStep Frequency Control> on cpu26 p4tcc26: <CPU Frequency Thermal Control> on cpu26 est27: <Enhanced SpeedStep Frequency Control> on cpu27 p4tcc27: <CPU Frequency Thermal Control> on cpu27 root@ns# <!--NeedCopy--> -
Führen Sie den folgenden Befehl aus, um zu überprüfen, ob das /var-Laufwerk als
/dev/ ar0s1a: root@ns# df –hgemountet ist.Beispiel
root@ns# df -h Filesystem Size Used Avail Capacity Mounted on /dev/md0 422M 404M 9.1M 98% / devfs 1.0k 1.0k 0B 100% /dev procfs 4.0k 4.0k 0B 100% /proc /dev/ar0s1a 23G 6.9G 14G 32% /flash /dev/ar0s1e 333G 32G 274G 10% /var root@ns# <!--NeedCopy--> -
Geben Sie den folgenden Befehl ein, um das Skript ns_hw_err.bash auszuführen, das nach latenten Hardwarefehlern sucht:
root@ns# ns_hw_err.bashBeispiel
root@ns# ns_hw_err.bash
NetScaler NS13.0: Build 73.17.nc, Date: Nov 11 2020, 07:56:08   (64-bit)
platform: serial 83WRVD62EM
platform: sysid 520310 - NSMPX-26000-50S 28*CPU+256GB+4*MLX(50)+16*F2X+2*E1K+4*4-CHIP COL 8955
HDD MODEL: ar0: 434992MB <Intel MatrixRAID RAID1> status: READY

Generating the list of newnslog files to be processed...
Generating the events from newnslog files...
Checking for HDD errors...
Checking for HDD SMART errors...
Checking for Flash errors...
Checking for Mega Raid Controller errors...
Checking for SSL errors...
Checking for BIOS errors...
Checking for SMB errors...
Checking for MotherBoard errors...
Checking for CMOS errors...
        License year: 2021: OK
Checking for SFP/NIC errors...

Checking for Firmware errors...
Checking for License errors...
Checking for Undetected CPUs...
Checking for DIMM flaps...
Checking for Memory Channel errors...
Checking for LOM errors...
Checking the Power Supply Errors...
Checking for Hardware Clock errors...
Script Done.
root@ns#
<!--NeedCopy-->
Wichtig: trennen Sie physisch alle Ports, außer dem LOM-Port, einschließlich des Management-Ports, vom Netzwerk.
-
Wechseln Sie an der Shell-Eingabeaufforderung zur ADC-Befehlszeile. Geben Sie ein: exit
Beispiel
root@ns# exit logout Done <!--NeedCopy--> -
Führen Sie den folgenden Befehl aus, um die Appliance herunterzufahren. Sie werden gefragt, ob Sie den ADC vollständig stoppen möchten. Geben Sie ein:
shutdown -p nowBeispiel
> shutdown -p now
Are you sure you want to completely stop NetScaler (Y/N)? [N]:y
Done
> Dec  5 06:09:11 <auth.notice> ns shutdown: power-down by root:
Dec  5 06:09:13 <auth.emerg> ns init: Rebooting via init mechanism
Dec  5 06:09:13 <syslog.err> ns syslogd: exiting on signal 15
Dec  5 06:09:13 aslearn[1662]: before pthread_join(), task name: Aslearn_Packet_Loop_Task
Dec  5 06:09:15 aslearn[1662]: Exiting function ns_do_logging
Dec  5 06:09:15 aslearn[1662]: before pthread_join(), task name: Aslearn_WAL_Cleanup_Task
Dec  5 06:09:15 aslearn[1662]: before pthread_join(), task name: Aslearn_HA_Primary_Task
Dec  5 06:09:15 aslearn[1662]: 1662 exiting gracefully
Dec  5 06:09:18 [1672]: nsnet_tcpipconnect: connect() failed; returned -1 errno=61
qat0: qat_dev0 stopped 12 acceleration engines
pci4: Resetting device
qat1: qat_dev1 stopped 12 acceleration engines
pci6: Resetting device
qat2: qat_dev2 stopped 12 acceleration engines
pci132: Resetting device
qat3: qat_dev3 stopped 12 acceleration engines
pci134: Resetting device
Dec  5 06:09:33 init: some processes would not die; ps axl advised
reboot initiated by init with parent kernel
Waiting (max 60 seconds) for system process `vnlru' to stop...done
Waiting (max 60 seconds) for system process `bufdaemon' to stop...done
Waiting (max 60 seconds) for system process `syncer' to stop...
Syncing disks, vnodes remaining...0 0 0 done
All buffers synced.
Uptime: 1h53m18s
ixl_shutdown: lldp start 0
ixl_shutdown: lldp start 0
ixl_shutdown: lldp start 0
ixl_shutdown: lldp start 0
usbus0: Controller shutdown
uhub0: at usbus0, port 1, addr 1 (disconnected)
usbus0: Controller shutdown complete
usbus1: Controller shutdown
uhub1: at usbus1, port 1, addr 1 (disconnected)
ugen1.2: <vendor 0x8087> at usbus1 (disconnected)
uhub3: at uhub1, port 1, addr 2 (disconnected)
ugen1.3: <FTDI> at usbus1 (disconnected)
uftdi0: at uhub3, port 1, addr 3 (disconnected)
ugen1.4: <vendor 0x1005> at usbus1 (disconnected)
umass0: at uhub3, port 3, addr 4 (disconnected)
(da0:umass-sim0:0:0:0): lost device - 0 outstanding, 0 refs
(da0:umass-sim0:0:0:0): removing device entry
usbus1: Controller shutdown complete
usbus2: Controller shutdown
uhub2: at usbus2, port 1, addr 1 (disconnected)
 ugen2.2: <vendor 0x8087> at usbus2 (disconnected)
uhub4: at uhub2, port 1, addr 2 (disconnected)
ugen2.3: <vendor 0x0557> at usbus2 (disconnected)
uhub5: at uhub4, port 7, addr 3 (disconnected)
ugen2.4: <vendor 0x0557> at usbus2 (disconnected)
ukbd0: at uhub5, port 1, addr 4 (disconnected)
ums0: at uhub5, port 1, addr 4 (disconnected)
usbus2: Controller shutdown complete
ixl_shutdown: lldp start 0
ixl_shutdown: lldp start 0
ixl_shutdown: lldp start 0
ixl_shutdown: lldp start 0
acpi0: Powering system off
<!--NeedCopy-->
Appliance aktualisieren
Führen Sie die folgenden Schritte aus, um die Appliance zu aktualisieren:
- Schalten Sie die ADC-Appliance aus.
-
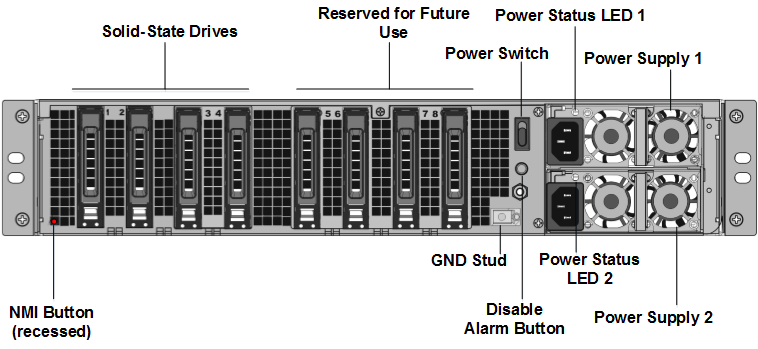
Suchen Sie die beiden Solid-State-Laufwerke (SSDs) auf der Rückseite der Appliance in Steckplatz Nr. 1 und Steckplatz Nr. 2, wie in der folgenden Abbildung gezeigt:
-
Stellen Sie sicher, dass die Ersatz-Solid-State-Laufwerke (SSDs) die für Ihr ADC-Modell erforderlichen sind. Die Konvertierung erfordert mindestens vier SSDs. Das NetScaler-Etikett befindet sich auf der Oberseite einer der SSDs. Die SSD ist mit einer neuen BIOS-Version und einem aktuellen Build des erforderlichen NetScaler SDX Management Service vorinstalliert. Diese SSD muss in Steckplatz Nr. 1 installiert werden.
-
Entfernen Sie die SSDs, indem Sie die Sicherheitsverriegelung der Laufwerksabdeckung nach unten drücken, während Sie den Laufwerksgriff ziehen.
-
Öffnen Sie beim neuen Citrix-zertifizierten SSD-Laufwerk den Laufwerksgriff vollständig nach links. Führen Sie dann das neue Laufwerk so weit wie möglich in Steckplatz Nr. 1 ein.
-
Um das Laufwerk zu fixieren, schließen Sie den Griff bündig mit der Rückseite des Geräts, sodass das Laufwerk sicher im Steckplatz einrastet.
Wichtig: Die Ausrichtung der SSD ist wichtig. Wenn Sie das Laufwerk einsetzen, stellen Sie sicher, dass das NetScaler®-Produktetikett seitlich angebracht ist, ähnlich wie bei den bereits eingesetzten SSDs.
-
Setzen Sie eine zweite Citrix-zertifizierte SSD, deren Kapazität der SSD in Steckplatz Nr. 1 entspricht, in Steckplatz Nr. 2 ein.
Wichtig
Das Mischen und Anpassen von alten und neuen SSDs wird nicht unterstützt. SSDs in Steckplatz Nr. 1 und Steckplatz Nr. 2, die das erste RAID-Paar (lokaler Speicher) bilden, müssen die gleiche Größe und den gleichen Typ haben. Ebenso müssen SSDs in Steckplatz Nr. 3 und Steckplatz Nr. 4, die das zweite RAID-Paar (VPX-Speicher) bilden, die gleiche Größe und den gleichen Typ haben. Verwenden Sie nur Laufwerke, die Teil des bereitgestellten Konvertierungskits sind.
-
Setzen Sie die leeren 960-GB-SSDs in die Steckplätze 3, 4, 5, 6, 7 und 8 ein.
-
trennen Sie alle Netzwerkkabel von den Datenports und den Management-Ports.
-
Starten Sie das ADC-Gerät. Anweisungen finden Sie unter Einschalten des Geräts.
Der Konvertierungsprozess kann bis zu 90 Minuten dauern, während dessen Sie das Gerät nicht neu starten dürfen. Der gesamte Konvertierungsprozess ist möglicherweise nicht auf der Konsole sichtbar und scheint möglicherweise nicht zu reagieren.
Der Konvertierungsprozess aktualisiert das BIOS, installiert den Citrix Hypervisor™ und das Betriebssystem des Management Service.
-
Lassen Sie das Konsolenkabel während des Konvertierungsprozesses angeschlossen. Lassen Sie den Prozess abschließen, woraufhin die SDX-Anmeldeaufforderung angezeigt wird.
-
Während des Konvertierungsprozesses könnte die LOM-Port-Verbindung verloren gehen, da sie die IP-Adresse auf den Standardwert 192.168.1.3 zurücksetzt.
-
Die Standardanmeldeinformationen für den Citrix Hypervisor werden auf root/nsroot geändert, nachdem die Appliance von einer MPX in eine SDX konvertiert wurde. Wenn dieses Kennwort nicht funktioniert, versuchen Sie, nsroot/die Seriennummer der Appliance einzugeben. Der Barcode der Seriennummer befindet sich auf der Rückseite der Appliance und ist auch in der Ausgabe des Befehls
show hardwareverfügbar.Hinweis:
Die Seriennummer der Appliance bleibt gleich.
- Um sicherzustellen, dass die Konvertierung erfolgreich ist, überprüfen Sie, ob das FVT-Ergebnis Erfolg anzeigt. Führen Sie den folgenden Befehl aus:
tail /var/log/fvt/fvt.log
Die konvertierte Appliance neu konfigurieren
Nach dem Konvertierungsprozess verfügt die Appliance nicht mehr über ihre vorherige funktionierende Konfiguration. Daher können Sie nur über die Standard-IP-Adresse 192.168.100.1/16 auf die Appliance über einen Webbrowser zugreifen. Konfigurieren Sie einen Computer im Netzwerk 192.168.0.0 und verbinden Sie ihn direkt mit dem Management-Port (0/1) der Appliance mit einem Crossover-Ethernet-Kabel. Alternativ können Sie über einen Netzwerk-Hub mit einem Straight-Through-Ethernet-Kabel auf die NetScaler SDX Appliance zugreifen. Verwenden Sie die Standardanmeldeinformationen, um sich anzumelden, und führen Sie dann die folgenden Schritte aus:
- Wählen Sie die Registerkarte Dashboard aus.
- Überprüfen Sie, ob der Abschnitt Systemressource die genaue Anzahl der CPU-Kerne, SSL-Kerne und den gesamten Speicher für Ihre NetScaler SDX Appliance anzeigt.
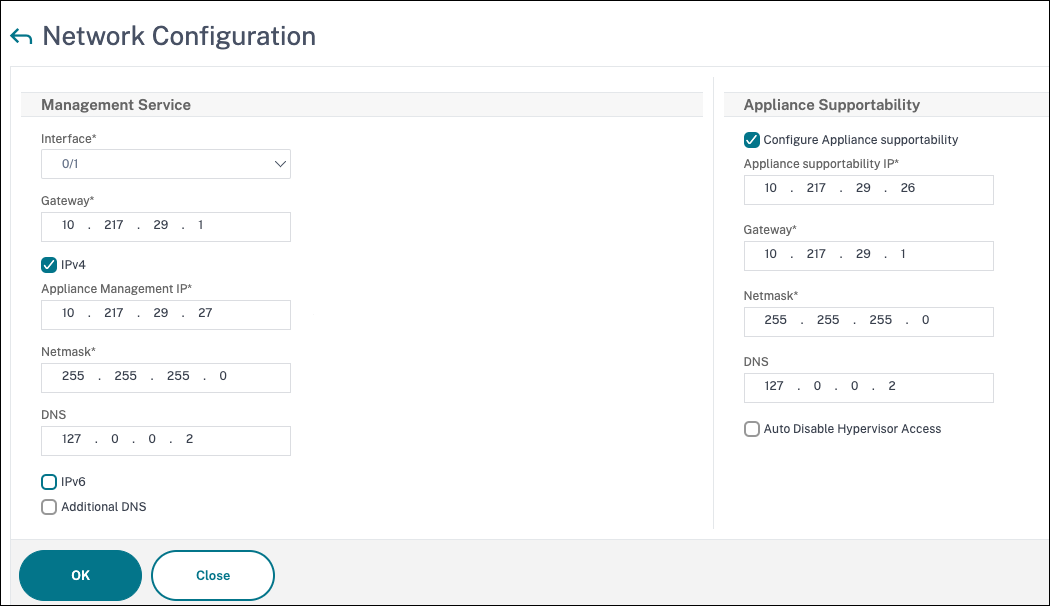
- Navigieren Sie zu Konfiguration > System, um die Netzwerkinformationen des Management Service zu ändern.
- Geben Sie im Dialogfeld Netzwerkkonfiguration ändern die folgenden Details an:
- Schnittstelle: Managementschnittstelle, die die Appliance mit einer Management-Workstation oder einem Netzwerk verbindet. Mögliche Werte: 0/1, 0/2. Standard: 0/1.
- Gateway: IP-Adresse des Routers, der den Datenverkehr aus dem Subnetz der Appliance weiterleitet.
- Aktivieren Sie das Kontrollkästchen IPv4, wenn Sie die IPv4-Adresse für den Management Service verwenden möchten, und geben Sie die Details für die folgenden Parameter ein:
- Appliance-Management-IP: Die IPv4-Adresse, die für den Zugriff auf den Management Service über einen Webbrowser verwendet wird.
- Netzmaske: Die Subnetzmaske, in der sich die SDX-Appliance befindet.
- DNS: IPv4-Adresse des primären DNS-Servers. IPv6-Adressen werden für den primären DNS-Server nicht unterstützt.
- Aktivieren Sie das Kontrollkästchen IPv6, wenn Sie die IPv6-Adresse für den Management Service verwenden möchten, und geben Sie die Details für die folgenden Parameter ein:
- IP-Adresse des Management Service: Die IPv6-Adresse, die für den Zugriff auf den Management Service über einen Webbrowser verwendet wird.
- Gateway-IPv6-Adresse: Die IPv4-Adresse des Routers, der den Datenverkehr aus dem Subnetz der Appliance weiterleitet.
- Wählen Sie Zusätzlicher DNS aus, um DNS-Server-IP-Adressen als zusätzlichen DNS-Server neben dem primären DNS-Server hinzuzufügen. Die IP-Adressen können entweder IPv4 oder IPv6 sein.
-
Klicken Sie auf OK. Die Verbindung zum Management Service geht verloren, da die Netzwerkinformationen geändert wurden.
-
Verbinden Sie den Management-Port 0/1 der NetScaler SDX-Appliance mit einem Switch, um über das Netzwerk darauf zuzugreifen. Navigieren Sie zu der zuvor verwendeten IP-Adresse und melden Sie sich mit den Standardanmeldeinformationen an.
-
Wenden Sie die neuen Lizenzen an. Anweisungen finden Sie unter SDX-Lizenzierungsübersicht.
- Navigieren Sie zu Configuration > System und klicken Sie in der Gruppe System Administration auf Reboot Appliance. Klicken Sie zur Bestätigung auf Yes. Sie können nun die VPX-Instanzen auf der NetScaler SDX-Appliance bereitstellen. Anweisungen finden Sie unter Bereitstellen von NetScaler-Instanzen.