Routing in a cluster
Routing in a cluster works in much the same way as routing in a standalone system. A few points to note:
-
All routing configurations must be performed from the cluster IP address and the configurations are propagated to the other cluster nodes.
-
Routes are limited to the maximum number of ECMP routes supported by the upstream router.
-
Node-specific routing configurations must be performed by using the owner-node argument as follows:
  router ospf
    owner-node 0
      ospf router-id 97.131.0.1
    exit-owner-node
  !
<!--NeedCopy-->
The following command displays the consolidated cluster configuration for all nodes in VTYSH.
show cluster-config
The following command displays the cluster status on each node.
show cluser node
IPv4 routing in L2 cluster
The following section contains sample configurations that help you to configure IPv4 OSPF and BGP routing in L2 cluster.
Adding spotted SNIP address and enabling dynamic routing
In the following configuration, OSPF, and BGP routing are enabled. Also, spotted SNIP addresses are added and dynamic routing is enabled on these SNIP addresses.
en ns fea ospf bgp
add vlan 10
add ns ip 10.10.10.1 255.255.255.0 -dynamicrouting enabled -ownernode 1
add ns ip 10.10.10.2 255.255.255.0 -dynamicrouting enabled -ownernode 2
add ns ip 10.10.10.3 255.255.255.0 -dynamicrouting enabled -ownernode 3
bind vlan 10 -ipaddress 10.10.10.1 255.255.255.0
<!--NeedCopy-->
VTYSH IPv4 OSPF configuration
For configuring IPv4 OSPF in L2 cluster, you must
- Set the priority to zero.
- Configure the Router-id as a spotted configuration.
Note
The OSPF configuration guidelines for L2 cluster are applicable for OSPFv3 also.
In the following sample configuration IPv4 OSPF is configured.
      interface vlan10
       IP OSPF PRIORITY 0
       !
      router ospf
          owner-node 1
            ospf router-id 97.131.0.1
          exit-owner-node
          owner-node 2
            ospf router-id 97.131.0.2
          exit-owner-node
          owner-node 3
            ospf router-id 97.131.0.3
          exit-owner-node
      network 10.10.10.0/24 area 0
      redistribute kernel
       !
<!--NeedCopy-->
VTYSH IPv4 BGP configuration
In the following VTYSH sample configuration, IPv4 BGP is configured.
    router bgp 100
      neighbor 10.10.10.10 remote-as 200
     owner-node 1
      neighbor 10.10.10.10 update-source 10.10.10.1
     exit-owner-node
     owner-node 2
      neighbor 10.10.10.10 update-source 10.10.10.2
     exit-owner-node
     owner-node 3
      neighbor 10.10.10.10 update-source 10.10.10.3
     exit-owner-node
    redistribute kernel
    !
<!--NeedCopy-->
Note
The update-source command is used for each neighbor with owner-node argument in the following configuration to connect with proper source IP.
IPv6 routing in L2 cluster
The following section contains sample configurations that help you to configure IPv6 OSPF and BGP routing in L2 cluster.
Enable IPv6 routing
Before configuring IPv6 routing in a L2 cluster, you must enable the IPv6 feature.
To enable IPv6 routing by using the CLI,
At the command prompt, type:
enable ns fea ipv6pt
Adding spotted SNIP6 address and enabling dynamic routing
In the following configuration, OSPF, and BGP routing are enabled. Also, spotted SNIP6 addresses are added and dynamic routing is enabled on these SNIP6 addresses.
add ns ip6 3ffa::1/64 -dynamicrouting enabled -ownernode 1
add ns ip6 3ffa::2/64 -dynamicrouting enabled -ownernode 2
add ns ip6 3ffa::3/64 -dynamicrouting enabled -ownernode 3
add vlan 10
bind vlan 10 -ipaddress 3ffa::1/64
<!--NeedCopy-->
VTYSH IPv6 BGP configuration
In the following VTYSH sample configuration, IPv6 BGP is configured.
  router bgp 100
   neighbor 3ffa::10 remote-as 200
     owner-node 1
      neighbor 3ffa::10 update-source 3ffa::1
     exit-owner-node
     owner-node-2
      neighbor 3ffa::10 update-source 3ffa::2
     exit-owner-node
     owner-node-3
      neighbor 3ffa::10 update-source 3ffa::3
     exit-owner-node
   no neighbor 3ffa::10 activate
   address-family ipv6
    redistribute kernel
    neighbor 3ffa::10 activate
   exit-address-family
  !
<!--NeedCopy-->
Install IPv6 learned routes
The Citrix® ADC cluster can use routes learned by various routing protocols after you install the routes in the Citrix ADC cluster routing table.
To install IPv6 learned routes to the internal routing table by using the CLI:
At the command prompt, type:
-
ns route-install ipv6 bgp -
ns route-install ipv6 ospf -
ns route-install default
Note
If you have to exchange IPv4 routes on a IPv6 neighbor, you must remove the
no neighbor 3ffa::10 activeVTYSH command from the earlier configuration.The
update-sourceVTYSH command must be used for each owner node to specify right IPv6 source IP while connecting to BGP peer as given in BPG IPv4 configuration.
Routing in a L3 cluster
The routing in L3 cluster works only when the following configurations are done on the Citrix ADC appliance.
-
Enable the dynamic routing for a VLAN.
set vlan <id> -dynamicrouting enabled <!--NeedCopy--> -
To reach all cluster nodes, the VIP, CLIP, and Citrix ADC IP (NSIP) must be advertised by routing protocols along with
set vlancommand.
Deployment scenario for BGP in L3 cluster
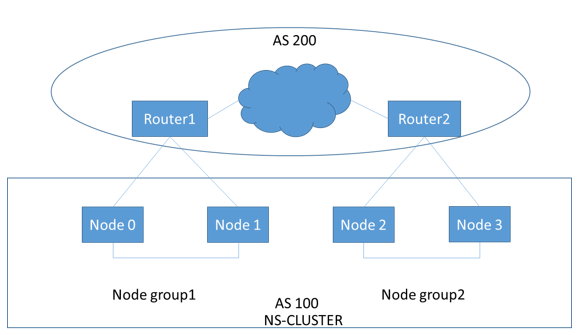
Consider an example where all the cluster nodes are grouped in AS 100 network, and the upstream routers are in different AS 200.
The following figure depicts the AS 100 and AS 200 deployment in a cluster setup.

In this deployment, CLIP advertises CCO to upstream routers. Some cluster nodes drop the advertised traffic, as AS loop is detected.
To overcome the issue, configure the following command in vtysh BGP router mode for each neighbor.
At the VTYSH command prompt, type:
neighbor <peer_ip> allowas-in 1
As a best practice, Citrix recommends you to configure any one of the following:
-
Configure route-maps to learn only desired networks such as; default route, Citrix ADC IP (NSIP), and NSIP subnets on cluster nodes.
-
Configure upstream routes to advertise only desired networks such as; CLIP and Citrix ADC IP (NSIP) in cluster.