Using Equal Cost Multiple Path (ECMP)
By using the Equal Cost Multiple Path (ECMP) mechanism on a cluster deployment, active cluster nodes advertise the virtual server IP addresses. The cluster node which receives the advertised traffic steers the traffic to the node that must process the traffic. There can be redundant steering in spotted and partially striped virtual servers. Therefore, from NetScaler® 11 onwards, spotted and partially striped virtual server IP addresses advertise the owner nodes, which reduce the redundant steering.
You must have detailed knowledge of routing protocols to use ECMP. For more information, see “Configuring Dynamic Routes. For more information on routing in a cluster, see “Routing in a Cluster”.
To use ECMP, you must first perform the following:
- Enable the required routing protocol (OSPF, RIP, BGP, or ISIS) on the cluster IP address.
- Bind the interfaces and the spotted IP address (with dynamic routing enabled) to a VLAN.
- Configure the selected routing protocol and redistribute the kernel routes on the ZebOS by using the vtysh shell.
Perform similar configurations on the cluster IP address and on the external connecting device.
Note
- Make sure that the licenses on the cluster support dynamic routing, otherwise ECMP does not work.
- ECMP is not supported for wildcard virtual servers since RHI needs a VIP address to advertise to a router and wildcard virtual servers do not have associated VIP addresses.
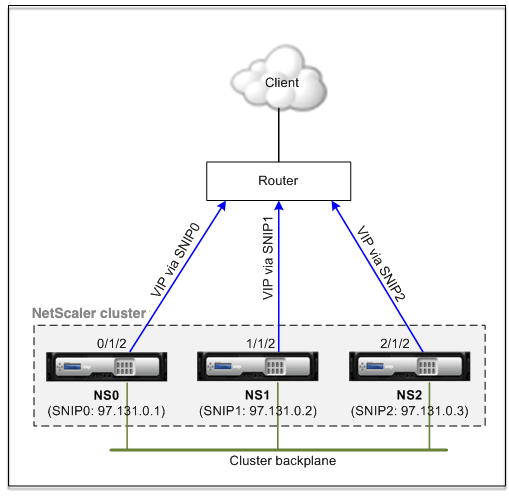
Figure 1. ECMP topology

When you use ECMP mechanism for traffic distribution on a cluster deployment, the active cluster nodes advertise the virtual server IP addresses to the upstream router. The ECMP router can reach the VIP address via SNIP0, SNIP1, or SNIP2. The traffic flow in the Figure 1 is described as follows:
- The client sends a request to the VIP hosted on cluster.
- The upstream router, based on the learned routes of the VIP, forwards the packet to any one of the nodes. Let’s say NS1. The node NS1 is the flow receiver.
- The flow receiver (NS1) determines the node that must process the traffic, which is called the flow processor. For example, Node NS2 is the flow processor.
- The flow receiver (NS1) with SNIP1 (97.131.0.2) steers the request to the flow processor (NS2) with SNIP2 (97.131.0.3).
- The flow processor (NS2) establishes a connection with the server.
- The server processes the request and sends the response to the SNIP address that sent the request to the server.
Notes:
- Only ACTIVE nodes advertise VIP routes.
- INACTIVE nodes do not advertise VIP routes.
- All ACTIVE nodes advertise striped VIPs.
- Only ACTIVE owner nodes advertise spotted or partially striped VIPs.
To configure ECMP on the cluster by using the command line interface
-
Log on to the cluster IP address.
-
Enable the routing protocol.
enable ns feature <feature>Example: To enable the OSPF routing protocol.
enable ns feature ospf -
Add a VLAN.
add vlan <id>Example
add vlan 97 -
Bind the interfaces of the cluster nodes to the VLAN.
bind vlan <id> -ifnum <interface_name>Example
bind vlan 97 -ifnum 0/1/2 1/1/2 2/1/2 -
Add a spotted SNIP address for each node and enable dynamic routing on it.
add ns ip <SNIP> <netmask> -ownerNode <positive_integer> -dynamicRouting ENABLEDExample
add ns ip 97.131.0.1 255.0.0.0 -ownerNode 0 -dynamicRouting ENABLED -type SNIP add ns ip 97.131.0.2 255.0.0.0 -ownerNode 1 -dynamicRouting ENABLED -type SNIP add ns ip 97.131.0.3 255.0.0.0 -ownerNode 2 -dynamicRouting ENABLED -type SNIP -
Bind one of the spotted SNIP addresses to the VLAN. When you bind one spotted SNIP address to a VLAN, all other spotted SNIP addresses defined on the cluster in that subnet are automatically bound to the VLAN.
bind vlan <id> -IPAddress <SNIP> <netmask>Example
bind vlan 97 -ipAddress 97.131.0.1 255.0.0.0Note
You can use NSIP addresses of the cluster nodes instead of adding SNIP addresses. If so, you do not have to perform steps 3–6.
-
Configure the routing protocol on ZebOS using vtysh shell.
Example:
To configure an OSPF routing protocol on node IDs 0, 1, and 2.
vtysh
! interface vlan97 !
 router ospf   owner-node 0
ospf router-id 97.131.0.1   exit-owner-node
owner-node 1    ospf router-id 97.131.0.2
exit-owner-node
owner-node 2
ospf router-id 97.131.0.3   exit-owner-node   redistribute kernel network 97.0.0.0/8 area 0  !
Note
For VIP addresses to be advertised, RHI setting is done by using the vserverRHILevel parameter as follows:
add ns ip <IPAddress> <netmask> -type VIP -vserverRHILevel <vserverRHILevel>For OSPF specific RHI settings, there are more settings that can be done as follows:
add ns ip <IPAddress> <netmask> -type VIP -ospfLSAType \( TYPE1 | TYPE5 ) -ospfArea <positive\_integer>Use the add ns ip6 command to perform the preceding commands on IPv6 addresses.
-
Configure ECMP on the external switch. The following sample configurations are provided for the Cisco Nexus 7000 C7010 Release 5.2(1) switch. Similar configurations must be performed on other switches.
//For OSPF (IPv4 addresses) Global config: Configure terminal  feature ospf    Interface config:  Configure terminal  interface Vlan10      no shutdown      ip address 97.131.0.5/8    Configure terminal  router ospf 1  network 97.0.0.0/8 area 0.0.0.0  ---------------------------------

//For OSPFv3 (IPv6 addresses) Global config:  Configure terminal  feature ospfv3    Configure terminal  interface Vlan10      no shutdown      ipv6 address use-link-local-only      ipv6 router ospfv3 1 area 0.0.0.0    Configure terminal  router ospfv3 1
Router monitoring cluster nodes in ECMP deployment
In a cluster setup, on an owner node that has a spotted SNIP address configuration, you can now disable the ownerDownResponse option. By default, the option is enabled, allowing the node to respond to an ICMP/ARP/ICMP6/ND6 request coming from the upstream router. You can now disable this option to allow the router to monitor if a cluster node is active or inactive. When the router sends a request, if the option is disabled, it identifies the owner node to be inactive and unavailable for traffic distribution.
To configure ECMP for static routes traffic distribution by using the command line interface
add ns ip <ipddress> <netmask> -ownernode <node-id> –ownerDownResponse disable