Apply NetScaler VPX configurations at the first boot of the NetScaler appliance on VMware ESX hypervisor
You can apply the NetScaler VPX configurations during the first boot of the NetScaler appliance on the VMware ESX hypervisor. Therefore in certain cases, a specific setup or VPX instance is brought up in much lesser time.
For more information on Preboot user data and its format, see Apply NetScaler VPX configurations at the first boot of the NetScaler appliance in cloud.
Note:
To bootstrap using preboot user data in ESX, default gateway config must be passed in
<NS-CONFIG>section. For more information on the content of the<NS-CONFIG>tag, see Sample-<NS-CONFIG>-section.
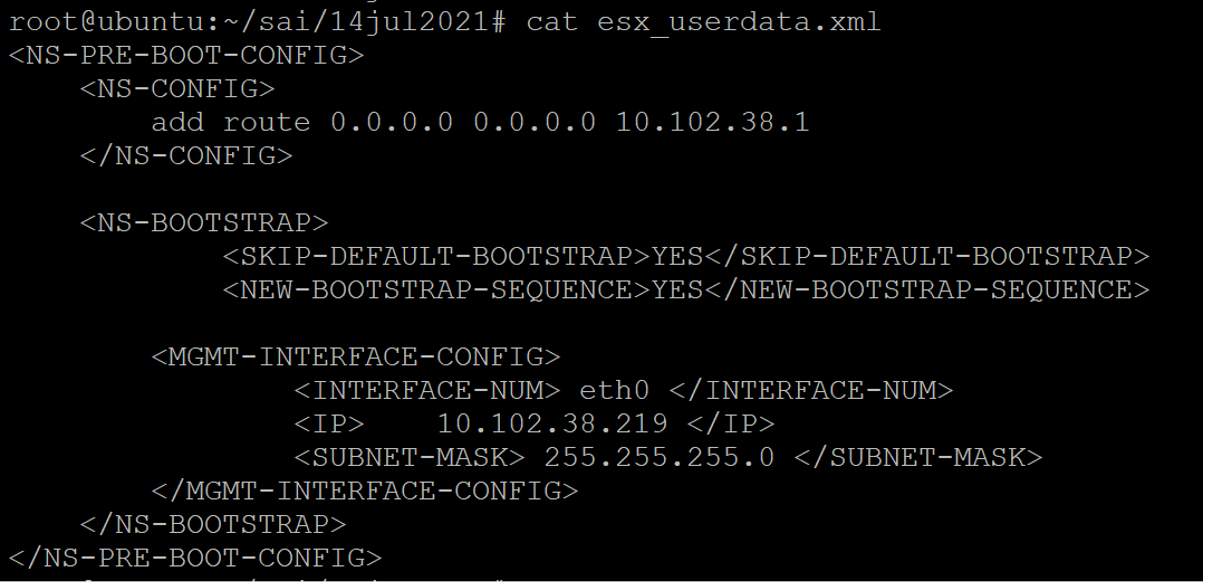
Sample <NS-CONFIG> section:
<NS-PRE-BOOT-CONFIG>

    <NS-CONFIG>
        add route 0.0.0.0 0.0.0.0  10.102.38.1
    </NS-CONFIG>

    <NS-BOOTSTRAP>
            <SKIP-DEFAULT-BOOTSTRAP>YES</SKIP-DEFAULT-BOOTSTRAP>
            <NEW-BOOTSTRAP-SEQUENCE>YES</NEW-BOOTSTRAP-SEQUENCE>

        <MGMT-INTERFACE-CONFIG>
                <INTERFACE-NUM> eth0 </INTERFACE-NUM>
                <IP> 10.102.38.216 </IP>
                <SUBNET-MASK> 255.255.255.0 </SUBNET-MASK>
        </MGMT-INTERFACE-CONFIG>
    </NS-BOOTSTRAP>

</NS-PRE-BOOT-CONFIG>
<!--NeedCopy-->
How to provide preboot user data on ESX hypervisor
You can provide preboot user data on ESX hypervisor from web client or vSphere client in the following two ways:
- Using CD/DVD ISO
- Using OVF Property
Provide user data using CD/DVD ISO
You can use the VMware vSphere client to inject user data into the VM as an ISO image using the CD/DVD drive.
Follow these steps to provide user data using the CD/DVD ISO:
-
Create a file with file name
userdatathat has the preboot user data content. For more information on the content of the<NS-CONFIG>tag, see Sample<NS-CONFIG>section.Note:
File name must be strictly used as
userdata. -
Store the
userdatafile in a folder, and build an ISO image using the folder.You can build an ISO image with
userdatafile by the following two methods:- Using any image processing tool such as PowerISO.
- Using
mkisofscommand in Linux.
The following sample configuration shows how to generate an ISO image using the
mkisofscommand in Linux.root@ubuntu:~/sai/14jul2021# ls -l total 4 drwxr-xr-x 2 root root 4096 Jul 14 12:32 esx_preboot_userdata root@ubuntu:~/sai/14jul2021# root@ubuntu:~/sai/14jul2021# ls -l esx_preboot_userdata/total 4 -rw-r--r-- 1 root root 3016 Jul 14 12:32 userdata root@ubuntu:~/sai/14jul2021# mkisofs -o esx_preboot_userdata.iso ./esx_preboot_userdata I: -input-charset not specified, using utf-8 (detected in locale settings) Total translation table size: 0 Total rockridge attributes bytes: 0 Total directory bytes: 112 Path table size(bytes): 10 Max brk space used 0 176 extents written (0 MB) root@ubuntu:~/sai/14jul2021# ls -lh total 356K drwxr-xr-x 2 root root 4.0K Jul 14 12:32 esx_preboot_userdata -rw-r--r-- 1 root root 352K Jul 14 12:34 esx_preboot_userdata.iso root@ubuntu:~/sai# ls preboot_userdata_155_193 userdata root@ubuntu:~/sai# mkisofs -o preboot_userdata_155_193.iso ./preboot_userdata_155_193 I: -input-charset not specified, using utf-8 (detected in locale settings) Total translation table size: 0 Total rockridge attributes bytes: 0 Total directory bytes: 112 Path table size(bytes): 10 Max brk space used 0 176 extents written (0 MB) <!--NeedCopy--> -
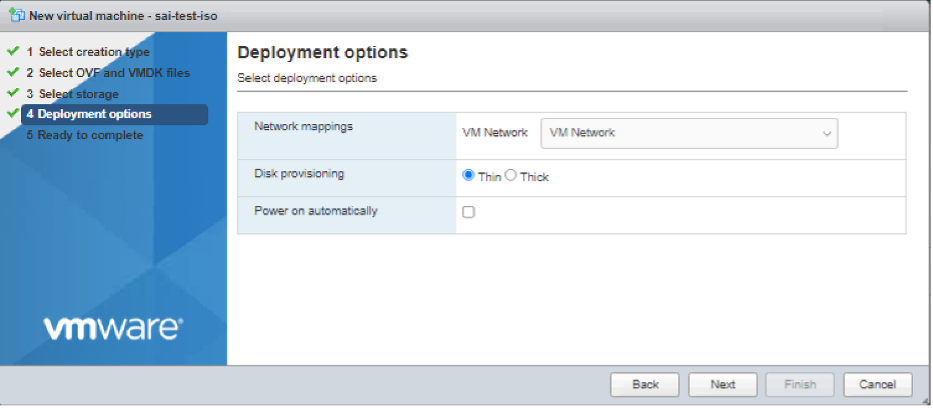
Provision the NetScaler VPX instance using standard deployment process to create the VM. But do not power on the VM automatically.
-
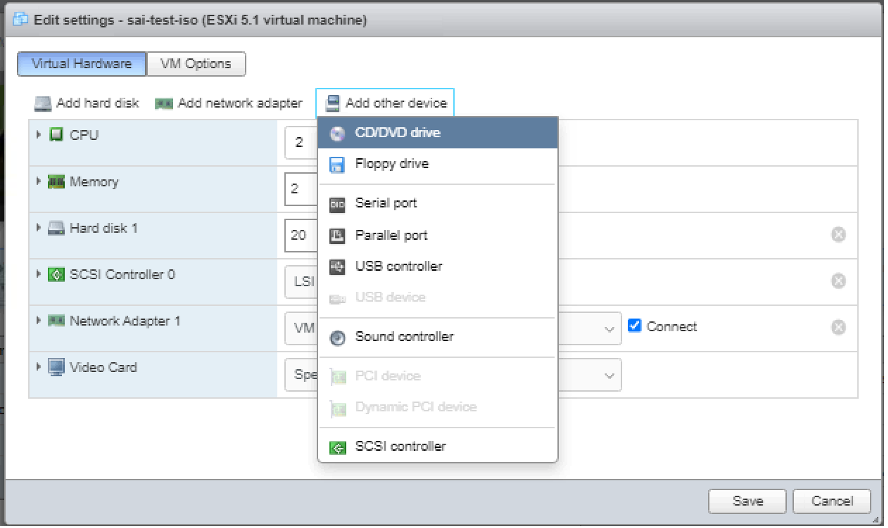
After the VM is successfully created, attach the ISO file as CD/DVD drive to the VM.
-
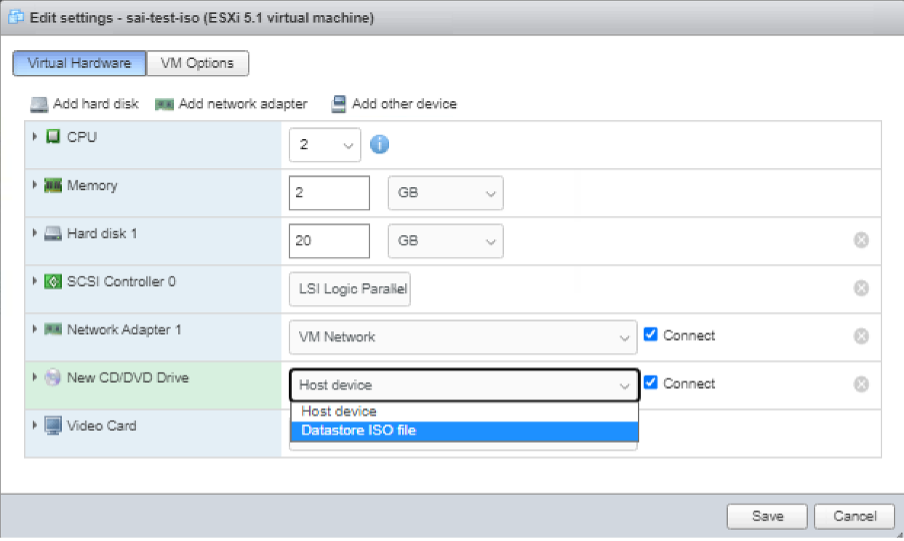
Navigate to New CD/DVD Drive and choose Datastore ISO file from the drop-down menu.
-
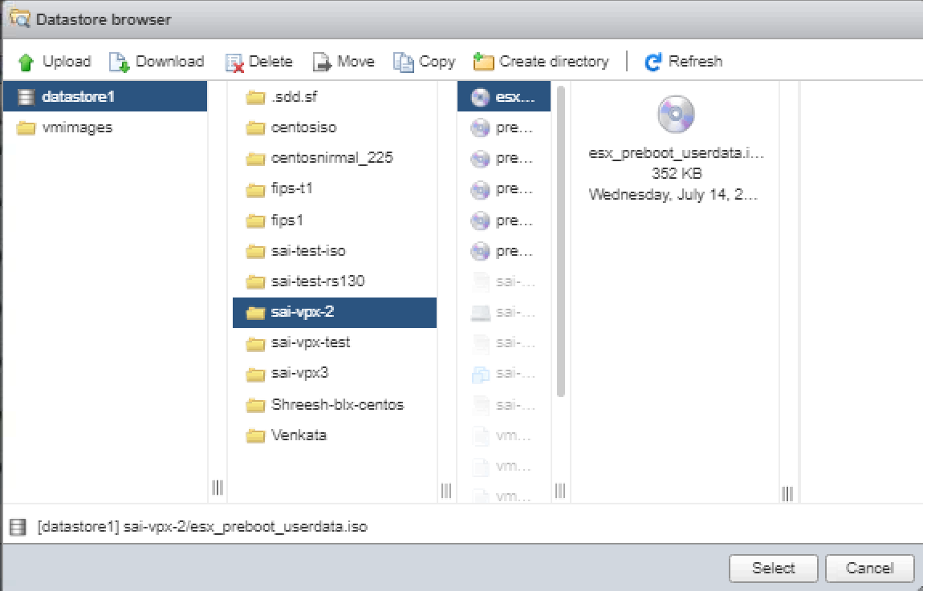
Select a Datastore in the vSphere Client.
-
Power on the VM.
Provide user data using OVF property from ESX web client
Follow these steps to provide user data using OVF property.
-
Create a file with user data content.
-
Encode the user data content with Base64 encoding. You can perform the Base64 encoding using the following two methods:
-
In Linux, use the following command:
 base64 <userdata-filename>  >   <outuput-file>
 <!--NeedCopy-->
Example:
 base64 esx_userdata.xml  > esx_userdata_b64
 <!--NeedCopy-->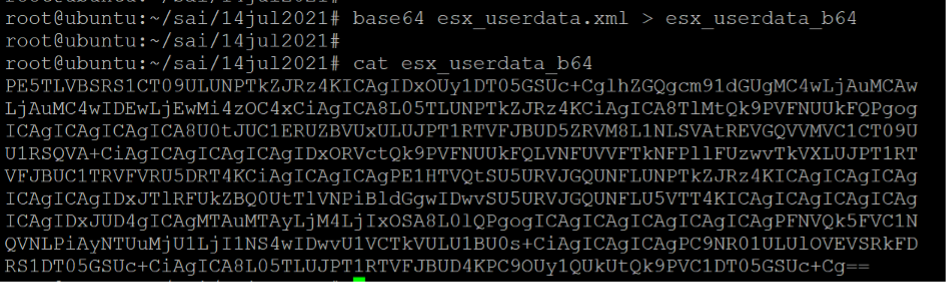
-
Use online tools to encode user data content, for example, Base64 Encode and Decode.
-
-
Include a Product section in the OVF template of a NetScaler VPX instance on ESX hypervisor.
Sample Product section:
<ProductSection> <Info>Information about the installed software</Info> <Product>NSVPX-VSK Template</Product> <Vendor>Citrix</Vendor> <VendorUrl>www.citrix.com</VendorUrl> <Category> Preboot Userdata </Category> <Property ovf:key="guestinfo.userdata" ovf:type="string" ovf:userConfigurable="true" ovf:value=""> <Label>Userdata</Label> <Description> Userdata for ESX VPX </Description> </Property> </ProductSection> <!--NeedCopy--> -
Provide the base64 encoded user data as the
ovf:valueforguestinfo.userdataproperty in the Product section.<ProductSection> <Info>Information about the installed software</Info> <Product>NSVPX-VSK Template</Product> <Vendor>Citrix</Vendor> <VendorUrl>www.citrix.com</VendorUrl> <Category> Preboot Userdata </Category> <Property ovf:key="guestinfo.userdata" ovf:type="string" ovf:userConfigurable="true" ovf:value="PE5TLVBSRS1CT09ULUNPTkZJRz4KICAgIDxOUy1DT05GSUc+CglhZGQgcm91dGUgMC4wLjAuMCAw LjAuMC4wIDEwLjEwMi4zOC4xCiAgICA8L05TLUNPTkZJRz4KCiAgICA8TlMtQk9PVFNUUkFQPgog ICAgICAgICAgICA8U0tJUC1ERUZBVUxULUJPT1RTVFJBUD5ZRVM8L1NLSVAtREVGQVVMVC1CT09U U1RSQVA+CiAgICAgICAgICAgIDxORVctQk9PVFNUUkFQLVNFUVVFTkNFPllFUzwvTkVXLUJPT1RT VFJBUC1TRVFVRU5DRT4KCiAgICAgICAgPE1HTVQtSU5URVJGQUNFLUNPTkZJRz4KICAgICAgICAg ICAgICAgIDxJTlRFUkZBQ0UtTlVNPiBldGgwIDwvSU5URVJGQUNFLU5VTT4KICAgICAgICAgICAg ICAgIDxJUD4gICAgMTAuMTAyLjM4LjIxOSA8L0lQPgogICAgICAgICAgICAgICAgPFNVQk5FVC1N QVNLPiAyNTUuMjU1LjI1NS4wIDwvU1VCTkVULU1BU0s+CiAgICAgICAgPC9NR01ULUlOVEVSRkFD RS1DT05GSUc+CiAgICA8L05TLUJPT1RTVFJBUD4KPC9OUy1QUkUtQk9PVC1DT05GSUc+Cg=="> <Label>Userdata</Label> <Description> Userdata for ESX VPX </Description> </Property> </ProductSection> <!--NeedCopy--> -
Use the modified OVF template with Product section for the VM deployment.
Provide user data using OVF property from ESX vSphere client
Follow these steps to provide user data using OVF property from ESX vSphere client.
-
Create a file with user data content.
-
Encode the user data content with Base64 encoding. You can perform the Base64 encoding using the following two methods:
-
In Linux, use the following command:
 base64 <userdata-filename>  >   <outuput-file>
 <!--NeedCopy-->
Example:
base64 esx_userdata.xml > esx_userdata_b64 <!--NeedCopy--> -
Use online tools to encode user data content, for example, Base64 Encode and Decode.
-
-
Include a Product section in the OVF template of a NetScaler VPX instance on ESX hypervisor.
Sample Product section:
<ProductSection> <Info>Information about the installed software</Info> <Product>NSVPX-VSK Template</Product> <Vendor>Citrix</Vendor> <VendorUrl>www.citrix.com</VendorUrl> <Category> Preboot Userdata </Category> <Property ovf:key="guestinfo.userdata" ovf:type="string" ovf:userConfigurable="true" ovf:value=""> <Label>Userdata</Label> <Description> Userdata for ESX VPX </Description> </Property> </ProductSection> <!--NeedCopy--> -
Provide the base64 encoded user data as the
ovf:valueforguestinfo.userdataproperty in the Product section.<ProductSection> <Info>Information about the installed software</Info> <Product>NSVPX-VSK Template</Product> <Vendor>Citrix</Vendor> <VendorUrl>www.Citrix.com</VendorUrl> <Category> Preboot Userdata </Category> <Property ovf:key="guestinfo.userdata" ovf:type="string" ovf:userConfigurable="true" ovf:value="PE5TLVBSRS1CT09ULUNPTkZJRz4KICAgIDxOUy1DT05GSUc+CglhZGQgcm91dGUgMC4wLjAuMCAw LjAuMC4wIDEwLjEwMi4zOC4xCiAgICA8L05TLUNPTkZJRz4KCiAgICA8TlMtQk9PVFNUUkFQPgog ICAgICAgICAgICA8U0tJUC1ERUZBVUxULUJPT1RTVFJBUD5ZRVM8L1NLSVAtREVGQVVMVC1CT09U U1RSQVA+CiAgICAgICAgICAgIDxORVctQk9PVFNUUkFQLVNFUVVFTkNFPllFUzwvTkVXLUJPT1RT VFJBUC1TRVFVRU5DRT4KCiAgICAgICAgPE1HTVQtSU5URVJGQUNFLUNPTkZJRz4KICAgICAgICAg ICAgICAgIDxJTlRFUkZBQ0UtTlVNPiBldGgwIDwvSU5URVJGQUNFLU5VTT4KICAgICAgICAgICAg ICAgIDxJUD4gICAgMTAuMTAyLjM4LjIxOSA8L0lQPgogICAgICAgICAgICAgICAgPFNVQk5FVC1N QVNLPiAyNTUuMjU1LjI1NS4wIDwvU1VCTkVULU1BU0s+CiAgICAgICAgPC9NR01ULUlOVEVSRkFD RS1DT05GSUc+CiAgICA8L05TLUJPT1RTVFJBUD4KPC9OUy1QUkUtQk9PVC1DT05GSUc+Cg=="> <Label>Userdata</Label> <Description> Userdata for ESX VPX </Description> </Property> </ProductSection> <!--NeedCopy--> -
Add the property
ovf:transport="com.vmware.guestInfo"to VirtualHardwareSection as follows:<VirtualHardwareSection ovf:transport="com.vmware.guestInfo"> <!--NeedCopy--> -
Use the modified OVF template with Product section for the VM deployment.