Anwenden von NetScaler VPX-Konfigurationen beim ersten Start der NetScaler Appliance auf dem VMware ESX Hypervisor
Sie können die NetScaler VPX-Konfigurationen beim ersten Start der NetScaler Appliance auf dem VMware ESX-Hypervisor anwenden. Therefore in certain cases, a specific setup or VPX instance is brought up in much lesser time.
Weitere Informationen zu Preboot-Benutzerdaten und ihrem Format finden Sie unter Anwenden von NetScaler VPX-Konfigurationen beim ersten Start der NetScaler Appliance in der Cloud.
Hinweis:
To bootstrap using preboot user data in ESX, default gateway config must be passed in
<NS-CONFIG>section. For more information on the content of the<NS-CONFIG>tag, see Sample-<NS-CONFIG>-section.
Sample <NS-CONFIG> section:
  <NS-PRE-BOOT-CONFIG>

      <NS-CONFIG>
          add route 0.0.0.0 0.0.0.0  10.102.38.1
      </NS-CONFIG>

      <NS-BOOTSTRAP>
              <SKIP-DEFAULT-BOOTSTRAP>YES</SKIP-DEFAULT-BOOTSTRAP>
              <NEW-BOOTSTRAP-SEQUENCE>YES</NEW-BOOTSTRAP-SEQUENCE>

          <MGMT-INTERFACE-CONFIG>
                  <INTERFACE-NUM> eth0 </INTERFACE-NUM>
                  <IP> 10.102.38.216 </IP>
                  <SUBNET-MASK> 255.255.255.0 </SUBNET-MASK>
          </MGMT-INTERFACE-CONFIG>
      </NS-BOOTSTRAP>

  </NS-PRE-BOOT-CONFIG>
<!--NeedCopy-->
How to provide preboot user data on ESX hypervisor
Sie können Preboot-Benutzerdaten auf dem ESX Hypervisor vom Webclient oder vSphere-Client aus auf die folgenden zwei Arten bereitstellen:
- Using CD/DVD ISO
- Using OVF Property
Provide user data using CD/DVD ISO
Sie können den VMware vSphere-Client verwenden, um Benutzerdaten mithilfe des CD/DVD-Laufwerks als ISO-Image in die VM einzufügen.
Gehen Sie wie folgt vor, um Benutzerdaten mithilfe der CD/DVD-ISO bereitzustellen:
-
Erstellen Sie eine Datei mit einem Dateinamen
userdata, die den Inhalt der Preboot-Benutzerdaten enthält. For more information on the content of the<NS-CONFIG>tag, see Sample<NS-CONFIG>section.Hinweis:
Der Dateiname muss strikt als
userdataverwendet werden. -
Store the
userdatafile in a folder, and build an ISO image using the folder.You can build an ISO image with
userdatafile by the following two methods:- Using any image processing tool such as PowerISO.
- Using
mkisofscommand in Linux.
The following sample configuration shows how to generate an ISO image using the
mkisofscommand in Linux.root@ubuntu:~/sai/14jul2021# ls -l total 4 drwxr-xr-x 2 root root 4096 Jul 14 12:32 esx_preboot_userdata root@ubuntu:~/sai/14jul2021# root@ubuntu:~/sai/14jul2021# ls -l esx_preboot_userdata/total 4 -rw-r--r-- 1 root root 3016 Jul 14 12:32 userdata root@ubuntu:~/sai/14jul2021# mkisofs -o esx_preboot_userdata.iso ./esx_preboot_userdata I: -input-charset not specified, using utf-8 (detected in locale settings) Total translation table size: 0 Total rockridge attributes bytes: 0 Total directory bytes: 112 Path table size(bytes): 10 Max brk space used 0 176 extents written (0 MB) root@ubuntu:~/sai/14jul2021# ls -lh total 356K drwxr-xr-x 2 root root 4.0K Jul 14 12:32 esx_preboot_userdata -rw-r--r-- 1 root root 352K Jul 14 12:34 esx_preboot_userdata.iso root@ubuntu:~/sai# ls preboot_userdata_155_193 userdata root@ubuntu:~/sai# mkisofs -o preboot_userdata_155_193.iso ./preboot_userdata_155_193 I: -input-charset not specified, using utf-8 (detected in locale settings) Total translation table size: 0 Total rockridge attributes bytes: 0 Total directory bytes: 112 Path table size(bytes): 10 Max brk space used 0 176 extents written (0 MB) <!--NeedCopy--> -
Stellen Sie die NetScaler VPX-Instanz über den Standardbereitstellungsprozess zum Erstellen der VM bereit. But do not power on the VM automatically.
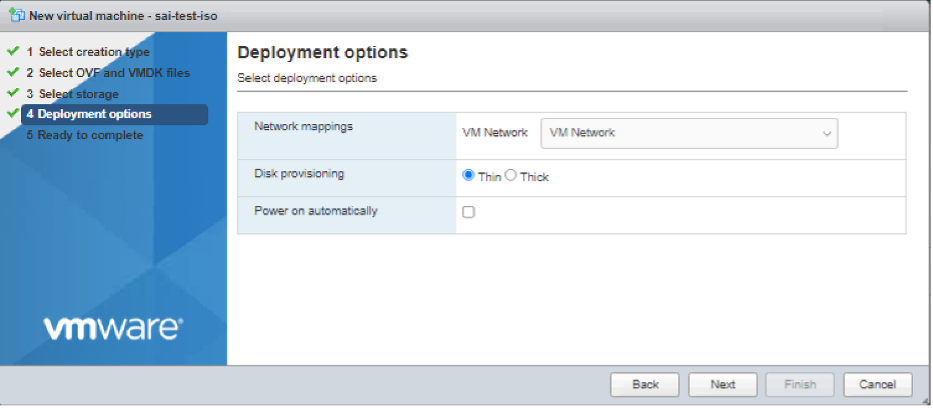
-
After the VM is successfully created, attach the ISO file as CD/DVD drive to the VM.
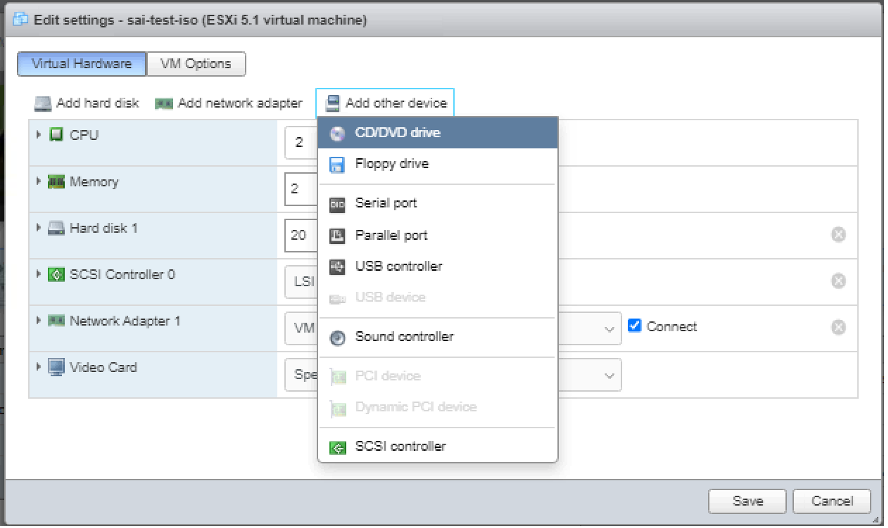
-
Navigate to New CD/DVD Drive and choose Datastore ISO file from the drop-down menu.
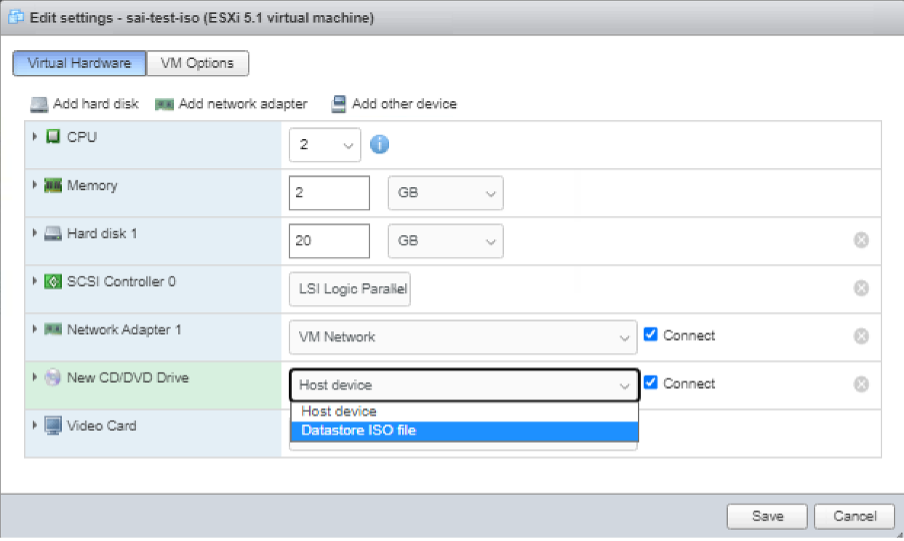
-
Select a Datastore in the vSphere Client.
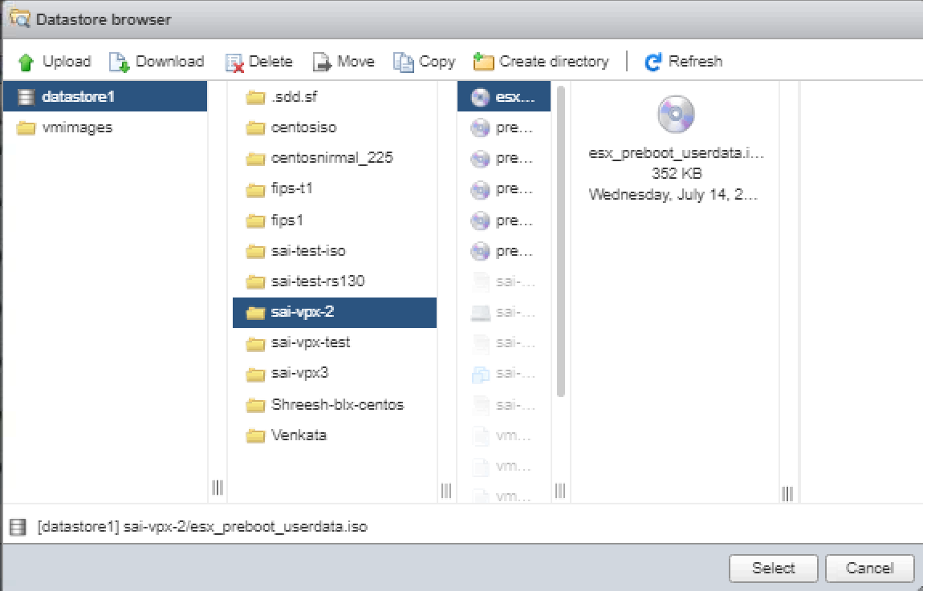
-
Power on the VM.
Stellen Sie Benutzerdaten mithilfe der OVF-Eigenschaft vom ESX-Webclient bereit
Follow these steps to provide user data using OVF property.
-
Create a file with user data content.
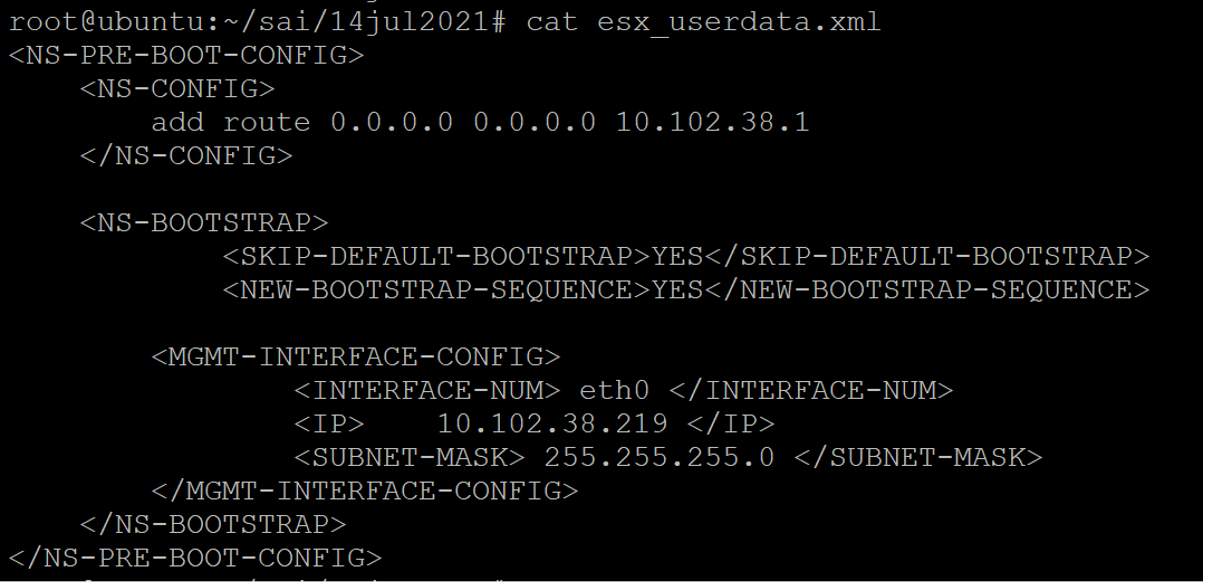
-
Encode the user data content with Base64 encoding. You can perform the Base64 encoding using the following two methods:
-
In Linux, use the following command:
   base64 <userdata-filename>  >   <outuput-file>
 <!--NeedCopy-->
Beispiel
   base64 esx_userdata.xml  > esx_userdata_b64
 <!--NeedCopy-->
-
Use online tools to encode user data content, for example, Base64 Encode and Decode.
-
-
Nehmen Sie einen Produktabschnitt in die OVF-Vorlage einer NetScaler VPX-Instanz auf dem ESX-Hypervisor auf.
Sample Product section:
<ProductSection> <Info>Information about the installed software</Info> <Product>NSVPX-VSK Template</Product> <Vendor>Citrix</Vendor> <VendorUrl>www.citrix.com</VendorUrl> <Category> Preboot Userdata </Category> <Property ovf:key="guestinfo.userdata" ovf:type="string" ovf:userConfigurable="true" ovf:value=""> <Label>Userdata</Label> <Description> Userdata for ESX VPX </Description> </Property> </ProductSection> <!--NeedCopy--> -
Provide the base64 encoded user data as the
ovf:valueforguestinfo.userdataproperty in the Product section.<ProductSection> <Info>Information about the installed software</Info> <Product>NSVPX-VSK Template</Product> <Vendor>Citrix</Vendor> <VendorUrl>www.citrix.com</VendorUrl> <Category> Preboot Userdata </Category> <Property ovf:key="guestinfo.userdata" ovf:type="string" ovf:userConfigurable="true" ovf:value="PE5TLVBSRS1CT09ULUNPTkZJRz4KICAgIDxOUy1DT05GSUc+CglhZGQgcm91dGUgMC4wLjAuMCAw LjAuMC4wIDEwLjEwMi4zOC4xCiAgICA8L05TLUNPTkZJRz4KCiAgICA8TlMtQk9PVFNUUkFQPgog ICAgICAgICAgICA8U0tJUC1ERUZBVUxULUJPT1RTVFJBUD5ZRVM8L1NLSVAtREVGQVVMVC1CT09U U1RSQVA+CiAgICAgICAgICAgIDxORVctQk9PVFNUUkFQLVNFUVVFTkNFPllFUzwvTkVXLUJPT1RT VFJBUC1TRVFVRU5DRT4KCiAgICAgICAgPE1HTVQtSU5URVJGQUNFLUNPTkZJRz4KICAgICAgICAg ICAgICAgIDxJTlRFUkZBQ0UtTlVNPiBldGgwIDwvSU5URVJGQUNFLU5VTT4KICAgICAgICAgICAg ICAgIDxJUD4gICAgMTAuMTAyLjM4LjIxOSA8L0lQPgogICAgICAgICAgICAgICAgPFNVQk5FVC1N QVNLPiAyNTUuMjU1LjI1NS4wIDwvU1VCTkVULU1BU0s+CiAgICAgICAgPC9NR01ULUlOVEVSRkFD RS1DT05GSUc+CiAgICA8L05TLUJPT1RTVFJBUD4KPC9OUy1QUkUtQk9PVC1DT05GSUc+Cg=="> <Label>Userdata</Label> <Description> Userdata for ESX VPX </Description> </Property> </ProductSection> <!--NeedCopy--> -
Use the modified OVF template with Product section for the VM deployment.
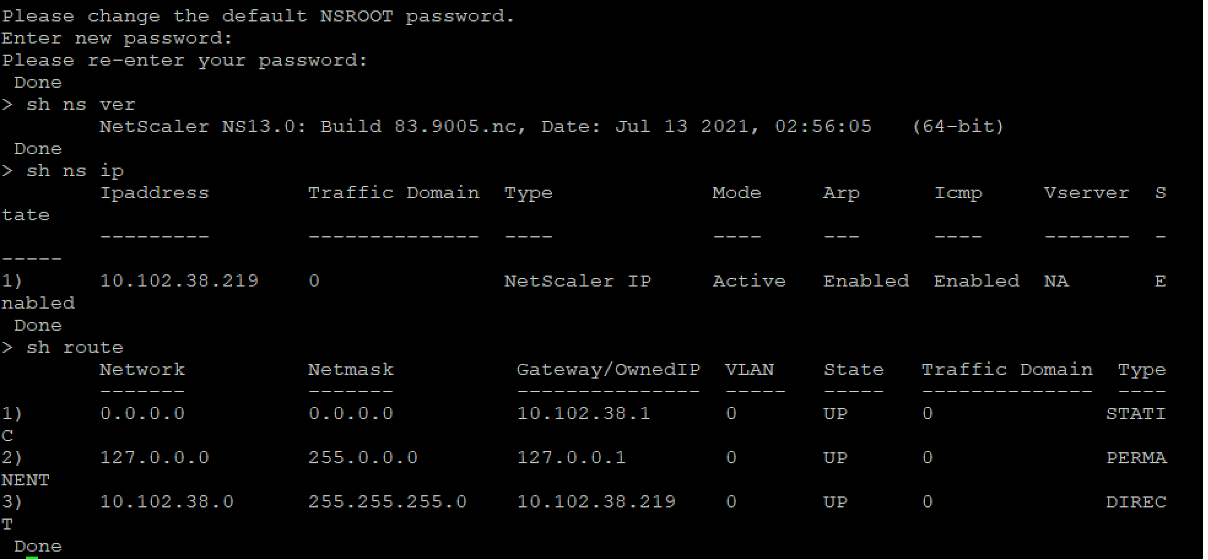
Stellen Sie Benutzerdaten mithilfe der OVF-Eigenschaft vom ESX vSphere-Client bereit
Gehen Sie wie folgt vor, um Benutzerdaten mithilfe der OVF-Eigenschaft vom ESX vSphere Client bereitzustellen.
-
Create a file with user data content.

-
Encode the user data content with Base64 encoding. You can perform the Base64 encoding using the following two methods:
-
In Linux, use the following command:
   base64 <userdata-filename>  >   <outuput-file>
 <!--NeedCopy-->
Beispiel
   base64 esx_userdata.xml  > esx_userdata_b64
 <!--NeedCopy-->
-
Use online tools to encode user data content, for example, Base64 Encode and Decode.
-
-
Nehmen Sie einen Produktabschnitt in die OVF-Vorlage einer NetScaler VPX-Instanz auf dem ESX-Hypervisor auf.
Sample Product section:
<ProductSection> <Info>Information about the installed software</Info> <Product>NSVPX-VSK Template</Product> <Vendor>Citrix</Vendor> <VendorUrl>www.citrix.com</VendorUrl> <Category> Preboot Userdata </Category> <Property ovf:key="guestinfo.userdata" ovf:type="string" ovf:userConfigurable="true" ovf:value=""> <Label>Userdata</Label> <Description> Userdata for ESX VPX </Description> </Property> </ProductSection> <!--NeedCopy--> -
Provide the base64 encoded user data as the
ovf:valueforguestinfo.userdataproperty in the Product section.<ProductSection> <Info>Information about the installed software</Info> <Product>NSVPX-VSK Template</Product> <Vendor>Citrix</Vendor> <VendorUrl>www.Citrix.com</VendorUrl> <Category> Preboot Userdata </Category> <Property ovf:key="guestinfo.userdata" ovf:type="string" ovf:userConfigurable="true" ovf:value="PE5TLVBSRS1CT09ULUNPTkZJRz4KICAgIDxOUy1DT05GSUc+CglhZGQgcm91dGUgMC4wLjAuMCAw LjAuMC4wIDEwLjEwMi4zOC4xCiAgICA8L05TLUNPTkZJRz4KCiAgICA8TlMtQk9PVFNUUkFQPgog ICAgICAgICAgICA8U0tJUC1ERUZBVUxULUJPT1RTVFJBUD5ZRVM8L1NLSVAtREVGQVVMVC1CT09U U1RSQVA+CiAgICAgICAgICAgIDxORVctQk9PVFNUUkFQLVNFUVVFTkNFPllFUzwvTkVXLUJPT1RT VFJBUC1TRVFVRU5DRT4KCiAgICAgICAgPE1HTVQtSU5URVJGQUNFLUNPTkZJRz4KICAgICAgICAg ICAgICAgIDxJTlRFUkZBQ0UtTlVNPiBldGgwIDwvSU5URVJGQUNFLU5VTT4KICAgICAgICAgICAg ICAgIDxJUD4gICAgMTAuMTAyLjM4LjIxOSA8L0lQPgogICAgICAgICAgICAgICAgPFNVQk5FVC1N QVNLPiAyNTUuMjU1LjI1NS4wIDwvU1VCTkVULU1BU0s+CiAgICAgICAgPC9NR01ULUlOVEVSRkFD RS1DT05GSUc+CiAgICA8L05TLUJPT1RTVFJBUD4KPC9OUy1QUkUtQk9PVC1DT05GSUc+Cg=="> <Label>Userdata</Label> <Description> Userdata for ESX VPX </Description> </Property> </ProductSection> <!--NeedCopy--> -
Fügen Sie die Eigenschaft wie folgt
ovf:transport="com.vmware.guestInfo"zu VirtualHardwareSection hinzu:<VirtualHardwareSection ovf:transport="com.vmware.guestInfo"> <!--NeedCopy--> -
Use the modified OVF template with Product section for the VM deployment.
