Deploy a NetScaler VPX instance on AWS Outposts
AWS Outposts is a pool of AWS compute and storage capacity deployed at your site. Outposts provides AWS infrastructure and services in your on-premises location. AWS operates, monitors, and manages this capacity as part of an AWS Region. You can use the same NetScaler VPX instances, AWS APIs, tools, and infrastructure across on-premises and the AWS cloud for a consistent hybrid experience.
You can create subnets on your Outposts and specify them when you create AWS resources such as EC2 instances, EBS volumes, ECS clusters, and RDS instances. Instances in the Outposts subnets communicate with other instances in the AWS Region using private IP addresses, all within the same Amazon Virtual Private Cloud (VPC).
For more information, see the AWS Outposts user guide.
How AWS Outposts works
AWS Outposts is designed to operate with a constant and consistent connection between your Outposts and an AWS Region. To achieve this connection to the Region, and to the local workloads in your on-premises environment, you must connect your Outpost to your on-premises network. Your on-premises network must provide WAN access back to the Region and to the internet. The internet must also provide LAN or WAN access to the local network where your on-premises workloads or applications reside.
Prerequisite
- You must install an AWS Outposts at your site.
- The AWS Outposts’ compute and storage capacity must be available for use.
For more information on how to place an order for AWS Outposts, see the following AWS documentation: https://aws.amazon.com/blogs/aws/aws-outposts-now-available-order-your-racks-today/
Deploy a NetScaler VPX instance on AWS Outposts by using the AWS web console
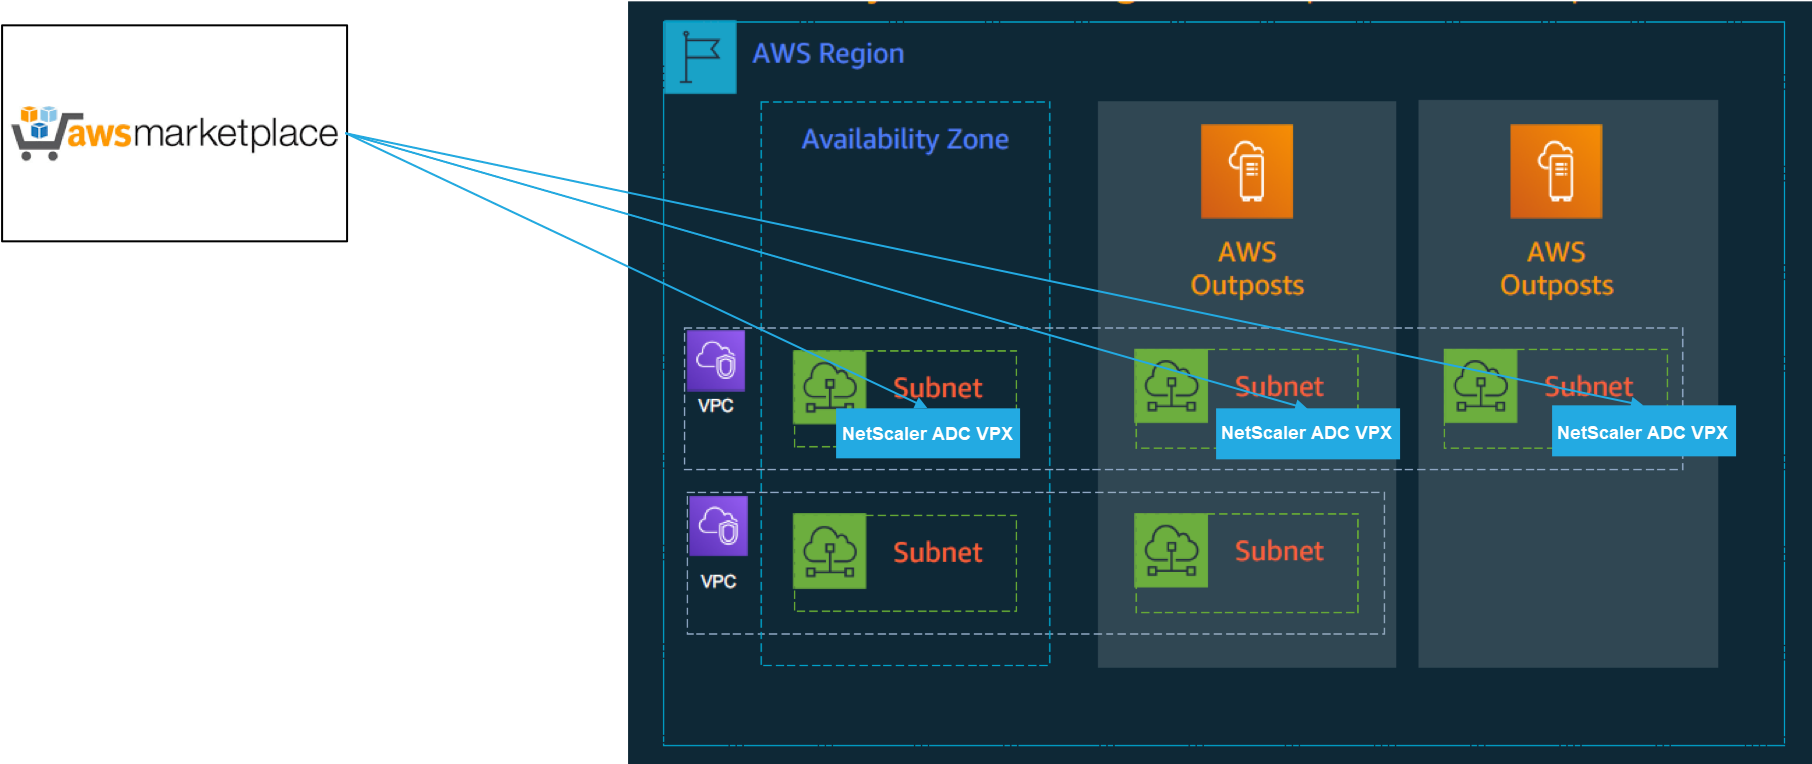
The following figure depicts a simple deployment of NetScaler VPX instances on the Outposts. The NetScaler AMI present in the AWS Marketplace is also deployed in the Outposts.

Log in to the AWS web console and complete the following steps to deploy NetScaler VPX EC2 instances on your AWS Outposts.
- Create a key pair.
- Create a Virtual Private Cloud (VPC).
- Add more subnets.
- Create security groups and security rules.
- Add route tables.
- Create an internet gateway.
- Create an NetScaler VPX instance by using the AWS EC2 service. From the AWS dashboard, navigate to Compute > EC2 > Launch Instance > AWS Marketplace.
- Create and attach more network interfaces.
- Attach elastic IPs to the management NIC.
- Connect to the VPX instance.
For detailed instructions on each of the steps, see Deploy a NetScaler VPX instance on AWS by using the AWS web console.
For high availability within same availability zone deployment, see Deploy a high availability pair on AWS.
Deploy a NetScaler VPX instance on hybrid cloud with AWS Outposts
You can deploy a NetScaler VPX instance on hybrid cloud in an AWS environment that contains AWS outposts. You can simplify the app delivery mechanism using the NetScaler global server load balancing (GSLB) solution. The GSLB solution distributes application traffic across multiple data centers in hybrid clouds that are built using AWS regions and AWS Outposts infrastructure.
NetScaler GSLB supports both the active-active and active-passive deployment types to address different use cases. Along with these flexible deployment options and application delivery mechanisms, NetScaler secures the entire network and application portfolio, irrespective of whether applications are deployed natively on AWS Cloud or AWS Outposts.
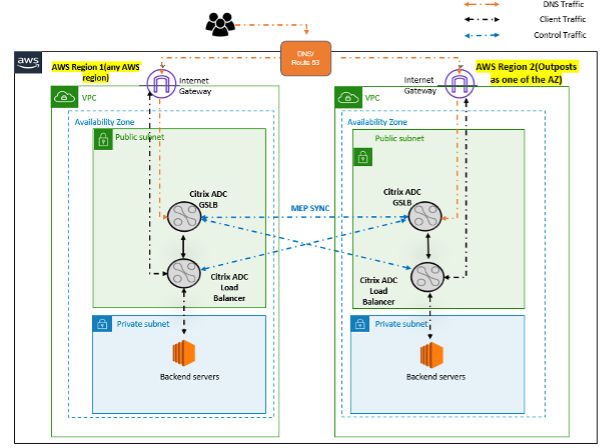
The following diagram illustrates an application delivery with NetScaler appliance in hybrid cloud with AWS.

In an active-active deployment, the NetScaler steers the traffic globally across a distributed environment. All the sites in the environment exchange metrics about their availability and health of resources through the Metrics Exchange Protocol (MEP). The NetScaler appliance uses this information to load balance traffic across sites, and sends client requests to the most appropriate GSLB site as determined by the defined method (round robin, least connection, and static proximity) specified in the GSLB configuration.
You can use the active-active GSLB deployment to:
- Optimize the resource utilization with all nodes being active.
- Enhance the user experience by steering requests to the site closest to each individual user.
- Migrate applications to the cloud at a user-defined pace.
You can use the active-passive GSLB deployment for:
- Disaster recovery
- Cloud burst