Migrate from Citrix Ready KVM VPX to officially supported NetScaler VPX™ on Nutanix AHV
The Citrix Ready® KVM-based NetScaler VPX on Nutanix AHV has been used by many customers but does not have official Citrix® support and advanced automation features. Hence, we recommend our customers to migrate from Citrix Ready KVM VPX to officially supported NetScaler VPX on Nutanix AHV.
Prerequisite
Before migrating, review the limitations of the Nutanix AHV-specific VPX image to ensure that your environment does not depend on any excluded features. For more information, see Unsupported features and limitations.
You can migrate from Citrix Ready KVM VPX to officially supported NetScaler VPX on Nutanix AHV using one of the following methods:
-
In-place upgrade from Citrix Ready KVM VPX to officially supported NetScaler VPX on Nutanix AHV
-
Migrate by using the Node-by-Node high availability (HA) replacement
In-place upgrade from Citrix Ready KVM VPX to officially supported NetScaler VPX on Nutanix AHV
Starting from NetScaler release 14.1 build 66.x, you can perform an in-place upgrade from Citrix Ready KVM-based VPX instances to the officially supported NetScaler VPX on Nutanix AHV.
Important:
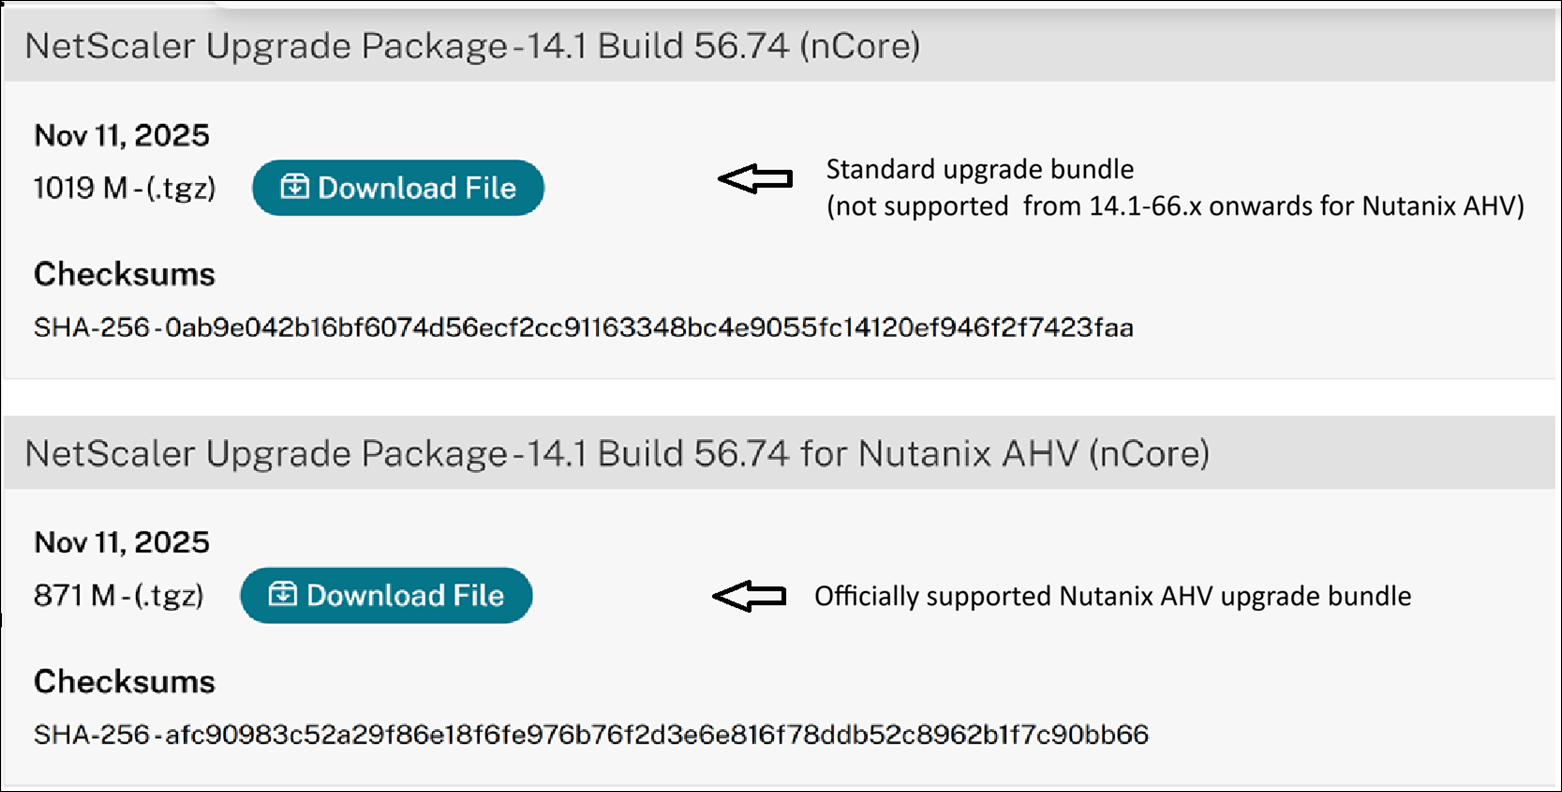
Citrix Ready VPX instances upgrading to version 14.1-66.x or later must use the officially supported Nutanix-specific upgrade bundle. The standard upgrade bundle is not supported for this migration.
Prerequisites
-
Minimum NetScaler version: Ensure the current NetScaler version is 14.1–56.74 or later. If the current version is earlier, upgrade the appliance using the standard upgrade bundle before proceeding.
-
Hardware requirements: A minimum of 2 GB of RAM is required for each vCPU. For example, a VM with 4 vCPUs must have at least 8 GB of RAM allocated.
-
Review limitations: Review the Nutanix AHV-specific VPX limitations before proceeding.
Critical considerations before proceeding with the upgrade
-
VM Snapshot (mandatory): You must create a snapshot of the running VM before proceeding with the upgrade. This allows you to restore the VM if there is any configuration loss. For more information, see Creating a VM Snapshot Manually.
-
External backup (recommended): We recommend you to create an external backup of critical configurations and custom data, especially for files located outside of preserved directories. This step is optional if a VM snapshot is already taken.
-
Data backup and preservation: Review the Data backup and preservation during upgrade section.
Data backup and preservation during upgrade
-
The upgrade automatically preserves custom files, certificates, and signature files within specific directories. Data located outside these paths is not preserved and requires manual backup and restoration.
Preserved directories:
/flash/nsconfig/flash/boot/flash/configdb/var/tmp/*.csv/var/AAA/var/analytics_conf/var/download/var/krb/var/learnt_data/var/metrics_conf/var/netscaler/gui/var/netscaler/locdb/var/netscaler/logon/var/netscaler/ssl/var/nstemplates/var/vpn/var/vpns/var/clusterd/nsclusterd.conf
-
If you have customized configuration files in the
/etcdirectory, see Upgrade considerations for customized configuration files in the /etc directory, before proceeding with the migration. -
Customizations made to the following files are preserved during the migration process but might not work the same as before migration:
rc.netscalernsbefore.shnsafter.shcrontab
You must review and update these customization files to ensure compatibility with the upgraded NetScaler.
Upgrade procedure
-
Download the NetScaler VPX upgrade bundle compatible with Nutanix AHV (format:
build-<version-build>_lx_64.tgz) from the Citrix Downloads page. -
Navigate to Citrix.com > Downloads > NetScaler > Virtual Appliances, and download the NetScaler VPX upgrade bundle compatible with Nutanix AHV from the Citrix Downloads page.
-
Copy the downloaded
build-<version-build>_lx_64.tgzfile to the/var/nsinstall/directory on the NetScaler VPX Shell and extract it. -
Run
./installnsand reboot the appliance when prompted. Do not turn off the VM during the multiple reboots required for the process.
Post-upgrade validation
-
Log in to the NetScaler VPX GUI/CLI and verify that the running version matches the target upgrade bundle version.
-
Validate all virtual services, SSL certificates, and policies to ensure correct functionality.
Migrate by using the Node-by-Node high availability (HA) replacement method
The HA node-by-node replacement methodology enables a zero-downtime, fully supported upgrade from the Citrix Ready KVM VPX to the officially supported Nutanix AHV VPX image. This transition unlocks advanced automation capabilities, full official support, and a modernized deployment platform for NetScaler.
Step 1: Lock the HA state of your legacy primary node.
-
Log in to your Citrix Ready KVM VPX primary node and run the following command:
set ha node -hastatus STAYPRIMARY <!--NeedCopy--> -
On the legacy secondary node, remove its HA pairing with the primary node using the following command:
rm ha node <primary-nsip> <!--NeedCopy--> -
Verify that the primary node continues to serve the traffic without interruption while you proceed with migration or replacement tasks.
Step 2: Deploy a new secondary node.
- Provision a new NetScaler VPX instance using the official Nutanix AHV 14.1-51.x image.
- Assign the management IP address previously used by your legacy secondary node.
- Complete the initial setup, apply the license, and check that the network configuration is correct.
-
Join HA nodes by running the following command:
add ha node <primary-nsip> <!--NeedCopy--> -
Verify that the HA status is UP and synchronization is successful by using the following command:
show ha node status
<!--NeedCopy-->
Step 3: Promote the new secondary node to primary.
-
On the old primary node (the legacy KVM VPX), unset the stay primary status by using the following command:
unset ha node -stayprimary <!--NeedCopy--> -
Force a failover by using the following command:
force ha failover <!--NeedCopy--> -
Verify that the newly deployed secondary node has successfully become the primary node and is fully operational.
show ha node status <!--NeedCopy--> -
Set the new primary node to stay primary by using the following command:
set ha node -hastatus STAYPRIMARY
<!--NeedCopy-->
Note:
If HA synchronization fails, manually synchronize RPC passwords on both nodes using the
set rpcNode <peer-ip> -password <password>command. -
If any problems arise during this step, fail back to the old primary and restore the legacy secondary node. For assistance, contact the Citrix Support team.
Step 4: Replace the legacy secondary with a new VPX.
-
Remove the legacy secondary node from the HA configuration using the following command:
rm ha node <legacy-secondary-nsip> <!--NeedCopy--> - Provision another new VPX instance using the official Nutanix AHV 14.1-51.x image.
- Assign the management IP address of the legacy secondary node to the new VPX instance.
-
Complete the setup and license activation.
-
Join this new VPX to the HA pair using the following command:
add ha node <new-primary-nsip> <!--NeedCopy--> -
Verify that the HA status is stable, “UP”, and synchronized using the following command.
show ha node status
<!--NeedCopy-->
Step 5: Validate and finalize.
- Verify the HA roles and synchronization status across both new nodes.
- Validate all virtual services, SSL certificates, and policies to ensure correct functionality.
- Perform failover and failback tests to verify redundancy.
- Back up all configurations and snapshot the new environment.
- After successful validation, delete the legacy VPX instances to free up resources.
Critical considerations
-
Backup: It is essential to retain backups of your legacy nodes until the new VPX environment has been fully validated and is stable.
-
Unsupported Features: Migration is not recommended if your current deployment relies on features that are not supported in the new Nutanix AHV VPX image. For more information, see Unsupported features and limitations.