Install NetScaler VPX on Nutanix Acropolis hypervisor
NetScaler offers a dedicated VPX image for Nutanix Acropolis Hypervisor (AHV), significantly improving the deployment and management experience. Previously, customers relied on a generic KVM hypervisor image under the Citrix Ready partnership program. The new image simplifies how you provision NetScaler VPX. You can now deploy instances using standard AHV Prism Central. Customers receive official support and can access all necessary resources, enabling seamless deployment on Nutanix infrastructure.
Important:
The Nutanix AHV support is available starting from NetScaler release 14.1 build 51.x. Following the General Availability (GA) of this dedicated Nutanix VPX image, deployments using the Citrix Ready KVM VPX image are no longer supported on Nutanix AHV. Customers are advised to migrate their existing Citrix Ready KVM VPX virtual machines to the new, officially supported Nutanix VPX image.
System requirements
The CPU and memory requirements for deploying NetScaler VPX on Nutanix AHV depend on the VPX model and expected workload.
- CPU: At least 2 vCPUs.
- Memory: At least 4 GB RAM.
- Storage: A minimum of 20 GB disk space.
Note:
Starting with NetScaler release 14.1-72.x, NetScaler VPX on Nutanix AHV can be provisioned with 2 GB RAM.
Install NetScaler VPX instances on Nutanix AHV using Prism
Follow this step-by-step procedure to install a NetScaler VPX on Nutanix AHV.
Step 1. Prepare the environment.
- Ensure that your Nutanix AHV cluster is up and running.
- Verify that you have access to Prism Central, Nutanix’s management interface.
- Ensure that you have the necessary permissions to create and manage VMs within the Nutanix environment.
Step 2. Obtain the NetScaler VPX image.
-
Navigate to Citrix.com > Downloads > NetScaler > Virtual Appliances, and download the NetScaler VPX image compatible with Nutanix AHV from the Citrix Downloads page.
-
Extract the downloaded “NSVPX-NUTANIX-
<version-build>_lx_64.tgz” file to get the qcow2 image file.
Step 3: Upload the image to Nutanix AHV.
- Log in to your Nutanix Prism web console.
- In the Prism Central dashboard, go to Compute > Image section, and click Add image.
-
Upload the NetScaler VPX image file, ensuring to select the correct image type (DISK image) and format (qcow2).
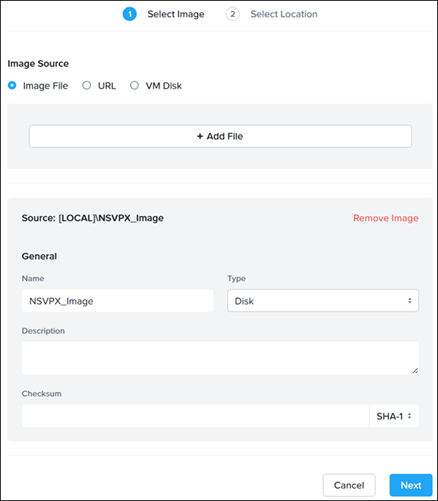
- Click Save.
Step 4. Create the NetScaler VPX VM.
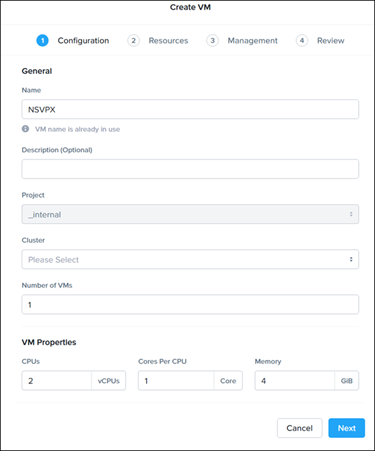
- In Prism Central, go to the Compute > VM section and click Create VM.
-
Configure the VM hardware specifications according to NetScaler® recommendations for the VPX model you’re deploying. For details, see System requirements.
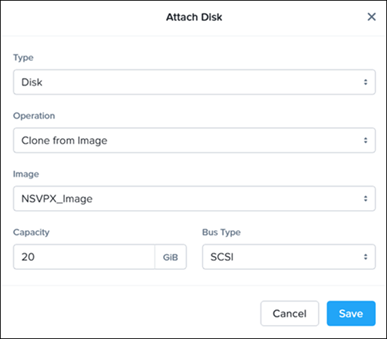
- Click Add New Disk, and enter the following details:
- Type - Disk.
- Operation - Clone from Image Service.
- Image - Assign the VPX image uploaded in the previous step as the VM’s disk.
-
Click Add New NIC and enter the required details.
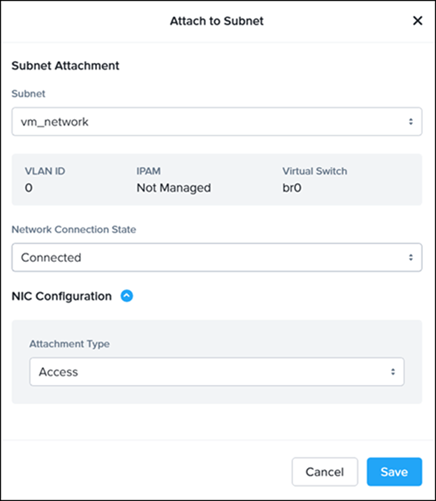
- Save the configurations.
Step 5. Launch the NetScaler VPX VM.
- Power on the newly created VPX VM.
- Monitor the boot process through the console provided by Prism to ensure that the NetScaler VPX instance starts correctly.
Step 6. Initial configuration.
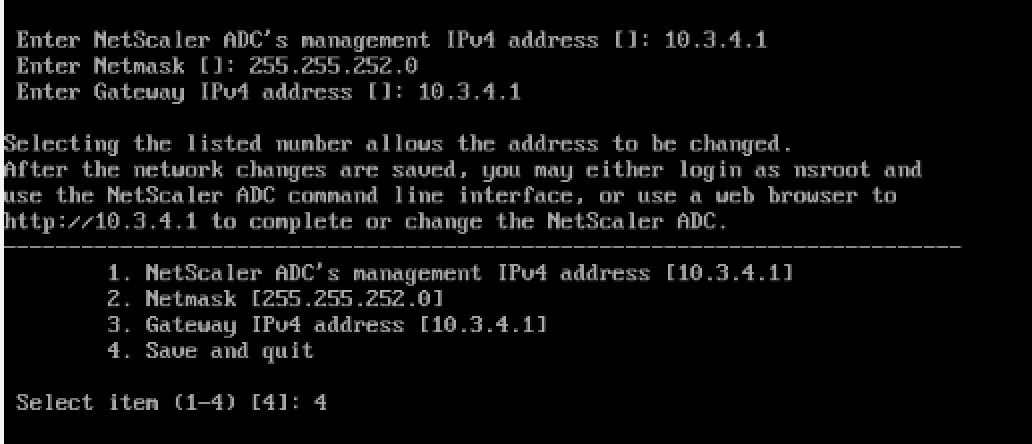
- During boot up, NetScaler displays a menu-driven interface. Perform the initial configuration by setting up IP addresses, subnet masks, and gateway addresses, then select the Save and Continue option.
- Once the VPX instance is up, access its management interface through the NetScaler console or NSIP.
Step 7: Finalize configuration.
After applying the licenses and configuring the network settings, set up NetScaler features like load balancing, SSL offloading, or the application firewall as needed for your deployment.
Upgrade NetScaler VPX™ on Nutanix AHV
Step 1: Download the Nutanix-specific NetScaler upgrade bundle.
- Navigate to Citrix.com > Downloads > NetScaler > Virtual Appliances, and download the NetScaler VPX upgrade bundle compatible with Nutanix AHV from the Citrix Downloads page.
Note:
When upgrading the NetScaler VPX on Nutanix AHV, do not use the standard NetScaler upgrade bundle because the upgrade fails. Instead, ensure that you use the Nutanix-specific upgrade bundle designed for VPX on AHV to avoid compatibility issues.
-
Copy and extract the downloaded “build-
<version-build>_lx_64.tgz” file to/var/nsinstall/directory on NetScaler VPX Shell. -
Run
./installnsand reboot to upgrade NetScaler VPX.
Note:
Upgrading from “Citrix Ready®” NetScaler VPX using the Nutanix-specific NetScaler upgrade bundle is not supported.
Unsupported features and limitations
Certain features, protocols, and system capabilities are not supported for NetScaler VPX deployments on Nutanix AHV. For the complete list, see Limitations for NetScaler VPX deployments on Red Hat OpenShift Virtualization and Nutanix AHV.