-
Optimize NetScaler VPX performance on VMware ESX, Linux KVM, and Citrix Hypervisors
-
Apply NetScaler VPX configurations at the first boot of the NetScaler appliance in cloud
-
Configure simultaneous multithreading for NetScaler VPX on public clouds
-
Install a NetScaler VPX instance on VMware ESX
-
Configure NetScaler VPX to use Intel QAT for SSL acceleration in SR-IOV mode
-
Migrating the NetScaler VPX from E1000 to SR-IOV or VMXNET3 network interfaces
-
Configure NetScaler VPX to use PCI passthrough network interface
-
Install a NetScaler VPX instance on Microsoft Hyper-V servers
-
Install a NetScaler VPX instance on Linux-KVM platform
-
Prerequisites for installing NetScaler VPX virtual appliances on Linux-KVM platform
-
Provisioning the NetScaler virtual appliance by using OpenStack
-
Provisioning the NetScaler virtual appliance by using the Virtual Machine Manager
-
Configuring NetScaler virtual appliances to use SR-IOV network interface
-
Configure a NetScaler VPX on KVM hypervisor to use Intel QAT for SSL acceleration in SR-IOV mode
-
Configuring NetScaler virtual appliances to use PCI Passthrough network interface
-
Provisioning the NetScaler virtual appliance by using the virsh Program
-
Provisioning the NetScaler virtual appliance with SR-IOV on OpenStack
-
Configuring a NetScaler VPX instance on KVM to use OVS DPDK-Based host interfaces
-
-
Deploy a NetScaler VPX instance on AWS
-
Deploy a VPX high-availability pair with elastic IP addresses across different AWS zones
-
Deploy a VPX high-availability pair with private IP addresses across different AWS zones
-
Protect AWS API Gateway using the NetScaler Web Application Firewall
-
Configure a NetScaler VPX instance to use SR-IOV network interface
-
Configure a NetScaler VPX instance to use Enhanced Networking with AWS ENA
-
Deploy a NetScaler VPX instance on Microsoft Azure
-
Network architecture for NetScaler VPX instances on Microsoft Azure
-
Configure multiple IP addresses for a NetScaler VPX standalone instance
-
Configure a high-availability setup with multiple IP addresses and NICs
-
Configure a high-availability setup with multiple IP addresses and NICs by using PowerShell commands
-
Deploy a NetScaler high-availability pair on Azure with ALB in the floating IP-disabled mode
-
Configure a NetScaler VPX instance to use Azure accelerated networking
-
Configure HA-INC nodes by using the NetScaler high availability template with Azure ILB
-
Configure a high-availability setup with Azure external and internal load balancers simultaneously
-
Deploy a NetScaler VPX HA pair in Azure using the secondary IP configurations
-
Configure a NetScaler VPX standalone instance on Azure VMware solution
-
Configure a NetScaler VPX high availability setup on Azure VMware solution
-
Configure address pools (IIP) for a NetScaler Gateway appliance
-
Deploy a NetScaler VPX instance on Google Cloud Platform
-
Deploy a VPX high-availability pair on Google Cloud Platform
-
Deploy a VPX high-availability pair with external static IP address on Google Cloud Platform
-
Deploy a single NIC VPX high-availability pair with private IP address on Google Cloud Platform
-
Deploy a VPX high-availability pair with private IP addresses on Google Cloud Platform
-
Install a NetScaler VPX instance on Google Cloud VMware Engine
-
This content has been machine translated dynamically.
Dieser Inhalt ist eine maschinelle Übersetzung, die dynamisch erstellt wurde. (Haftungsausschluss)
Cet article a été traduit automatiquement de manière dynamique. (Clause de non responsabilité)
Este artículo lo ha traducido una máquina de forma dinámica. (Aviso legal)
此内容已经过机器动态翻译。 放弃
このコンテンツは動的に機械翻訳されています。免責事項
이 콘텐츠는 동적으로 기계 번역되었습니다. 책임 부인
Este texto foi traduzido automaticamente. (Aviso legal)
Questo contenuto è stato tradotto dinamicamente con traduzione automatica.(Esclusione di responsabilità))
This article has been machine translated.
Dieser Artikel wurde maschinell übersetzt. (Haftungsausschluss)
Ce article a été traduit automatiquement. (Clause de non responsabilité)
Este artículo ha sido traducido automáticamente. (Aviso legal)
この記事は機械翻訳されています.免責事項
이 기사는 기계 번역되었습니다.책임 부인
Este artigo foi traduzido automaticamente.(Aviso legal)
这篇文章已经过机器翻译.放弃
Questo articolo è stato tradotto automaticamente.(Esclusione di responsabilità))
Translation failed!
Configure a NetScaler VPX on ESX hypervisor to use Intel QAT for SSL acceleration in SR-IOV mode
The NetScaler VPX instance on the VMware ESX hypervisor can use the Intel QuickAssist Technology (QAT) to accelerate the NetScaler SSL performance. Using Intel QAT, all heavy-latency crypto processing can be offloaded to the chip thus freeing up one or more host CPUs to do other tasks.
Previously, all NetScaler data path crypto processing was done in the software using host vCPUs.
Note:
Currently, NetScaler VPX supports only the C62x chip model under Intel QAT family. This feature is supported starting from NetScaler release 14.1 build 8.50.
Prerequisites
- The ESX host is provisioned with one or more Intel C62x (QAT) chips.
- NetScaler VPX meets the VMware ESX hardware requirements. For more information, see Install a NetScaler VPX instance on VMware ESX.
Limitations
There’s no provision to reserve crypto units or bandwidth for individual VMs. All the available crypto units of any Intel QAT hardware are shared across all VMs using the QAT hardware.
Set up the host environment for using Intel QAT
-
Download and install the Intel-provided VMware driver for the C62x series (QAT) chip model in the VMware host. For more information on the Intel package downloads and installation instructions, see Intel QuickAssist Technology Driver for VMware.
-
Enable SR-IOV on the ESX host.
-
Create virtual machines. When creating a VM, assign the appropriate number of PCI devices to meet the performance requirements.
Note:
Each C62x (QAT) chip can have up to three separate PCI endpoints. Each endpoint is a logical collection of VFs, and shares the bandwidth equally with other PCI endpoints of the chip. Each endpoint can have up to 16 VFs that show up as 16 PCI devices. You can add these devices to the VM to do the crypto acceleration using the QAT chip.
Points to note
- If the VM crypto requirement is to use more than one QAT PCI endpoint/chip, it’s recommended to pick the corresponding PCI devices/VFs in a round-robin fashion to have a symmetric distribution.
-
It’s recommended that the number of PCI devices picked is equal to the number of licensed vCPUs (without including the management vCPU count). Adding more PCI devices than the available number of vCPUs does not necessarily improve the performance.
Example:
Consider an ESX host with one Intel C62x chip that has 3 endpoints. While provisioning a VM with 6 vCPUs, pick 2 VFs from each endpoint, and assign them to the VM. This kind of assignment ensures an effective and equal distribution of crypto units for the VM. From the total available vCPUs, by default, one vCPU is reserved for the management plane, and the rest of the vCPUs are available for the data plane PEs.
Assign QAT VFs to VPX using the vSphere web client
-
In the vSphere web client, navigate to the ESX host where the virtual machine is located and click Power off.
-
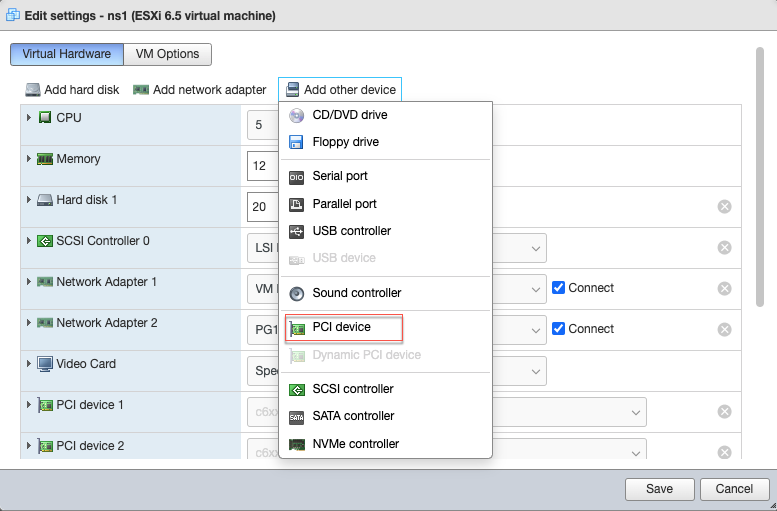
Navigate to Actions > Edit settings > Add other device, and select PCI device.
-
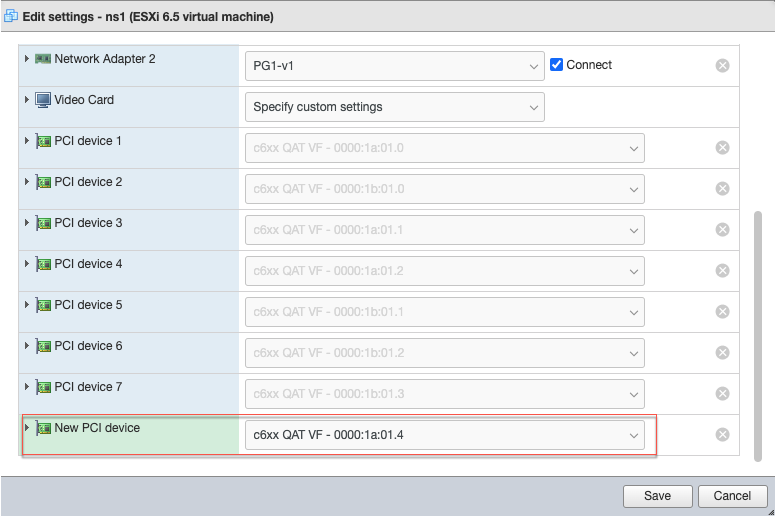
For the newly added PCI device, assign the c6xx QAT VF, and save the configuration.
-
Power on the VM again.
-
Run the
stat ssl
command in the NetScaler CLI to display the SSL summary, and verify the SSL cards after assigning QAT VFs to VPX.
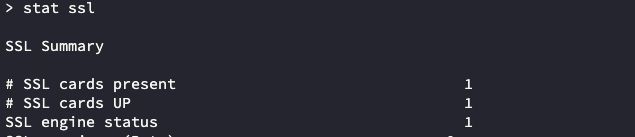
About the deployment
This deployment was tested with the following component specifications:
- NetScaler VPX version and build: 14.1–8.50
- VMware ESXi version: 7.0.3 (build 20036589)
- Intel C62x QAT driver version for VMware: 1.5.1.54
Share
Share
This Preview product documentation is Cloud Software Group Confidential.
You agree to hold this documentation confidential pursuant to the terms of your Cloud Software Group Beta/Tech Preview Agreement.
The development, release and timing of any features or functionality described in the Preview documentation remains at our sole discretion and are subject to change without notice or consultation.
The documentation is for informational purposes only and is not a commitment, promise or legal obligation to deliver any material, code or functionality and should not be relied upon in making Cloud Software Group product purchase decisions.
If you do not agree, select I DO NOT AGREE to exit.